
Summary of Contents for Coleman OUTFITTER 550
- Page 1 OUTFITTER 550/750 ASSEMBLY INSTRUCTIONS For questions regarding these assembly instructions, please contact Coleman Powersports Phone: (888) 405-8725 / Email: support@colepow.com 070618...
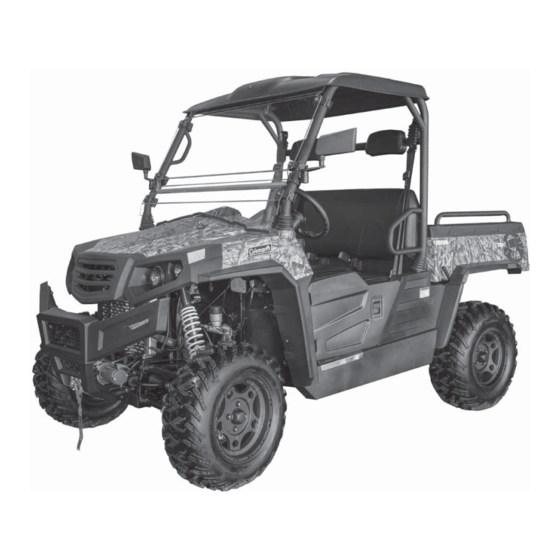
- Page 2 PARTS UTV Chassis Hardware Pack Steering Wheel Roll Cage Seat back and bench seat Assembly Front Roll Rear Roll Cage Boots Cage Boots Front Bumper and Bars Windshield Mirrors Head Rests Battery, Electrolyte & Bracket...
- Page 3 HARDWARE KIT REFERENCE Ref. 1 M10X45 Allen Head Bolt QTY. 4 Ref. 10 M6X20 Screw QTY. 8 Ref. 2 M8 Shoulder Bolt QTY. 2 Ref. 11 M8 Lock Nut QTY. 2 Ref. 3 M8 Shoulder Nut QTY. 2 Ref. 12 M10 Cap Nut QTY.
-
Page 4: Steering Wheel Installation
STEERING WHEEL INSTALLATION Steering wheel Tools needed: 4mm - Allen Head Wrench Center Horn Note: Before steering wheel install, make sure the front tires are straight and in line with the rear tires. Horn wire Uninstall the 6 - M5X20 allen bolts and clamp Connector ring from the steering column. - Page 5 ROLL CAGE INSTALL Roll cage assembly Tools needed: 8mm - Allen Head Wrench 16mm Socket/Wrench Rear roll cage boot Front roll cage boot 1. While on the ground, place front and rear roll cage boots onto the appropriate bars. 2. With assistance, lift the cage assembly onto the mounting locations.
- Page 6 HEADRESTS, SEAT BELTS AND SEAT BACK ATTACHMENT 4 - M6X15 Screws (per side) M10 Shoulder Bolt (per side) M10 Lock Nut (per side) (Hardware Fig. #10) (Hardware Fig. #5) (Hardware Fig. #13) Tools needed: 10mm Socket/Wrench 12mm Socket/ Wrench 14mm Socket/Wrench Phillips screw driver 1.
- Page 7 FRONT BUMPER INSTALL Tools needed: M8 Lock Nut (per side) M8X20 Bolt (per side) 8mm Socket/Wrench (Hardware Fig. #11) (Hardware Fig. #8) 10mm Socket/Wrench 12mm Socket/Wrench 1. Install bumper bars on the inside of both mounting points using M8X20 Bolts and M8 Lock Nuts. Note: The flatter side of the bar should be facing inside.
- Page 8 WINDSHIELD AND MIRROR INSTALL Tools needed: 4mm Allen head wrench Phillips screw driver Note: Hardware and parts for the windshield are located in the the Windshield box. Rubber Grommet 1. Insert Rubber Grommets in all bracket holes in windshield. Metal Washer Bushing 2 .
- Page 9 WINDSHIELD AND MIRROR INSTALL 5. Install bottom portion of windshield on UTV Bottom windshield Note: Hardware and parts for the Mirror are located in the the Mirror package . Mirror assembly 6. Install left and right mirrors at the top portion of the bottom windshield assembly.
-
Page 10: Battery Installation
BATTERY INSTALLATION Battery Tools needed: 8 mm Socket/Wrench 10mm Socket/Wrench Rubber Pads for Battery (Hardware Fig. #15) Note: Follow manufacturer’s instructions on preparing battery with fluid before installation. . 1. Place battery in battery box under driver side seat area and press rubber pads into battery bracket. 2. - Page 11 PARTS SCHEMATIC REFERENCE...
Need help?
Do you have a question about the OUTFITTER 550 and is the answer not in the manual?
Questions and answers
power steering pump location on a Coleman 550