
Related Manuals for BH FITNESS ZERO G400


Summary of Contents for BH FITNESS ZERO G400
- Page 1 G400 Instrucciones de montaje y utilización Instructions for assembly and use Instructions de montage et utilisation Instruções de montagem e utilização Istruzioni di montaggio e d'uso...
- Page 2 Fig.1 Fig.2...
- Page 3 Fig.3 Fig.4 Fig.5 Fig.6...
- Page 4 Fig.7 Fig.8...
- Page 5 Fig.9...
- Page 6 Español INSTRUCCIONES DE SEGURIDAD.- Este aparato ha sido diseñado y RIESGO PARA LA SALUD construido de modo que proporcione Precaución: Antes de comenzar a la máxima seguridad. Sin embargo, utilizar el equipo, consulte a su deben aplicarse ciertas precauciones médico. al utilizar aparatos de ejercicio.
- Page 7 tornillos y reapriételos si es necesario. 3.- Compruebe el equipo antes de Compruebe ruidos extraños comenzar ejercicio, para contacte con el servicio de asistencia asegurarse de que se han montado técnica oficial si tiene dudas. todas las piezas y que las tuercas, tornillos, pedales y brazos se han INSTRUCCIONES PARA EL apretado correctamente antes del uso.
- Page 8 someter sus piernas y brazos a un mayor esfuerzo. Deberá reducir la velocidad para mantener el ritmo cardíaco en la zona objetivo. INSTRUCCIONES DE MONTAJE.- Saque la unidad de la caja Esta fase debería durar un mínimo de compruebe que tiene todas las piezas. Para el montaje de esta unidad, se 12 minutos aunque se recomienda a la mayoría de la gente comenzar con...
- Page 9 pletinas antiapertura (8 y 9) en 5.- Acerque el soporte inferior de pies dirección flecha, hasta (6) en el extremo del tubo telescópico posicionarlas en horizontal como le (4) como le muestra la Fig.6. muestra la Fig.3. Tire del pomo (31) situado en el 2.- Coloque las fundas de protección extremo del tubo telescópico (4) Fig.6 (13) como le muestra la Fig.3...
- Page 10 MONTAJE DE LA CAMILLA EN Situación y Colocación.- EL SOPORTE.- Se deben realizar los ejercicios en un lugar abierto, con un espacio libre 7.- En este paso del montaje se alrededor de más de 4m2 y bien recomienda la ayuda de una segunda iluminados.
-
Page 11: Table Of Contents
INSTRUCCIONES PARA EL USO DE LA TABLA DE INVERSIÓN.- ¡Importante! Por favor lea detenidamente las instrucciones de este manual antes de usar la tabla de inversión por primera vez. TABLA DE CONTENIDOS.- 1. PREPARACIÓN DE LA TABLA DE INVERSIÓN. 2. USO DE LA TABLA DE INVERSIÓN. 2.1. -
Page 12: Uso De La Tabla De Inversión
USO DE LA TABLA DE INVERSIÓN.- Atención: Es muy recomendable que se encuentre en compañía de otra persona al usar la tabla de inversión por primera vez. Podrá ayudarle en caso de ser necesario. Inversión parcial.- Lo primero que debe hacer es recostarse sobre la camilla y poner los pies sobre los apoyos. -
Page 13: Solución De Problemas
También debe verificar que los brazos pivote se encuentran en el nivel más alto. Siempre es bueno también tener a otra persona presente en caso de necesitar ayuda. Para subirse a la tabla de inversión, repita los pasos de la inversión parcial. Ya en la posición inicial, mueva sus brazos hacia atrás hasta que su cuerpo se encuentre en posición de inversión total. -
Page 14: Preguntas Frecuentes
PREGUNTAS FRECUENTES.- ¿Hasta qué punto debo realizar la inversión? Recuerde siempre escoger un ángulo en el que se sienta seguro. Posiblemente su cuerpo se sienta más cómodo realizando movimientos hasta 45 grados de inversión. Deténgase siempre que sienta cualquier tipo de sensación incómoda, mareos o dolores. - Page 15 English SAFETY INSTRUCTIONS.- HEALTH HAZARDS Caution: Consult your doctor This appliance has been designed and before beginning constructed provide maximum equipment. This advice safety. Nevertheless, certain especially important for those over precautions should be taken when suffering from health using exercise equipment. Carefully problems.
- Page 16 4. Use original spares from supplier. 1,Warm-up phase The replacement or modification of This phase speeds up the body’s blood any component, other than what is circulation and gets the muscles ready approved by supplier, will void your of for exercise. It also reduces the risk of warranty.
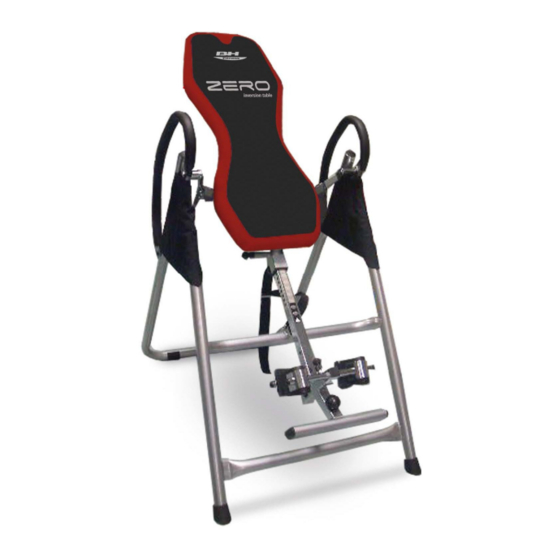
- Page 17 (1) Main support 3. Cool-down phase (3) Couch support. This phase allows the cardiovascular (4) Telescopic foot tube. and muscle system to relax. It consists (5) Footrest. of repeating the warm-up exercises, (6) Footrest holding bar. i.e. reducing the rhythm and (7) Grips.
- Page 18 (45) and tighten the self-locking nut inside the tube for the couch, Fig.7, (48) securely, Fig.4. release the knob and select your Perform the same operation for the height from the scale on the telescope handgrip on the other side. tube.
- Page 19 It can be rotated to different angles. Do not hesitate to get touch with the Angle positions.- Technical Assistance Service if you have any queries by phoning customer See end pages. services (see last page in manual) Characteristics.- BH RESERVES THE RIGHT TO - Maximum load 130 kg MODIFY THE SPECIFICATIONS OF - Recommended maximum height 190...
- Page 20 INSTRUCTIONS ON HOW TO USE THE INVERSION TABLE.- CONTENTS.- 1. PREPARING THE INVERSION TABLE. 2. USING THE INVERSION TABLE. 2.1. Partial inversion. 2.2. Full inversion. 3. TROUBLESHOOTING. 3.1. The inversion table does not move. 3.2. The inversion table flips backward very quickly. 4.
- Page 21 Now you can rest your whole body on the table. Cross your hands over your chest. At this point check to see if the inversion table has been set up correctly: The table and your body should move backward. While your hands are crossed over your chest, the top part of your body should remain slightly higher than your legs.
- Page 22 TROUBLESHOOTING.- The inversion table does not move. If, after getting into position with your arms folded across his chest, the inversion table does not move, this may be due to an incorrect foot support adjustment. Take your feet out of the supports and adjust it to a lower height. It is best to do this level by level until you achieve the proper height adjustment.
- Page 23 (E) Posiciones de grados. (GB) Angle positions.
- Page 24 G400 Para pedido de repuesto: Indicar el modelo de la máquina Nº correspondiente a la pieza Cantidad To order replacement parts: State the machine model Corresponding parts Nº Quantity Ejemplo / E.g: G400...
- Page 25 Tel.: +351 707 22 55 24 902 170 258 Fax: +351 234 729 519 Fax: +34 945 56 05 27 e-mail: info@bhfitness.pt e-mail: sat@bhfitness.com BH FITNESS NORTH AMERICA BH FITNESS MEXICO BH Germany GmbH 20155 Ellipse BH Exercycle de México S.A. de Altendorfer Str. 526...
Need help?
Do you have a question about the ZERO G400 and is the answer not in the manual?
Questions and answers