Table of Contents
Advertisement
Advertisement
Table of Contents

Related Manuals for Akai MPC 2000XL


Summary of Contents for Akai MPC 2000XL
- Page 1 MIDI PRODUCTION CENTER...
- Page 2 WARNING!! To prevent fire or shock hazard, do not expose this appliance to rain or moisture. CAUTION: TO REDUCE THE RISK OF ELECTRIC SHOCK NO USER-SERVICEABLE PARTS INSIDE. REFER SERVICING TO QUALIFIED SERVICE PERSONNEL. THE SYMBOLS ARE RULED BY UL STANDARDS (U.S.A.) The lightning flash with arrowhead symbol , within an equilateral triangle, is intended to alert the user to the presence of uninsulated “dangerous voltage”...
- Page 3 • Always disconnect the MPC2000XL from the power supply by pulling on the plug, not the cord. • Allow only an AKAI professional dealer or qualified professional engineer to repair or reassemble the MPC2000XL. Apart from voiding the warranty, unauthorized engineers might touch live internal parts and receive a serious electrical shock.
- Page 4 Warning THIS APPARATUS MUST BE EARTHED This equipment is fitted with an approved non-rewireable UK mains plug. To change the fuse in this type of plug proceed as follows: 1) Remove the fuse cover and old fuse. 2) Fit a new fuse which should be a BS1362 5 Amp A.S.T.A or BSI approved type. 3) Refit the fuse cover.
- Page 5 FCC WARNING This equipment has been tested and found to comply with the limits for a Class B digital device pursuant to Part 15 of the FCC rules. These limits are designed to provide reasonable protection against harmful interference in a residential installation. This equipment generates, uses, and can radiate radio frequency energy and, if not installed and used in accordance with the instructions, may cause harmful interference to radio communications.
- Page 6 If the warranty is valid, AKAI professional will, without charge for parts or labor, either repair or replace the defective part(s). Without a valid warranty, the entire cost of the repair (parts and labor) is the responsibility of the product's owner.
-
Page 7: Table Of Contents
Chapter 1: Introduction ... 1 Features ... 2 Panel Descriptions ... 4 Front Panel ... 4 Rear Panel ... 7 Handling Floppy Disks ... 8 The Disk Drive ... 8 Taking care of your Disks ... 8 CD-ROM Care ... 9 Chapter 2: The Basics ... - Page 8 Contents Setting the Tempo ... 37 Tempo Change Window ... 37 Entering and Modifying a Tempo Change ... 38 Selecting a Tempo Source ... 39 Setting the Time Correct (Quantization) ... 40 Setting the Beat ... 41 Setting the Number of Bars ... 42 Looping a Sequence ...
- Page 9 Sequence Preferences ... 74 Transposing a Track ... 74 Chapter 5: Song Mode ... 76 Overview ... 76 Song Mode ... 78 Creating a Song ... 78 Renaming a Song ... 79 Selecting a Song ... 78 Deleting a Song ... 80 Copying a Song ...
- Page 10 Contents Copying Programs ... 115 Assigning Notes to the Drum Pads ... 116 Assigning Sounds to Notes ... 117 Auto Chromatic Assignement ... 117 The Pad Assign Mode and Initialize ... 118 Deleting Unused Sounds from the Memory ... 118 The Program Sound Generation Mode ...
- Page 11 Selecting Folders/Files ... 162 Deleting Folders ... 163 Renaming Folders ... 163 Loading Files ... 164 Deleting a File from the Disk ... 168 Loading an Updated Operating System ... 169 Loading Files Created on the AKAI MPC60/60II ... 170 Chapter 11: Flash ROM (optional) ...
- Page 12 Page x...
-
Page 13: Chapter 1: Introduction
Chapter 1 Introduction... -
Page 14: Features
Chapter 1: Introduction Features The following is a summary of some of the advanced features of the MPC2000XL. General • Large 248 x 60 dot LCD display with graphics. • 6 function keys under the LCD display provide various functions on each page. •... - Page 15 Sequencer • Loop recording function enables quick recording by looping short phrases. • Sequencer memory equivalent to 300,000 notes (including note and other data). The maximum number events in a sequence is equivalent to 50,000 notes. • 99 sequences may be held in memory at once. Each sequence contains 64 individual tracks.
-
Page 16: Panel Descriptions
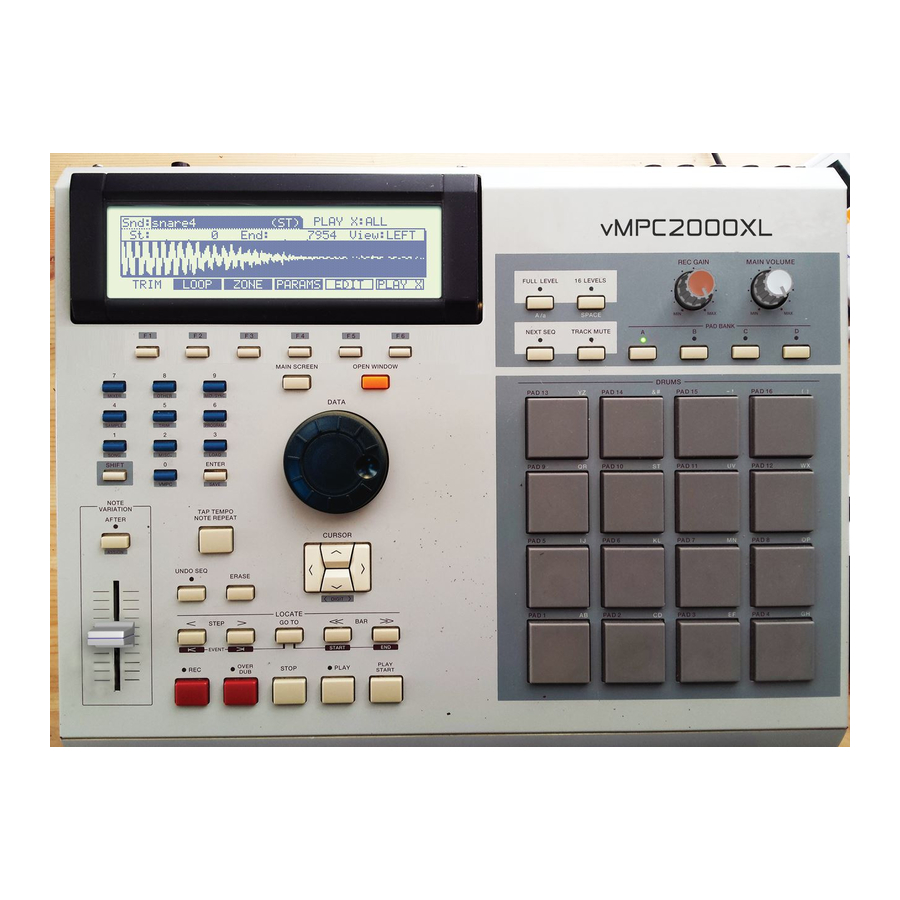
Chapter 1: Introduction Panel Descriptions Front Panel INTEGRATED RHYTHM MACHINE 16 BIT DRUM SAMPLER / MIDI SEQUENCER MAIN SCREEN MIXER OTHER MIDI /SYNC SAMPLE TRIM PROGRAM SONG MISC LOAD SHIFT ENTER SAVE NOTE VARIATION TAP TEMPO NOTE REPEAT AF TER ASSIGN UNDO SEQ ERASE... - Page 17 OPEN WINDOW key When certain fields are selected, pressing this key opens another window to allow you to set further data related to that field. Pressing the key again closes the window. DATA wheel This allows you to change the numbers or data of the selected field.
- Page 18 Chapter 1: Introduction BAR << / >> key This locates the sequence point by bars. Holding the GO TO key, press this key to locate the start or end point of the selected sequence. REC key While holding this key, press the PLAY key or the PLAY START key to begin sequence recording.
-
Page 19: Rear Panel
Rear Panel PHONES RIGHT LEFT RIGHT LEFT STEREO RECORD MIDI ASSIGNABLE MIX OUT DIGITAL STEREO OUT PHONES Connect your stereo headphones here. The same sound is output to the STEREO OUT LEFT and RIGHT jacks. STEREO OUT LEFT/RIGHT These are the main output jacks. RECORD IN These are the input jacks used for sampling. -
Page 20: Handling Floppy Disks
Chapter 1: Introduction Handling Floppy Disks The Disk Drive The 3.5 inch floppy disk drive will accept high density and low density disks. Disks are inserted into the drive thus: DISK ACTIVITY LED WRITE PROTECT TAB regularly save your work as you are working. All good computer users do this and it prevents the accidental loss of data should power be accidentally removed from the instrument. -
Page 21: Cd-Rom Care
Chapter 1: Introduction CD-ROM care Dust, dirt, scratches or warps on the CD-ROM may lead to faulty CD-ROM data loading. In order to take full advantage of the CD-ROM player’s performance capabilities, follow the precautions outlined on this page. Disc handling Hold the CD-ROM by the outer edge only, supporting it at the center with your index finger if necessary. -
Page 22: Chapter 2: The Basics
Chapter 2: The Basics Chapter 2 The Basics Page 10... -
Page 23: Hooking Up Your System
Hooking Up Your System The following diagram shows how to hook up the MPC2000XL to a MIDI keyboard, two sound modules and a CD ROM. You can connect other external SCSI devices (such as a hard disk, ZIP drive, etc.) to the SCSI interface on the rear panel so that you can save or load samples, songs, etc. -
Page 24: The Terms Used In Mpc2000Xl
Chapter 2: The Basics The Terms Used in MPC2000XL Here are some definitions of terms used in the MPC2000XL that you should know: Sequence A sequence is the most basic unit in creating data on the MPC2000XL. The performance data from a MIDI keyboard or pad is recorded on each track within a sequence. -
Page 25: Sound
Chapter 2: The Basics Sound Each individually sampled recording in the MPC2000XL is called a sound. A sound can be re- corded or loaded from a disk. The start or end of a sound can be changed or the looping of a sound can be set on the TRIM page. -
Page 26: Operating The Front Panel And Screen
Chapter 2: The Basics Operating the Front Panel and Screen Before you can use the MPC2000XL, you must learn how to use the cursor keys, data fields, numeric key pad and Function keys. Turn the power on. After the initial loading screens, the following screen will appear: Sq:01-(Unused) ™:120.0(SEQ) Count:OFF... -
Page 27: The Function Keys
Chapter 2: The Basics There are also fields that select functions instead of entering numbers. Rotate the DATA wheel to select these functions. For example, move the cursor to the Timing field. Rotate the DATA wheel one click at a time and check the display change in the field. After you have finished, turn the field back to “OFF”. -
Page 28: Basic Functions
Chapter 2: The Basics Basic Functions Loading and Playing Programs All sounds and programs are stored on the memory held in RAM and the data is therefore lost whenever the power is turned off. In order to play any sounds after turning the power on, you must load them in from the CD or external device connected to the rear panel SCSI interface. - Page 29 Press the RIGHT CURSOR key to open the file and then select a drum set file (ambience, dry or gated) with the UP/DOWN CURSOR keys. In this example, we will choose the ambience drums. MPC2000X MPC3000_ MPC60_DI STANDARD Press RIGHT CURSOR AMBIENCE_SET__1.PGM with the DATA wheel.
-
Page 30: Playing The Drum Pads, The Pad Bank & Full Level Keys
Chapter 2: The Basics When loading is finished, press MAIN SCREEN and try the sounds by hitting the drum Sq:01-(Unused) ™:120.0(SEQ) Count:OFF Tr:01-(Unused) S:DRUM1:OFF AMBIENCE_SET__1 S:DRUM1:OFF AMBIENCE_SET__1 STEP Playing the Drum Pads, the PAD BANK & FULL LEVEL Keys Each recorded sample is called a sound. To hear some of the drum sounds you have loaded, play the 16 drum pads on the front panel. -
Page 31: Selecting Programs
Selecting Programs A program is an edited set with note numbers and sounds assigned to it. The MPC2000XL can hold up to 24 programs. Each program has 64 sound assignments. If you change from one pro- gram to another, playing the four banks of pads will produce entirely different sounds. When you played the drum pads, you were hearing the sounds assigned in Program 1. -
Page 32: The Assign Key
Chapter 2: The Basics The ASSIGN Key To assign a pad and parameter to the NOTE VARIATION slider, hold down SHIFT and press AFTER (ASSIGN). The following screen will appear: Assign Assign note: note:38/A06-NORI_SN_0 Parameter:DECAY Assign NV slider to ctrl change:OFF Assign NV slider to ctrl change:OFF To assign the slider to a drum pad and parameter: 1. -
Page 33: The After Key
• Low range: and High range: These two fields control the range of the slider effect. The Low range: field determines the parameter value that will be produced when the pad is hit while the slider is at the bottom of its travel;... -
Page 34: The 16 Levels Key
Chapter 2: The Basics The 16 LEVELS key By using the 16 LEVELS function, you can play a sound in 16 parameter levels of velocity, tone, attack, decay, or filter. To use the 16 LEVELS function, in the Main Screen, press the 16 LEVELS key to display the following screen. -
Page 35: Chapter 3: Recording Sequences
Chapter 3: Recording Sequences Chapter 3 Recording Sequences Page 23... -
Page 36: How Sequences Are Organized
Chapter 3: Recording Sequences How Sequences are Organized A sequence is the most basic unit for creating on the MPC2000XL. The performance data from a MIDI keyboard or pad is recorded on each track within a sequence. Each sequence has 64 tracks, to which performance data can be recorded. -
Page 37: Bar.beat.tick
Chapter 3: Recording Sequences Bar.Beat.Tick The sequencer of the MPC2000XL divides the quarter note into 96 parts. Each one of these divisions is called a tick. In many of the sequence editing screens it is necessary to enter the start and end of the region that you want to edit. -
Page 38: Examples Of Sequence Recordings
Chapter 3: Recording Sequences Examples of Sequence Recordings The MPC2000XL is a sequencer with an internal sampler. You can simply use it as a drum machine, or as a sequencer connected to a MIDI device. It is also possible to set a loop to a sequence and repeatedly play a phrase. Example 1: Recording a Drum Pad Performance First let's record a drum pad performance. - Page 39 6. Select the Loop: field with the CURSOR keys and rotate the DATA wheel to the left to select OFF. Sq:01-Sequence01 ™:120.0(MAS) Count:OFF Tr:01:(Unused) S:DRUM1:OFF New Pgm-A S:DRUM1:OFF New Pgm-A STEP EDIT 7. Select the Count: field with the CURSOR keys and rotate the DATA wheel to the right to turn it ON.
-
Page 40: Example 2: Recording A Loop
Chapter 3: Recording Sequences 14. Hold down REC and press PLAY START if you want to record over the previous recording. 15. To overdub on top of a recorded sequence, hold down OVER DUB and press PLAY START (the original recording is kept and the new sounds added to it). Example 2: Recording a Loop This allows you to repeatedly play a preset number of bars and keep dubbing sounds over it. - Page 41 7. While the Loop: field is selected, press OPEN WINDOW to open the Loop window. Number of bars: 2 Number of bars: 2 8. Select the First bar: field with the CURSOR keys and set to 1 with the DATA wheel. 9.
-
Page 42: Example 3: Recording With External Midi Equipment
Chapter 3: Recording Sequences Example 3: Recording with External MIDI Equipment This is an example of recording using the internal sequencer and an external MIDI sound source in addition to the internal drum sounds. 1. Refer to the example on page 12 and connect the MIDI device to the MPC2000XL, turn the power on and load the drum sounds from the attached sound disk. - Page 43 Chapter 3: Recording Sequences 7. When the set number of bars is exceeded, bars will automatically be added. To stop the recording, press STOP. You can play back the sequence by pressing PLAY START. 8. To record again, hold down REC and press PLAY START. 9.
-
Page 44: The Main Screen
Chapter 3: Recording Sequences The MAIN SCREEN After the power is turned on, the LCD screen shows the following contents: Sq:01-(Sequence01) ™:120.0(MAS) Count:OFF Tr:01-(Unused) S:DRUM1:OFF STEP EDIT This is called the Main screen. It is the main operating screen of the MPC2000XL and most playing and recording of sequences is done while this screen is showing. -
Page 45: Name Window
Name window Tap a drum pad or rotate the DATA wheel at the name field to display the Name window. The Name window is common to all naming fields. Sq:01-(Sequence01) ™:120.0(MAS) Count:OFF Tr:01-(Unused) S:DRUM1:OFF STEP EDIT COPY Enter letters with the DATA wheel and move to the left/right with the CURSOR LEFT or RIGHT keys. -
Page 46: Copying A Sequence
Chapter 3: Recording Sequences Copying a Sequence To open the Sequence window select the Sq: field and press OPEN WINDOW. Press COPY [F5] to open the Copy Sequence window. Sq:01-(Sequence01) ™:120.0(MAS) Sequence name:Sequence01 Sequence name: Count:OFF Default name:Sequence01 Default name:Sequence01 Tr:01-(Unused) S:DRUM1:OFF STEP... - Page 47 Next sq: field The sequence that will be played next is displayed. SUDDEN [F4] key The currently playing sequence will stop playing and the next sequence will immediately be played. CLEAR [F5] Empties the data in the Next sq:field. If the Next sq: field is empty, and the sequence playing is set to loop on, that sequence will be continuously looped until a separate sequence is input to Next sq: or the STOP key is pressed.
-
Page 48: Second Sequence Feature
Chapter 3: Recording Sequences Second sequence feature This allows you to play back two sequences at the same time: the sequence already selected on the main screen, plus another one that you can select here. From the main screen, hold down SHIFT and press MISC. (numeric key 2), then press 2ndSEQ [F3]. -
Page 49: Setting The Tempo
Setting the Tempo To set the tempo of the sequence. Sq:01-(Sequence01) ™:120.0(MAS) Count:OFF Tr:01-Track01 S:DRUM1:OFF New Pgm-A S:DRUM1:OFF New Pgm-A STEP EDIT Move the cursor to the : field and set the tempo by rotating the DATA wheel. To set the value to 120.5, enter “1205” and press ENTER. To set the value to 88.5, enter “885” and press ENTER to confirm the entry. -
Page 50: Entering And Modifying A Tempo Change
Chapter 3: Recording Sequences Entering and Modifying a Tempo Change To open the Tempo Change window, select the tempo field in the Main Screen and press OPEN WINDOW. Sq:01-(Sequence01) ™:120.0(MAS) Tempo change: ON Tempo change: ON Count:OFF :001.01.00 %:100.0 ™=120.0 :001.01.00 %:100.0 Tr:01-Track01 S:DRUM1:OFF... -
Page 51: Selecting A Tempo Source
Selecting a Tempo Source This allows the performance of each sequence to a set tempo or the master tempo set by MPC 2000XL. Sq:01-(Sequence01) ™:120.0(MAS) Count:OFF Tr:01-Track01 S:DRUM1:OFF New Pgm-A S:DRUM1:OFF New Pgm-A STEP EDIT Move the cursor to the Tempo Source Field as shown above and set the tempo source with the DATA wheel. -
Page 52: Setting The Time Correct (Quantization)
Chapter 3: Recording Sequences Setting the Time Correct (Quantization) When data is recorded to a sequence in real-time, the note event is time corrected to the value specified here. Also, when the bar, beat, or tick point is moved using the STEP < / > key, the value specified here is used. -
Page 53: Setting The Beat
• amount: This sets the amount of the shift timing. The maximum value varies depending on the Note Value settings. For example, if the Note Value is set at 1/16, the maximum amount is 12 which corresponds to half of the time correction value (24 ticks). •... -
Page 54: Setting The Number Of Bars
Chapter 3: Recording Sequences Setting the Number of Bars To set the number of bars for each sequence. Sq:01-(Sequence01) ™:120.0(MAS) Count:OFF Tr:01-Track01 S:DRUM1:OFF New Pgm-A S:DRUM1:OFF New Pgm-A STEP EDIT To display the Change Bars window select the Bars: field with the CURSOR and rotate the DATA wheel. - Page 55 The following is a description of each field. • After bar: Specifies where to insert a bar. The new blank bar is inserted after the specified bar. • Number of bars: Specifies the number of bars to insert. To insert a bar, press INSERT[F2] after completing the above settings. •...
-
Page 56: Looping A Sequence
Chapter 3: Recording Sequences Looping a Sequence During playback, the designated region of the sequence will be played back repeatedly until STOP is pressed. During recording, after the set number of bars have been recorded the REC mode automatically changes to the OVERDUB mode and the sequence will then play repeatedly until STOP is pressed, allowing you to keep dubbing on top of the sequence (further recording is added to the original, the original is not deleted). -
Page 57: Setting The Recording Count In/Metronome
Setting the Recording Count In / Metronome This is for set-up of the count in and metronome. Sq:01-Sequence01 ™:120.0(MAS) Count: ON Count: ON Tr:01-Track-01 S:MIDI :10A-Device10 S:MIDI :10A-Device10 STEP EDIT Select the Count: field with the CURSOR key and select ON or OFF by rotating the DATA wheel. - Page 58 Chapter 3: Recording Sequences Setting the metronome sound, volume and output When the “Count/Metronome” window is displayed (see previous section), pressing “SOUND” (F5) opens the “Metronome sound” window where you can select sounds and output for the metronome. Sound: Volume:100 Output:STEREO Sound: Here you can select a metronome sound CLICK, DRUM 1, 2, 3 or 4.
-
Page 59: Selecting A Track
Selecting a Track Sq:01-Sequence01 ™:120.0(MAS) Count:OFF Tr:01-Track-01 S:MIDI :10A-Device10 S:MIDI :10A-Device10 STEP EDIT Move the cursor to the Tr: field and select the track by rotating the DATA wheel. The name and number of each track will appear. Renaming a Track To open the Track window, select the Tr: field and press the OPEN WINDOW key. -
Page 60: Deleting A Track
Chapter 3: Recording Sequences Deleting a Track From the Main Screen, select the Tr: field and press OPEN WINDOW. To open the Delete Track window, press DELETE [F2]. Tr:01-Track-01 Pressing DO IT will erase Pressing DO IT will erase this track !! this track !! To erase the data of the selected track, press DO IT [F5]. -
Page 61: Turning The Track On Or Off
Turning the Track ON or OFF Press the TrMUTE [F3] key to turn the track on (YES) or off (NO) (the present condition is displayed in the On: field). It can also be turned off by moving the cursor to this field and rotating the DATA wheel. -
Page 62: Deleting All The Tracks That You Have Turned Off
Chapter 3: Recording Sequences Deleting All the Tracks that You Have Turned Off To delete all of the tracks that have been turned off, move the cursor to the Main Screen ON: field. Sq:01-BEAT ™:106.9(SEQ) Count: ON Count: ON Tr:05-ORCHESTRA_HIT S:MIDI : 2B-SG01k Velo%:100 S:MIDI : 2B-SG01k STEP... -
Page 63: Settings For Midi Reception
Settings for MIDI Reception From the Main Screen, select the track type field (MIDI or Drum 1-4) and press the OPEN WIN- DOW key to display the MIDI input window. Receive channel: Receive Sustain pedal to Duration: ON Sustain pedal to Duration: ON MIDI filter:OFF MIDI filter:OFF Type:NOTES... -
Page 64: Midi Filter Function
Chapter 3: Recording Sequences MIDI Filter Function This sets the MPC2000XL to receive or not receive MIDI events. • MIDI filter: This is the on or off setting for the entire MIDI filter function. When this is off, all MIDI events will be received regardless of the settings in the Type: and Pass?: fields. -
Page 65: Settings For Midi Output
Settings for MIDI output To display the MIDI output window, from the Main Screen, select the field shown below. Sq:01-(Sequence01) ™:120.0(MAS) Count:OFF Tr:01-Track-01 S:MIDI : S:MIDI :10A-Device10 STEP EDIT Then press OPEN WINDOW. Soft thru:AS TRACK Soft thru:AS TRACK Device name:10A-Device10 Device name:10A-Device10 MONITR Soft thru:... -
Page 66: Multiple Track Recording
Chapter 3: Recording Sequences Multiple Track Recording With this mode, multiple tracks can be recorded at the same time. From the Main Screen (press MAIN SCREEN), move the cursor to the S: field. Sq:01-(Sequence01) ™:120.0(MAS) Count:OFF Tr:01-Track-01 S:MIDI :10A-Device10 :MIDI :10A-Device10 STEP EDIT Here you can select S for single track recording or M for multiple track recording. -
Page 67: Editing The Velocity
Editing the Velocity This adjusts the velocity of the data that is recorded on the selected track when the sequence is played. Sq:01-(Sequence01) ™:120.0(MAS) Count:OFF Tr:01-Track-01 S:MIDI :10A-Device10 S:MIDI :10A-Device10 STEP EDIT Select the Velo%: field with the CURSOR keys and set the incremental or decremental ratio of the velocity with the DATA wheel. -
Page 68: Setting The Program Change Transfer
Chapter 3: Recording Sequences Setting the Program Change Transfer You can send program changes on each track in addition to sending program change events within a track when a sequence is selected. Sq:01-(Sequence01) ™:120.0(MAS) Count:OFF Tr:01-Track-01 S:MIDI :10A-Device10 S:MIDI :10A-Device10 STEP EDIT Select the Pgm: field with the CURSOR key and set the program number you want to set with the... -
Page 69: The Main Screen Function Keys
• Display style: Select B A R , B E A T , C L O C K to display bar, beat, and clock. Select HOUR,MINUTE,SEC to display the hours, minutes, and seconds. • Start time: Select HOUR,MINUTE,SEC in Display style: to start the time display on the main screen from the time set in this field. -
Page 70: The Play/Record Keys And The Locate Keys
Chapter 3: Recording Sequences The Play/Record Keys and the Locate Keys These ten keys operate similarly to the transport keys on a tape recorder, with some useful addi- tions: • The PLAY START key: This plays back the currently selected sequence to begin playing from the first bar. •... - Page 71 Storing a locate point from the stop mode Select a location point in the Now: field of the Main Screen and press the GO TO key. Select a locate memory (that you want to save) from 1 - 9 with the CURSOR keys. 7:001.01.00 8:001.01.00 9:001.01.00 7:001.01.00 8:001.01.00 9:001.01.00 4:001.01.00 5:001.01.00 6:001.01.00...
-
Page 72: The Auto Punch In/Out Function
Chapter 3: Recording Sequences AUTO PUNCH IN / OUT Auto Punch allows you to Overdub or Record automatically between 2 preset points. This can be very useful at times such as when you want to execute a very tight punch-in and there isn’t enough time to get from the MPC2000XL to the MIDI keyboard to play the new notes after the punch-in. -
Page 73: Chapter 4: Editing Sequences
Chapter 4: Editing Sequences Chapter 4 Editing Sequences Page 61... -
Page 74: Overview
Chapter 4: Editing Sequences Overview There are three ways to edit a sequence. The first is to erase unnecessary note data using the ERASE key. The second is to display and edit each note or event. The third is to specify the bar or note range and edit the data together. - Page 75 ALL EXCEPT This erases all events except those selected. When ALL EX- CEPT is selected, the field on the right enables you to select the event. The events selected here will not be erased. For note events, the notes set in the Note: field below are erased. When notes are selected in the field where events are selected, the Note: field will not appear and all the data except the notes will be erased.
-
Page 76: Step Editing
Chapter 4: Editing Sequences Step Editing The Step Edit screen allows you to finely edit MIDI data on a track or enter data one at a time from the drum pads or a MIDI keyboard. Step Editing Screen From the Main Screen, press STEP [F1] to display the Step Edit screen. View:ALL EVENTS ALL EVENTS >N: 38/A06 Tun:... -
Page 77: Timing Correct In Step Edit
AS PLAYED The metronome will play from the moment the drum pad or MIDI key- board is pressed until it is released. TC VALUE: Regardless of the time that the key is actually pressed, the duration will be the value set in the Timing: field. When TC VALUE is selected, the percentage field will also appear. -
Page 78: Operating The List Display
Chapter 4: Editing Sequences Channel Pressure Polyphonic Pressure Exclusive Data Exclusive:F0 F7 Exclusive:F0 F7 Operating the List Display When many events are entered at one point and the whole list cannot be displayed, you can scroll through the list with the CURSOR UP or DOWN keys. Press PLAY [F6] to generate the selected event. -
Page 79: Copying An Event
• Edit type: Edit the selected parameters according to the following settings. ADD VALUE SUB VALUE MULT VAL% SET TO VAL This unifies all the parameters to the value set in Value:. • Value: This sets the edit method selected in Edit type:. Copying an Event To temporarily save the data on the clip board, select an event and execute Copy. -
Page 80: Inserting An Event
Chapter 4: Editing Sequences Inserting an Event To insert an event, specify the point of insertion in the Now: field and press INSERT[F4]. Type: Select the type of event you want to insert from the following: NOTE, PITCH BEND, CONTROL CHANGE, PROGRAM CHANGE, CH PRESSURE, POLY PRESSURE, EXCLUSIVE and MIXER. -
Page 81: The Editing Screen
The Editing Screen The editing screen allows you to copy an entire event within a sequence. It is also possible to rearrange the tracks, transpose, or set the preferences of a newly created sequence. To display the editing screen, press EDIT [F2] in the main screen. Event edit Time and notes are specified here for various types of editing. -
Page 82: Editing The Duration Of A Note
Chapter 4: Editing Sequences Editing the Duration of a Note When DURATION is selected in the Edit: field the following screen is displayed. Edit:DURATION Time: 001.001.00-001.01.00 Notes: EVENTS BARS Left Window • Time: Set the range of the event you want to edit. •... -
Page 83: Transposing A Note
Right Window • Edit sq:/ Tr: To select the sequence and track that you want to edit. • Mode: ADD VALUE Adds the value selected in the Value: field to the note. SUB VALUE Subtracts the value selected in the Value: field from the note. MULTI VALUE % Multiplies the velocity (percent) by the value selected in the Value: field. -
Page 84: Copying By Bar
Chapter 4: Editing Sequences Copying by Bar You can group the data on all of the tracks in a sequence and copy them by bar measures. Press EDIT [F2] in the Main Screen to display the event copy screen and press BARS [F2]. From From First bar:... -
Page 85: Rearranging The Tracks
Rearranging the tracks This allows you to rearrange/move tracks within a sequence. From the the Main Screen, press EDIT [F2] to display the Event Copy screen and press TrMOVE [F3]. Sq:80-Sequence80 Select track Select track to move. EVENTS BARS Select the sequence in the Sq: field and then move the cursor to the field where the track is displayed using the CURSOR DOWN key. -
Page 86: Sequence Preferences
Chapter 4: Editing Sequences Sequence Preferences This sets the preferences of the main screen for when you create new sequences. From the main screen, press EDIT [F2] to display the Event Copy screen, then press USER [F5]. Main screen user defaults Main screen user defaults ™:120.0(SEQ) S:MIDI :10A-Device10... - Page 87 To transpose and change the data, press FIX [F6]. Pressing Do IT will transpose Pressing Do IT will transpose note data parmanently note data parmanently Press DO IT [F5], the data is transposed to the settings in Transpose amount:. Chapter 4: Editing Sequences Transpose permanent Transpose permanent CLOSE...
-
Page 88: Chapter 5: Song Mode
Chapter 5: Song Mode Chapter 5 Song Mode Page 76... - Page 89 Overview There are two main ways to create music data on the MPC2000XL. One way is to create a long sequence as a whole piece, the other way is to create short sequences and play them sequentially as a Song. The Song Mode sequentially plays the data of selected sequences.
-
Page 90: Song Mode
Chapter 5: Song Mode Song Mode Hold down SHIFT and press SONG (1 on the numeric keypad). The Song Mode screen will ap- pear: Song:01-(Unused) TEMPO:MAS ™:120.0 LOOP:OFF While this screen is displayed the Song Mode is active, this means that if playback is started, the active song will play instead of the active sequence. -
Page 91: Renaming A Song
Select the next sequence (assigned to Step 2), with the DATA wheel. Song:01-Song01 TEMPO:MAS ™:120.0 LOOP:OFF In the same way as above, assign sequences and increase the number of steps. Renaming a Song To open the Song window, select the Song: field and press OPEN WINDOW. Default name :song Default name :song DELETE... -
Page 92: Selecting A Song
Chapter 5: Song Mode Selecting a Song Song:01-Song01 TEMPO:MAS ™:120.0 LOOP:OFF Move the cursor to the Song: field and select a song by rotating the DATA wheel. The song number and song name will appear. If there is no data in the song, (Unused) will appear. Deleting a Song From the song screen, select the Song: field and press OPEN WINDOW. -
Page 93: Copying A Song
Copying a Song From the song screen, select the Song: field and press the OPEN WINDOW key. To open the Copy Song window, press COPY[F5]. Select the song that you want to copy (top level) with the DATA wheel. Select the copy destination (bottom level) by pressing the CURSOR DOWN key and select the song that you want to copy the data to with the DATA wheel. -
Page 94: Setting The Tempo
Chapter 5: Song Mode Setting the Tempo This sets the tempo of the song. Song:01-Song01 TEMPO:MAS ™:120.0 LOOP:OFF • TEMPO: This sets the sequence to either be played in the tempo it was recorded in or the Master tempo. Move the cursor to the TEMPO: field and set the tempo source by rotating the DATA wheel. -
Page 95: Setting The Loop
Setting the Loop This allows you to repeatedly play a loop of a specified number of steps of the song until STOP is pressed. Song:01-Song01 TEMPO:MAS ™:120.0 LOOP:OFF Select the LOOP: field with the CURSOR keys and rotate the DATA wheel to select ON (set to OFF to cancel the loop mode). -
Page 96: Selecting A Step And Changing A Sequence
Chapter 5: Song Mode Selecting a Step and Changing the Sequence Select the step number in the Step field with the CURSOR keys. If there are a lot of steps, press the CURSOR UP or DOWN key to scroll up and down the screen. You can also use the DATA wheel to select the step. -
Page 97: Deleting A Step
Deleting a Step Select the step number or sequence that you want to delete with the CURSOR keys and press DELETE[F5]. When the step is deleted, the following steps will all be moved up. Song:01-Song01 TEMPO:SEQ ™:120.0 LOOP:OFF Song:01-Song01 TEMPO:MAS ™:120.0 LOOP:OFF Inserting a Step... -
Page 98: Moving To A Specific Point In A Song (Locate)
Chapter 5: Song Mode Moving to a Specific Point in the Song Select the Now: field with the CURSOR keys and set the point in the song that you want to go to with the CURSOR keys and DATA wheel. Song:01-Song01 TEMPO:MAS ™:120.0... -
Page 99: Converting A Song To A Sequence
Converting a Song to a Sequence The song mode function is convenient when assembling a song. When editing detailed data within a song that has a complicated structure, it’s easier to assemble the song as 1 sequence and then edit that sequence. In this type of case, it is a good idea to create the basic structure of the song using the song mode and then convert that to one sequence. -
Page 100: Chapter 6: Creating And Editing Sounds
Chapter 6 Creating and Editing Sounds... -
Page 101: Sampling A New Sound
Sampling a New Sound Sampling is done in 16-bit linear format with the same 44.1kHz sampling rate as used with com- pact discs. CAUTION: All sounds are lost when the power is turned off. This means that you must load in sounds from a disk every time the MPC2000XL is turned on, and you must save any edited or newly sampled sounds to disk, or the changes will be lost! To sample a sound, hold down SHIFT and press SAMPLE (or 4 on the numeric pad) to display the... - Page 102 Chapter 6: Creating and Editing Sounds • Monitor: When L/R is selected, the sound from the input is sent to the stereo mix outputs. When OFF is selected, it is not sent. If you are sampling with a microphone in the same room as the speakers, select OFF to avoid audio feedback.
- Page 103 • LEVEL METER While this screen is displayed, the meter will constantly display the level of the signal input. The threshold setting is graphically represented by a within the meter’s range. In addition, a shows the highest peak level received since the last time the RESET PEAK[F1] was pressed.
- Page 104 Chapter 6: Creating and Editing Sounds Before saving a sampled sound, first set the following fields: Name for new sound: • Enter a name for the sampled sound here. Tap a drum pad or rotate the DATA wheel to display the Name window. Enter a name and press ENTER [F5] to confirm.
-
Page 105: Editing A Sound
Editing a Sound This allows you to edit a sound loaded from a disk or sampled into the memory. Hold down SHIFT and press TRIM (or 5 on the numeric pad), the TRIM mode screen appears. Snd:loop_1 TRIM LOOP Sound display and order can be changed while in the TRIM, LOOP or ZONE screens, by press- ing the TRIM, LOOP or ZONE key again (example: F2 in the LOOP page) The display can be toggled between Memory (order recorded in memory), Size (order of file size), Name (alphabetical order). -
Page 106: Deleting A Sound
Chapter 6: Creating and Editing Sounds • <Sound spec.> This displays the specifications of the currently selected sound. You cannot change the value here. Type: Displays stereo or monaural mode. Rate: Displays the frequency of the sample. Size: Displays the data size of the sound. Deleting a Sound To open the Sound window, select the Snd: field and press OPEN WINDOW. -
Page 107: Converting A Sound
Converting a Sound You can convert a stereo sound into 2 mono sounds, as well as converting 2 mono sounds into one stereo sound. Note: Since the sound conversion is to create a new sound file, please check that there is sufficient memory available before the conversion. -
Page 108: Converting Mono To Stereo
Chapter 6: Creating and Editing Sounds Converting Mono to Stereo When a mono sound is selected, the following window will be displayed. Press NEXT [F5]. New ST name:KICK_OF_1B____-S New ST name:KICK_OF_1B____-S L source= field is the name of sound selected. This source will be the left channel of a stereo sound to be created. -
Page 109: Re-Sampling
Re-sampling Re-sampling allows you to change the sampling frequency of the sample. This is useful for con- serving memory or it can be used to ‘creatively’ change the quality of the sound (to ‘dirty it up’ a little). From the TRIM, LOOP or ZONE screen, select the Snd: field and press OPEN WINDOW. Sound name: Sound <Sound spec.>... -
Page 110: Trim Mode
Chapter 6: Creating and Editing Sounds TRIM Mode This allows you to trim a sound by selecting new start and end points. The wave pattern of the entire sound is displayed and the area between the start and end points will be displayed in white on a blue background. -
Page 111: Fine Adjustment Of The Start Point
Fine Adjustment of the Start Point Select the St: field and press OPEN WINDOW to open the Start fine window. ZOOM- Start: • Set the start point. Change the value with the DATA wheel or enter a number with the numeric pad and press ENTER. -
Page 112: Fine Adjustment Of The End Point
Chapter 6: Creating and Editing Sounds Fine Adjustment of the End Point Select the End: field and press OPEN WINDOW to open the End fine window. ZOOM- • End: Set the end point. Change the value with the DATA wheel or enter a number with the numeric pad and press ENTER. -
Page 113: Loop Mode
LOOP Mode Set the loop of the sound. Set to play loops, such as a phrase sample, in this mode. Hold SHIFT and press TRIM (or 5 on the numeric pad), then press LOOP [F2]. • This sets the turn of the loop. Select the To: field with the cursor and change the value with the DATA wheel. -
Page 114: Fine Adjustment Of The Loop Points
Chapter 6: Creating and Editing Sounds Fine Adjustment of the Loop Points Select the To: field in the LOOP screen and press OPEN WINDOW to open the Loop To fine window. ZOOM- • This sets the beginning of the loop. Change the value with the DATA wheel. You can enter large numbers by entering a number with the numeric pad and then pressing ENTER. -
Page 115: Zone Mode
ZONE mode The ZONE mode allows you to divide a sample into a number of equal parts (from 1 to 16). This could be useful, for example, if a 2 bar sample has 4 beats to a bar: dividing the sample into 8 would give you 8 zones of 1 beat each. -
Page 116: Fine Adjustment Of The End Point Of A Zone
Chapter 6: Creating and Editing Sounds Fine Adjustment of the End Point of a Zone Select the End: field in the ZONE mode and press OPEN WINDOW to open the Zone end fine window. ZOOM- • End: Set the end point. Change the value with the DATA wheel. You can enter large numbers by entering a number with the numeric pad and then pressing ENTER. - Page 117 LOOP FROM START TO END Edit:LOOP FROM ST TO END LOOP FROM ST TO END Sets the loop from start to end of the selected range. Press DO IT [F5] to execute. SECTION 4 NEW SOUND Edit:SECTION New name:loop_2 New name:loop_2 This creates a new sound by copying the range selected.
- Page 118 Chapter 6: Creating and Editing Sounds REVERSE SECTION Edit:REVERSE SECTION Pressing DO IT will execute Pressing DO IT will execute the selected edit. the selected edit. This reverses the range selected. Press DO IT[F5] to execute the REVERSE SECTION command. TIME STRETCH Time stretch uses preset algorithms to lengthen or shorten a sample.
-
Page 119: Bpm Match
Adjust: You can use this to ‘tweak’ the selected preset. If the selected preset gives near enough a good result, but you feel it may benefit from a little fine tuning, try a few different settings here until you get the best result. A positive value will help improve high frequency and percussive sounds while a negative value will help improve bass sounds. - Page 120 Chapter 6: Creating and Editing Sounds SLICE SOUND This edit option is only available from the ZONE screen. After you have divided a sound into zones, you can use this mode to make each individual zone into a new sample. You can also create a new program containing these samples where each sample will be assigned to 16 drum pads.
-
Page 121: Setting The Sound Parameters
Setting the Sound Parameters This is for setting sound parameters such as the volume or pitch of the sound. It is also possible to set the BEAT LOOP FUNCTION. Holding SHIFT and press TRIM (or 5 on the numeric pad) and display the sound parameter screen by pressing PARAMS [F4]. -
Page 122: Chapter 7: Creating And Editing Programs
Chapter 7 Creating and Editing Programs... -
Page 123: What Are Programs
What Are Programs? A program is a collection of sounds assigned to 64 note numbers (notes 35-98). You can set the envelope and filter for each note number individually and create up to 24 programs. Four programs can be played back at the same time. A sound can only be played back (using the drum pads or MIDI keyboard) when it is assigned to a note number in a program. -
Page 124: Creating A Program
Chapter 7: Creating and Editing Programs The following shows how data is organized within programs: Program 24: Acoustic drum set Data for each note number: Program 3: Jazz drum set Program 2: Brushes drum set Program 1: Rock drum set Data for each note number: Pad: Note#:... -
Page 125: Selecting A Program And Assigning A Sound
Selecting a Program and Assigning a Sound There are five screens in program edit mode and the following are the functions: 1. Assign Screen Assigns a note number to the pad, and a sound to the note number. 2. Parameter Screen Edits the tone using the envelope, filter, etc. 3. -
Page 126: Renaming Programs
Chapter 7: Creating and Editing Programs Renaming Programs Open the Program screen, select the Pgm: field and press OPEN WINDOW. Program DELETE • Program name: This changes the name of the program. Tap a drum pad or rotate the DATA wheel to display the name window. New name:Newpgm-a Press PADs or use DATA knob. -
Page 127: Creating New Programs
Creating New Programs Open the Program screen, select the Pgm: field and press OPEN WINDOW. The Create New Program window will open if you press NEW[F3]. • New name: This sets the name of the program. Refer to “Renaming a Program” on how to enter char- acters. -
Page 128: Assigning Notes To The Drum Pads
Chapter 7: Creating and Editing Programs Assigning Notes to the Drum Pads The preset note numbers for the drum pads are as follows: PAD A PAD B Pad 1-16 = 35 - 50 Pad 1-16 = 51 - 66 You can assign different note numbers if you want to. From the Program screen, select the Pad: field with the CURSOR keys and select a drum pad that you want to assign a note to with the DATA wheel or by hitting one of the drum pads. -
Page 129: Assigning Sounds To Notes
Assigning Sounds to Notes This assigns sounds to note numbers. Select the Note: field with the CURSOR keys and select the note number that you want to assign with the DATA wheel. Pgm: 1-NewPgm-A Pad:A01=Note:37 Note:60=Snd:OFF Mode:NORMAL ASSIGN PARAMS Select the Snd: field by pressing the CURSOR RIGHT key and select the sound you want to assign by rotating the DATA wheel. -
Page 130: The Pad Assign/Initialize Pad Assign Modes
Chapter 7: Creating and Editing Programs • Prog name: Tap a drum pad or rotate the DATA wheel to display the name window. Input the name and press ENTER [F5] to save the new name. While this window is open, the program can be played according to the parameters assigned. Press DO IT [F5] when you have finished entering all the data. -
Page 131: The Program Sound Generation Mode
The Program Sound Generation Mode By setting the sound generation mode, you can generate up to three sounds simultaneously or switch the sound by using velocity and decay. Pgm: 1-NewPgm-A Pad:A01=Note:37 Note:60=Snd:OFF Mode:NORMAL ASSIGN PARAMS Select the Mode: field with the CURSOR keys and select from the following four modes with the DATA wheel. - Page 132 Chapter 7: Creating and Editing Programs DCY SW This switches between the sound assigned to the program and the two sounds set here using the value set in the Decay field (see following pages). When this option is selected, two If over: fields appear to the right of the Mode: field.
-
Page 133: Editing Note Parameters
Editing Note Parameters This edits the note parameters assigned to the program. Hold down SHIFT and press PROGRAM (6 on the numeric keypad) to display the program assign screen and press PARAMS [F2] to display the parameter screen. Pressing PARAMS [F2] again, displays the DRUM 1-4 select screen. -
Page 134: Copying The Note Parameter
Chapter 7: Creating and Editing Programs Copying the Note Parameter The various settings you make on the parameter screen effect the note number. When a compli- cated edit is made on a note and you want to use this edit on another note, you can copy the note parameters to another note. - Page 135 CAUTION: When the sample is short, the decay time will have higher priority than the attack time. While one of the envelope fields is selcted, press OPEN WINDOW to display the following win- dow. Note:60/C05-OFF Velo Attack: Velo Attack: Velo Velo Velo You can set the ratio in which the envelope or volume changes according to the velocity.
-
Page 136: Setting The Filter
Chapter 7: Creating and Editing Programs Setting the Filter This edits the filter of the sound assigned to each note. The filter has two parameters that you can edit. Select the parameter field you want to edit with the CURSOR key and set the value with the DATA wheel. Pgm: 1 Note:60/C05-OFF <Envelope>... -
Page 137: Setting The Pitch
Setting the Pitch This sets the pitch of the sound assigned to each note. Pgm: 1 Note:60/C05-OFF <Envelope> Attack: Attack: Decay:100 Dcy md:END ASSIGN PARAMS Select the Tune: field with the CURSOR keys and enter the number with the DATA wheel. You can enter numbers directly with the numeric pad. -
Page 138: Setting The Voice Overlap
Chapter 7: Creating and Editing Programs Setting the Voice Overlap When the same note is generated repeatedly, this can be used to set whether the previous sound is canceled or overlapped. Pgm: 1 Note:60/C05-OFF <Envelope> Attack: Attack: Decay:100 Dcy md:END ASSIGN PARAMS Select the Voice Overlap: field with the CURSOR keys and select one of the following... -
Page 139: The Midi Settings Of The Sampler
The MIDI Settings of the Sampler This sets the MIDI settings of the internal sampler. Hold down SHIFT and press PROGRAM (numeric key 6), then select “DRUM 1-4”. Then press DRUM (F3). Pressing DRUM [F3] again, displays the DRUM 1-4 select screen. Drum:1 Pgm: 1-NewPgm-A Pgm: 1-NewPgm-A... -
Page 140: Chapter 8: Mixer Functions
Chapter 8: Mixer Functions Chapter 8 Mixer Functions Page 128... -
Page 141: Stereo Output Mixer
Stereo Output Mixer The MPC2000XL has a 64 channel stereo mixer which allows you to set the volume and pan for each of the 64 notes assigned to a program. Hold down SHIFT and press MIXER (numeric key 7), then select “DRUM 1-4”. The mixer display will appear. -
Page 142: Setting The Left/Right Pan
Chapter 8: Mixer Functions Setting the Left/Right Pan Move the cursor to the Pan field at the top of the screen with the CURSOR UP key. Select the channel that you want to adjust with the CURSOR LEFT/RIGHT key or by hitting the drum pad. STEREO INDIV Set the pan with the DATA wheel. -
Page 143: Setting The Individual Outputs And Effect Send (Option)
Setting the Individual Outputs and Effect Send (Option) When the optional 8 Individual Output Board (IB-M208P) or Effect board (EB16) is installed, you can set the output of the sound or the effect send from the Individual Out screen. CAUTION: If the Individual Output Board (IB-M208P) or effect board (EB16) is not installed, changes here will have no effect. -
Page 144: Setting The Output Level
Chapter 8: Mixer Functions Setting the Output Level Move the cursor to the Level field with the CURSOR DOWN key. Select the channel of that you want to adjust with the CURSOR LEFT/RIGHT key or by hitting the drum pad. STEREO INDIV Set the level with the DATA wheel. -
Page 145: Sending Effects
Sending Effects Effect send can only be used when the optional EB16 effect board is installed. Press FXsend (F3) to display the effect send screen. R1 R2 R1 R2 M1 M2 M2 R1 R1 M1 M1 M1 R1 M1 R2 M1 STEREO INDIV Assigning the Effect to be Used... -
Page 146: Setting The Volume Or Pan For Each Note
Chapter 8: Mixer Functions Setting the Volume or Pan for Each Note Up to this section the volume or pan settings were set by displaying them together for each pad bank. It is also possible to display a list of parameters for each note. Hold down SHIFT and press MIXER (numeric key 7), then select “DRUM 1-4”. -
Page 147: Setting Up The Mixer
Setting Up the Mixer Hold down SHIFT and press MIXER (numeric key 7), then select “DRUM 1-4”. The mixer display will appear. Press SETUP [F4] to display the mixer setup screen. Mixer setup Mixer setup ..Stereo mix Stereo mix sourch: INDIV/FX source:PROGRAM INDIV/FX source:PROGRAM Copy pgm mix to drum:YES... -
Page 148: Setting The Master Level
Chapter 8: Mixer Functions There are four types of events. STEREO LEVEL STEREO PAN FXsend LEVEL INDIV LEVEL Pad numbers A01 ~ D16 correspond to 00 ~ 3F. Value can be set between the range 00 ~ 64. Setting the Master Level To adjust the total output level of the MPC2000XL, use the Master Level section. -
Page 149: Chapter 9: Effects (Optional)
Chapter 9: Effects Chapter 9 Effects (optional) Page 137... -
Page 150: Editing Effects
Chapter 9: Effects By installing the optional effect board (EB16), you can carry out various effect processing for each sound. Editing Effects Hold down SHIFT and press MIXER (numeric key 7), then select “DRUM 1-4”. The mixer display will appear. Press FXedit [F5] to display the effects screen. -
Page 151: Multi-Effects
Multi-effects The MPC2000XL has two multi-effects and each has five effect modules. You can execute vari- ous routings by rearranging the modules. Select MULTI FX1 or FX2 in the Edit: field of the FXedit screen and then select MIX with the CURSOR keys. Drum:1 Edit:MULTI FX1 DIST... - Page 152 Chapter 9: Effects When REV4MOD/ECHO is selected The signal flow is as follows: M1/M2 FILT DIST Drum:1 Edit:MULTI FX1 DIST DRUM 1 DRUM 1 DRUM 2 DRUM 2 When MOD/ECHO+REV is selected The signal flow is as follows: M1/M2 FILT DIST Drum:1 Edit:MULTI FX1...
-
Page 153: Reverb Effects
Reverb Effects In addition to the two types of multi-effects, the MPC2000XL provides two reverb-only effects. These can be selected directly from the FXsend screen, but it is also possible to use them with the multi-effects. You can send a signal to the reverb from four points in the multi-effect. So you can use the R1(R2) reverb while M1(M2) is selected in FXsend. - Page 154 Chapter 9: Effects When REV4MOD/ECHO is selected M1/M2 DIST FILT FX1/2 DIST/FLT M1/2 R1/R2 When MOD/ECHO+REV is selected M1/M2 FILT DIST M1/2 R1/R2 The output level and pan is set in the Effect Mixer window. Select the MIX module and press OPEN WINDOW FX1/2 REVERB ECHO...
-
Page 155: Editing Each Effect
Editing Each Effect Set the Edit: field to MULTI FX1(or 2), select an effect (DIST, FILT, MOD, ECHO, REV) with the CURSOR keys and press OPEN WINDOW. <DISTORTION> Level:99 The function keys are the same for all effect windows. By pressing SOLO [F2], you can listen to the effect currently open in this window and ignore all the other effects. - Page 156 Chapter 9: Effects Modulation Modulation produces various effects such as phaser, flanger, chorus, rotary speaker, auto-pan, and pitch-shifter. <Phaser> Select PHASE SHIFT in the Type: field in Modulation window. The effect adds a hissing effect to the sound. Type:PHASE SHIFT Speed: This adjusts the speed of the phase effect.
- Page 157 <Rotary Speaker> Select ROTARY SPEAKERS in the Type: field of the Modulation window. This effect simu- lates the sound of a rotary speaker. Type:ROTARY SPEAKERS Speed1:0.5Hz Depth:30 Speed1: This sets the rotating speed of the speaker. Depth: This adjusts the degree of the effect. MIDI control#: This sets the MIDI controller which changes the rotating speed.
- Page 158 Chapter 9: Effects <Pitch Shifter> Select PITCH SHIFT in the Type: field of Modulation window. This effect produces a shift in the pitch of the original sound. Type:PITCH SHIFT Tune: This sets the amount of the shift. The effect is processed in stereo and it is necessary to set both left and right.
- Page 159 Delay/Echo Delay/Echo is an effect which broadens the sound by overlaying sounds that are slightly delayed on top of the original sound. There are four modes to choose from. <MONO LEFT> Select MONO LEFT in the Type: field in DELAY/ECHO window. A monaural delay is added to the LEFT output of the stereo effect.
- Page 160 Chapter 9: Effects <X-OVER L&R> Select X-OVER L&R in the Type: field of Delay/Echo window. This returns the feedback of the stereo input signals after reversing the left and right channels. This produces an interesting pan delay effect. Type:XOVER L&R Feedback: This adjusts the feedback volume.
- Page 161 Reverb The reverb effect adds an echo to the original sound. There are 3 main types: Hall (room) Gate, and Reverse. <HALL, ROOM> Select from LARGE HALL, SMALL Type: field in the Reverb window. These create a feeling of space. Type:LARGE HALL Predelay:50ms Predelay: This adjusts the delay time from the generation of the sound to the beginning of...
- Page 162 Chapter 9: Effects <REVERSE> Select REVERSE in the Type: field of Reverb window. The decay effect is reversed. Type:REVERSE Predelay:50ms Predelay: This adjusts the delay time from the generation of the sound to the start of the reverb. Time: This adjusts the time it takes for the reverb to dissolve. Diffuse: This sets the density of the reflected sound of the reverb.
-
Page 163: Chapter 10: Disk Operation
Chapter 10: Disk Operation Chapter 10 Disk Operation Page 151... -
Page 164: Overview
Chapter 10: Disk Operation Overview When the power is turned off, all of the data will be erased. If you have any data that you want to keep, make sure that you save the data to a disk before the power is turned off. The data will be saved as a file and you can name the file using up to 16 characters. -
Page 165: Before Proceeding To Use A Floppy Disk
This icon is also displayed: MPC2000XL Before Proceeding to Use a Floppy Disk Do NOT press the disk eject button when you are using a floppy disk and the light of the disk drive on the front panel of the MPC2000XL is on. The data or disk may be damaged or destroyed. SETTING UP the Primary Device This sets up the primary device the MPC2000XL searches the file to load automatically when it is turned on. -
Page 166: Formatting A Disk
Chapter 10: Disk Operation Formatting a Disk In order to load or save a file to a floppy disk or an external SCSI drive, it is necessary to format the disk in order to use it with the MPC2000XL. CAUTION: Once the disk is formatted, all the data on the disk will be erased. Formatting a Floppy Disk Insert a floppy disk into the disk drive of the MPC2000XL, hold SHIFT and press LOAD (3 on the numeric keypad). -
Page 167: Formatting A Scsi Drive
Formatting a SCSI Drive Connect the MPC2000XL to an external SCSI drive using SCSI connectors (refer to “Con- necting an External SCSI Drive”). Hold SHIFT and press LOAD (3 on the numeric keypad) to enter the Disk mode. Press FORMAT [F4] to display the format screen. Select the SCSI ID number of the drive in the Device: field. -
Page 168: Saving The Data
Chapter 10: Disk Operation Saving the Data When the power is turned off, all of the data will be erased. If you have any data that you want to keep, make sure that you save the data to a disk before the power is turned off. The MPC2000XL uses various files and they are labeled with different extensions depending on the type of file. - Page 169 4-1. Saving All Sequences & Songs This saves all the sequence and song data of the MPC2000XL's memory. Select Save Sequence File: field. Press DO IT [F6]. File neme:ALL_SEQ_SONG1 File neme:ALL_SEQ_SONG1 You can change the file name you are saving in the File name: field. Tap a drum pad or rotate the DATA wheel to display the Name window.
- Page 170 Chapter 10: Disk Operation 4-3. Saving All Program & Sounds This saves all the programs and sounds within the MPC2000XL memory. Select Save All Program & Sounds. The File: field will display the file name to be saved. Press DO IT [F6]. File :ALL_PROGRAM You can change the name of the file that you are saving in the File name: field.
-
Page 171: Saving Across Multiple Floppy Disks
4-5. Saving a Sound This saves each sound from the MPC2000XL's memory. Select Save a Sound. Select the sound that you want to save in the File: field. Press DO IT [F6]. The file name of the sound being saved will appear in the File: field. 5-1. -
Page 172: Saving To Folders On A Scsi Device
Chapter 10: Disk Operation Saving to Folders on a SCSI Device Creating a New Folder If you have a SCSI disk device connected to the MPC2000XL, you can make separate folders that you can save files to, the same as you would on a computer. For example, you could have separate folders for drum sounds, piano sounds, loops, etc. -
Page 173: Making Folders Within Folders
Making Folders Within Folders To make a new folder inside an existing folder, follow steps 1 - 3 of “Creating a New Folder”. DRUMSET DELETE Select one of the existing folders with the CURSOR UP/DOWN keys. ROOT DELETE Press the CURSOR RIGHT key to open the folder (press the CURSOR LEFT key to move back through folders). -
Page 174: Selecting Folders/Files
Chapter 10: Disk Operation Selecting Folders/Files Once you have created folders and files, you will need to be able to navigate through them so that you can load or save files. Follow steps 1 - 3 of “Creating a New Folder”. DRUMSET DELETE Use the CURSOR keys to select a file or folder. -
Page 175: Deleting Folders
Deleting Folders Follow steps 1 - 2 of “Selecting Folders/Files”. Press DELETE [F2]. The Delete Folder window appears. Pressing DO IT will delete Pressing DO IT will delete selected folder and its selected folder and its contents!! Press DO IT [F5]. The folder and its contents will be deleted. -
Page 176: Loading Files
Chapter 10: Disk Operation Loading Files The following files can be loaded into the MPC2000XL: ______.SND Sound file. ______.SEQ Sequence file. ______.ALL All sequence and song files. ______.MIDI Standard MIDI file. ______.PGM Program file. ______.APS Multiple programs. ______.WAV PC wave file. ______.SET Set of sounds Hold SHIFT and press LOAD (3 on the numeric keypad) to display the LOAD screen. - Page 177 Note: When SCSI is selected in the Device: field, the Part: field appears on the screen. View:ALL Files File:LOOP_1 Device:SCSI-1 Type=MPC2000XL LOAD Select the partition that you want to load from. If you are using a disk with a large amount of disk space, such as a hard disk, it is easier to manage the files by dividing the disk space into partitions (see "Formatting a SCSI Drive").
- Page 178 Chapter 10: Disk Operation If you don't want to keep the loaded sound, press DSCARD [F4] to discard it. Press KEEP [F5] to load the sound to the selected drum pad. 4-2. Loading .SEQ (sequence) or .MID (standard MIDI) Files Press DO IT [F6] to load the sequence file.
- Page 179 CAUTION: The following window will appear when you are loading a program and a sound file assigned to that program cannot be found. Insert the disk with the sound displayed in the Can't find file: field and press LOAD [F5]. If you have saved across multiple floppy disks, insert the next disk and press LOAD [F5].
-
Page 180: Deleting A File From The Disk
Chapter 10: Disk Operation Deleting a File from the Disk You can select and delete files from the disk. Hold SHIFT and press LOAD (3 on the numeric keypad). View:ALL Files ALL Files File:HOUSE_KICK2 Device:SCSI-5 Type=MPC2000XL LOAD SAVE Move the cursor to the Device: field and select the device that contains the file that you want to delete. -
Page 181: Loading An Updated Operating System
The file type options are as follows: ALL FILES Deletes all files .SND Deletes only the MPC2000XL sound files .PGM Deletes program files .APS Deletes files that contain All Program and Sound data .MID Deletes standard MIDI files .ALL Deletes set of sequence and song files .WAV Deletes WAV type sound files .SEQ... -
Page 182: Loading Files Created On The Akai Mpc60/60Ii
Chapter 10: Disk Operation Loading Files Created on the AKAI MPC60/60II Loading a Sound (.SND) file Follow steps 1 to 4-1 in “Loading Files” and select the .SND file in step 3. Loading Sound Set (.SET) Files Follow steps 1-3 in “Loading Files” and select the .SET file in step 3. Then press DO IT [F6]. [SET] [SOUND] load one sound from Press SET [F5]. - Page 183 File:CLOSE_HAT Assign to note: Assign to The loaded sound can be played by pressing PLAY [F3]. Set the Note Number to be assigned in the Assign to note: field. To save the sound, press KEEP [F5]. To delete the sound to free the memory, press DSCARD [F4].
-
Page 184: Chapter 11: Flash Rom (Optional)
Chapter 11 Flash ROM (optional) -
Page 185: Formatting The Flash Rom
Flash ROM By installing the optional flash ROM board FMX008M (which has 8MB of memory), you can save data to the flash ROM. Saving data to the flash ROM saves RAM space. When you are installing the flash ROM board, please refer to the manual supplied with it. Formatting the Flash ROM Before using the flash ROM, you must format it first. -
Page 186: Saving To Flash Rom
Chapter 11: Flash ROM Saving to Flash ROM You can save data into flash ROM in the same way you would a floppy disk or SCSI device. Hold down SHIFT and press LOAD (numeric key 3) and then press SAVE [F2]. Type:Save All Sequences Type:Save All Sequences File:08-Sequence08... -
Page 187: Deleting Data From Flash Rom
Deleting Data from Flash ROM You can delete a file from the flash ROM in the same way you would from an ordinary disk. Move the cursor to the Device: field and select F-ROM. Move the cursor to the top right folder field and press OPEN WINDOW to open the Directory window. -
Page 188: Editing A Sound Within Flash Rom
Chapter 11: Flash ROM Note: Do not turn the MPC2000XL off during de-fragmentation. The data in the flash ROM will be destroyed and cannot be recovered. The above window appears during de-fragmentation. Note: It will take several minutes to complete the operation. Editing a Sound within the Flash ROM When sound data stored in the flash ROM is loaded, only the location information of the data is loaded to the RAM, wave pattern data is not loaded. -
Page 189: Chapter 12: Midi/Sync Mode, Other Mode
Chapter 12 MIDI/SYNC Mode OTHER Mode... -
Page 190: Midi/Sync Mode
Chapter 12: MIDI/SYNC Mode, OTHER Mode MIDI/SYNC Mode The MPC2000XL complies to MIDI CLOCK, MIDI TIME CODE and MIDI MACHINE CONTROL messages. This enables you to synchronize with other sequencers and also by using a MIDI MACHINE CONTROL compliant MTR (Multi Track Recorder) control the MTR from the MPC2000XL. - Page 191 MIDI CLOCK MIDI CLOCK is a general synchronization signal which most sequencers are equipped with. When MIDI CLOCK is used, the tempo is determined by the settings of the master sequencer. Shift early(ms): When you are playing synchronously, set the offset which slides the timing against the master. Normally, leave this set to 0.
-
Page 192: Synchronizing Another Sequencer Or Mtr To The Mpc2000Xl
Chapter 12: MIDI/SYNC Mode, OTHER Mode Synchronizing Another Sequencer or MTR to the MPC2000XL To set the MPC2000XL as a master and synchronize another sequencer to it, connect the MIDI IN of the sequencer to the MIDI OUT of the MPC2000XL. Sequencer Slave MIDI IN... - Page 193 MIDI CLOCK MIDI CLOCK is a general synchronization signal which most sequencers are equipped with. When MIDI CLOCK is used, the tempo of the MPC2000XL will control another sequencer. MIDI TIME CODE (MTC) In contrast to MIDI CLOCK, MIDI TIME CODE is a snchronous signal with absolute time. The MTC does not have tempo data and therefore it is necessary to set the tempo change on the slave device and the MPC2000XL.
-
Page 194: Synchronizing With Smpte Time Code
Chapter 12: MIDI/SYNC Mode, OTHER Mode Synchronizing with the SMPTE Time Code By installing the optional SMPTE IC chip IC-M2TC, you can synchronize using SMPTE. SMPTE is a time code signal containing absolute time information. Connecting To receive time code from an external device, connect the SMPTE OUT jack of the other device to the SMPTE IN jack on the rear panel. -
Page 195: Midi Sample Dump
MIDI Sample Dump Sound data can be transmitted and received between the MPC2000XL and external devices via MIDI using the MIDI Sample Dump Standard Format. Sample Dump Setting Connect the MPC2000XL and external device with MIDI cables in the hand shake method (Con- nect MIDI OUT of MPC2000XL to MIDI IN of the external device, and MIDI IN of MPC2000XL to MIDI OUT of the external device). - Page 196 Chapter 12: MIDI/SYNC Mode, OTHER Mode If you want to abort Sample Dump receive, press CANCEL [F6]. When Sample Dump receive is completed, the following window will appear. Name for new sound:sound001 Name for new sound:sound001 (Press ENTER to commit.) (Press ENTER to commit.) Assign to note:--/OFF Assign to note:--/OFF...
-
Page 197: Midi Footswitch Assignement
MIDI Footswitch Assignment MIDI Control Change messages sent from the external MIDI devices to the MPC2000XL can control various functions of the MPC2000XL. Footswitch Setting MIDI Footswitch Assignment is set from the MIDI/SYNC mode. Hold down SHIFT and press MIDI/ SYNC (9 on the numeric pad) to display the MIDI/SYNC mode screen and then press MIDIsw [F3]. -
Page 198: Other Mode
Chapter 12: MIDI/SYNC Mode, OTHER Mode OTHER MODE Set the tempo with the TAP TEMPO key and initialize the data. It is also possible to check the version of the MPC2000XL operating system. OTHERS Screen Hold down SHIFT and press OTHER (8 on the numeric pad) to display the OTHER mode screen. averaging:3 Display contrast Display contrast... -
Page 199: Ver. Screen
VER. Screen Hold down SHIFT and press OTHER (8 on the numeric pad) to display the OTHER mode screen and press VER. [F3] to display the Version screen. The version of the operating system currently loaded on the MPC2000XL is displayed. OTHERS Chapter 12: MIDI/SYNC Mode, OTHER Mode Operating system:1.00... -
Page 200: Appendix
Appendix... -
Page 201: Notes On Using Scsi Drives
Notes on Using SCSI Drives Connecting an External SCSI Drive SCSI devices (hard disk, MO drives, etc.) are connected as follows: SCSI INTERFACE SCSI RIGHT LEFT RIGHT LEFT STEREO RECORD MIDI MIDI ASSIGNABLE MIX OUT DIGITAL SCSI CABLE The MPC2000XL uses a 50-pin high-pitch SCSI connector to load or save data to other devices such as hard disks connected by a SCSI cable. -
Page 202: Scsi Id
Chapter 13: Appendix SCSI ID Make sure the SCSI ID number of the device connected to a SCSI bus is unique. For example, the ID of the MPC2000XL is 6 and the ID of the other devices connected must be set to any number other than 6. -
Page 203: Installing The Options-To Service Technicians
Important Note: Consult your AKAI professional dealer on installation of any options (including memory) to the MPC2000XL. Self-servicing may cause malfunction of components or the instrument itself. AKAI professional does not guarantee against the unit's malfunction, damage or any loss caused by self-servicing or improper operation. -
Page 204: Installing Memory Expansion
Chapter 13: Appendix IC-M2TC You should take care that the IC is in the correct position when installing. Insert the IC according to the direction of the socket. EB16 Connect this to the J330 connector on the PC MAIN board and secure it with the provided screw. FMX008M Connect to the provided relay board and secure it with the provided screw. -
Page 205: Technical Specifications
Technical Specifications General • Display ... 248 x 60 dot graphic LCD • Disk drive ... 3.5 inch 2HD/2DD • Dimensions ... 405(W) x 106(H) x 331(D) mm • Weight ... 5.5 kg • Power requirements ... 100-240 VAC, 50/60Hz, 23W (13W without option) •... -
Page 206: Standard Accessory
Chapter 13: Appendix Options • EB16 ... Multi-effect processor board • FMX008M ... 8Mb Flash ROM board • IB-M208P ... 8 individual output and digital In/Out board • IC-M2TC ... SMPTE IC chip • S3SM16 ... 16 Mb SIMM board Standard accessory •... -
Page 207: The Midi Implementation Charts
The MIDI Implementation Charts Model: MPC2000XL (sound generator section) Function **** Basic Default Channel Changed Default Mode Messages Altered Note Number True Voice Velocity Note ON Note OFF After Key’s Touch Ch’s Pitch Bender Control Change Prog Change (True #) System Exclusive System : Song Position... -
Page 208: Midi Implementation Chart
Chapter 13: Appendix Model: MPC2000XL (sequencer section) Function **** Basic Default Channel Changed Default Mode Messages Altered Note Number True Voice Velocity Note ON Note OFF After Key’s Touch Ch’s Pitch Bender Control Change Prog Change True# System Exclusive System : Song Position : Song Select Common...
Need help?
Do you have a question about the MPC 2000XL and is the answer not in the manual?
Questions and answers