Wasp Delta 3MT INDUSTRIAL 4.0 LDM Original Instructions Manual
Hide thumbs
Also See for Delta WASP 3MT INDUSTRIAL 4.0 LDM:
- Manual of use and maintenance (85 pages)
Table of Contents
Advertisement
Quick Links
Advertisement
Table of Contents

Related Manuals for Wasp Delta WASP 3MT INDUSTRIAL 4.0 LDM


Summary of Contents for Wasp Delta WASP 3MT INDUSTRIAL 4.0 LDM
- Page 1 MANUAL OF USE AND MAINTENANCE INDUSTRIAL LINE 4.0 LDM ORIGINAL INSTRUCTIONS...
- Page 2 Maintanance. The missing acknowledgment of the manual can be cause of personal injury, worst quality results or damages to the printer Delta WASP INDUSTRIAL LINE 4.0 LDM. Always make sure that the personal using the 3D printer knows and understands the content of the manual in order to the best results from DELTA Delta WASP INDUSTRIAL LINE 4.0 LDM...
-
Page 3: Table Of Contents
8.5. Print removal ................51 2.1. Control panel ................14 8.6. Wifi and remote control ............. 51 2.2. Work area ................. 15 2.3. WASP Concrete extruder description ......16 9 ADDITIONAL INSTRUCTIONS ........51 2.3.1. Cleaning and maintenance..........17 9.1. General warnings ..............51 2.4. -
Page 5: Premises
PREMISES 0 PREMISES 0.1. Aim of the instruction manual IIMPORTANT: Before proceding with the installing and starting of the printer, the technician, the user, the maintainer and the safety responsible must read and understand the actual manual. The manual must be considered as a fundamental part of the printer. The correct use and maintanence of the machine depends on the informations contained here. -
Page 6: Storage Of The Manual Of Instructions
PREMISES PREMISES How the read the manual of instructions This manual is composed by: COVER WITH PRINTER IDENTIFICATION By consulting the cover you trace to the printer model covered in the manual and to the printer serial number in your possession. ANALYTICAL INDEX By consulting the index it is possible to indentify to the chapter and to the paragraph on which all the notes relating to a given topic are reported. -
Page 7: General Information
The marking can be identified by means of an identification plate of the Manufacturer as required by the Machinery Directive. In case of damage, the Recipient must commission a copy. Legend: Stampante 3D Modello: Delta WASP 3MT INDUSTRIAL 4.0 IT16060000009355 Volts: 230V 50/60Hz Advanced settings Potenza Max: 2400W... -
Page 8: Position Of The Label On The Printer
GENERAL INFORMATION 1.2.1. Position of the label on the printer 1.3. Testing The printer is tested directly by the Manufacturer during the phase of mounting and post mounting. 1.4. Warranty The printers built by CSP S.r.l. are covered by a warranty for a period of 12 months for companies or VAT and 24 months for individuals. -
Page 9: Personal Protective Equipment
GENERAL INFORMATION ATTENTION: The Manufacturer is not responsible in any way for improper use of the printer and the software contained in it by the customer. Any attempt to modify or tamper with the interface, the management software, not expressly authorized by the Manufacturer in writing, will immediately void the Warranty. -
Page 10: General Safety Warnings
GENERAL INFORMATION 1.5. General safety warnings READ CAREFULLY THE USER MANUAL BEFORE OPERATING ON THE MACHINE READ CAREFULLY Caution: warm, do not touch: risk of burns THE USER MANUAL BEFORE OPERATING ON THE MACHINE © CSP S.r.l. -
Page 11: Glossary And Pictograms
GENERAL INFORMATION ATTENTION: The user must not perform operations reserved for maintenance personnel or qualified technicians. The manufacturer is not liable for damages deriving from failure to observe this prohibition. Users or qualified technicians. 1.6. Glossary and pictograms 1.6.1. Identification of operating personnel The operator responsible for the operation or maintenance of the printer must possess the specific professional requirements for each intended operation. -
Page 12: Editorial Pictograms
GENERAL INFORMATION 1.6.2. Editorial pictograms To ensure a deeper knowledge of the printer, the text of this manual is accompanied by indications that complete it, providing additional information, indispensable attention or particularly significant hazards to consider; in this regard, the following notation is used: DANGER: Indica situazioni o operazioni che devono obbligatoriamente essere eseguite o le informazioni alle quali occorre prestare particolare attenzione per evitare danni alle persone. -
Page 13: Description Of The Printer
DESCRIPTION OF THE PRINTER 2 DESCRIPTION OF THE PRINTER The device described in this manual is a 3d printed intended for fluid-dense materials. The printer consists of an extruder with a screw mounted on a delta robot type structure. The material is put under pressure through a continuous feeding system and pushed towards the extruder where it is dosed in a controlled way by a screw and poured through a nozzle that deposits the material on the work surface. -
Page 14: Control Panel
DESCRIPTION OF THE PRINTER 2.1. Control panel Fig. 2.1 - Control panel Legend: 1.ETHERNET CABLE 2. USB door 3. ON/OFF 4. Operator display 5. Display control handle (Rotates left and right and is clickable) © CSP S.r.l. -
Page 15: Work Area
DESCRIPTION OF THE PRINTER 2.2. Work area Fig. 2.3 - Work area Legenda: 1. Feeding tube 2. Handling arms 3. Motor brushless extruder 4. Extruder 5. printing plan © CSP S.r.l. -
Page 16: Wasp Concrete Extruder Description
DESCRIPTION OF THE PRINTER 2.3. WASP Concrete extruder description The WASP Concrete Extruder is an extruder developed specifically for the Delta WASP 3MT 4.0 3D printer. It is capable to extrude fluid-dense materials such as concrete mortars, clay and other raw earth-based mixtures. -
Page 17: Cleaning And Maintenance
DESCRIPTION OF THE PRINTER 2.3.1. Cleaning and maintenance The entire extrusion system has been designed for fast disassembly to promote great speed during the cleaning phase. In fact, a thorough cleaning of all parts is required every time a print is finished or the extrusion is interrupted for a period longer than the setting time of the material. - Page 18 DESCRIPTION OF THE PRINTER Fig. 2.6 - Extruder Fig. 2.7 - Nozzle © CSP S.r.l.
-
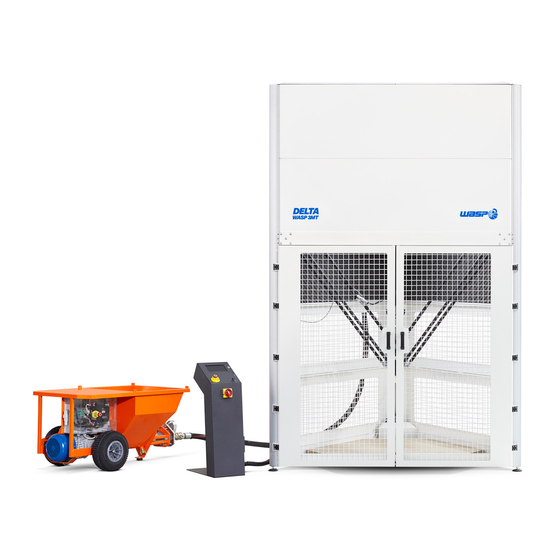
Page 19: External Printer Area
DESCRIPTION OF THE PRINTER 2.4. External printer area Fig. 2.8 - External printer area Legend: 1. Feeding tube 2. Mixer pump 3. Label CE © CSP S.r.l. -
Page 20: Feeding System Description
The continuous loading system is connected to the WASP Concrete Extruder through a camlock coupling located at the end of the feeding hose. The material supply to the extruder is controlled by an adjustable pressure sensor positioned near the material inlet. -
Page 21: Noisiness
DESCRIPTION OF THE PRINTER Technical data All WASP 3D printers are characterized by considerable strength and working precision. Their mechanics allows for greater precision and stability, guaranteeing greater production speeds. A further advantage is the possibility of restarting the production of the piece from the point where it should be interrupted for any reason. -
Page 22: Intended Use Of The Printer
DESCRIPTION OF THE PRINTER The presence of more machines in the same area increases ATTENTION: It is the responsibility of the customer to carry out an assessment of the noise risk of his activity as prescribed by the legislation in force in the place where the printer is installed, and to equip the operators with adequate Personal Protective Equipment (such as headphones for hearing protection). -
Page 23: Transport And Handling
TRANSPORT AND HANDLING 3 TRANSPORT AND HANDLING 3.1. General warnings The reading of this chapter assumes, in order to use the printer safely, the knowledge of the contents of paragraph 1.6 “General safety warnings”. Furthermore, the specific requirements for safe interaction with the printer, related to this chapter, are detailed in the following paragraphs. -
Page 24: Unpackaging
TRANSPORT AND HANDLING 3.2. Unpackaging ENVIRONMENTAL NOTE: Once the packaging has been removed from the printer it is recommended to keep it for any requests for assistance from the Manufacturer. The printer will be delivered in a horizontally oriented wooden box. After removing the printer from the case, you must place the printer upright. -
Page 25: Installation
INSTALLATION 4 INSTALLATION 4.1. General warnings The reading of this chapter assumes, in order to use the printer safely, the knowledge of the contents of paragraph 1.6 “General safety warnings”. Furthermore, the specific requirements for safe interaction with the printer, related to this chapter, are detailed in the following paragraphs. -
Page 26: Electrical Connection
4.3. WASP Concrete Extruder • Remove any other extruders from the Delta WASP 3MT 4.0 3D printer. • Position the extruder vertically on the printing surface and screw the plates positioned on the three arms of the printer to the appropriate threaded inserts on the extruder using a number 6 hex wrench. It is necessary to orient the extruder maintaining the entrance of the material and the pressure sensor towards the front of the printer. -
Page 27: Preparing To Use The Printer
PREPARING TO USE THE PRINTER 5 PREPARING TO USE THE PRINTER 5.1. General warnings The reading of this chapter assumes, in order to use the printer safely, the knowledge of the contents of paragraph 1.6 “General safety warnings”. Furthermore, the specific requirements for safe interaction with the printer, related to this chapter, are detailed in the following paragraphs. -
Page 28: User Interface
PREPARING TO USE THE PRINTER 5.2. User interface 5.2.1. Main board Fig. 5.2.1 - Main board The main board appears when turning on the printer and when launching the print. It is intended to be the principal tool for the monitoring and control of the printer Legenda: 1. -
Page 29: Menù Print
PREPARING TO USE THE PRINTER 5.2.2. Menù print Fig. 5.2.2 - Menu print The PRINT menu contains the commands useful in order to prepare and launch the print, proceeding in reading order Legenda: 1. Auto home: resets the printer to the axis reset position 6. -
Page 30: Menu Prepara
PREPARING TO USE THE PRINTER 5.2.3. Menu PREPARA Fig. 5.2.3 - Menu PREPARE It is accessed from the respective button on the toolbar and contains several useful commands that are not frequently used. Legend: • Free Zeta system: as in Free Zeta System •... -
Page 31: Menù Advanced
PREPARING TO USE THE PRINTER 5.2.4. Menù ADVANCED Fig. 5.2.4 - Menu ADVANCED It has several useful commands for extraordinary use. Legend: • Send arbitrary command: contains a keyboard that allows you to directly launch commands to the card • Wifi settings: is used to connect the machine to a WiFi network(par 8.14) •... -
Page 32: Wifi Settings
PREPARING TO USE THE PRINTER 5.2.5. WIFI settings Fig. 5.2.5 - WIFI settings Through WIFI settings, present in the ADVANCED menu it is possible to connect the printer on the network (par 8.14) Legend: 1. SSID: It is used to select the desired network to connect 2. -
Page 33: Gcode
PREPARING TO USE THE PRINTER 5.2.6. GCODE Fig. 5.2.6 - GCODE From the “PRINT> GCODE” menu it is possible to choose the code to be launched and save it from the USB flash drive to the internal memory (par 8.5) Legend: 1. -
Page 34: Menù Info
PREPARING TO USE THE PRINTER 5.2.7. Menù INFO Fig. 5.2.7 - menu INFO In the INFO menu there is a series of explanatory videos collected with a didactic title. It is possible to view them directly on the machine display. Exiting the menu the video will pause. Clicking the INFO button inside a specific page dedicated to that area (when present) ©... -
Page 35: First Use Of The Printer
FIRST USE OF THE PRINTER 6 FIRST USE OF THE PRINTER 6.1. General warnings The reading of this chapter assumes, in order to use the printer safely, the knowledge of the contents of paragraph 1.6 “General safety warnings”. Furthermore, the specific requirements for safe interaction with the printer, related to this chapter, are detailed in the following paragraphs. -
Page 36: Gcode Creation
6.4. Printing bed The Delta WASP Industrial 4.0 3D printer is designed to print on the ground or on a mobile support, the printed part is easily removable by frontal translation through a passage positioned at ground level (to open the passage: lift and remove the bottom front beam positioned under the doors). -
Page 37: First Print Layer
6. insert the screw, checking that the seal on the coupling is present, (fig 6.7.g) 7. fit the motor to the WASP Concrete Extruder, checking that the cables are connected (fig 6.7.h) and (fig 6.7.i) 8. Grease all the camlock couplings on the extruder and on the mortar pump 9. - Page 38 FIRST USE OF THE PRINTER Fig. 6.7.a Fig. 6.7.b Fig. 6.7.c Fig. 6.7.d Fig. 6.7 - First use © CSP S.r.l.
- Page 39 FIRST USE OF THE PRINTER Fig. 6.7.e Fig. 6.7.f Fig. 6.7.g Fig. 6.7.h Fig. 6.7 - First use © CSP S.r.l.
- Page 40 FIRST USE OF THE PRINTER Fig. 6.7.i Fig. 6.7.j Fig. 6.7.k Fig. 6.7.l Fig. 6.7 - First use © CSP S.r.l.
- Page 41 FIRST USE OF THE PRINTER Fig. 6.7.m Fig. 6.7.n Fig. 6.7.o Fig. 6.7.p Fig. 6.7 - First use © CSP S.r.l.
- Page 42 FIRST USE OF THE PRINTER Fig. 6.7.q Fig. 6.7.r Fig. 6.7.s Fig. 6.7.t Fig. 6.7 - First use © CSP S.r.l.
-
Page 43: End Of The Print
FIRST USE OF THE PRINTER 6.8. End of the print 1. Remove the printed part from the 3d printer 2. insert water in the mortar pump and extrude until the material exiting the extruder is clear 3. unplug the feeding hose from the extruder (fig 6.8.a) 4. - Page 44 FIRST USE OF THE PRINTER Fig. 6.8.a Fig. 6.8.b Fig. 6.8.c Fig. 6.8.d Fig. 6.8 - End of the print © CSP S.r.l.
- Page 45 FIRST USE OF THE PRINTER Fig. 6.8.e Fig. 6.8.f Fig. 6.8.g Fig. 6.8.h Fig. 6.8 - End of the print © CSP S.r.l.
- Page 46 FIRST USE OF THE PRINTER For info and assistance visit the section F.A.Q. on our website: www.3dwasp.com © CSP S.r.l.
-
Page 47: Maintenance
MAINTENANCE 7 MAINTENANCE 7.1. General warnings The reading of this chapter assumes, for a safe use of the printer, the knowledge of what contained in chapter1.6 “General safety warnings”. Moreover, the specific prescriptions for interacting in a safe way with the printer, relative to this chapter, are detailed in the next paragraphs. -
Page 48: Ordinary Maintenance
MAINTENANCE 7.2. Ordinary maintenance Periodic maintenance and correct use are essential factors to ensure the functionality, safe operation and life of the printer. The maintenance operations and the interventions prescribed are the responsibility of the mechanical maintenance technician who must operate in compliance with the safety prescriptions contained in this manual. ATTENTION: Maintenance operations must be performed by disconnecting the printer from the power supply by disconnecting the power plug. -
Page 49: Feeding System
MAINTENANCE 7.2.5. Feeding system Instructions are given in the mortar pump manual. 7.3. Extraordinary maintenance ATTENTION Extraordinary maintenance operations must be carried out by Technicians of the Manufacturer or by maintenance staff instructed and authorized by the Manufacturer. Any of these operations not carried out by a technician of the Manufacturer may cause irreversible damage to the machine or its parts and therefore void the Warranty. -
Page 50: Use Of The Printer
ATTENTION: The operations concerning these activities must be carried out by authorized and professionally qualified personnel. 8.2. Load the gcode In the WASP 4.0 line the gcode can be loaded in two ways: • Using a USB flash drive •... -
Page 51: Change Height
USE OF THE PRINTER 8.4. Change height The height of the printer is the distance (in mm) set between the tip of the nozzle and the printing surface. It is a fundamental requirement for calibration. It is necessary in the case of: •... - Page 52 To enter the machine control interface: 1. Make sure both the computer and the printer are connected to the same wifi network 2. Enter in the browser URL * the IP address that appears on the machine by adding “/ wasp” (eg http://192.168.12.177/wasp) 3.
-
Page 53: Instructions For Emergency Situations
USE OF THE PRINTER NOTE: It is absolutely necessary to apply the regulations in force in the country of destination, regarding waste disposal, therefore it is forbidden to disperse any type of processing residue, oils, etc. in the environment. Divide the dismantled parts by type for a correct differentiated collection of materials. NOTE: Within the European Community, electrical equipment must be disposed of in accordance with the provisions of the European Community Directive 2012/19 / EU on waste electrical and electronic... - Page 54 USE OF THE PRINTER NOTE __________________________________________________________________________________ __________________________________________________________________________________ __________________________________________________________________________________ __________________________________________________________________________________ __________________________________________________________________________________ __________________________________________________________________________________ __________________________________________________________________________________ __________________________________________________________________________________ __________________________________________________________________________________ __________________________________________________________________________________ __________________________________________________________________________________ __________________________________________________________________________________ __________________________________________________________________________________ __________________________________________________________________________________ __________________________________________________________________________________ __________________________________________________________________________________ __________________________________________________________________________________ __________________________________________________________________________________ __________________________________________________________________________________ __________________________________________________________________________________ __________________________________________________________________________________ __________________________________________________________________________________ __________________________________________________________________________________ __________________________________________________________________________________ © CSP S.r.l.
- Page 55 CSP S.R.L. Viale Zaganelli, 26 - 48024 Massa Lombarda (RA) Italia Tel. +39 0545 87858 www.3dwasp.com - info@3dwasp.com...
Need help?
Do you have a question about the Delta WASP 3MT INDUSTRIAL 4.0 LDM and is the answer not in the manual?
Questions and answers