Table of Contents
Advertisement
Quick Links
ADM & Sub Aspida
User Manual
Commercial in Confidence
Analox Limited
15 Ellerbeck Court, Stokesley Business Park,
North Yorkshire, TS9 5PT, UK
UK/RoW T: +44 (0)1642 711400 F: +44 (0)1642 713900
US T: (714) 891-4478
W: www.analox.net E:
info@analox.net
Copyright © 2017 Analox Ltd. All Rights Reserved.
Advertisement
Table of Contents

Related Manuals for ANALOX ADM Aspida


Summary of Contents for ANALOX ADM Aspida
- Page 1 Commercial in Confidence Analox Limited 15 Ellerbeck Court, Stokesley Business Park, North Yorkshire, TS9 5PT, UK UK/RoW T: +44 (0)1642 711400 F: +44 (0)1642 713900 US T: (714) 891-4478 W: www.analox.net E: info@analox.net Copyright © 2017 Analox Ltd. All Rights Reserved.
-
Page 3: Table Of Contents
Installation ....................10 Installation of the Sub Aspida ................. 10 Installation of the ADM Aspida (Using faceplate kit) ..........10 Gaining access to the ADM Aspida (When faceplate is fitted) ........12 Battery installation....................13 Charging the Analox Aspida ................ 14 Operation .................... - Page 4 ADM & Sub Aspida User Manual Int. Approved Document ref: PSA-811-22 March 2020 Page 4 of 45 Copyright © 2017 Analox Ltd. All Rights Reserved. Commercial in Confidence...
-
Page 5: Safety Information
The unit must not be stored in areas containing organic solvents or in flammable liquid stores. Document ref: PSA-811-22 March 2020 Page 5 of 45 Copyright © 2017 Analox Ltd. All Rights Reserved. Commercial in Confidence... -
Page 6: Package Contents Checklist
Wall mounting plate (Including fixing kit) or belt-clip attachment (only one supplied) Charger power supply to suit USB communication cable Software disc Quick start guide Calibration adaptor Document ref: PSA-811-22 March 2020 Page 6 of 45 Copyright © 2017 Analox Ltd. All Rights Reserved. Commercial in Confidence... - Page 7 Calibration adaptor (Including 300mm of tubing, single or dual) USB communication cable (Not shown) Test Certificate Quick Start Guide Single variant Dual variant Document ref: PSA-811-22 March 2020 Page 7 of 45 Copyright © 2017 Analox Ltd. All Rights Reserved. Commercial in Confidence...
-
Page 8: Aspida Devices Overview
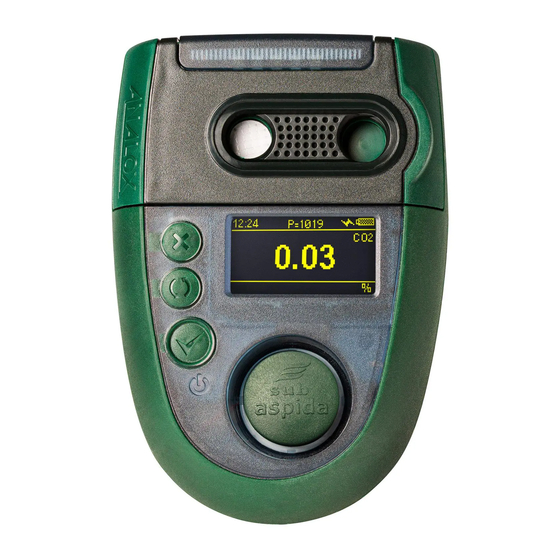
A high-resolution Organic Light-Emitting Diode (OLED) display shows clear, live gas levels in all light conditions. The Analox Aspida is housed in a robust, IP65 splash proof enclosure. The instrument operates using rechargeable battery technology, allowing it to run for more than 12 hours continuously between charges. -
Page 9: Aspida Main Features
10) Charger socket 11) USB communication socket 12) Battery compartments 13) Lanyard pin 14) Breather (pressure equalisation) hole – do not cover Document ref: PSA-811-22 March 2020 Page 9 of 45 Copyright © 2017 Analox Ltd. All Rights Reserved. Commercial in Confidence... -
Page 10: Installation
Optional fixing kits are available from Analox, see spares and accessories list at section 7.1 To install the ADM Aspida into your panel, place the captive nuts from the fixing kit through each of the 10mm diameter holes in the panel, then while securing the captive nuts screw in the M5 x 25mm Pozi Pan screws from the fixing kit until the captive nut comes back on itself. - Page 11 Ensure the supplied 9V PSU’s DC jack is connected to the rear of the unit. Remove the screws and align the ADM Aspida front panel mounting holes up with the captive nuts, then re-insert the M5 x 25mm Pozi Pan screws through and tighten.
-
Page 12: Gaining Access To The Adm Aspida (When Faceplate Is Fitted)
Int. Approved Gaining access to the ADM Aspida (When faceplate is fitted) To gain access to the ADM Aspida for either USB connection or sensor change the following steps should be followed. Firstly, remove the ADM Aspida from the instrument panel by removing the four M5 x 25mm Pozi Pan screws. -
Page 13: Battery Installation
Int. Approved Battery installation The Analox Sub Aspida is powered by a pair of standard AA batteries. The device can be powered using the NiMH re-chargeable batteries included in the product package or using a pair of standard AA type non-rechargeable batteries. -
Page 14: Charging The Analox Aspida
WARNING: THE FOLLOWING SAFETY WARNINGS SHOULD BE OBSERVED BEFORE ATTEMPTING TO CHARGE THE ANALOX ASPIDA: THE ANALOX ASPIDA SHOULD ONLY BE CHARGED WHEN THE NIMH BATTERIES SUPPLIED WITH THE PRODUCT ARE FITTED. ATTEMPTING TO RECHARGE NON-RECHARGEABLE ALKALINE BATTERIES WILL IN MOST CASES RESULT IN AN... - Page 15 EFFECT IS NORMAL. IT IS HOWEVER SUGGESTED THAT THE DEVICE IS CHARGED INDOORS AT ROOM TEMPERATURE TO ENSURE A FULL CHARGE CYCLE COMPLETES. Document ref: PSA-811-22 March 2020 Page 15 of 45 Copyright © 2017 Analox Ltd. All Rights Reserved. Commercial in Confidence...
-
Page 16: Operation
ADM & Sub Aspida User Manual Int. Approved Operation Button functions The Analox Aspida has three buttons that are used as follows: Button Function • Power on/off • Confirm • Select button • Show device menu • Cycle through options •... -
Page 17: User Registration
Int. Approved User registration The Analox Aspida allows for registration of up to two usernames. This allows users to share use of the device. On start-up, a username is selected, and all subsequent gas information is logged internally against the selected user ID. Users can be registered to a device using the Aspida configuration software. -
Page 18: Screen Saver
DEVICES WHICH HAVE BEEN SWITCHED OFF FOR AN EXTENDED PERIOD OF TIME. THE TRUE BATTERY STATUS WILL BE INDICATED WITHIN A FEW MINUTES OF POWER-UP. Document ref: PSA-811-22 March 2020 Page 18 of 45 Copyright © 2017 Analox Ltd. All Rights Reserved. Commercial in Confidence... -
Page 19: Menus
Document ref: PSA-811-22 March 2020 Page 19 of 45 Copyright © 2017 Analox Ltd. All Rights Reserved. Commercial in Confidence... -
Page 20: Gas Alarms
Int. Approved Gas alarms The Analox Aspida has a range of configurable alarms to warn the user of potentially dangerous atmospheres. For each gas sensor fitted to the device, up to 3 configurable alarms are available. In the case of carbon dioxide, an extra time weighted average (TWA) alarm is provided. See section 6.18 for more details. -
Page 21: Global Alarm Options
The alarm set-points and direction can be changed using the Aspida configuration software. See the Aspida configuration software manual for instructions. An ADM Aspida also has the facility to change the alarm set-points on the device as per section 6.11.1 6.11.1... -
Page 22: Alarm Latching
Sometimes it is useful for a user to be alerted to a harmful gas level, even after the level of gas has dropped to a safe level. The Analox Aspida can be configured to use latching alarms so that alarms triggered by harmful gas levels will not be missed. The latching alarms option can be enabled using the Aspida configuration software. -
Page 23: Data Logging
6.16 Man-down alarm The Analox Aspida is equipped with a man-down alarm which is disabled by default. If the man- down alarm feature is enabled the Aspida device will monitor any movement the device is subject to. If the user who is wearing the alarm is somehow incapacitated, an alarm will be sounded to alert others in the nearby area of the accident. -
Page 24: Panic Alarm
The Analox Aspida has a facility which automatically calculates a TWA value on a per-user basis. When a user powers on the device and selects a user ID, the Analox Aspida begins calculating and continuously updating that user’s own TWA. The device also considers any historic data from the last 24 hours which is relevant to the selected user. -
Page 25: Maintenance Reminders
See the ‘Calibration’ section of this manual for details of how to calibrate the sensors. Document ref: PSA-811-22 March 2020 Page 25 of 45 Copyright © 2017 Analox Ltd. All Rights Reserved. Commercial in Confidence... -
Page 26: Sensor Replacement Reminders
FLASHING AND THE AMBER ‘FAULT’ INDICATOR IS FLASHING THE ASPIDA MUST NOT BE USED AND THE SUPPLIER SHOULD BE CONTACTED. Document ref: PSA-811-22 March 2020 Page 26 of 45 Copyright © 2017 Analox Ltd. All Rights Reserved. Commercial in Confidence... -
Page 27: Troubleshooting
The oxygen sensor is due to be Refer to section 7.5 oxygen gas reading replaced of this manual for instructions Document ref: PSA-811-22 March 2020 Page 27 of 45 Copyright © 2017 Analox Ltd. All Rights Reserved. Commercial in Confidence... -
Page 28: Maintenance
T3672EG Australian Plug Head for Universal PSU PGA-607 9V DC Car Charger P0132-401 ADM Aspida mounting brackets (Optional – to replace ties and bases) 4000-0132-0001 ADM Aspida Faceplate Kit P0132-602 ADM Aspida fixing kit comprising: 4 x M5 cage nuts... -
Page 29: Sensor Calibration
6] When the sampling process has complete, an audible alert will be given, and a calibration confirmation screen will be shown as below. Document ref: PSA-811-22 March 2020 Page 29 of 45 Copyright © 2017 Analox Ltd. All Rights Reserved. Commercial in Confidence... - Page 30 14] The unit will now sample the ambient air for 30 seconds to detect a stable gas reading. The progress of the sampling will be displayed on screen as shown below. Document ref: PSA-811-22 March 2020 Page 30 of 45 Copyright © 2017 Analox Ltd. All Rights Reserved. Commercial in Confidence...
- Page 31 To attempt the calibration again repeat steps 3 – 8. Once calibrated successfully, the calibration due date for the sensor will be reset. Document ref: PSA-811-22 March 2020 Page 31 of 45 Copyright © 2017 Analox Ltd. All Rights Reserved. Commercial in Confidence...
-
Page 32: Co 2 Sensor Replacement
SURFACES WITH WATER. IN THE EVENT THAT YOU DO COME INTO CONTACT WITH THE ELECTROLYTE WASH THE CONTAMINATED PART WITH COPIOUS AMOUNTS OF WATER. For ADM Aspida’s section 4.3 should be followed to gain access to the instrument. To replace the oxygen sensor: Document ref: PSA-811-22... - Page 33 WARNING: DO NOT TOUCH THE INSIDE OF THE (INSTRUMENT OTHER THAN AS NOTED IN THESE INSTRUCTIONS) WITHOUT APPROPRIATE ANTI-STATIC PRECAUTIONS. Document ref: PSA-811-22 March 2020 Page 33 of 45 Copyright © 2017 Analox Ltd. All Rights Reserved. Commercial in Confidence...
- Page 34 Aspida case as shown in Figure 28. Figure 28 Align the extraction tool Document ref: PSA-811-22 March 2020 Page 34 of 45 Copyright © 2017 Analox Ltd. All Rights Reserved. Commercial in Confidence...
- Page 35 6] Squeeze the grip on the extraction tool to achieve a firm hold on the oxygen sensor as shown in Figure 30. Figure 30 Squeeze the extraction tool Document ref: PSA-811-22 March 2020 Page 35 of 45 Copyright © 2017 Analox Ltd. All Rights Reserved. Commercial in Confidence...
- Page 36 Figure 32 Insert the new sensor into the extraction tool Document ref: PSA-811-22 March 2020 Page 36 of 45 Copyright © 2017 Analox Ltd. All Rights Reserved. Commercial in Confidence...
- Page 37 11] Align the extraction tool rib with the Aspida case alignment mark as in step 4 as shown in Figure 34. Figure 34 Align the new sensor with the Aspida device Document ref: PSA-811-22 March 2020 Page 37 of 45 Copyright © 2017 Analox Ltd. All Rights Reserved. Commercial in Confidence...
- Page 38 Then refit the cap and recheck the alignment. Figure 36 Centralised and misaligned sensors Document ref: PSA-811-22 March 2020 Page 38 of 45 Copyright © 2017 Analox Ltd. All Rights Reserved. Commercial in Confidence...
- Page 39 Aspida configuration software. See the Aspida software configuration manual for instructions. Document ref: PSA-811-22 March 2020 Page 39 of 45 Copyright © 2017 Analox Ltd. All Rights Reserved. Commercial in Confidence...
-
Page 40: Cleaning
For this reason, after accidental immersion the unit should be left in a dry environment to completely dry before subsequent use. Document ref: PSA-811-22 March 2020 Page 40 of 45 Copyright © 2017 Analox Ltd. All Rights Reserved. Commercial in Confidence... -
Page 41: Specifications
±(1% of full scale+ 2% of reading) temperature and pressure): For ADM Aspida Accuracy (at standard ±(1% of full scale+ 2% of reading) temperature and pressure): Document ref: PSA-811-22 March 2020 Page 41 of 45 Copyright © 2017 Analox Ltd. All Rights Reserved. Commercial in Confidence... - Page 42 For Sub Aspida Accuracy ±1% of full scale For ADM Aspida Accuracy (at standard ±1% of full scale temperature and pressure): Document ref: PSA-811-22 March 2020 Page 42 of 45 Copyright © 2017 Analox Ltd. All Rights Reserved. Commercial in Confidence...
-
Page 43: Warranty Information
ADM & Sub Aspida User Manual Int. Approved Warranty information We provide the following Warranties for the ADM Aspida and the Sub Aspida and associated accessories A 2-year electronics warranty. A 6-month oxygen sensor warranty. A 5-year carbon dioxide sensor warranty In all cases the warranty period runs from the date of our invoice. -
Page 44: Disposal
It should not be burnt since it may evolve toxic fumes. Document ref: PSA-811-22 March 2020 Page 44 of 45 Copyright © 2017 Analox Ltd. All Rights Reserved. Commercial in Confidence... -
Page 45: Declaration Of Conformity
ADM & Sub Aspida User Manual Int. Approved Declaration of conformity Document ref: PSA-811-22 March 2020 Page 45 of 45 Copyright © 2017 Analox Ltd. All Rights Reserved. Commercial in Confidence...
Need help?
Do you have a question about the ADM Aspida and is the answer not in the manual?
Questions and answers