Siemens SIPLUS HCS Operating Instructions Manual
Heating control systems
Hide thumbs
Also See for SIPLUS HCS:
- Operating instructions manual (150 pages) ,
- Compact operating instructions (20 pages)
Table of Contents
Advertisement
Quick Links
Advertisement
Table of Contents

Related Manuals for Siemens SIPLUS HCS


Summary of Contents for Siemens SIPLUS HCS
- Page 3 ___________________ SIPLUS HCS4200 Introduction ___________________ Security information ___________________ Heating control systems System overview ___________________ Application planning Heating control system SIPLUS HCS4200 ___________________ Installation/mounting ___________________ Connecting Operating Instructions ___________________ Commissioning ___________________ Configuration ___________________ Functions ___________________ Communications ___________________ Process and system messages, error handling ___________________ Service and maintenance ___________________...
- Page 4 Note the following: WARNING Siemens products may only be used for the applications described in the catalog and in the relevant technical documentation. If products and components from other manufacturers are used, these must be recommended or approved by Siemens. Proper transport, storage, installation, assembly, commissioning, operation and maintenance are required to ensure that the products operate safely and without any problems.
-
Page 5: Table Of Contents
Table of contents Introduction ............................. 9 Introduction ..........................9 Security information ..........................11 IT security ..........................11 Safety information ........................12 System overview ........................... 15 Area of application ........................15 Features ..........................16 System configuration ......................18 Central Interface Module (CIM) ....................20 3.4.1 Function and design........................ - Page 6 Table of contents Connecting ............................45 Safety information and guidelines ..................45 Connecting the protective conductor ..................46 Connecting PROFINET / PROFIBUS fieldbus ............... 47 Connecting the 24 V DC power supply .................. 48 Connecting the heating elements and three-phase line supply ..........50 6.5.1 Block diagram ........................
- Page 7 Table of contents 9.6.2 Line supply voltage monitoring ....................84 9.6.3 Monitoring of the 24 V DC supply voltage ................85 9.6.4 Frequency monitoring ......................85 9.6.5 Temperature monitoring......................86 9.6.6 Monitoring power channels ..................... 87 9.6.7 Further diagnostics ......................... 88 Communications ...........................
- Page 8 Table of contents 13.6 Dimension drawings ......................144 Appendix ............................. 147 Certificates and approvals ....................147 A.1.1 Certificates and approvals ....................147 Ordering data ........................148 ESD guidelines........................149 Service & Support ........................ 151 Index ..............................153 SIPLUS HCS4200 Operating Instructions, 11/2015, A5E35066204A/RS-AA/002...
-
Page 9: Introduction
Introduction Introduction Purpose of this documentation These operating instructions contain the information you require to commission, operate and service the HCS4200 heating control system. Target group The documentation is intended for qualified personnel in the following specialist fields: ● Operators, project engineers, programmers ●... - Page 10 (Page 99)): The information that is read is always for the full configuration, i.e. for 192 channels or 12 POMs. • The data sets 160, 190 and 202 are not available. Registered trademarks SIPLUS ® is a registered trademark of Siemens AG. SIPLUS HCS4200 Operating Instructions, 11/2015, A5E35066204A/RS-AA/002...
-
Page 11: Security Information
Siemens recommends strongly that you regularly check for product updates. To ensure the secure operation of products and solutions from Siemens, it is necessary to take suitable preventive action (e.g. cell protection concept) and integrate each component into a holistic, state-of-the-art industrial security concept. -
Page 12: Safety Information
Security information 2.2 Safety information Safety information This device corresponds to the approvals printed on the type plate. If you have questions about whether it is permissible to install the device in the planned environment, please contact your service representative. NOTICE Alterations to the devices are not permitted. - Page 13 Repairs WARNING No user-serviceable parts May cause death or serious injury Incorrectly performed repairs may result in substantial damage to equipment or endanger the user. Return the device to Siemens for repair. SIPLUS HCS4200 Operating Instructions, 11/2015, A5E35066204A/RS-AA/002...
- Page 14 Security information 2.2 Safety information SIPLUS HCS4200 Operating Instructions, 11/2015, A5E35066204A/RS-AA/002...
-
Page 15: System Overview
System overview Area of application The SIPLUS HCS 4200 heating control system is used to activate and switch heating elements in industry, such as quartz, ceramic, flash, halogen or infrared emitters. It is of modular design and can be flexibly adapted to suit the specific requirements of the respective application. -
Page 16: Features
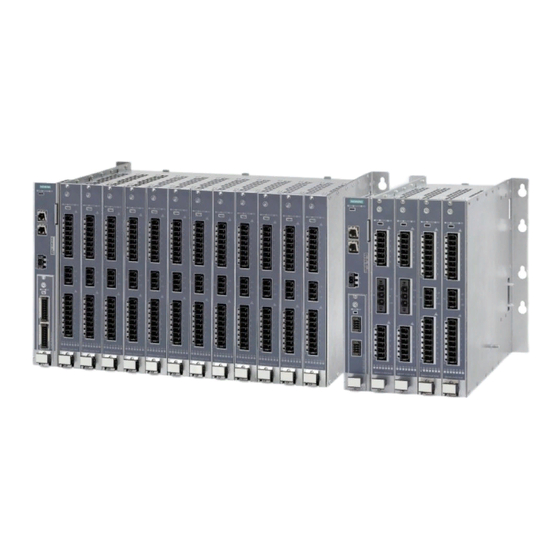
System overview 3.2 Features Features An HCS4200 system comprises one rack with 4 or 12 slots, one Central Interface Module (CIM) and up to 24 Power Output Modules (POM). As an option, one I/O module can be operated on the CIM. Fan modules can be mounted on the rack. Each fan module serves 4 slots or POMs. - Page 17 3.2 Features Features ● Modular (central) design ● Communication over PROFINET or PROFIBUS ● Parameterization, commissioning, visualization and diagnostics via the Siemens TIA Portal ● Integrated diagnostic and monitoring functions ● Control modes: Half-wave control and soft start ● Connection of incoming supply through 3-pole connector on the front of the POM ●...
-
Page 18: System Configuration
System overview 3.3 System configuration System configuration System components A complete HCS4200 heating control system includes the following components: ● Central Interface Module (CIM) 4210 with PROFINET / PROFIBUS ● Power Output Module (POM) 4220 ● Rack ● Fan module (optional) ●... - Page 19 System overview 3.3 System configuration Communication over PROFINET or PROFIBUS PROFIBUS has been established for years as the fieldbus for machines and plants. Based on serial bus technology, it is the foundation for the distributed concepts that are common today. PROFINET unites the industrial experience of PROFIBUS with the openness and flexible options of Ethernet.
-
Page 20: Central Interface Module (Cim)
System overview 3.4 Central Interface Module (CIM) Central Interface Module (CIM) 3.4.1 Function and design Function The Central Interface Module (CIM) handles the communication with the higher-level controller and with the connected Power Output Modules (POM). The CIM also provides the 24 V DC power supply for the connected POMs and fan modules. -
Page 21: Power Output Module (Pom)
System overview 3.5 Power Output Module (POM) Power Output Module (POM) 3.5.1 Function and design Function The power output module (POM) offers power outputs for resistive loads and can be operated in TN and TT networks. ● POM 4220 low-end: 16 output channels, 230 V AC, total switching power 16.1 kW ●... -
Page 22: I/O Modules
System overview 3.6 I/O modules I/O modules 3.6.1 PM4000 DI/DO Function The I/O module PM4000 DI/DO provides 8 digital outputs and 8 configurable inputs/outputs. The digital I/O modules are controlled by the S7-CPU using the process image. NOTICE The PM4000 DI/DO may not be used for safety-related functions. Design PM4000 DI/DO Item... -
Page 23: Pm4000 U/I
System overview 3.6 I/O modules 3.6.2 PM4000 U/I Function The I/O module PM4000 U/I provides inputs for measuring line voltage and line current. ● Voltage measurement: Either the supplied line-to-line voltage or the star voltage is measured (parameterizable) The rms effective value is calculated from the measured values. -
Page 24: Pm4000 Temperature
System overview 3.6 I/O modules 3.6.3 PM4000 Temperature Function Temperature I/O module for HCS Central Interface Module (CIM). ● Four measuring inputs for temperature in two-wire technology or two measuring inputs for temperature in four-wire technology. ● Four analog inputs for 0...20 mA The measured values are transferred via the fieldbus and can be evaluated and further processed by the user. -
Page 25: Application Planning
Siemens AG. SIPLUS HCS4200 Operating Instructions, 11/2015, A5E35066204A/RS-AA/002... -
Page 26: Scope Of Delivery
Application planning 4.3 Scope of delivery Scope of delivery Depending on the components ordered, the scope of delivery includes: Component Included in the scope of supply HCS Rack4200 Compact Operating Instructions • HCS POM4220 Compact Operating Instructions • For POM4220 low-end: 2 plug connectors, 8-pin •... -
Page 27: Installation Location
Application planning 4.4 Installation location Installation location The SIPLUS HCS4200 heating controller is designed for stationary installation in a control cabinet. The rack forms the "outer frame" of the heating controller that you install in the control cabinet. Installation location requirements WARNING Electric shock hazard May cause death or serious injury... - Page 28 Application planning 4.4 Installation location Mounting position and clearance dimensions ● The rack is mounted in the horizontal position. The Power Output Modules (POM) are inserted vertically in the rack. ● Maintain the minimum clearances from walls and other devices: –...
- Page 29 Application planning 4.4 Installation location Double frame setup The following combinations are permissible for the installation/layout of racks: Combination Individually / side by side One above the other 12+12 12+4 All combinations can be mounted directly alongside each other. The combinations "4+4" and "12+12"...
- Page 30 Application planning 4.4 Installation location NOTICE • If you arrange the racks on top of one another, the fan subassembly in the top row must always be switched on. The units are switched on/off by the user by means of a data record.
- Page 31 • above 1600 W at 230 V AC for POM mid-range, switching operations can result in extremely high currents which trigger the channel fuses. We therefore recommend that you have these heating elements gauged by Siemens AG. Derating of fuses Note that fuses are subject to derating at high ambient temperatures, i.e.
-
Page 32: Performance Profile Of The Pom4220
Application planning 4.5 Performance profile of the POM4220 Performance profile of the POM4220 Performance profile of the POM4220 low-end 230 V Image 4-2 Performance profile of the POM4220 low-end 230 V Performance profile of the POM4220 mid-range 230 V Image 4-3 Performance profile of the POM4220 mid-range 230 V SIPLUS HCS4200 Operating Instructions, 11/2015, A5E35066204A/RS-AA/002... - Page 33 Application planning 4.5 Performance profile of the POM4220 Performance profile of the POM4220 mid-range 277 V Image 4-4 Performance profile of the POM4220 mid-range 277 V SIPLUS HCS4200 Operating Instructions, 11/2015, A5E35066204A/RS-AA/002...
- Page 34 Application planning 4.5 Performance profile of the POM4220 SIPLUS HCS4200 Operating Instructions, 11/2015, A5E35066204A/RS-AA/002...
-
Page 35: Installation/Mounting
Installation/mounting Requirements Safety information WARNING Dangerous voltages in the control cabinet May cause death, serious injury or damage to property Dangerous voltages may be present in the control cabinet. Before work starts on mounting and connecting the HCS4200 heating controller, you must implement safety measures to prevent any touching. - Page 36 Installation/mounting 5.2 Mounting the rack Mounting the rack Install the rack in the following sequence: Image 5-1 Mounting the rack Drill the threads for the M6 fixing screws in the mounting plate. The positions of the pre- fabricated mounting holes on the rack are shown in the drill hole template (see figure below). ①...
- Page 37 Installation/mounting 5.2 Mounting the rack Dimensions and distance between holes for installation on mounting plate Image 5-2 Rack4200 for 12 POMs: Dimensions and distance between holes for installation on mounting plate Image 5-3 HCS Rack4200 for 4 POMs: Dimensions and distance between holes for installation on mounting plate SIPLUS HCS4200 Operating Instructions, 11/2015, A5E35066204A/RS-AA/002...
-
Page 38: Mounting The Fan Module
Installation/mounting 5.3 Mounting the fan module Mounting the fan module Tool You will need a Torx T10 screwdriver. Mounting the fan module The procedure for mounting the fan module is described below: Image 5-4 Mounting the fan module Steps ① Loosen the two fastening screws on the fan module (but do not remove them) ②... - Page 39 Installation/mounting 5.3 Mounting the fan module Steps ③ Place the fan module on the rack and lift it at the rear until the screw heads fit through the two keyholes. • ④ Push the fan module forward until the two tabs pass through the corresponding openings •...
-
Page 40: Installing The Central Interface Module (Cim)
Installation/mounting 5.4 Installing the central interface module (CIM) Installing the central interface module (CIM) Tool You will need a Torx T10 screwdriver. Mounting the Central Interface Module (CIM) The Central Interface Module (CIM) is screwed directly to the rack. The mounting procedure is described below: Image 5-5 Mounting the CIM... -
Page 41: Installing The I/O Module (Pm)
Installation/mounting 5.5 Installing the I/O module (PM) Installing the I/O module (PM) The CIM is equipped with a receptacle for one I/O module. NOTICE The I/O module may only be inserted or removed when the power is off. Tool You will need a Torx T8 screwdriver. Installing the I/O module The procedure for installing an I/O module is described below: Image 5-6... -
Page 42: Installing The Power Output Module (Pom)
Installation/mounting 5.6 Installing the power output module (POM) Installing the power output module (POM) Tool You will need a Torx T8 screwdriver. Mounting the POM The procedure for mounting the POM is described below: Image 5-7 Mounting the POM Steps ①... -
Page 43: Mounting The Blanking Covers
Installation/mounting 5.7 Mounting the blanking covers Mounting the blanking covers You must cover the unused slots in the rack with blanking covers. Blanking covers are available as an accessory (Page 148). Tool You will need a Torx T8 screwdriver. Mounting the blanking cover 1. -
Page 44: Double Frame Setup
Installation/mounting 5.8 Double frame setup Double frame setup The following describes how to set up a double frame. Modifications to the lower frame: 1. Release retaining clip on the right-hand (CIM) side by pressing on the interlock. 2. Feed the ribbon cable through the opening to the back. 3. -
Page 45: Connecting
Connecting Safety information and guidelines Safety information WARNING Hazardous voltages from the mains power input or heating element feeder cables Will cause death, serious injury or damage to property Dangerous voltages may be present on incoming lines from the supply and to heating elements. -
Page 46: Connecting The Protective Conductor
Connecting 6.2 Connecting the protective conductor Connecting the protective conductor Connecting the protective conductor Connect the rack to the protective conductor (PE). You will find an M6 threaded bolt on the ① right side of the rack for this purpose . -
Page 47: Connecting Profinet / Profibus Fieldbus
Connecting 6.3 Connecting PROFINET / PROFIBUS fieldbus Connecting PROFINET / PROFIBUS fieldbus Connecting PROFINET CIM PROFINET connection X1 / X2 Connect X1 / X2 to the higher-level controller and/or the next PROFINET device using an Ethernet cable according to the PROFINET specification. Connecting PROFIBUS / setting PROFIBUS address CIM PROFIBUS connection X1 The PROFIBUS address is assigned using the S1 / S2 address selec-... -
Page 48: Connecting The 24 V Dc Power Supply
Connecting 6.4 Connecting the 24 V DC power supply Connecting the 24 V DC power supply The power supply of the Central Interface Module (CIM) is drawn from the external 24 V DC power supply. Use a power supply unit which conforms to IEC 60536, protection class III (PELV). - Page 49 Connecting 6.4 Connecting the 24 V DC power supply Connecting the 24 V DC supply voltage to the CIM CIM 24 V connection X3 The plug connector for the 24 V DC connection is included in the scope of supply. Features: Push-in spring terminal with release clip •...
-
Page 50: Connecting The Heating Elements And Three-Phase Line Supply
Connecting 6.5 Connecting the heating elements and three-phase line supply Connecting the heating elements and three-phase line supply Connecting the heating elements and three-phase line supply The heating elements are connected by means of two 8-pin (POM low-end) or 6-pin (POM mid-range) plug connectors at X1 and X3 of the POM. - Page 51 Connecting 6.5 Connecting the heating elements and three-phase line supply POM, low-end Pin assignment X1 to X3 8-pin connector for power output 1...8 3-pin connector for line connection phase LX1, N, LX3 8-pin connector for power output 9...16 SIPLUS HCS4200 Operating Instructions, 11/2015, A5E35066204A/RS-AA/002...
- Page 52 Connecting 6.5 Connecting the heating elements and three-phase line supply POM, mid-range Pin assignment X1 to X3 6-pin connector for power output 1...6 3-pin connector for line connection phase LX1, N, LX3 6-pin connector for power output 7...12 SIPLUS HCS4200 Operating Instructions, 11/2015, A5E35066204A/RS-AA/002...
-
Page 53: Block Diagram
Connecting 6.5 Connecting the heating elements and three-phase line supply Wiring diagram for three-phase system Note To achieve the most evenly balanced loading of the three-phase system possible, connect 8 or 6 POM channels at a time consecutively to phases L1, L2 and L3. Image 6-2 Wiring diagram for three-phase system 6.5.1... - Page 54 Connecting 6.5 Connecting the heating elements and three-phase line supply POM4220 low-end block diagram Image 6-3 POM4220 low-end power outputs SIPLUS HCS4200 Operating Instructions, 11/2015, A5E35066204A/RS-AA/002...
- Page 55 Connecting 6.5 Connecting the heating elements and three-phase line supply POM4220 mid-range block diagram Image 6-4 POM4220 mid-range power outputs SIPLUS HCS4200 Operating Instructions, 11/2015, A5E35066204A/RS-AA/002...
-
Page 56: Connecting I/O Modules
Connecting 6.6 Connecting I/O modules Connecting I/O modules 6.6.1 PM4000 DI/DO Connecting digital inputs/outputs The connection is made by means of two 18-pin plug connectors of the PM4000 DI/DO. Image 6-5 PM4000 DI/DO pin assignment Note The connection cables are to be shielded if longer than 30 m. For every connector there is one pin for connecting or looping through the 24 V supply voltage and the 0 V. - Page 57 Connecting 6.6 Connecting I/O modules X1: Digital outputs: 18-pin connector with spring-loaded connection and interlock. The mating connectors are included in the scope of supply. Assignment Digital output 1 Digital output 2 Digital output 3 Digital output 4 Digital output 5 Digital output 6 Digital output 7 Digital output 8...
-
Page 58: Pm4000 U/I
Connecting 6.6 Connecting I/O modules 6.6.2 PM4000 U/I Connecting line measurement inputs The line current is connected by means of the 8-pin X1 plug connector of the PM4000 U/I. The line voltage is connected by means of the 6-pin X2 plug connector of the PM4000 U/I. WARNING Voltage hazards Danger to life... - Page 59 Connecting 6.6 Connecting I/O modules X1: Current measurement 8-pin connector with spring-loaded connection and interlock. The mating connectors are included in the scope of supply. Assignment I1 - I1 + I2 - I2 + I3 - I3 + Reserved Reserved Note The connection cable for the current measurement must not be longer than 30 m.
-
Page 60: Pm4000 Temperature
Connecting 6.6 Connecting I/O modules 6.6.3 PM4000 Temperature Connecting the measurement inputs The analog inputs 0...20 mA are connected by means of the 8-pin plug connector X1 of the PM4000 Temperature. The measurement inputs for temperature are connected by means of the 8-pin plug connector X2 of the PM4000 Temperature. - Page 61 Connecting 6.6 Connecting I/O modules X2: Temperature measuring inputs 8-pin connector with spring-loaded connection. The mating connectors are included in the scope of supply. 2-wire measurement Assignment Temperature channel 1 - Temperature channel 1 + Temperature channel 2 - Temperature channel 2 + Temperature channel 3 - Temperature channel 3 + Temperature channel 4 -...
- Page 62 Connecting 6.6 Connecting I/O modules SIPLUS HCS4200 Operating Instructions, 11/2015, A5E35066204A/RS-AA/002...
-
Page 63: Commissioning
Commissioning Requirements Before commissioning starts, the system components must be installed and wired up. This requires the following: ● A programmable logic controller, e.g. SIMATIC S7 CPU / SIMOTION with PROFINET/PROFIBUS interface ● A SIPLUS HCS4200 heating control system, comprising one rack, one Central Interface Module (CIM) and at least one Power Output Module (POM). - Page 64 Commissioning 7.3 Insulation test SIPLUS HCS4200 Operating Instructions, 11/2015, A5E35066204A/RS-AA/002...
-
Page 65: Configuration
You can download the GSDML file "GSDML-V2.3-Siemens-002A-HCS4200- " from the Siemens Service & Support website (http://www.siemens.com/automation/service&support). If a non-Siemens PROFINET controller is used, install the GSDML file as described in the manufacturer's instructions. Integrating the HCS4200 into the PROFIBUS configuration Procedure with SIMATIC S7 If the hardware catalog of your configuration software does not feature the HCS4200 yet, it can be integrated by installing the GSD file. -
Page 66: Device/Hardware Configuration In The Tia Portal
Configuration 8.3 Device/hardware configuration in the TIA Portal Device/hardware configuration in the TIA Portal 8.3.1 PROFINET device configuration Device configuration In the case of PROFINET, the structure of the hardware is mirrored in the TIA device configuration: POM 1 POM 2 POM 3 Final POM Slot num-... -
Page 67: Profibus Device Configuration
Configuration 8.3 Device/hardware configuration in the TIA Portal 8.3.2 PROFIBUS device configuration Device configuration In the case of PROFIBUS, the structure of the hardware is mirrored in the TIA device configuration as follows: POM 1 POM 2 POM 3 Final Slot number The configuration rules are as follows: The CIM module includes the PROFIBUS connection and is permanently present in slot 1. -
Page 68: Configuration Parameters
Configuration 8.3 Device/hardware configuration in the TIA Portal 8.3.3 Configuration parameters 8.3.3.1 CIM / POM configuration parameters The configuration parameters are directly assigned to the respective modules and are set during device configuration. They are transferred automatically on start-up and during re- parameterization. -
Page 69: Configuration Parameters For I/O Modules
Configuration 8.3 Device/hardware configuration in the TIA Portal 8.3.3.2 Configuration parameters for I/O modules The configuration parameters are directly assigned to the respective I/O modules and are set during device configuration. They are transferred on start-up and during re-parameterization. PM4000 Temperature parameters Description Range of values Analog channel 1 measuring range... - Page 70 Configuration 8.3 Device/hardware configuration in the TIA Portal PM4000 DI/DO parameters Description Range of values Digital channel 9 Input (default) • … Output • Digital channel 16 Output 1 Response to errors Switch off (default) • … Hold last value •...
-
Page 71: Software Tools For Commissioning Support
Configuration 8.4 Software tools for commissioning support Software tools for commissioning support 8.4.1 Overview of tools for commissioning support Listed below are the tools that can provide support with configuration and commissioning. SIMATIC WinCC A library in the TIA Portal for SIMATIC WinCC is available for integration in an HMI system. This library contains a specific number of channels and fields;... - Page 72 Configuration 8.4 Software tools for commissioning support SIPLUS HCS4200 Operating Instructions, 11/2015, A5E35066204A/RS-AA/002...
-
Page 73: Functions
Functions Status and actual displays You can obtain information about the current state of the device/system/process as follows: Status display via LEDs The LEDs on the Central Interface Module (CIM) as well as on the Power Output Module (POM) provide information about the current operating status of the device or the heating system. -
Page 74: Power Output Control
Functions 9.2 Power output control Power output control 9.2.1 Half-wave control Half-wave control can be parameterized for activating the heating elements. This parameterization is performed for each POM and applies to all channels of the POM. Principle of half-wave control The power outputs are controlled in half-waves: For each half-wave, the controller supplies On/Off information to the triac and this switches as specified. -
Page 75: Soft Starting Function
Functions 9.2 Power output control 9.2.2 Soft starting function Operating principle Soft starting can be parameterized for activating the channels in order to control loads with a high inrush current. This paramaterization is performed for each POM and applies to all channels of the POM. -
Page 76: Switch On Heating
Functions 9.2 Power output control 9.2.3 Switch on heating Switch on heating To control the power outputs, the heating must first be activated. This is done via the cyclic data. Heating status Description Channels are activated Channels are deactivated. Note A time-delayed start-up or channel soft start only occurs if heating is "On". -
Page 77: Channel Control Via Fields
Functions 9.2 Power output control 9.2.5 Channel control via fields It is possible to control the channels via fields. For this, it is necessary to combine the channels into fields, and to assign setpoints for channels and fields. Operating modes The operating mode can be pre-selected via the cyclic data. -
Page 78: Line Voltage Compensation
Functions 9.2 Power output control 9.2.6 Line voltage compensation Line voltage compensation Line voltage compensation makes it possible to achieve a balanced output on the power outputs, even when the voltage deviates from normal values. The function can be switched on and off by the user. -
Page 79: Behavior Of The Power Outputs
Functions 9.2 Power output control 9.2.7 Behavior of the power outputs Parameterizable response The response of the power outputs to an interruption in communication with the higher-level controller can be defined. For each power output, the following can be parameterized: ●... -
Page 80: Digital Inputs/Outputs
Functions 9.3 Digital inputs/outputs Digital inputs/outputs Note A PM4000 DI/DO must be available for the processing of digital inputs/outputs. No links of any kind to the functionality of the heating control are available. Digital outputs The PM4000 DI/DO provides 8 digital outputs that the user can control directly. What is more, 8 further digital outputs are available if no digital inputs are used (configurable). -
Page 81: Recording Of Analog Measured Line Values
Functions 9.4 Recording of analog measured line values Recording of analog measured line values Note For recording analog measured line values, a PM4000 U/I must be available. Line current Three inputs are available for recording measured current values. lL1, lL2, and lL3 can be connected. - Page 82 Functions 9.4 Recording of analog measured line values Line frequency The measured frequency value is available as soon as the phase voltage is connected. This is not linked to the functionality of the heating control. Further processing must be carried out by the user.
-
Page 83: Recording Of Analog Measured Values
Functions 9.5 Recording of analog measured values Recording of analog measured values Note For the recording of analog measured values a PM4000 U/I Temperature must be available. No links of any kind to the functionality of the heating control are available. Analog inputs 0...20 mA Four inputs are available for recording of measured current values for a current measuring range of 0...20 mA. -
Page 84: Monitoring Functions
Functions 9.6 Monitoring functions Monitoring functions 9.6.1 Monitoring phase connection The two line voltage connections of the POM are monitored to determine whether one phase is connected or not. If one phase is not connected, an error message is generated (see SectionFault reporting through diagnostics data (Page 109) ) and heater operation for this phase stops. -
Page 85: Monitoring Of The 24 V Dc Supply Voltage
Functions 9.6 Monitoring functions 9.6.3 Monitoring of the 24 V DC supply voltage The 24 V DC supply voltage is monitored on the CIM. If the 24 V fails, the power outputs of the POMs are automatically deactivated. There is no manufacturer-specific diagnostics alarm in the case of failure of the 24 V supply. -
Page 86: Temperature Monitoring
Functions 9.6 Monitoring functions 9.6.5 Temperature monitoring Internal temperature monitoring A sensor is installed on the heat sink inside the heating controller (POM) to measure the internal temperature. An alarm threshold is defined for the internal temperature. The following reactions are triggered when the threshold is overshot: ●... -
Page 87: Monitoring Power Channels
Functions 9.6 Monitoring functions 9.6.6 Monitoring power channels Power output diagnostics The Power Output Module (POM) has a diagnostics function to detect faults in the power circuit. In every half-wave, the status of the power output is requested and checked at a fixed point in time. -
Page 88: Further Diagnostics
Functions 9.6 Monitoring functions 9.6.7 Further diagnostics The following are also monitored, depending on the configuration level: ● Communication between the CIM and POM / PM ● Internal communication CIM ● Measuring range (PM4000 Temp) ● 24 V supply (PM4000 DI/DO) ●... -
Page 89: Communications
Communications The information provided in the section "Communication" refers to Siemens SIMATIC S7 controllers, but this also applies to other controllers with PROFINET/PROFIBUS due to the standardized PROFINET/PROFIBUS communication. 10.1 Cyclic data exchange 10.1.1 Cyclic output data Cyclic data exchange between the heating control system and the S7 takes place via the process/I/O address area of the CPU. - Page 90 Communications 10.1 Cyclic data exchange Cyclic output data for POM low-end Byte Description Power output 1 setpoint Power output 2 setpoint Power output 3 setpoint Power output 4 setpoint Power output 5 setpoint Power output 6 setpoint Power output 7 setpoint Power output 8 setpoint Power output 9 setpoint Power output 10 setpoint...
- Page 91 Communications 10.1 Cyclic data exchange Cyclic output data for PM4000 Temperature Byte Description Compensation temperature Cyclic output data for PM4000 DI/DO Byte Description Digital output 1 Digital output 2 Digital output 3 Digital output 4 Digital output 5 Digital output 6 Digital output 7 Digital output 8 Digital output 9...
-
Page 92: Cyclic Input Data
Communications 10.1 Cyclic data exchange 10.1.2 Cyclic input data Cyclic data exchange between the heating control system and the S7 takes place via the process/I/O address area of the CPU. The cyclic data can be addressed in the S7 through the process image or I/O commands. - Page 93 Communications 10.1 Cyclic data exchange Cyclic input data for POM low-end Byte Description Power output 1 actual value Power output 2 actual value Power output 3 actual value Power output 4 actual value Power output 5 actual value Power output 6 actual value Power output 7 actual value Power output 8 actual value Power output 9 actual value...
- Page 94 Communications 10.1 Cyclic data exchange Cyclic input data for CIM PM4000 Temperature Byte Description Analog channel 1 Analog channel 2 Analog channel 3 Analog channel 4 Temperature channel 1 10,11 Temperature channel 2 12,13 Temperature channel 3 14,15 Temperature channel 4 Cyclic input data for CIM PM4000 DI/DO Byte Description...
-
Page 95: Acyclic Data Exchange
Communications 10.2 Acyclic data exchange 10.2 Acyclic data exchange S7 has system function blocks for writing / reading this data. The following data is transferred for addressing: Index Dataset number Logical address of the PROFINET/PROFIBUS components For the datasets described below, the logical address is always the diagnostics address from the hardware configuration. - Page 96 Communications 10.2 Acyclic data exchange Note When a dataset 100 is written, it is no longer possible to use the datasets for field type 2. Data set 101 to 132 "field type 2" Byte Description Number of channel 1 of field (dataset number minus 100) Number of channel 2 of field (dataset number minus 100) …...
- Page 97 Communications 10.2 Acyclic data exchange Data set 150 "Production field value" Byte Description Setpoint for field 1 Setpoint for field 2 … Setpoint for field 32 Definition is via an array [1..32] with one element of type "Byte". The field number corresponds to the array index. Data set 151 "Standby field value"...
- Page 98 Communications 10.2 Acyclic data exchange PROFINET: Definition is via an array [1…384] with one element of type "Bool". PROFIBUS: Definition is via an array [1…192] with one element of type "Bool". Each bit is assigned to one channel. The size of the array depends on the maximum configuration possible for the HCS (number of POMs, number of channels per POM).
-
Page 99: Acyclic Input Data
Communications 10.2 Acyclic data exchange 10.2.2 Acyclic input data The datasets/values described in section "Acyclic output data (Page 95)" can also be read. Data set 100 "field type 1" One dataset of the maximum possible length (32 fields) is always returned. A non-assigned field is entered as channel number 0. - Page 100 Communications 10.2 Acyclic data exchange Data set 200 "measured values" Byte Description Data POM 1 Internal temperature Reserved Frequency (with one decimal place) Data POM 2 … … … … … Data for POM 12/24 … … PROFINET: Definition is via an array [1..24] with one element of type "Structure". PROFIBUS: Definition is via an array [1..12] with one element of type "Structure".
- Page 101 Communications 10.2 Acyclic data exchange Data set 202 "Measured values for PM4000 U/I" Byte Description Frequency (with one decimal place) Measured voltage value L1/L12 (in [V] with one decimal place) Measured voltage value L2/L23 (in [V] with one decimal place) Measured voltage value L3/L31 (in [V] with one decimal place) Measured current value RMS L1/L12 (in [A] with three decimal places) 10,11...
-
Page 102: Transfer Of Diagnostic Alarms To The Controller
Communications 10.3 Transfer of diagnostic alarms to the controller 10.3 Transfer of diagnostic alarms to the controller 10.3.1 Transferring diagnostic alarms to the controller: PROFINET Diagnostics alarms Diagnostics alarms are transferred as diagnostic interrupts using the channel diagnostics (identifier 8000h) as the diagnostic type. The PROFINET device identification number is required for identifying a diagnostic interrupt. -
Page 103: Transferring Diagnostic Alarms To The Controller: Profibus
Communications 10.3 Transfer of diagnostic alarms to the controller 10.3.2 Transferring diagnostic alarms to the controller: PROFIBUS Diagnostics alarms Diagnostic alarms are transferred as diagnostic interrupts. The PROFIBUS device identification number is required for identifying a diagnostic interrupt. The HCS4200 has the identification number 81C4. The evaluation in SIMATIC is performed via I/O_FLT1 (OB82) and RALRM (SFB54). -
Page 104: Manufacturer-Specific Error Codes
Communications 10.3 Transfer of diagnostic alarms to the controller 10.3.3 Manufacturer-specific error codes CIM / POM error codes Error code Description CIM4210 POM42xx (hex) 5101 Communication error on HCS bus ✓ 5102 Line voltage is outside the admissible range ✓ (values for PM4000 U/I) 5103 Frequency is outside the permissible range. - Page 105 Communications 10.3 Transfer of diagnostic alarms to the controller Note The following applies for PM4000 DI/DO: The error codes for short-circuit and wire break are each signaled for one group of 4 channels only. The number of the first channel of the group of 4 is entered as the channel number.
- Page 106 Communications 10.3 Transfer of diagnostic alarms to the controller SIPLUS HCS4200 Operating Instructions, 11/2015, A5E35066204A/RS-AA/002...
-
Page 107: Process And System Messages, Error Handling
Process and system messages, error handling 11.1 Central Interface Module (CIM) 11.1.1 LED operating display for CIM The device has 3 LEDs on the front: The LEDs provide information about the operating status of the device/system. Meaning of LEDs READY HEATING ON ERROR green... -
Page 108: Power Output Module (Pom)
Process and system messages, error handling 11.2 Power Output Module (POM) 11.2 Power Output Module (POM) 11.2.1 LED operating display for POM The device has 3 LEDs on the front: The LEDs provide information about the operating status of the device/system. Meaning of LEDs READY HEATING ON... -
Page 109: Fault Reporting Through Diagnostics Data
Process and system messages, error handling 11.2 Power Output Module (POM) 11.2.2 Fault reporting through diagnostics data The internal monitoring functions (Page 87) recognize specific faults in the Power Output Module. The corresponding information is provided in the diagnostics data. Causes of error and possible remedies Error code Description... -
Page 110: I/O Modules
Process and system messages, error handling 11.3 I/O modules 11.3 I/O modules LED status display The I/O module has 2 LEDs on the front. The LEDs provide information about the operating status of the device/system. Meaning of LEDs ERROR Description green Power OFF, device switched off Initialization: The LED flashes until the HCS is detected and accepted as a... -
Page 111: Service And Maintenance
Service and maintenance 12.1 Maintenance work The following work must be carried out at regular intervals to guarantee smooth operation of the device. Maintenance work Fan module Check regularly that the fan is functional. Remove dust deposits with a cleaning brush and vacuum cleaner. SIPLUS HCS4200 Operating Instructions, 11/2015, A5E35066204A/RS-AA/002... -
Page 112: Firmware Update
Service and maintenance 12.2 Firmware update 12.2 Firmware update 12.2.1 PROFINET firmware update Delivery condition The current firmware version is already loaded on the module when the HCS4200 is shipped. Firmware update If required, a PC tool and the necessary update files for updating the firmware are available to you at Customer Support . - Page 113 Service and maintenance 12.2 Firmware update POM: In a firmware update, new firmware is downloaded to all Power Output Modules (POMs) operated on a Central Interface Module (CIM). After the update, the HCS4200 restarts automatically. Only in the event of a fault when the update has not been correctly completed do you have to restart the HCS4200.
-
Page 114: Profibus Firmware Update
Service and maintenance 12.2 Firmware update 12.2.2 PROFIBUS firmware update Delivery condition The current firmware version is already loaded on the module when the HCS4200 is shipped. Firmware update If required, a PC tool and the necessary update files for updating the firmware are available to you at Customer Support . - Page 115 Service and maintenance 12.2 Firmware update I/O module PM: In the event of a firmware update, new firmware is loaded into the inserted PM. After the update, the HCS4200 restarts automatically. Only in the event of a fault, if the update has not been correctly completed, is it necessary to restart the HCS4200.
-
Page 116: Fuse Replacement
Service and maintenance 12.3 Fuse replacement 12.3 Fuse replacement Safety information WARNING Voltage hazards May cause death or serious injury • Before changing a fuse, you must isolate the load circuit from the supply. • Before working on the heating control system or the connected components, ensure the system is disconnected. - Page 117 Service and maintenance 12.3 Fuse replacement Position of fuses on the board Image 12-1 Position of fuses on the board Checking/replacing fuses NOTICE Electronic components are fitted to the rear of the board. When replacing fuses,ensure that these components are not damaged. 1.
-
Page 118: Replacing The Fan Module
Service and maintenance 12.4 Replacing the fan module 12.4 Replacing the fan module Requirements WARNING Electric shock hazard The device is energized. Before you begin to replace components, you must: • Disconnect the AC power supply of the heating controller and secure it against reclosing. - Page 119 Service and maintenance 12.4 Replacing the fan module Disassembling the fan module Proceed as follows to disassemble the fan module: Image 12-2 Disassembly of fan module Steps Remove the fan connector (recommendation: pulling directly at the cable makes it easier to remove the •...
-
Page 120: Replacing The Power Output Module (Pom)
Service and maintenance 12.5 Replacing the Power Output Module (POM) 12.5 Replacing the Power Output Module (POM) Requirements ● The AC power supply is disconnected from the supply at the mounting location of the device and secured against switching on again. ●... - Page 121 Service and maintenance 12.5 Replacing the Power Output Module (POM) Removing the POM Image 12-3 Removing the POM Steps ① Unscrew the two fixing screws on the POM ② ③ Detach the POM using the ejector lever and withdraw the POM Place board on an ESD-compatible surface Assembly, connection and commissioning 1.
-
Page 122: Replacing The Central Interface Module (Cim)
Service and maintenance 12.6 Replacing the Central Interface Module (CIM) 12.6 Replacing the Central Interface Module (CIM) Requirements ● The AC power supply is disconnected from the supply at the mounting location of the device and secured against switching on again. ●... - Page 123 Service and maintenance 12.6 Replacing the Central Interface Module (CIM) Procedure for removing the CIM Withdraw all connectors from the terminals on the front of the CIM. ① ② Unscrew the six fixing screws and remove the CIM ③ Withdraw the connector of the flat cable to the system interface SIPLUS HCS4200 Operating Instructions, 11/2015, A5E35066204A/RS-AA/002...
-
Page 124: Replacing An I/O Module
Service and maintenance 12.7 Replacing an I/O module 12.7 Replacing an I/O module Requirement ● The AC power supply must be disconnected from the supply at the mounting location of the device and secured against switching on again. ● The 24 V DC supply voltage must be disconnected. Preparations Remove all connectors from the PM before dismantling the I/O module. - Page 125 Service and maintenance 12.7 Replacing an I/O module Removing the I/O module Image 12-5 Removing the PM ① 1. Undo the two fixing screws on the PM ② 2. Release the PM using the ejector lever and pull PM out 3.
-
Page 126: Recycling And Disposal
Service and maintenance 12.8 Recycling and disposal 12.8 Recycling and disposal Note The POM and CIM modules of the HCS4200 heating control system fulfill the requirements of RoHS-II and REACH. The components can be recycled due to their lack of harmful materials. Contact a certified electronic scrap disposal company in order to ensure the environmentally-friendly recycling and disposal of your used device. -
Page 127: Technical Specifications
Technical specifications 13.1 Technical specifications for Rack4200 product brand name SIPLUS Product designation Rack4200 for 12 POM Rack4200 for 4 POM General technical data: Equipment marking / acc. to DIN EN 81346-2 Number of slots Type of power output / connectable POM4220 Supply voltage: Power capacity... - Page 128 Technical specifications 13.1 Technical specifications for Rack4200 Ambient conditions: Air pressure 860 ... 1 080 Pa during operation • 660 ... 1 080 Pa during storage • Degree of pollution Installation altitude / at height above sea level / 2 000 m maximum Relative humidity 95 %...
-
Page 129: Technical Specifications For Cim
Technical specifications 13.2 Technical specifications for CIM 13.2 Technical specifications for CIM product brand name SIPLUS Product designation CIM4210 PROFINET CIM4210 PROFIBUS General technical data: Equipment marking / acc. to DIN EN 81346-2 Number of slots Type of power output / connectable POM4220 Supply voltage: Type of voltage / of the supply voltage... - Page 130 Technical specifications 13.2 Technical specifications for CIM Mechanical data: Mounting position vertical Mounting type Screw mounting to rack Type of ventilation Forced ventilation Vibration resistance 10 ... 58 Hz / 0.075 mm, 58 ... 150 Hz / 1g during operation / acc. to IEC 60068-2-6 •...
-
Page 131: Technical Specifications For Pom
Technical specifications 13.3 Technical specifications for POM 13.3 Technical specifications for POM product brand name SIPLUS Product designation POM4220 Lowend POM4220 Midrange General technical data: Type of load Ohmic load Equipment marking / acc. to DIN EN 81346-2 Supply voltage: Type of voltage / of the supply voltage Supply voltage / at AC / rated value 230 V... - Page 132 Technical specifications 13.3 Technical specifications for POM Power Electronics: Control version / of heat emitters Half-wave control Half-wave control and soft start Number of outputs / for heating power Number of heat emitters / per output / maximum Output voltage / at output / for heating power 230 V 277 V Power capacity / per output...
- Page 133 Technical specifications 13.3 Technical specifications for POM Mechanical data: Mounting position vertical Mounting type Screw mounting to rack Type of ventilation Self ventilation or forced ventilation Vibration resistance 10 ... 58 Hz / 0.075 mm, 58 ... 150 Hz / 1g during operation / acc.
-
Page 134: Technical Specifications For I/O Module
Technical specifications 13.4 Technical specifications for I/O module 13.4 Technical specifications for I/O module PM4000 DI/DO product brand name SIPLUS Product designation I/O4000 DI/DO General technical data: Equipment marking / acc. to DIN EN 81346-2 Digital Inputs: Number of digital inputs Type of electrical connection / at the digital inputs 1 x 18-pin connector with tension spring con- nection... - Page 135 Technical specifications 13.4 Technical specifications for I/O module 1x (24 ... 16) Type of connectable conductor cross-section / at the digital out- • puts / for AWG conductors Communication: Design of the interface system interface Display: Number of status displays Display version / as status display by LED LED green = Ready, LED red = Error display, 1 LED yellow per output: LED on - H status;...
- Page 136 Technical specifications 13.4 Technical specifications for I/O module Ambient conditions: Ambient temperature 0 ... 55 °C during operation • -25 ... +70 °C during storage • -25 ... +70 °C during transport • Air pressure 860 ... 1 080 hPa during operation •...
- Page 137 Technical specifications 13.4 Technical specifications for I/O module PM4000 U/I product brand name SIPLUS Product designation I/O4000 U/I General technical data: Equipment marking / acc. to DIN EN 81346-2 Measuring inputs for current: Product function / Current detection Current measuring range 0 ...
- Page 138 Technical specifications 13.4 Technical specifications for I/O module Mechanical data: Mounting position vertical Mounting type Screw mounting to CIM Type of ventilation Forced ventilation Vibration resistance 10 ... 58 Hz / 0.075 mm. 58 ... 150 Hz / 1 g during operation / acc.
- Page 139 Technical specifications 13.4 Technical specifications for I/O module Ambient conditions: Ambient temperature 0 ... 55 °C during operation • -25 ... +70 °C during storage • -25 ... +70 °C during transport • Air pressure 860 ... 1 080 hPa during operation •...
- Page 140 Technical specifications 13.4 Technical specifications for I/O module Connectable probes: Temperature measuring range / for Pt 100 acc. to IEC 60751 0 ... 410 °C Temperature measuring range / for Pt 1000 acc. to IEC 60751 0 ... 850 °C Temperature measuring range / for thermocouple type J 0 ...
- Page 141 Technical specifications 13.4 Technical specifications for I/O module Electromagnetic compatibility: EMC emitted interference Limit value in accordance with IEC 61000-6- 4:2007 + A1:2011 Conducted interference / due to burst / acc. to IEC 61000-4-4 2 kV signal cables Conducted interference / due to surge / acc. to IEC 61000-4-5 not applicable Conducted interference / due to high-frequency radiation / acc.
-
Page 142: Technical Specifications For Fan Module
Technical specifications 13.5 Technical specifications for fan module 13.5 Technical specifications for fan module product brand name SIPLUS Product designation FM4240 Fan Module General technical data: Equipment marking / acc. to DIN EN 81346-2 Supply voltage: Active power consumption / maximum 10 W Auxiliary circuit: Design of the power supply... - Page 143 Technical specifications 13.5 Technical specifications for fan module Ambient conditions: Ambient temperature 0 ... 55 °C during operation • -25 ... +70 °C during storage • -25 ... +70 °C during transport • Air pressure 860 ... 1 080 hPa during operation •...
-
Page 144: Dimension Drawings
Technical specifications 13.6 Dimension drawings 13.6 Dimension drawings HCS4200 with Rack4200 for 12 POM full configuration Image 13-1 Dimensions of HCS4200 with Rack4200 for 12 POMs, full configuration Rack4200 for 12 POMs Image 13-2 Dimension drawing for Rack 4200 for 12 POMs SIPLUS HCS4200 Operating Instructions, 11/2015, A5E35066204A/RS-AA/002... - Page 145 Technical specifications 13.6 Dimension drawings Rack4200 for 4 POMs Image 13-3 Dimension drawing for Rack 4200 for 4 POMs Dimension drawing for CIM4210 Image 13-4 Dimension drawing for CIM4210 SIPLUS HCS4200 Operating Instructions, 11/2015, A5E35066204A/RS-AA/002...
- Page 146 Technical specifications 13.6 Dimension drawings Dimension drawing for POM4220 Image 13-5 Dimension drawing for POM4220 Dimension drawing for fan module FM4240 Image 13-6 Dimension drawing for fan module HCS4240 SIPLUS HCS4200 Operating Instructions, 11/2015, A5E35066204A/RS-AA/002...
-
Page 147: Appendix
Appendix Certificates and approvals A.1.1 Certificates and approvals Note Approvals are only valid when marked on the product The specified approvals apply only when the corresponding mark is printed on the product. You can check which of the following approvals have been granted for your product by the markings on the type plate. -
Page 148: Ordering Data
Appendix A.2 Ordering data Ordering data Ordering data Single part Article No. HCS Rack 4200 for 12 POMs 6BK1942-0AA00-0AA0 HCS Rack 4200 for 4 POMs 6BK1942-0BA00-0AA0 HCS CIM4210 PROFINET 6BK1942-1AA00-0AA0 HCS CIM4210 PROFIBUS 6BK1942-1BA00-0AA0 HCS POM4220 low-end 6BK1942-2AA00-0AA0 HCS POM4220 mid-range 6BK1942-2CA00-0AA0 HCS FM4240 Fan Module 6BK1942-4AA00-0AA0... -
Page 149: Esd Guidelines
Appendix A.3 ESD guidelines ESD guidelines Definition of ESD All electronic modules are equipped with large-scale integrated ICs or components. Due to their design, these electronic elements are highly sensitive to overvoltage, and thus to any electrostatic discharge. The electrostatic sensitive components/modules are commonly referred to as ESD devices. This is also the international abbreviation for such devices. - Page 150 Appendix A.3 ESD guidelines Electrostatic charging Anyone who is not connected to the electrical potential of their surroundings can be electrostatically charged. The figure below shows the maximum electrostatic voltage which may build up on a person coming into contact with the materials indicated. These values correspond to IEC 801-2 specifications.
-
Page 151: Service & Support
The online catalog and the online ordering system can also be found at Industry Mall homepage (http://www.siemens.com/industrymall) SIPLUS HCS heating control systems on the Internet Current information on SIPLUS HCS is provided as part of our online presence (http://www.siemens.com/siplus-hcs). SIPLUS HCS4200... - Page 152 An example application for SIMATIC S7 is available as a guide and basis for your own applications. This application example explains the mode of operation of the heating controller. You can download the application example from the Siemens Service&Support website . SIPLUS HCS4200 Operating Instructions, 11/2015, A5E35066204A/RS-AA/002...
-
Page 153: Index
Index GSDML file download, 65 Guidelines ESD guidelines, 149 Application example, 152 Approvals, 147 History, 10 Basic knowledge, 9 Inrush current, 74 IT security, 11 Cleaning work, 111 Connecting Safety information, 12 Line supply voltage monitoring, 84 Line voltage compensation, 78 Low-voltage directive, 147 Delivery Unpacking, 26... - Page 154 Index Qualified personnel, 9 Recycling, 126 Registered trademarks, 10 Safety information Changes to the devices, 12 Circuit breaker, 12 Connecting, 12 Fuse replacement, 13 Repairs, 13 Working on the device, 13 Scope of delivery, 26 Shipping Note, 25 Storage, 25 Storage conditions, 25 Target group, 9 Technical Support, 151...