Table of Contents
Advertisement
Quick Links
Advertisement
Table of Contents

Summary of Contents for Apantac CP-16
- Page 1 CP-16 User Manual...
- Page 2 All the registered trademarks referred to this manual are belonging to their respective companies. WARRANTY STATEMENT Apantac LLC (herein after referred to as “Apantac”) warrants to the original purchaser of the products manufactured by Apantac (the “Product,”) will be free from defects in material and workmanship for a period of three (3) year from the date of shipment of the Product to the purchaser.
-
Page 3: Table Of Contents
6.0 Installation ....................... 4 7.0 Configuration and Programming ................5 7.1. Getting Started ....................5 7.2. Connecting to the CP-16 with a Web Browser ........... 5 7.3. CP-16 Administration Setup ................6 7.3.1. CP-16 Module Setup .................. 7 7.3.2. Multiviewer Connection Setup ..............9 7.4. -
Page 4: What's In The Box
DC 5-Volt, 3.2 Amp power adapter 440mm W x 125mm D x 44mm H Size (not including rack mounting 'rack-ears') Mounting Rack mount, 1 rack unit in height APANTAC LLC, 10200 SW Allen Blvd, Beaverton, OR 97005 Support@Apantac.com, TEL: +1 503 968 3000... -
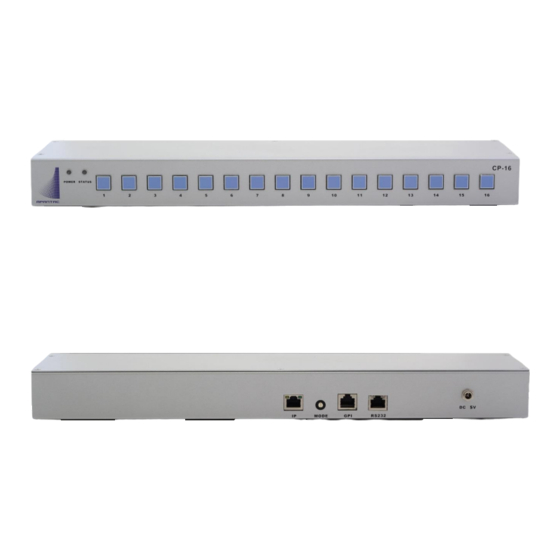
Page 5: Front/Rear Panels
Front/Rear Panels Front Panel Figure 4-1 CP-16 Front Panel Rear Panel Figure 4-2: CP-16 Rear Panel APANTAC LLC, 10200 SW Allen Blvd, Beaverton, OR 97005 Support@Apantac.com, TEL: +1 503 968 3000... -
Page 6: Accessories
Accessories Power Adapter 2 x Mounting Plate RJ50 to DB9 Cable for GPI/O RJ45 to DB9 Cable for RS-232 Terminal Block for GPI/O APANTAC LLC, 10200 SW Allen Blvd, Beaverton, OR 97005 Support@Apantac.com, TEL: +1 503 968 3000... -
Page 7: Installation
GPI connections must include the ground (GND) reference. The input is activated when it is brought to the ground reference level. GPO outputs provide a 5volt output level from the CP-16 when active, and ground level when inactive. RJ50-DB9... -
Page 8: Configuration And Programming
Getting Started The CP-16 is designed to control a single or multiple Apantac products that supports GPI or AXP protocol. This section will help you get the CP-16 up and running with the built-in web page setup as quickly as possible. -
Page 9: Administration Setup
CP-16 Administration Setup After you logon to the CP-16 page, you will be able to access 3 tabs, Setup, Advance and Adminstration. Click the Administration tab. Figure 7.2: Administration Tab, CP-16 settings APANTAC LLC, 10200 SW Allen Blvd, Beaverton, OR 97005 Support@Apantac.com,... -
Page 10: Module Setup
NOTE: If DHCP is Enabled, the following four network settings will be ignored. (Your Network's DHCP server will assign them.) Static IP Address The IP Address of the CP-16 module. This should be set to an address on the same subnet as the multiviewers it will control. Static Subnet Mask Default subnet masks depend on the class of your network. - Page 11 Accessible IP Setting WARNING: If enabled, only computers with these IP addresses can login to the CP-16's webpages. IP #1 through IP #4 Enter the IP addresses of the computer's to be permitted to login to, access, and change the CP-16's settings.
-
Page 12: Multiviewer Connection Setup
7.3.2 Multiviewer Connection General Setup The areas outlined in red in the figure below pertain to the CP-16 module connecting to the multiviewer/s it will control. Figure 7.3: Administration Tab, Multiviewer general settings APANTAC LLC, 10200 SW Allen Blvd, Beaverton, OR 97005 Support@Apantac.com,... - Page 13 Server / Client Mode CP-16 to Multiviewer communication mode. Default is 'Client' and cannot be changed. Server Listening Port Not applicable to the CP-16 functionality. Default is '2009'.
- Page 14 Multiviewer Connection Specific Setup The areas outlined in red in the figure below pertain to configuring all the multiviewers which the CP-16 module will control and which buttons will control which multiviewer/s. Figure 7.3b: Administration Tab, Multiviewer specific settings APANTAC LLC, 10200 SW Allen Blvd, Beaverton, OR 97005 Support@Apantac.com,...
- Page 15 Setting this parameter to 0 (zero) will assign no buttons to this host, effectively disabling the host. Client Destination Host Name / IP Enter the IP addresses of the Apantac Tahoma Multiviewer to be associated with the chosen Host Number. Client Destination Port This is the TCP/IP port number the multiviewer receives the AXP command protocol through.
- Page 16 3. Set the Client Destination Host Name / IP to the IP address of this multiviewer. (In this example we used 192.168.1.151 .) 4. Set the Client Destination Port to “101”. (All Apantac multiviewer’s receive AXP command protocol via port 101. ) 5.
-
Page 17: Programming And Gpio Setup
CP-16 Programming and GPIO Setup The Setup tab provides for button programming and for GPIO setup. Figure 7.4: Setup Tab APANTAC LLC, 10200 SW Allen Blvd, Beaverton, OR 97005 Support@Apantac.com, TEL: +1 503 968 3000... -
Page 18: Button Programming
7.4.1 Button Programming When a button on the CP-16 is pressed it will send an ASCII text command to an Apantac Tahoma Multiviewer via TCP/IP protocol over Ethernet. The list of commands Apantac Tahoma Multiviewers will respond to is known as the "Apantac eXchange Protocol" or AXP for short. -
Page 19: Gpio Control Setup
There are two options; GPO and AXP CMD. When this option is selected the GPIO port on the back of the CP-16 is configured for output. When buttons 1 through 8 are pressed the corresponding GPO wire on the port will go high (5 Volts). -
Page 20: Advance Tab
When certain setup actions are performed an alternate webpage is displayed as standard warnings. These are enabled by default and there are no reasons to alter these settings. APANTAC LLC, 10200 SW Allen Blvd, Beaverton, OR 97005 Support@Apantac.com, TEL: +1 503 968 3000... - Page 21 Appendix - I Two Popular AXP Commands NOTE: This is a partial listing of AXP commands. For a complete listing see the separate "Apantac eXchange Protocol" document, available for download from our website. Audio: Set audio monitoring output Audio [VPM_ID][Type][Input_#][GROUP] [Channel/PAIR]...
- Page 22 Values Description [file_name] The preset file *The file name must be name. bracketed with “| |”. Examples: Command Description Load |1_full.pt1| Loads preset name “1_full.pt1” APANTAC LLC, 10200 SW Allen Blvd, Beaverton, OR 97005 Support@Apantac.com, TEL: +1 503 968 3000...
- Page 23 Key in the factory reset command “dft net ” then click Enter. (Note: insert a space after ‘dft’ and a space after ‘net’), Power reset the CP-16 unit. You can now connect to the CP-16 unit using WEB page. Factory reset CP-16 IP address: 192.168.1.151...
- Page 24 When successfully connected to the CP-16 unit, the CP-16 will repeatedly output the following message approximately every 5 seconds. Make a TCP connection with host ip 192 168 1 151 at port 101 After typing the 'dft net ' command and pressing enter, the CP-16 will return the following acknowledgement. AXP CMD(12)->...
Need help?
Do you have a question about the CP-16 and is the answer not in the manual?
Questions and answers