Table of Contents
Advertisement
Quick Links
Advertisement
Table of Contents

Related Manuals for Neptune ProCoder


Summary of Contents for Neptune ProCoder
- Page 1 ProCoder™ Quick Install Guide...
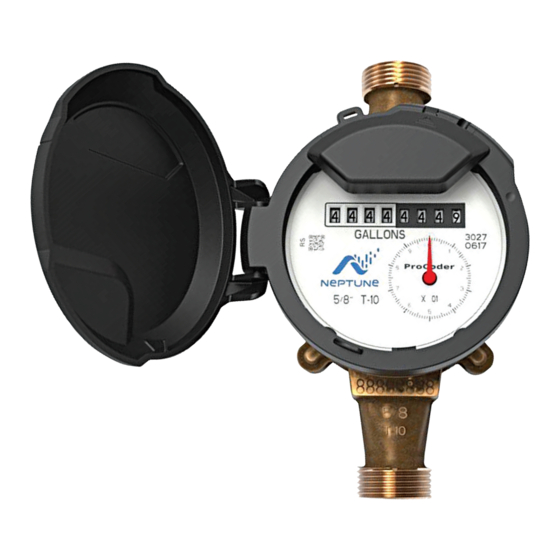
- Page 3 Figure 1: ProCoder™ Dial Face with Sweep Hand This guide helps you identify and read information displayed on the ProCoder register. It also helps you recognize the common causes of leaks and instructs what to do if you find one. This guide contains steps to determine whether a leak is fixed after repairs.
- Page 4 2: Wiring Inside Set Version To run a three-conductor cable from the ProCoder™ register to the MIU, complete the following steps. 1. Connect the three-conductor wire to the encoder register’s terminals as described in the manufacturer’s instructions, using this color code:...
- Page 5 Corning #4 to the terminal screws and exposed bare wires. Figure 5: Applying Compound Neptune recommends Novagard G661 or Dow Corning Compound #4. Novagard may cause irritation to eyes and skin. If swallowed, do not induce vomiting; dilute with one to two glasses of water or milk and seek medical attention.
- Page 6 For copies of MSDS sheets, call Neptune Customer Support at (800) 647-4832. 3. Place the terminal cover on register, ensuring the wire is routed through the strain relief. Figure 6: Placing the Cover on the Register 4. Snap the terminal...
- Page 7 3: Wiring the Pit Set Version To wire the pit set version, complete the steps. Figure 5 shows the components required for installation. Figure 8: Installation Components 1. Hold the Scotchlok™ between the index finger and thumb with the red cap facing down.
- Page 8 6. Repeat steps 1 through 5 for each color wire. See Table 1 on page 7 for the wiring configuration to connect MIUs to the ProCoder. - 6 -...
- Page 9 Table 1: Color Codes for Wires MIU Wire Color/ MIU Type Encoder Terminal Black / B Green / G Red / R R900 R450 Black / G Green / R Red / B Sensus Black / B White / G Red / R Itron Black / G White / R Red / B Aclara...
- Page 10 These instructions only apply to v3 MIUs. The Dual Port R900 and R450 MIUs work with ® Neptune ProRead™, E-CODER , and ProCoder registers. Each register must be programmed in RF Network mode prior to installation. - 8 -...
- Page 11 (HI) and secondary (LO) meters in a dual set application. Programming the HI Register To complete the following steps, use the Neptune Field Programmer to select the ProRead Program tab for programming. 1. Select RF Compound HI format.
- Page 12 5. Program the register. 6. Read or query the register to confirm correct programming. See Figure 17. Programming the LO Register Use the Neptune Field Programmer to select the ProRead Program tab for programming. 1. Select RF Compound LO format.
- Page 13 5: Wiring Networked Registers Complete the following steps to wire networked registers. 1. Connect each color wire with the appropriate color wire from the pigtail and both registers, until all three colors have been successfully connected. See Figure 19. Figure 19: Interconnection of Like Terminals Remove any bare or non-insulated wire.
- Page 14 6: Crimping Tool Manufacturers To apply the Scotchlok™ connectors, Neptune requires the use of a proper crimping tool. Table 2 shows a list of various manufacturers and model numbers. To reduce fatigue, use a tool within each splicing group with the highest mechanical advantage indicated within the parentheses ( ).
- Page 15 The sensitive sweep hand provides a visual representation of extreme low flows as well as reverse flow. Depending on the size and type of ProCoder™ register, a specific multiplier is present. This multiplier, along with the current position of the sweep hand, provides additional digits of resolution that are especially useful for testing.
- Page 16 For further information on reading the ProCoder sweep hand, see the Product Support Document entitled How to Read the Neptune ProCoder Register. 8: Common Causes of Leaks Leaks can result from various circumstances. To better help you identify a possible leak, Table 3 contains some common causes of leaks.
- Page 17 Table 3: Possible Leaks (continued) Possible Cause of Intermittent Continuous Leak Leak Leak Washing machine leaking Dishwasher leaking Hot water heater leaking Watering yard for more than eight hours Continuous pet feeder Water-cooled air conditioner or heat pump Filling a swimming pool Any continuous use of water for 24...
- Page 18 9: How to Tell if Water is in Use To determine if water is in use, complete the following steps. 1. Look at the mechanical sweep hand. 2. Determine which of the following conditions exist. Table 4: Determining if Water in Use If...
- Page 19 10: What to Do if There is a Leak Refer to the following checklist if there is a leak. Table 5: Checklist for Leaks Check all faucets for possible leaks. Check all toilets and toilet valves. Check the ice maker and water dispenser.
- Page 20 1. Check the sweep hand after at least 24 hours. If the leak has been correctly repaired, the sweep hand does not move. 2. Refer to the following table which describes the standard functions of the ProCoder™ flags. Table 6: ProCoder™ Flags ® (When connected to an R900...
- Page 21 Table 6: ProCoder™ Flags (continued) ® (When connected to an R900 MIU) Backflow Flag (Resets After 35 Days) Intermittent leak Eighth digit incremented in 50 of the 96 15-minute intervals Continuous leak Eighth digit incremented in all of the 96 15-minute intervals...
- Page 22 13: Contact Information Within the United States, Neptune Customer Support is available Monday through Friday, 7:00 A.M. to 5:00 P.M. Central Standard Time, by telephone, email, or fax. By Phone To contact Neptune Customer Support by phone, complete the following steps.
- Page 23 By Fax To contact Neptune Customer Support by fax, send a description of your problem to (334) 283-7497. Please include on the fax cover sheet the best time of day for a customer support specialist to contact you. By Email To contact Neptune Customer Support by email, send your message to support@neptunetg.com.
- Page 24 Notes ________________________________________________________________ ________________________________________________________________ ________________________________________________________________ ________________________________________________________________ ________________________________________________________________ ________________________________________________________________ ________________________________________________________________ ________________________________________________________________ ________________________________________________________________ ________________________________________________________________ ________________________________________________________________ ________________________________________________________________ ________________________________________________________________ ________________________________________________________________ ________________________________________________________________ ________________________________________________________________ ________________________________________________________________ ________________________________________________________________ ________________________________________________________________ ________________________________________________________________ ________________________________________________________________ ________________________________________________________________ - 22 -...
- Page 26 QI ProCoder 02.19 / Part No. 13706-001 ©Copyright 2017 -2019 Neptune Technology Group Inc. Neptune is a registered trademark of Neptune Technology G9roup Inc.
Need help?
Do you have a question about the ProCoder and is the answer not in the manual?
Questions and answers