Table of Contents
Advertisement
Available languages
Available languages
RADIO KUCHENNE
Model: 200384-KR-SL, 200384-KR-WH
(Instrukcja obejmuje różne wersje kolorystyczne urządzenia)
SPIS TREŚCI
1 Użycie zgodnie z przeznaczeniem . . . . . . . . . . . . . . . . . . . . . . . . . .2
2 Dane techniczne . . . . . . . . . . . . . . . . . . . . . . . . . . . . . . . . . . . . . . . .2
3 Zasady bezpiecznego użytkowania . . . . . . . . . . . . . . . . . . . . . . . . .2
4 Objaśnienie symboli . . . . . . . . . . . . . . . . . . . . . . . . . . . . . . . . . . . . .4
5 Budowa . . . . . . . . . . . . . . . . . . . . . . . . . . . . . . . . . . . . . . . . . . . . . . .5
6 Zawartość zestawu . . . . . . . . . . . . . . . . . . . . . . . . . . . . . . . . . . . . . .7
7 Użytkowanie . . . . . . . . . . . . . . . . . . . . . . . . . . . . . . . . . . . . . . . . . . .7
8 Czyszczenie i konserwacja . . . . . . . . . . . . . . . . . . . . . . . . . . . . . . . .13
9 Naprawa . . . . . . . . . . . . . . . . . . . . . . . . . . . . . . . . . . . . . . . . . . . . . .13
10 Przechowywanie i transport . . . . . . . . . . . . . . . . . . . . . . . . . . . . .13
11 Utylizacja . . . . . . . . . . . . . . . . . . . . . . . . . . . . . . . . . . . . . . . . . . . . .13
12 Deklaracja CE . . . . . . . . . . . . . . . . . . . . . . . . . . . . . . . . . . . . . . . . . .14
13 Gwarancja i serwis . . . . . . . . . . . . . . . . . . . . . . . . . . . . . . . . . . . . . .14
Advertisement
Chapters
Table of Contents

Summary of Contents for HYKKER 200384-KR-SL
-
Page 1: Table Of Contents
RADIO KUCHENNE Model: 200384-KR-SL, 200384-KR-WH (Instrukcja obejmuje różne wersje kolorystyczne urządzenia) SPIS TREŚCI 1 Użycie zgodnie z przeznaczeniem . . . . . . . . . . . . . . . . . . . . . . . . . .2 2 Dane techniczne . -
Page 2: Użycie Zgodnie Z Przeznaczeniem
FM (87,5 MHz – 108MHz) oraz odsłuchiwania dźwięków za pomocą funkcji bluetooth. Urządzenie jest przeznaczone tylko do prywatnego użytku domowego, wewnątrz pomieszczeń i nie może być używane do celów profesjonalnych. Przestrzeganie instrukcji zapewnia bezpieczeństwo użytkowania urządzenia. 2 Dane techniczne Nr partii POJM200384 Model 200384-KR-SL, 200384-KR-WH Zasilanie 230 V ~ 50 Hz Zasilanie podtrzymujące zegar 3V , 2 x bateria AA 1,5V Moc Zakres częstotliwości radiowych FM 87,5 MHz – 108 MHz Maks. moc wyjściowa - głośniki 2 x 0 .4 W Długość przewodu zasilającego... - Page 3 13 . Nie ustawiać/ nie montować urządzenia w pobliżu rozchlapującej się wody. 14 . Nie dotykaj urządzenia elektrycznego, jeśli wpadło do wody lub uległo zalaniu. Natychmi¬ast odłącz zasilanie elektryczne gniazda, do którego podłączone jest urządzenie, wyłączając główny wyłącznik/bezpiecznik. 15 . Nie dotykaj urządzenia mokrymi rękami. 16 . Urządzenie do użytku domowego. Nie używać do innych celów, niezgodnych z jego przeznaczeniem. 17 . Zachować ostrożność podczas użytkowania urządzenia. 18 . Urządzenie należy ustawić/ zamontować na stabilnej, płaskiej powierzchni. 19 . Odłącz urządzenie od zasilania, gdy nie używasz urządzenia. 20 . Aby uniknąć ryzyka pożaru lub porażenia prądem, podczas korzystania z urządzeń elektrycznych, zwłaszcza w obecności dzieci, należy przestrzegać podstawowych zasad bezpieczeństwa. 21 . Aby zapobiec porażeniu prądem elektrycznym, nie zanurzać wtyczki, przewodu sieciowego lub urządzenia w wodzie lub innych płynach. 22 . Nie przewieszać przewodu sieciowego przez krawędź stołu czy zlewu. 23 . Przed użyciem należy upewnić się czy napięcie zasilania wskazane na urządzeniu odpowiada napięciu w sieci elektrycznej. 24 .
-
Page 4: Objaśnienie Symboli
4 Objaśnienie symboli Przeczytaj instrukcję. Produkt zgodny z wymaganiami dyrektyw Unii Europejskiej. Utylizacja urządzeń elektrycznych i elektronicznych – patrz punkt UTYLIZACJA w niniejszej instrukcji. Urządzenie przeznaczone wyłącznie do użytku wewnątrz pomieszczeń. Klasa ochronności II – w urządzeniach tej klasy ochronności bezpieczeństwo pod względem porażeniowym jest zapewnione przez zastosowanie odpowiedniej izolacji – podwójnej lub wzmocnionej – której zniszczenie jest bardzo mało prawdopodobne. Oznaczenie materiału, z którego wykonane jest opakowanie – PAP20 - tektura falista. -
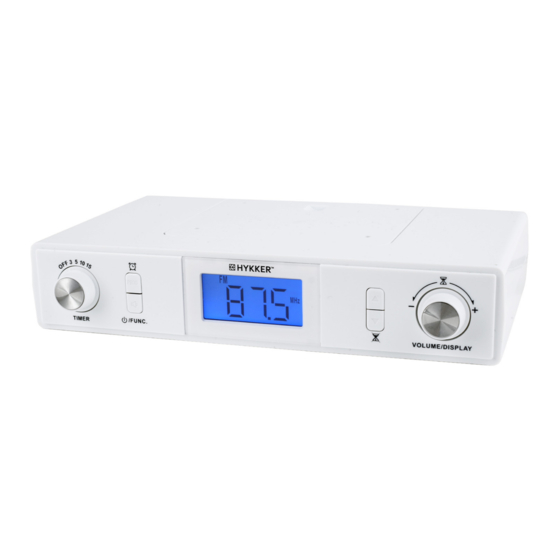
Page 5: Budowa
5 Budowa... - Page 6 Pokrętło funkcji odmierzania czasu: OFF/3/5/10/15 minut Przycisk funkcyjny: drzemka alarmu, AMS, budzik Otwory bazy montażowej Baza montażowa Wyświetlacz Przycisk „w górę” Pokrętło regulacji głośności/ manualna funkcja odmierzania czasu Przycisk „w dół” Przycisk funkcyjny: włącz/ wyłącz radio, Bluetooth, FM Wspornik do postawienia Głośnik Komora baterii Antena Przewód z wtyczką Kołek dystansowy Wkręt długi Wkręt krótki...
-
Page 7: Zawartość Zestawu
6 Zawartość zestawu Ilość Element Radio kuchenne z przewodem sieciowym i anteną Kołek dystansowy Wkręt długi Wkręt krótki Instrukcja obsługi Otwórz opakowanie i ostrożnie wyjmij urządzenie. Sprawdź, czy zestaw jest kompletny i bez uszkodzeń. Upewnij się, że części z tworzyw sztucznych nie są pęknięte, a przewody nie są uszkodzone. Jeśli stwierdzisz, że brakuje części bądź są uszkodzone, nie używaj urządzenia, lecz skontaktuj się ze sprzedawcą. Zachowaj opakowanie lub zutylizuj zgodnie z lokalnymi przepisami. Uwaga! Dla bezpieczeństwa dzieci proszę nie zostawiać swobodnie dostępnych części opakowania (torby plastikowe, kartony, styropian itp.). - Page 8 4 . Wsuń radio na bazę montażową. 5 . Sprawdź czy parametry zasilania urządzenia odpowiadają parametrom lokalnej sieci elektrycznej. 6 . Podłącz urządzenie do gniazda sieci elektrycznej. Montaż na blacie 1 . Postaw urządzenie na płaskiej, stabilnej powierzchni. 2 . Rozłóż wspornik do postawienia. 3 . Sprawdź czy parametry zasilania urządzenia odpowiadają parametrom lokalnej sieci elektrycznej. 4 . Podłącz urządzenie do gniazda sieci elektrycznej. 7.2 Montaż/ wymiana baterii Urządzenie posiada możliwość podtrzymywania funkcji zegara i alarmu, gdy urządzenie jest odłączone od sieci elektrycznej. W tym celu należy zamontować baterie (nie dołączone do zestawu): 1 .
- Page 9 • Niebezpieczeństwo wybuchu! Baterie nie mogą być demontowane, wrzucane do ognia lub zwierane. • Zawsze wyjmuj baterie, gdy nie używasz urządzenia – zapobiegnie to zniszczeniu urządzenia w przypadku wycieknięcia elektrolitu z baterii. • Wyczerpane baterie należy bezzwłocznie wyjąć z urządzenia. •...
- Page 10 UWAGA! Minimalny poziom głośności dla radia wynosi 07. UWAGA! Po podłączeniu urządzenia do sieci w ciągu 1 minuty można ustawić alarm za pomocą przycisków „w górę” (6) lub w „dół” (8), zatwierdzając wybór przyciskiem funkcyjnym (2). Wyłączenie alarmu Aby deaktywować budzik, należy nacisnąć przycisk funkcyjny (2), w trybie wyświetlania godziny. Ikona zniknie z wyświetlacza. Zatrzymanie alarmu Aby zatrzymać narastający dźwięk alarmu naciśnij jeden z poniższych przycisków: • Przycisk funkcyjny (2) • Przycisk funkcyjny (9) • Przycisk „w górę” (6) lub w „dół” (8) • Pokrętło ustawienia głośności/ Arbitralna funkcja odmierzania czasu (7) 7.4 Funkcje odliczania czasu Automatyczna funkcja odliczania czasu 1 . W trybie wyświetlania godziny wybierz odpowiednią ilość czasu do odliczenia, przekręcając pokrętło (1) na wybrany czas: 3, 5, 10 lub 15 minut. Zegar zacznie odliczanie natychmiast, na wyświetlaczu pojawi się symbol klepsydry oraz wybrany czas. Po 5 sekundach na wyświetlaczu ponownie pojawi się zegar, a czas będzie odliczany w tle.
- Page 11 odmierzania czasu (7), na wyświetlaczu pojawi się 0:00. Ponownie naciśnij i przytrzymaj około 5 sekund. 2 . 0:00 na wyświetlaczu zacznie migać. Ustaw czas odliczania, godziny i minuty, przekręcając pokrętło (7), zgodnie z ruchem wskazówek zegara, aby zwiększyć czas. Maksymalny czas to 3:00. 3 . Aby zmienić ustawienie postępuj zgodnie z punktami 1 i 2, przekręcając pokrętło (7), w lewo, aby zmniejszyć czas, w prawo, aby zwiększyć. 4 . Aby zatrzymać odliczanie czasu, naciśnij dwukrotnie pokrętło (7), na wyświetlaczu pojawi się czas, który pozostał. Naciśnij ponownie i przytrzymaj, czas zacznie migać, aby wyzerować naciśnij przycisk „w dół” (8). Funkcja odliczania czasu arbitralna Arbitralną funkcję odliczania czasu można ustawić, gdy jest uruchomiona automatyczna funkcja odliczania czasu.
- Page 12 1 . Włącz funkcję radia zgodnie z punktem włączanie/ wyłączanie radia. 2 . Naciskaj przycisk „w górę” (6) lub w „dół” (8), aby wybrać stację radiową, następnie naciśnij przycisk funkcyjny (2), aby zatwierdzić wybór. 7.7 Funkcja bluetooth Parowanie Radia z urządzeniem mobilnym poprzez bluetooth Aby połączyć Radio ze swoim telefonem lub innym urządzeniem mobilnym postępuj według poniższych instrukcji: 1 . Naciskaj przycisk funkcyjny (9), aby włączyć funkcję bluetooth. Na wyświetlaczu będzie migać „bt”, gdy funkcja bluetooth będzie włączona. 2 . Uruchom funkcję bluetooth na swoim urządzeniu mobilnym i wyszukaj radio na liście dostępnych urządzeń (Hykker Radio). 3 . Jeśli urządzenie mobilne poprosi o hasło wpisz „0000” lub „1234” i zatwierdź. 4 . Połącz / Sparuj urządzenia. Gdy urządzenia będą poprawnie sparowane napis na wyświetlaczu „bt” przestanie migać. UWAGA! Maksymalna odległość urządzenia mobilnego od radia wynosi 10 m.
-
Page 13: Czyszczenie I Konserwacja
Dostosowywanie głośności Aby ustawić pożądaną głośność użyj pokrętła regulacji głośności (7) aby zmienić głośność: obróć w lewo, aby zmniejszyć, w prawo, aby zwiększyć. Uwaga! Podczas odtwarzania poprzez funkcję bluetooth, głośność dźwięków zależy również od ustawionej głośności w urządzeniu mobilnym. 8 Czyszczenie i konserwacja Urządzenie należy przecierać suchą ściereczką. Nie stosować żadnych żrących środków czyszczących, gdyż mogą uszkodzić produkt. Nie zanurzać urządzenia w wodzie ani innych płynach. 9 Naprawa Urządzenie nie zawiera części serwisowanych przez użytkownika. Nie naprawiaj urządzenia samodzielnie. Zawsze zlecaj naprawę fachowcowi. 10 Przechowywanie i transport • Zalecane jest przechowywanie urządzenia w oryginalnym opakowaniu. •... -
Page 14: Deklaracja Ce
innym formom wykorzystania zużytych urządzeń wnoszą Państwo istotny wkład w ochronę naszego środowiska. 4 . Informacji o właściwym punkcie usuwania zużytych urządzeń elektrycznych i elektronicznych udzieli Państwu administracja gminna lub sprzedawca urządzenia. 5 . Zużyte, całkowicie rozładowane baterie i akumulatory muszą być wyrzucane do specjalnie oznakowanych pojemników, oddawane do punktów przyjmowania odpadów specjalnych lub sprzedawcom sprzętu elektrycznego. 12 Deklaracja CE Urządzenie zostało zaprojektowane, wyprodukowane i wprowadzone na rynek zgodnie z wymaganiami Dyrektyw “Nowego Podejścia” i dlatego wyrób został... - Page 15 Karta gwarancyjna 1. Stempel .................. 2. Data sprzedaży ............... 3. Podpis ..................4. Nazwa sprzętu ................ 5. Model sprzętu ................ 6. Nr seryjny lub nr partii ............Ogólne warunki gwarancji 1 . Gwarant niniejszego produktu gwarantuje, że w okresie 24 miesięcy od daty zakupu produktu, potwierdzonej prawidłowo wypełnioną kartą gwarancyjną, produkt będzie, wedle uznania Gwaranta, podlegał: a) bezpłatnej naprawie przez Gwaranta, z zastrzeżeniem, że zdemontowane, uszkodzone lub wadliwe części produktu w celu zapewnienia bezpieczeństwa Klienta stają się własnością Gwaranta, b) wymianie produktu na nowy w miejscu zakupu produktu, w związku z czym uszkodzony lub wadliwy produkt staje się własnością Gwaranta, c) zwrotowi w zamian za zwrot ceny za zakupiony produkt, w związku z czym uszkodzony lub wadliwy produkt staje się własnością Gwaranta. 2 . Za produkt uszkodzony uważa się taki produkt, który nie spełnia funkcji określonych w instrukcji obsługi, a przyczyną tego stanu jest wewnętrzna właściwość urządzenia.
- Page 16 serwisowych. 9 . Niniejsza gwarancja na sprzedany towar konsumpcyjny nie wyłącza, nie ogranicza ani nie zawiesza uprawnień kupującego wynikających z przepisów o rękojmi za wady rzeczy sprzedanej zgodnie z postanowieniami Kodeksu Cywilnego z dnia 23 kwietnia 1964 roku (Dz.U.2014.121). 10 . Terytorialny zasięg ochrony gwarancyjnej: terytorium Rzeczpospolitej Polskiej.
- Page 17 KITCHEN RADIO Model: 200384-KR-SL, 200384-KR-WH (The user’s manual covers various color versions of the device) TABLE OF CONTENTS 1 Intended use . . . . . . . . . . . . . . . . . . . . . . . . . . . . . . . . . . . . . . . . . .18 2 Technical data .
-
Page 18: Intended Use
1 Intended use The device is intended to receive radio broadcasts in the FM (87.5 MHz – 108 MHz) frequency band, as well as to listen to music using the Bluetooth function. The device is intended for private household use indoors only. It must not be used for professional purposes. Following the instructions in this manual will ensure safe use of the device. 2 Technical data Lot No. POJM200384 Model 200384-KR-SL, 200384-KR-WH Power supply 230 V ~ 50 Hz 3V , 2 x AA 1,5V battery Clock backup power supply Power FM radio frequency band 87,5 MHz – 108 MHz Max. output power – loudspeakers 2 x 0 .4 W Power cord length 160 cm 3 Safety instructions 1 . - Page 19 outlet the device is connected to by switching off the main switch/fuse. 15 . Do not touch the device with wet hands. 16 . The device is intended for household use only. Do not use the device for any purpose other than its intended use. 17 . Operate the device carefully . 18 . Place/install the device on a stable and flat surface. 19 . If you are not using the device, disconnect it from the power source. 20 . In order to prevent fire or electric shock when using electrical devices, in particular in the presence of children, follow basic safety rules. 21 . Do not immerse the power cord, its plug or the device itself in water or any other liquid, so as to avoid electric shock.
-
Page 20: Explanation Of Symbols
4 Explanation of symbols Read the instructions Product compliant with requirements prescribed in the applicable European Union directives. Disposal of waste electrical and electronic equipment — see the DISPOSAL section of this manual. Indoor use only. Protection class II: Protection against electric shock is ensured by adequate insulation (double or enhanced), the failure of which is very unlikely. Designation of the packaging material – PAP20 – corrugated cardboard. Symbol indicating that the manufacturer has made a financial contribution to the development and operation of a packaging materials recovery and recycling system. Segregation sign - Labeling indicating the need for waste segregation. -
Page 21: Overview
5 Overview... - Page 22 Time countdown function dial: OFF/3/5/10/15 minutes Function button: alarm snooze, AMS, alarm clock Mounting base openings Mounting base Display “Up” button Volume control dial/manual time countdown function “Down” button Function button: radio, Bluetooth, FM on/off Standing bracket Loudspeaker Battery compartment Antenna Power cord with plug Spacing plug Long screw Short screw...
-
Page 23: Set Contents
6 Set contents Item Kitchen radio with power cord and antenna Spacing plug Long screw Short screw User's manual Open the packaging and carefully take out the device. Make sure the set is complete and that its components are undamaged. Check that the plastic parts are not cracked, and the cables are not damaged. If any parts are damaged or missing, contact the dealer and do not use the device. Keep the packaging or dispose of it in accordance with local regulations. Caution! For the sake of children’s safety, do not leave any packaging materials accessible and unattended (plastic bags, cardboard boxes, Styrofoam, etc.). Risk of suffocation! 7 Use 7.1 Device assembly You may place the device on a flat surface or hang it under a kitchen cabinet using the... - Page 24 4 . Slide the radio onto the mounting base. 5 . Check whether the device power supply parameters match the parameters of the local mains. 6 . Connect the device to the power outlet. Installation on a desktop 1 . Put the device on a flat and stable surface. 2 . Unfold the standing bracket. 3 . Check whether the device power supply parameters match the parameters of the local mains. 4 . Connect the device to the power outlet. 7.2 Inserting and changing batteries The device can keep the clock and alarm functions on when it is disconnected from the mains. To use this function, install batteries (not included): 1 . Open the battery compartment. 2 . Remove the spent batteries (if present) and install new batteries. 3 . Close the battery compartment. Caution! •...
- Page 25 • When the device is not used, always remove the batteries. This will prevent damage to the device in the event that electrolyte leaks from the batteries. • Remove spent batteries from the device immediately. • Electrolyte may leak out of spent batteries, causing damage to the device. •...
- Page 26 Turning off the alarm To deactivate the alarm clock, press the function button (2) in the time display mode. The icon will disappear from the display. Stopping the alarm To stop the increasing alarm sound, press one of the following buttons: • Function button (2) • Function button (9) • “Up” (6) or “Down” (8) button • Volume control dial/Arbitrary time countdown function (7) 7.4 Time countdown functions Automatic time countdown function 1 . In the time display mode, select the amount of time to be counted down by rotating the dial (1) to the selected time: 3, 5, 10, or 15 minutes. The clock will immediately start counting down, the hourglass symbol and the selected time will be shown on the display. After 5 seconds, the clock will reappear on the display, the time will be counted down in the background. 2 . When the selected time elapses, the increasing alarm sound will be heard. 3 . To stop the alarm sound, press one of the following buttons: • Function button (2) •...
- Page 27 shown on the display. Press again and hold, the time will start flashing. To reset, press the “Down” button (8). Arbitrary time countdown function You may set the arbitrary time countdown function when the automatic time countdown function is active. 1 . Set the automatic time countdown function. 2 . Press the volume control/manual time countdown function dial (7) twice, the time of the first alarm will be shown on the display. Press the dial again and hold for approx. 5 seconds. 3 . 0:00 will start flashing on the display. Set the countdown time, format: HH:MM, by rotating the dial (7) clockwise to increase the time. The maximum time is 3:00.
- Page 28 2 . Press repeatedly the “Up” (6) or “Down” (8) button to select the radio station, then press the function button (2) to confirm the selection. 7.7 Bluetooth function How to pair the radio with a mobile device via Bluetooth To pair the radio with your phone or another mobile device, follow the instructions below: 1 . Press repeatedly the function button (9) to enable the Bluetooth function. When Bluetooth is active, “bt” will flash on the display. 2 . Enable Bluetooth in your mobile device, and search for the device on the list of available devices (Hykker Radio). 3 . If the mobile device asks for the password, enter “0000” or “1234” and confirm. 4 . Connect / pair the devices. When the devices are successfully paired, the “bt” on the display will stop flashing. CAUTION! The maximum distance between the mobile device and the radio is 10 m. Volume adjustment To set the desired volume, use the volume control dial (7) to change it: rotate counter- clockwise to decrease, clockwise to increase. Caution! When playing music via Bluetooth, the sound volume also depends on the...
-
Page 29: Cleaning And Care
8 Cleaning and care Wipe the device with a dry cloth. Do not use any aggressive cleaning agents, as they may damage the product. Do not immerse the device in water or other liquids. 9 Repair The device does not contain any user-serviceable parts. Do not attempt to repair the device on your own. Always have a specialist perform repairs. 10 Handling and storage • It is recommended to store the device in the original packaging. • Always store the device in a dry and well-ventilated room, beyond children’s reach . • Protect the device against vibration and shock during transport. 11 Disposal All the packaging materials are 100% recyclable, and are labelled as such. Dispose of the packaging in accordance with local regulations. Keep the packaging materials out of children’s reach, as these materials can pose a hazard. Correct disposal of the device: 1 . -
Page 30: Ce Declaration Of Conformity
12 CE Declaration of Conformity This device has been designed, manufactured and marketed in compliance with the requirements of the New Approach Directives, therefore, the product has been marked with the CE mark, and a declaration of conformity has been issued for it, which is made available to market regulators. 13 Warranty and service In order to submit a complaint about the product, submit the device to the Customer Service Point at any Biedronka store. - Page 31 Warranty card 1. Stamp ................... 2 . Sale date ................3 .
- Page 32 days. The said time limit may be extended to 1 month in the event that spare parts currently unavailable at the Service must be purchased. 8 . It is recommended that the complete product be submitted together with the complaint so as to facilitate service operations. 9 . This warranty for the sold consumer product does not exclude, restrict or suspend any rights of the Buyer related to laws and regulations concerning warranty for defects in sold items pursuant to the provisions of the Civil Code of 23 April 1964 (Journal of Laws Dz.U.2014.121). 10 . The warranty shall be applicable within the territory of the Republic of Poland.
Need help?
Do you have a question about the 200384-KR-SL and is the answer not in the manual?
Questions and answers