Advertisement
Quick Links
Before You Begin
Product Features
□ Pre-programmed sunrise and sunset times that adjust automatically throughout the year
based on your location.
□ Set one or more ON/OFF settings for each day of the week, daily cycles, or weekday -
weekend cycles
□ Stores up to 7 individual programs
□ A Random feature which turns the lights off and on between 30 minutes before and after the
programmed time, giving the appearance that somebody is currently home
□ 2 grounded outlets
Product Specifi cations
RATINGS
15A General Purpose /
125 VAC, 60 Hz
Resistive
Programming Instructional Video
Initial Setup
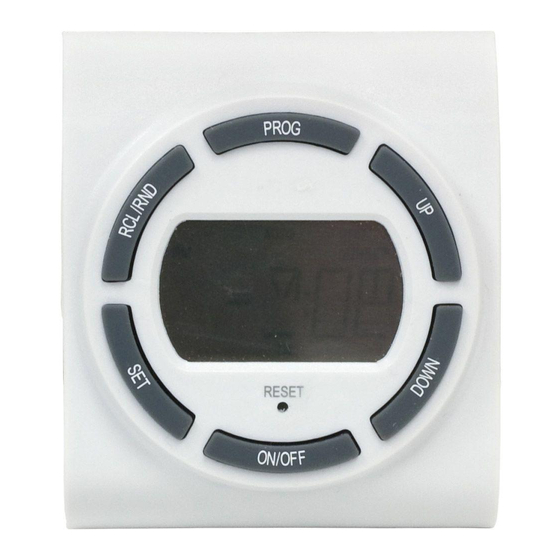
PRODUCT DESCRIPTION
Timer display shown in standard Clock mode:
Part Description
RCL/RND: When programming press to clear the ON/OFF setting. When in Clock mode, push
A
to activate the random feature, which turns the lights off and on between 30 minutes before
and after the programmed time, giving the appearnce that somebody is currently home.
SET: Hold for 5 seconds to set the clock/date. Push to confi rm a setting and move to the
B
next option.
PROGRAM: Hold 5 seconds to program ON/OFF timer settings. Push when programming is
C
complete to activate the timer.
D
UP/DOWN: Scroll through the Settings options.
E
RESET: Press and hold with a toothpick to clear all settings on the timer.
F
ON/OFF: ON=Always ON, Auto=Timer is active, OFF=Always OFF
1
SETTING UP THE TIMER FOR THE FIRST TIME
NOTE: Upon initial setup, you will be following Steps 1 through 2. The timer will automatically
return to clock mode (clock displayed on the timer display) if no buttons are pressed for 1
minute. If this happens, press and hold the SET button for 5 seconds and continue pressing
SET to scroll through the settings to return to where you last left off in the set up process.
If the LCD screen is displaying numbers, you are ready to program and can proceed with
these steps. If the screen is blank, plug in the timer and leave for two hours to charge the
internal battery before programing.
a. Use a toothpick or sharp pencil to push the RESET
button. The screen will go blank briefl y and then
display 12:00 AM.
b. Press and hold SET for 5 seconds until the hour
begins to fl ash. Release the button. See Figure 1.
c. Press UP/DOWN to adjust the hour. Press SET to
confi rm. The default is 12 AM. Take note of the AM/
PM on the upper left of the screen when setting the
hour.
d. Press UP/DOWN to adjust the minute. Press SET to
confi rm.
e. Press UP/DOWN to adjust the year. Press SET to
confi rm.
f. Press UP/DOWN to adjust the month. Press SET to
confi rm. See Figure 2.
g. Press UP/DOWN to adjust the day. Press SET to
confi rm.
h. Press UP/DOWN to select DST ON or DST OFF and
press SET to confi rm. DST stands for Daylight
Savings Time. If DST is set to ON, this feature
automatically resets the times in the timer to match
the current time change. The default DST time
change is 2:00 am, the second Sunday of March,
and then the fi rst Sunday in November. Press SET to
confi rm. See Figure 3.
i. When the timer display fl ashes NOR, proceed to
Step 2 – SETTING THE DAWN/DUSK REGION.
IP07232014
DAYLIGHT ADJUSTING INDOOR DIGITAL TIMER
1250 W(10A)
1/2 HP Motor
Tungsten
To view an instructional video on how to program this product:
1. Go to www.homedepot.com and enter either the Item or Model number found in the top right
corner of this instruction sheet in the search fi eld.
2. Click on your product from the list of search results and click on the video link in the Product
Overview section.
AUTO
AM
TH
Figure 1
DAY
MONTH
Figure 2
DST ON
MONTH
Figure 3
CONTINUE TO PAGE 2 TO COMPLETE SETUP AND PROGRAMMING
Use and Care Guide
Safety Information
RISK OF ELECTRIC SHOCK:
Plug directly into an electrical outlet
Do not use in wet locations
Use indoors only
Unplug the timer before cleaning
WARNING
Keep children away
RISK OF FIRE:
Do not use to control appliances that contain heating elements
[cooking appliances, heatrs, irons, etc.]
Do not exceed electrical ratings
Do not use with extension cords
A
B
2
SETTING THE DAWN/DUSK REGION
IMPORTANT: This step does not set your time zone. In this step you are identifying your location based
on this map to ensure an accurate sunup and sunset time for your area.
a. View the map below and determine which area best fi ts your location (see Figure 4). Press
UP/DOWN to scroll through the available areas in the timer and press SET at the appropriate
area. The options are:
□ NOR: North
□ CENT: Central
□ SOU: South
□ HI: Hawaii
□ ALAS: Alaska
b. The timer display shows SUNUP and the timer's pre-set SUNUP time with the HOUR blinking.
This SUNUP time should be close to the time the sun rises in your area. If this time is
acceptable, press SET twice to proceed to step d. To revise the SUNUP time, proceed to
step c.
c. To revise the SUNUP setting, press UP and DOWN as needed to adjust the hour. Pay attention
to the AM and PM at the top of the timer display. Press SET to confi rm the hour and then
press UP and DOWN as needed to set the minutes. Press SET to confi rm the minutes.
d. When SUNSET fl ashes on the timer display, repeat step b.
ALASKA
YEAR
NORTH
CENTRAL
SOUTH
YEAR
HAWAII
UPC #043180498083
C
AUTO
D
PM
TU
E
RESET
F
Figure 4
Please contact 1-866-308-3976 for further assistance.
Item #457-864
Model #49808
NORTH
CENTRAL
SOUTH
HOMEDEPOT.com
Advertisement

Related Manuals for Defiant 49808


Summary of Contents for Defiant 49808
- Page 1 Use and Care Guide Item #457-864 Model #49808 DAYLIGHT ADJUSTING INDOOR DIGITAL TIMER UPC #043180498083 Before You Begin Product Features Safety Information □ Pre-programmed sunrise and sunset times that adjust automatically throughout the year RISK OF ELECTRIC SHOCK: Plug directly into an electrical outlet based on your location.
- Page 2 Use and Care Guide DAYLIGHT ADJUSTING INDOOR DIGITAL TIMER Programming PROGRAMMING THE ON/OFF DAYS PROGRAMMING THE ON/OFF TIMES This timer is capable of storing 7 programmable times (PROG 1 – PROG 7) to allow for various a. Choose from one of these three options to begin confi guring the timer’s ON time. The ON/OFF times for different days of the week.
Need help?
Do you have a question about the 49808 and is the answer not in the manual?
Questions and answers