Table of Contents
Advertisement
Quick Links
Advertisement
Table of Contents

Subscribe to Our Youtube Channel
Related Manuals for Adaptec USB2Xchange


Summary of Contents for Adaptec USB2Xchange
- Page 1 Adaptec USB2Xchange User’s Guide...
- Page 2 Copyright © 2002 Adaptec, Inc. All rights reserved. No part of this publication may be reproduced, stored in a retrieval system, or transmitted in any form or by any means, electronic, mechanical, photocopying, recording or otherwise, without the prior written consent of Adaptec, Inc., 691 South Milpitas Blvd., Milpitas, CA 95035.
- Page 3 Adaptec Customer Support If you have questions about installing or using your Adaptec product, check this document first—you will find answers to most of your questions here. If you need further assistance, use the support options listed below. Technical Support Identification (TSID) Number Before contacting Technical Support, you need your unique 12-digit TSID number.
- Page 4 French: For support via e-mail, submit your question to Adaptec’s Technical Support Specialists at To order Adaptec products, including accessories and cables, call +32 11 300 379. Or, you can order cables online at Australia and New Zealand Visit our Web site at www.adaptec.com.au...
- Page 5 This device complies with part 15 of the FCC rules. Operation is subject to the following two conditions: (1) this device may not cause harmful interference and (2) this device must accept any interference received, including interference that may cause undesired operation. Adaptec, Inc. Tested to Comply With FCC Standards...
- Page 6 Canadian Compliance Statement This Class B digital apparatus meets all requirements of the Canadian Interference- Causing Equipment Regulations. Cet appareil numérique de la classe B respecte toutes les exigences du Règlement sur le matériel brouilleur du Canada. Japanese Compliance (Voluntary Control Council Initiative) This equipment complies to class B Information Technology equipment based on VCCI (Voluntary Control Council for Interface).
- Page 7 Limited 5-Year Hardware Warranty 1. Adaptec, Inc. (“Adaptec”) warrants to the purchaser of this product that it will be free from defects in material and workmanship for a period of five (5) years from the date of purchase. If the product should become defective within the warranty period, Adaptec, at its option, will repair or replace the product, or refund the purchaser’s purchase price for the product,...
- Page 8 Software is furnished will be free from defects in material or workmanship under normal use and service for a period of thirty (30) days from the date of delivery to you. ADAPTEC AND ITS LICENSORS DO NOT AND CANNOT WARRANT THE PERFORMANCE OR RESULTS YOU MAY OBTAIN BY USING THE SOFTWARE OR DOCUMENTATION.
- Page 9 This warranty gives you specific legal rights and you may also have other rights which vary from state to state. 8. The entire liability of Adaptec and its licensors, and your exclusive remedy for a breach of this warranty, shall be: a.
-
Page 10: Table Of Contents
Windows XP 7 Windows 2000 11 Windows Me 14 Windows 98SE 16 Uninstalling the Driver 19 Understanding the USB2Xchange Power Supply 21 Using an External DC Power Supply 23 Understanding SCSI 24 Preparing SCSI Devices for Installation 24 SCSI IDs 24... -
Page 11: Introduction
SCSI devices into the Universal Serial Bus (USB) port of your Windows computer. The SCSI controller in the USB2Xchange lets you connect up to seven SCSI devices to your desktop or laptop computer. The USB2Xchange provides USB 2.0 data transfer rates, up to 480 Megabits per second, while maintaining backward compatibility with USB 1.1 devices. -
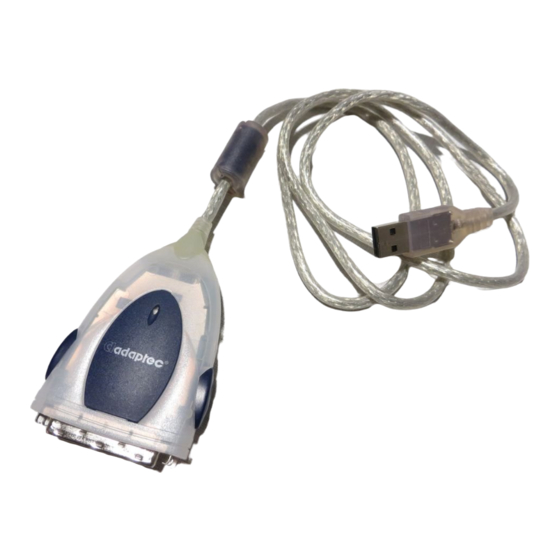
Page 12: Usb2Xchange Connectors
USB2Xchange Connectors The USB2Xchange is an integrated adapter with a 50-pin high-density connector at one end and a USB connector at the other, as shown in the figure below. 50-pin high-density SCSI connector The USB2Xchange adapter acts like a self-powered device— it receives its electrical power from attached SCSI devices. -
Page 13: Installing Usb2Xchange
USB2Xchange adapter.) Ensure that you have the proper connector to attach the USB2Xchange to the first SCSI device, and that you have a high- quality SCSI cable for each additional SCSI device being connected. Note: It is important to use only high-quality cables to ensure that data is written and read correctly. - Page 14 SCSI IDs on page 24 on page 25 for more information. 2 Connect the USB2Xchange adapter to the first SCSI device, as shown in the figure below. Depending on the SCSI device connector type, you can either attach the SCSI connector of the USB2Xchange directly to your SCSI device, or you may require an additional cable or converter.
-
Page 15: Connecting To Your Computer
2 Plug the USB connector into the USB port on your computer. 3 Make sure the cable ends are firmly connected. Do not force your connections as this may damage your system or the USB2Xchange. Note: The USB2Xchange receives its +5V power from either the terminator power line of the attached SCSI device, or if no termination power is available, from the USB bus. -
Page 16: Connecting To An External Usb Hub
USB2Xchange adapter to an optional power supply. See Understanding the USB2Xchange Power Supply on page 21 for more information. 2 Connect the USB connector of your USB2Xchange to a port on the external USB hub. USB2Xchange plugged into hub Installing USB2Xchange www.adaptec.com... -
Page 17: Installing The Driver
USB2Xchange CD. To install the Windows XP driver: 1 Ensure that Windows XP is running. 2 Plug the USB2Xchange adapter into the USB port on your computer. Make sure the adapter is connected to a powered-up SCSI device. The Found New Hardware Wizard opens. - Page 18 3 Insert the USB2Xchange CD into your CD-ROM drive. Select Install the software automatically (Recommended), then select Next. 4 Click Continue Anyway. Installing the Driver...
- Page 19 5 When the installation is complete, click Finish. A new Found New Hardware Wizard appears. 6 Select Install the software automatically (Recommended), then click Next. Installing the Driver...
- Page 20 7 If this screen appears, select Continue Anyway. 8 Click Finish to complete the installation. Note: Installing the drivers for the USB2Xchange adapter before connecting and powering-on at least one SCSI device might cause a drive load failure. This failure will show as a yellow exclamation point beside the USB2Xchange adapter in Device Manager.
-
Page 21: Windows 2000
USB2Xchange CD. To install the Windows 2000 driver: 1 Ensure that Windows 2000 is running. 2 Plug the USB2Xchange adapter into the USB port on your computer. Make sure the adapter is connected to a powered-up SCSI device. The Found New Hardware Wizard opens. - Page 22 Installing the Driver 4 Select Search for a suitable driver..., then click Next. 5 Insert the USB2Xchange CD into your CD-ROM drive. Select CD-ROM drives, then click Next.
- Page 23 6 Click Next to install the driver. Note: Your CD-ROM drive may have a different drive letter than the one shown in the example above. 7 Click Finish to complete the installation. Installing the Driver...
-
Page 24: Windows Me
USB2Xchange CD. To install the Windows Me driver: 1 Ensure that Windows Me is running. 2 Plug the USB2Xchange adapter into the USB port on your computer. Make sure the adapter is connected to a powered-up SCSI device. The Found New Hardware Wizard opens. - Page 25 3 Insert the USB2Xchange CD in your CD-ROM drive. Select Automatic search for a better driver (Recommended), then click Next. Windows Me installs the driver. 4 Click Finish to complete the installation. Note: Installing the drivers for the USB2Xchange adapter before connecting and powering-on at least one SCSI device might cause a drive load failure.
-
Page 26: Windows 98Se
USB2Xchange CD. To install the Windows 98SE driver: 1 Ensure that Windows 98SE is running. 2 Plug the USB2Xchange adapter into the USB port on your computer. Make sure the adapter is connected to a powered-up SCSI device. The Found New Hardware Wizard opens. - Page 27 Installing the Driver 4 Select Search for the best driver..., then click Next. 5 Insert the USB2Xchange CD in your CD-ROM drive. Select CD-ROM drive, then click Next.
- Page 28 6 Click Next. Note: Your CD-ROM drive may have a different drive letter than the one shown in the example above. 7 Click Finish to complete the installation. Installing the Driver...
-
Page 29: Uninstalling The Driver
Caution: If you uninstall the USB2Xchange driver, both USB2Xchange and USBXchange drivers will be removed. To uninstall the USB2Xchange driver: 1 Unplug the USB2Xchange adapter from the USB port of your computer. 2 Insert the USB2Xchange CD into the CD-ROM drive. - Page 30 Note: Your CD-ROM drive may have a different drive letter than the one shown in the example above. 5 Click Continue. 6 This dialog box appears when you have successfully uninstalled the USB2Xchange driver. Installing the Driver...
-
Page 31: Understanding The Usb2Xchange Power Supply
USB bus. There are cases when the USB bus cannot supply the needed power for the USB2Xchange to operate—if, for example, you’re using an unpowered USB hub and the attached SCSI devices don’t supply SCSI termination power. In these cases, you may need to use an optional DC power supply. - Page 32 If you click Yes when the error message appears, you may receive this message: You can try either of these suggestions to correct the problem: Unplug the USB2Xchange and plug it directly into another USB port on your computer, or into a self-powered hub that is connected to your computer.
-
Page 33: Using An External Dc Power Supply
Using an External DC Power Supply If you need an external power source, the Polarity: USB2Xchange adapter can use a DC power supply with a 4.5V to 7.5V output and a minimum 500 mA output current. An external 3.4 mm DC power plug (not included with kit) can be plugged into the DC input connector located on the side of the USB2Xchange, as shown in the figure below. -
Page 34: Understanding Scsi
SCSI bus. A SCSI bus is the path or channel that connects your computer, USB2Xchange adapter, and one or more SCSI devices. It's not a physical object that you can point to; instead, it's the whole collection of SCSI cables and devices (including the USB2Xchange) that make up the communication channel. -
Page 35: Terminating The Scsi Bus
Terminator Note: Some SCSI devices require that termination power be supplied to the SCSI bus. The USB2Xchange adapter does not supply termination power. To use these devices with the USB2Xchange, a device which does supply termination power must be added to the SCSI bus. -
Page 36: Using Scsi Cables
Using SCSI Cables High-quality cables are required in high-performance SCSI systems to ensure data integrity. Adaptec provides the highest quality SCSI cables designed specifically for use with SCSI devices. For purchasing information, visit the Adaptec Web site at www.adaptec.com The total length of cabling on the SCSI bus should not exceed the... -
Page 37: About Usb
About USB USB stands for Universal Serial Bus. It is the interface between your computer and the USB devices you plug into it. Your computer communicates with USB devices through the USB interface. Some USB features are particularly important to desktop computer users: USB is one-size-fits-all—any USB device can be plugged into any USB port using the appropriate USB cable. -
Page 38: Troubleshooting
Troubleshooting If you have problems with the USB2Xchange, work through these troubleshooting tips. My device is not recognized. How can I get the system to recognize my device? All SCSI devices must be powered on before the system acknowledges the USB2Xchange. Power on all SCSI devices and then reconnect your USB2Xchange to your computer. - Page 39 When I power off/on my SCSI device while still connected to USB2Xchange, the system does not detect the USB2Xchange or the SCSI device appears to be missing. How can I correct this problem? Unplug the USB2Xchange adapter from the USB port, then plug it in again.
- Page 40 Adaptec, Inc. 691 South Milpitas Boulevard Milpitas, CA 95035 USA © 2002 Adaptec, Inc. All rights reserved. Adaptec and the Adaptec logo are trademarks of Adaptec, Inc. which may be registered in some jurisdictions. Part Number: 513187-06, Ver. AA LB 05/02...
Need help?
Do you have a question about the USB2Xchange and is the answer not in the manual?
Questions and answers