
Related Manuals for Rio Mobility Firefly 2.5

Summary of Contents for Rio Mobility Firefly 2.5
- Page 1 Electric Handcycle Attachment Firefly 2.5 User Manual Ver 1.2 10_19_2020 Phone: 415-552-6277 Email: sales@riomobility.com...
-
Page 2: Wheelchair Requirements
Website: www.riomobility.com IMPORTANT! Consult with your health care professional to determine if the Firefly 2.5 is appropriate for you. DO NOT OPERATE THIS EQUIPMENT WITHOUT FIRST READING AND UNDERSTANDING THIS MANUAL. IT IS RECOMMENDED THAT INITIAL SETUP OF THIS HANDCYCLE BE PERFORMED BY A QUALIFIED TECHNICIAN, SUCH AS A WHEELCHAIR OR BICYCLE MECHANIC. - Page 3 1. Wheelchair Requirements As part of our installation process, you will attach our mounting clamps onto your wheelchair. Our wheelchair attachments fit most wheelchairs. However, a few wheelchairs will not fit our clamps. Use this guide to determine if our devices are right for you. There are five points that must be considered in order to determine whether your wheelchair is compatible with our wheelchair attachments: 1) Seat width.
- Page 4 The Firefly is compatible with almost all wheelchairs without the need for any special adapters. When seated in the wheelchair, your center of gravity must be far enough forward as to make “wheelies” or tipping Anti-Tips backwards difficult. IMPORTANT: If the chair is set up such that “wheelies”...
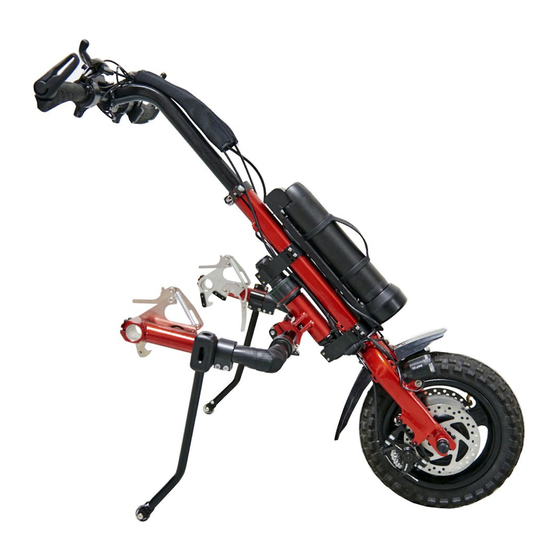
- Page 7 2. Installing the Firefly Visit our website for the Firefly installation video: www.riomobility.com Firefly 2.5 Component Names Connector cover Battery switch Battery key lock Handlebar Battery Stem Controller Stem QR Light Locking headset Disc/ rotor Coupler plate Motor/ wheel Kickstand Fork/ frame Fender T-Frame QR...
- Page 9 3. Controls Parking Brake Button Brake Lever Brake Lever Bar end Bar end Quick Release Reverse Throttle **Forward Throttle Grip Grip Bell Color Display *Light Switch *To activate the headlight: locate the light switch near the right brake lever. Press “down”...
- Page 10 4. Docking and Transfers Docking Firefly 2.5 is equipped with new safety features to help make docking and transferring in and out of the chair easier for you. To start the attach the Firefly 2.5 follow these steps. 1) Start by locking the headset lock. To do this twist the headset “clockwise”...
- Page 11 Headset Free Headset Locked (green line on top) (red line on bottom) Open Coupler Plate Locked Coupler Plate (No green line shown) (green line shown) Locator Pin L Tube L Tube U-Crossbar Assembly Coupler Tube Coupler Tube Coupler Plates (Firefly logo facing up) (Firefly logo facing up) (inside)
- Page 12 5. Maintenance Inspection / Maintenance Item Initially Weekly 6 Months Check and Tighten Hardware Tighten Headset Compression Nut Brake Pad Wear & Adjustment All hex/ Allen head screws must be tightened using a torque limiter wrench (included in your accessories box). NOTE: Do not attempt to adjust any Safety Torx screws (the star pattern screws with a pin the middle.) These particular clamp screws have been adjusted at the factory and should not need any additional adjustment.
-
Page 13: Troubleshooting
6. Troubleshooting When climbing a hill, the front wheel slips. The front wheel is too far forward of your center of gravity. Please adjust the handcycle so that the front wheel is as close as possible to the footrest without interfering while driving straight or turning. - Page 14 • Check to make sure all nuts and bolts are tight and all latches are secured. • Make sure the hand brakes work properly before riding your handcycle. • Do not add any parts or accessories not authorized by Rio Mobility to your handcycle. Any addition could be unsafe and will void your warranty.
-
Page 15: Limited Warranty
Do not put weight on the frame (objects or people). This handcycle is meant for everyday recreational or general sporting use and is not intended for use in competition. Rio Mobility is not responsible for any damage or injury due to misuse of your handcycle. 7. Limited Warranty... - Page 16 (1) year from the date of initial consumer purchase. This warranty covers any MANUFACTURING defects in materials and workmanship. Rio Mobility warrants the lithium Ion battery for three (3) months from the date of initial purchase. This covers any MANUFACTURING defects in materials and workmanship.
Need help?
Do you have a question about the Firefly 2.5 and is the answer not in the manual?
Questions and answers
Me está dando error24
Need replacement pin for locking attachment together was sent wrong part it looks like push pin