
Related Manuals for Lissmac MULTICUT 605 SG


Summary of Contents for Lissmac MULTICUT 605 SG
- Page 1 OPERATING MANUAL FLOOR SAW MULTICUT 605 SG LISSMAC Maschinenbau GmbH Lanzstrasse 4 D-88410 Bad Wurzach Telefon +49 (0) 7564 / 307 - 0 Telefax +49 (0) 7564 / 307 - 500 lissmac@lissmac.com www.lissmac.com 1/107...
- Page 2 2/107...
- Page 3 Legal notice This operating manual is valid for: LISSMAC floor saw MULTICUT 605 SG Manufacturer: LISSMAC Maschinenbau GmbH Lanzstrasse 4 D - 88410 Bad Wurzach Phone: +49 (0) 7564 / 307 – 0 Fax: +49 (0) 7564 / 307 – 500 lissmac@lissmac.com...
- Page 4 Instructions for the operator The warning notes contained are not exhaustive. Lissmac cannot foresee every potential hazard. Reasonable safety rules and precautions must be followed as with any other machine, in terms of working methodology and operation. 4/107...
- Page 5 The following warning signs and safety notes are used: Read the operating manual Wear hearing protection Wear safety goggles Wear work gloves Wear protective helmet Wear dust mask Wear suitable work clothes and wash regularly Attachment point for crane transports Remove the ignition key before working on the unit Engage or release parking break only at standstill Cutting hazard at the rotating tool...
- Page 6 Burn hazard Suffocation hazard from of toxic exhaust fumes Battery acid hazard Explosion hazard Entanglement hazard at belt drive Cut hazard at rotating tool Crush hazard Electrocution hazard from buried power lines Do not use high pressure cleaners Use by unauthorized persons not permitted No smoking Hazardous material: fine silica dust Do not work on machine while the tool is spinning...
- Page 7 In addition to this operating manual, further documentations from the respective manufacturer of individual components of the machine are available: Internal combustion engine operating manual LISSMAC does not assume responsibility or liability regarding correctness and completeness of third- party documentation. Changes and reservations We have taken every effort to ensure that this operating manual is correct and up to date.
- Page 8 Notes: 8/107...
-
Page 9: Table Of Contents
Table of contents 1. Features & Benefits ......................11 2. General safety notes ...................... 12 2.1. Principle of intended use ....................12 2.2. Organizational measures ....................13 2.3. Choice of personnel and - qualification; fundamental obligations ........14 2.4. Safety notes regarding the operating phases ..............14 2.5. - Page 10 8.10. Maintenance plan......................68 9. Tools ..........................69 10. Warranty ........................70 11. Circuit diagram ......................72 12. Appendix A: Error Code Liste HATZ ................76 10/107...
-
Page 11: Table Of Contents 1. Features & Benefits
1. FEATURES & BENEFITS The practical requirements of professional use were incorporated in the design of this powerhouse. This professional heavy duty Diesel-powered machine impresses witch outstanding price-performance ratio, rugged design and easy operation. Optimum power transmission by high-performance v-belt drive ... -
Page 12: General Safety Notes
Intended use The LISSMAC floor saw belongs to the floor cutting-off machines and is designed exclusively for wet- cutting joints in concrete or asphalt. The cutting requires a tool in form of a diamond saw blade. The floor saw may only be operated by one person. -
Page 13: Organizational Measures
2.2. Organizational measures This operating manual must be kept within easy reach for everyone at the place of use. Supplements to the operating manual include general statutory and other binding regulations for preventing accidents and protecting the environment and must be obeyed. These duties may also relate, for example, to handling hazardous substances or wearing personal protective equipment or road traffic regulations. -
Page 14: Choice Of Personnel And - Qualification; Fundamental Obligations
2.3. Choice of personnel and - qualification; fundamental obligations Operators must be aged 18 or above and they must be mentally and physically capable of operating the floor saw. All persons must be instructed in the operation and be expressly assigned by the employer with the operation of the floor saw. - Page 15 2.4.2. Commissioning When fitting the saw blade, protect your hands from sharp edges. Make sure the aggregate surface has the required load-bearing capacity. All obstacles must be removed from the cutting area and good lighting must be provided. Visual check of the entire floor saw for any damage and defects. Separate check of the protective devices.
-
Page 16: Note Relating To Special Types Of Danger
2.4.4. Maneuvering the floor saw The floor saw may only be relocated when the saw blade is standing still. Before leaving the operating position on the floor saw, the internal combustion engine must be switched off and the saw blade must be standing still. A rotating saw blade poses a serious cut hazard. -
Page 17: Transport
2.5.2. Electrical Energy Only use original fuses with the prescribed rating. The floor saw must be switched off immediately in the event of faults. Electrical work may only be carried out by certified and qualified technical personnel. The electrical equipment of a machine must be inspected/checked at regular intervals. Defects such as loose connections and damage cables must be rectified immediately. -
Page 18: Packaging And Storage
2.7. Packaging and storage In order to ensure sufficient protection during dispatch and transport, the machine and its components were carefully packed. The machine should be checked for damage upon receipt. The machine's packaging consists of recyclable materials. Please separately collect the different materials and place them in the appropriate containers for recycling. -
Page 19: Device Description
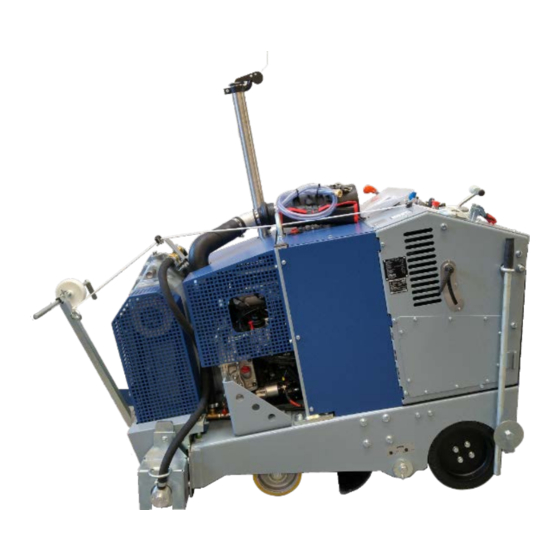
3. DEVICE DESCRIPTION 3.1. Designation of machine parts Pos. 1 Handle bars Pos. 7 Pointer Pos. 2 Emergency Stop button Pos. 8 Blade guard Pos. 3 Air filter Pos. 9 Chassis Pos. 4 Lifting eye Pos. 10 Drive axis (Hydrostat) Pos. -
Page 20: Technical Specifications
3.2. Technical specifications MULTICUT 605 SG Max. cutting depth 515 mm (20.2 in) Max. saw blade diameter 1200 mm (47.2 in) Saw blade arbor 25,4 or 35 mm (6x M12 –TK 120 mm) Blade flange Ø 150 mm Nominal speed 1. gear 950 1/min Nominal speed 2. -
Page 21: Sound Power Level
The emission sound power level at the operator's workplace L 91,4 dB(A) The guaranteed sound power level is: Multicut 605 SG 96 dB(A) The values are found by measuring the sound emissions. The test was carried out on the largest approved saw blade of the floor saw under load. -
Page 22: Hand-Arm Vibration
The specified value was determined with the maximum saw blade diameter of 1000 mm. The impact may be inversely proportional to the weight of the operator. Total vibration value: Multicut 605 SG below 2,5 m/s The following standards were applied for the measurements: EN ISO 5349, VD 2057 Part 2, 2002/42/EC Directive. -
Page 23: Comissioning
4. COMISSIONING 4.1. Consumables Diesel Only use Diesel fuel according to EN 590 / ASTM D 975-09a 1-D S15 or 2-D S15 with a Sulfur content of <15 mg/kg. So-called Ultra Low Sulfur Diesel (ULSD). When using other fuels, the emission levels change and the warranty expires. S≤15 mg/kg Engine Oil Only use HATZ-approved engine oil. -
Page 24: Tools (Saw Blade)
4.2. Tools (saw blade) NOTICE Tool selection Never use a rotating tool, with a maximum speed rating lower than the rated speed of the machine. Defective or broken tools must be replaced immediately. Selecting a saw blade See section 9 Tools Storing tools The tools used must be protected from moisture. -
Page 25: Water Pump
4.3. Water pump The removable water pump is suspended at the machine and supplies the saw blade with water. The water connection via GEKA couplings. Power supply is a switchable 12V outlet on the control panel. The pump has a sieve insert and a transparent plastic cover for daily inspection and cleaning. -
Page 26: Refueling
4.4. Refueling WARNING Extremely flammable fuel vapors Risk of serious injury from fire or explosion. Smoking is prohibited during the process. Remove all sources of ignition. Do not overfill tank or spill fuel. NOTICE Store fuel safely Fuel must only be stored in approved containers. -
Page 27: Saw Blade Installation / Change (Tool)
4.5. Saw blade installation / change (tool) WARNING Cut and crush hazard from rotating parts Rotating saw blade or flange can pull in and sever clothes or body parts. Switch off the engine and remove the ignition key. Before working on the machine, all parts must be stationary. ... - Page 28 Sequence Loosen clamping bolt (Pos. 1) on the inside of the blade guard (Pos. 2). Remove blade guard by pulling up on the handle. Remove flange screws (Pos. 3) with supplied tools and remove pressure disc (Pos. 4). NOTICE Saw blade installation Ensure flange surfaces to be clean before installing the diamond blade.
-
Page 29: Checking V-Belt Tension
4.6. Checking v-belt tension WARNING Cut and crush hazard from rotating v-belt drive When touching the rotating v-belt, hands and clothing can become entangled and pulled in, resulting in cut and crush injuries including dismemberment. Do not open or remove the belt guard or touch the v-belt while it rotates. ... -
Page 30: Replacing And Tensioning V-Belts
4.7. Replacing and tensioning v-belts WARNING Cut and crush hazard from rotating v-belt drive When touching the rotating v-belt, hands and clothing can become entangled and pulled in, resulting in cut, and crush injuries including dismemberment. Do not open or remove the belt guard or touch the v-belt while it rotates. ... -
Page 31: Transport
5. TRANSPORT 5.1. Transport position WARNING Crush hazard from unsecured machine Injuries through unintentional position change of the machine or falling of parts. Only transport the floor saws in the transport position Secure the floor saw via the attachment point ... -
Page 32: Relocating By Crane
5.2. Relocating by crane WARNING Suspended loads Crush hazard from falling parts. Do not step under raised machines or parts Only use undamaged lifting devices with sufficient load capacity and length The machine may only be moved in the transport position ... -
Page 33: Tie Down For Transport
5.3. Tie down for transport WARNING Injuries due to slipping or tilting of the machine Unintentional changes in the position of the machine can crush people. Only transport the floor saw in transport position. Secure the floor saw over the attachment points. ... -
Page 34: Control Desk
6. CONTROL DESK NOTICE Machine handling Before you start the floor saw, you must first familiarize yourself with the operation. The personnel assigned with activities at the machine must have read the operating manual before starting work, and here particularly the chapter safety notes. Pos. -
Page 35: Multifunction Display
6.1. Multifunction display NOTICE Heed monitor warning lights As a functional control all six warning lights around the LCD display must light up with active ignition. The alternator and oil level warning light remain lit until the engine is running. Warning lights Pos. - Page 36 6.2. Warning lights NOTICE Heed dashboard warning lights Warning signals indicate a fault in the engine. To avoid damage to the machine the indicated fault must be corrected as soon as possible. Oil level warning lamp Lights up red with ignition. Goes out a soon as the engine is running. If signal lights up during operation, the oil level is too low.
-
Page 37: Operation
7. OPERATION 7.1. Safety General principles • The floor saw may only be operated by one person. Direct other people out of the work area or build a barrier. • The operator may not leave the machine while the engine is running. •... - Page 38 WARNING Cut hazard form rotating saw blade Severe cut injuries from to rotating saw blade or ejected parts. Only cut with the blade guard in closed position. Keep safety distance. Never touch the rotating blade. Wear personal protective equipment. ...
-
Page 39: Parking Lock
7.2. Parking lock WARNING Unintentional movement of the machine Crush hazard from unintended rolling of the machine. To prevent the machine from rolling, the parking lock has to be activated whenever the machine is not in use. NOTICE The parking lock serves exclusively to immobilize the machine. Due to its cog-style design it may ONLY be activated at standstill. -
Page 40: Start Preparations
7.3. Start preparations NOTICE Cutting without obstacles Damage of articles located in the cutting area or the saw blade. Remove all obstacles from the cutting area and Provide good lighting of the work area. The cutting sequence can be marked by a marking spray for the orientation of the cutting sequence. Start preparation The following conditions must be fulfilled in order to use the floor saw safely and as intended: ... -
Page 41: Adjusting Lowering Speed Of Saw Arm
7.5. Adjusting lowering speed of saw arm The throttle valve should be fully closed first. Then gradually open the throttle as you perform test runs to set the right lowering speed. lower faster lower slower 7.6. Adjusting the handlebars The handlebars can be adjusted to fit the operator’s preference.. ... -
Page 42: Gear Selection
7.7. Gear selection NOTICE Change gears only at standstill The three gears allow the tool’s speed setting to be adjusted to each saw blade diameter and aggregate to be cut. Severe damage to the gearbox if operated incorrectly. Only change gears with the engine stopped. ... -
Page 43: Switching From Up-Cut To Down-Cut
7.8. Switching from Up-cut to down-cut NOTICE Invert the running direction at standstill only Inverting the running direction, allows up-cutting or down-cutting operations as required. Severe damage to the gearbox if operated incorrectly. Only change gears with the engine stopped. ... -
Page 44: Motor Starting And Stopping
7.9. Motor starting and stopping Starting set the ignition key to ignition wait until the multifunction display has been raised and the "0" appears in the speed display for the gearbox and engine speed. (3-4 seconds) then start the engine. NOTICE Error message when trying to start without completing the boot process If an attempt is made to start the engine without starting the multifunction device, the following permanent... -
Page 45: Thrust Angle Adjustment
7.10. Thrust angle adjustment The cutting saw blade tends to pull the machine to one side. This is completely normal and can easily be corrected via the toe-in adjustment to ensure a straight cut. Sequence Turn set-screw (Pos. 1): clockwise ->... -
Page 46: Cutting Operation
7.12. Cutting operation WARNING Destruction of the saw blade from lack off cooling water If the saw blade is not supplied with a sufficient amount of cooling water, the blade can overheat and cutting segments may break off. Grinding dust is not bound effectively. ... - Page 47 Cutting 1. Start engine with ignition key (Pos. 9) 2. Adjust cutting shaft speed with engine throttle (Pos. 6) check shaft RPM in the multifunction display (Pos. 14) 3. Activate water pump by throwing switch (Pos. 3) 4. Lower saw arm via switch (Pos. 11) until saw blade scratches the surface and zero the depth gauge (Pos.
-
Page 48: Maneuvering The Floor Saw
7.13. Maneuvering the floor saw WARNING Risk of injury from rotating saw blade By touching the rotating saw blade clothes can be pulled in and limbs severed. Any movement of the machine outside the area where cutting work is to be performed must be ... -
Page 49: Floor Saw Shut-Down
7.14. Floor saw shut-down WARNING Crush hazard from unintended movement Personal and material damage from accidentally rolling machine. Always activate the parking lock before leaving the machine Shutdown Raise saw blade with switch (Pos. 11) to have ample ground clearance ... -
Page 50: Conversion From Left- To Right-Cutting
7.15. Conversion from left- to right-cutting WARNING Cut and crush hazard from rotating saw blade When touching the rotating v-belt, hands and clothing can become entangled and pulled in, resulting in cut and crush injuries including dismemberment. Do not open or remove the blade guard or touch the saw blade while it rotates. Only perform this work with the engine turned off and secured against inadvertent reactivation. -
Page 51: Service Compartment
7.16. Service compartment Pos. 1 Reservoir for Hydrostatic-transmission oil (20W50) Pos. 2 Neutral-state monitoring unit (for machine start) Pos. 3 Reservoir for cutting shaft lifting unit (HV68) Hydraulic oil fill level HV 68 can only be checked correctly when the machine is lowered completely. Pos. - Page 52 7.17. Fuses The machine uses standard automotive ATO blade Type C fuses (ISO 8820-3). Replace only with same type and current rating. Fuse Rating Function Holder 1 F1 35 A Main fuse 15 A Socket for Water pump 10 A Socket 10 A Socket...
- Page 53 7.18. Battery 12V 62Ah - 540A cold cranking amps (replace with same type only) If battery tension drops below 6V at any point, the control unit will deactivate. Check battery tension regularly in the control menu section. Recharge or replace weak batteries. WARNING Risk of injury from battery acid Explosion hazard.
-
Page 54: Draining Gearbox Cooling Water
7.20. Draining gearbox cooling water NOTICE Drain water if there is risk of frost If there is risk of frost, the cooling water must be drained from the gearbox via the ball valve. Sequence Stop engine. Wait for all parts to stand still. ... -
Page 55: Checking Engine Oil Level
7.22. Checking engine oil level Check engine oil level daily before use. Sequence Check oil level with dipstick (Pos. 1) Replenish as required via previously cleaned filler neck (Pos. 2). Do not spill. Do not overfill. 55/107... -
Page 56: Cutting With Open Blade Guard
7.23. Cutting with open blade guard WARNING Ejected parts and cut hazard from open blade guard Serious personal injury from contact with running blade or ejected parts. Cordon off cut area Never touch the rotating blade Wear hard hat, goggles and safety boots ... -
Page 57: Maintenance
8. MAINTENANCE 8.1. Service WARNING Cut hazard from rotating objects Rotating objects can cut, crush or sever limbs on contact. Maintenance and repair may only be performed with the machine switched off Maintenance and repair may only be performed by trained personnel ... -
Page 58: Tensioning The Drive Chain
8.2. Tensioning the drive chain NOTICE Drive chain tension The correct chain tension is essential for the proper operation and longevity of the drive. Over-tensioning can cause damage to the drive unit. Maximum slack on the return strand may not exceed 10mm (0,4 in). ... -
Page 59: Changing Engine Oil
8.3. Changing engine oil NOTICE Engine oil disposal Disopse of used engine oil an enviromentally friendly and in accordance with national environmental protection laws. Use a colletion tray when drainig the engine oil Observe the engine manufacturer's operating instructions, enclosed with each machine. ... -
Page 60: Grease Points
8.4. Grease points Before performing service or maintenance work, the engine has to be switched off. Secure machine against inadvertent activation. Service and maintenance work may only be carried out by qualified personnel. Secure machine with a crane when working underneath. 60/107... -
Page 61: Transaxle Oil Change
8.5. Transaxle oil change Interval Initially after 80, then every 400 operating hours. Required Material Oil: 20W50 ca. 2,3L (4 Quarts) Oil filter: #1054655 Preparation Place flow saw on even ground and activate parking lock. Lift blade shaft, until frame is slightly tilted towards the back. ... - Page 62 Oil change sequence 1. Loosen the cover of the expansion tank. (Pos. 1) 2. Unscrew the adapter strip (A). 3. Unscrew the holder for support (B). 4. Unscrew back plate (C). 5. Place the collection container underneath. 6. Open the oil drain plug and drain the oil. 7.
-
Page 63: Particular Maintenance
Sequence Air purge Hoist the floor saw drive wheels off the ground and secure the machine from rolling away. Drive wheels must be able rotate freely. Open the bypass valve (= disengage) Start the engine Release parking lock ... -
Page 64: Regeneration Of The Diesel Particulate Filter
8.7. Regeneration of the Diesel particulate filter DPF regeneration During regular operation, the soot particles are automatically burned once a certain exhaust gas temperature is reached. However, over time, some ash and soot particles may still deposit in the particulate filter system. This may require a manually initiated pyrolytic cleaning process of the catalyst. - Page 65 Securely park floor saw in an open space with ample distance to flammable objects. Preparation The engine coolant temperature must be above 75°C (167°F). Set engine RPM (Pos.6) to idle. Initiate Set drive lever (Pos. 10) to neutral position Disengage drive clutch (Pos. 13) Engage parking block (Pos.
-
Page 66: Troubleshooting
8.8. Troubleshooting Stop engine before carrying out any service or repair work. Secure machine against accidental startup. Maintenance and service work may only be carried out by qualified technical personnel. NOTICE The following points must be checked first with cutting problems: ... -
Page 67: Torque Values For Screw Connections
8.9. Torque values for screw connections Grade: 10.9 12.9 Dimension max. tightening torque in Nm max. tightening torque in Nm max. tightening torque in Nm 11.2 11.3 16.5 19.3 27.3 40.1 46.9 1057 1136 1329 1176 1674 1959 1597 2274 2662 67/107... -
Page 68: Maintenance Plan
8.10. Maintenance plan This section shall serve as proof maintenance already performed and as service booklet. All maintenance and service work must be entered as proof. Machine/Type: Serial number/year of manufacture: Date Implemented maintenance or service work Date/signature 68/107... -
Page 69: Tools
The parameters must be correct in order to achieve the best results. The optimum cutting performance can be determined with this diagram. The prices of the tools can be determined in the LISSMAC sales booklet. This sales booklet can be obtained from the manufacturer at any time. -
Page 70: Warranty
10. WARRANTY The warranty for this machine is 12 months. For the wear parts listed in the following, warranty is only granted if the wear is not due to operation. Wear parts are those parts, which are subject to an operational wear with an intended use of the machines. The wear time cannot be defined in a uniform manner, it differs according to the usage intensity. - Page 71 LISSMAC Maschinenbau GmbH, D-88410 Bad Wurzach Dokumentationsbevollmächtigter: Leiter Konstruktion / Technische Dokumentation Machine description: The LISSMAC Floor saw pertains to floor cutting-off machines and is exclusively intended for cutting joints in concrete or asphalt. MULTICUT 600 SG Max cutting depth 515 mm Mas.
-
Page 72: Circuit Diagram
11. CIRCUIT DIAGRAM 72/107... - Page 73 73/107...
- Page 74 74/107...
- Page 75 75/107...
-
Page 76: Appendix A: Error Code Liste Hatz
12. APPENDIX A: ERROR CODE LISTE HATZ 76/107... - Page 77 77/107...
- Page 78 78/107...
- Page 79 79/107...
- Page 80 80/107...
- Page 81 81/107...
- Page 82 82/107...
- Page 83 83/107...
- Page 84 84/107...
- Page 85 85/107...
- Page 86 86/107...
- Page 87 87/107...
- Page 88 88/107...
- Page 89 89/107...
- Page 90 90/107...
- Page 91 91/107...
- Page 92 92/107...
- Page 93 93/107...
- Page 94 94/107...
- Page 95 95/107...
- Page 96 96/107...
- Page 97 97/107...
- Page 98 98/107...
- Page 99 99/107...
- Page 100 100/107...
- Page 101 101/107...
- Page 102 102/107...
- Page 103 103/107...
- Page 104 104/107...
- Page 105 105/107...
- Page 106 106/107...
- Page 107 107/107...
Need help?
Do you have a question about the MULTICUT 605 SG and is the answer not in the manual?
Questions and answers