
Related Manuals for Motorola solutions V300


Summary of Contents for Motorola solutions V300
- Page 1 V300 Body-Worn Camera User Guide October 2020 © 2020 Motorola Solutions, Inc. All rights reserved. Revision B...
- Page 2 Send us your suggestions We want to hear from you. Tell us about your experience and how you are using the V300. We will do our best to accommodate any suggestions you may have in future revisions. International customers, please contact your local distributor.
- Page 3 This equipment complies with Part 15 of the FCC rules and Industry Canada license-exempt RSS standard(s). This equipment should only be used with the antenna supplied by Motorola Solutions Video. Any changes or modifications not expressly approved by the manufacturer could void the user's authority to operate the equipment.
- Page 4 Type d'antenne (émetteur radio): Motorola Solutions part number WGP02451, 4.6 dBi gain, 50 Ohm impedance. The antennas used for this transmitter must not be co-located or operating in conjunction with any other antenna or transmitter.
-
Page 5: Table Of Contents
Contents Contents Introduction to the V300 Body-Worn Camera About this document What's New with the V300 Body-Worn Camera Related documents and information Transfer Station II and WiFi base Getting Started Using V300 Body-Worn Camera Overview First Steps Removing V300 Camera Battery... - Page 6 Categorizing an event on the camera in a recording group PreEvent and Record-After-the-Fact ® (RATF) Overview Docking the V300 Body-Worn Camera Docking the V300 Camera Overview Docking the V300 Camera in a Transfer Station II Docking the V300 in a WiFi base Charging the Battery Camera charging display...
- Page 7 Recording Group Overview Recording group members V300 Camera functions Smart Power Switch (SPS) Group Events V300 Camera Behavior About the Features of the V300 Camera V300 Camera Features Overview V300 Body-Worn Camera Components Microphone Buttons Power button Record Start/Stop button...
- Page 8 Error code Transfer Station II and WiFi base LEDs Power LED indicators Activity LED indicators Transfer Station II front LED indicators SmartControl Supported versions SmartControl Overview Get the SmartControl app Enabling SmartControl V300 Body-Worn Camera User Guide viii WGD00169, Revision B...
- Page 9 Transfer Station II Configuration V300 Settings DHCP IP Config Upgrade Transfer Station II Administrative functions Change Username and Password Disable Transfer Station II Restart Transfer Station II Get Transfer Station II Logs V300 Body-Worn Camera User Guide WGD00169, Revision B...
- Page 10 Contents This page intentionally left blank. V300 Body-Worn Camera User Guide WGD00169, Revision B...
-
Page 11: Introduction To The V300 Body-Worn Camera
The guide also includes a section on recording groups and how V300 Camera and the WiFi base work within a local recording group network. Note: This user guide covers the basic use of the V300. If you have a question that is not covered in the user guide, contact Customer Service at https://support.watchguardvideo.com/V300. -
Page 12: What's New With The V300 Body-Worn Camera
Transfer Station II and WiFi base The V300 Camera needs a second generation transfer station and WiFi base. You can dock either the stand-alone battery in the Transfer Station II or WiFi base or dock the camera and battery together. - Page 13 Docking both lets you charge and upload at the same time. Docking a spare battery in a WiFi base lets you have a second battery available when needed. The camera and battery only dock in one direction. V300 Body-Worn Camera User Guide WGD00169, Revision B...
- Page 14 Introduction to the V300 Body-Worn Camera This page intentionally left blank. (Undefined variable: Variables.ProductShortName) V300 Body-Worn Camera User Guide WGD00169, Revision B...
-
Page 15: Getting Started
Getting Started Getting Started In this section... Using the V300 Body-Worn Camera Overview (page 16) First steps Removing the battery (page 17) V300 Body-Worn Camera buttons (page 18) Wearing V300 Body-Worn Camera (page 20) Powering the camera on and off... -
Page 16: Using V300 Body-Worn Camera Overview
Connect the camera to Evidence Library (EL) to configure it and upload video for evidence management. The V300 Body-Worn Camera works with other V300 Body-Worn Cameras and the in-car 4RE DVR to form a recording group (page 41). -
Page 17: Removing V300 Camera Battery
Removing V300 Camera Battery Removing V300 Camera Battery You can remove the V300 battery and charge it separately from the camera. If you use a spare battery this ensures you never run out of power. Note: No events can be uploaded if the camera is not docked. -
Page 18: V300 Buttons
Press and release the Power (4) button on the bottom of the camera to power V300 on or off At the beginning of your first shift, V300 automatically calibrates the horizon, once a day, and notifies you when it finishes. -
Page 19: V300 Lcd Display
Categories are set by your agency. Error messages If an error appears on the V300 display screen the top LED flashes red to show an error condition. Press the Backlight button to acknowledge the error. The LED may then turn solid amber until the error is cleared by the camera. -
Page 20: Wearing The V300 Camera
Wear the V300 on your clothing and vest where it is most comfortable, convenient, and secure. Ensure that the lens is not obstructed and that it is aimed at the horizon (page 22). -
Page 21: Molle Vest Mount
The forked end should be fully engaged with the seam on the lower row of loops. The hooks should be fully engaged with two loops on the upper row of loops. 5. Align the V300 Camera with the two tabs on the bottom of the mount and snap the camera in to the mount. V300 Body-Worn Camera User Guide... -
Page 22: V300 Camera Field Of View
2. Lift out the V300 camera and battery. V300 Camera Field of View The V300 Body-Worn Camera Field of View can be configured in Evidence Library (EL) for individual officers. The 130-degree wide-angle lens adjusts vertically +15° / -20°. The camera angle is based on where the camera is worn and is set in EL. -
Page 23: Power Off
Warning! Avoid forcing the V300 to power off. Forcing the camera to power off can result in data corruption. If the V300 stops responding to commands (or if Technical Services instructs you to), remove the battery to force the camera to power off. -
Page 24: Starting And Stopping A Recorded Event
Use the Record Start/Stop button on the front of the camera to start or stop a recorded event. If your Motorola Solutions V300 is a member of a recording group, the camera can start or stop a recorded event automatically. Another group member can alert that it has started or stopped an event (page 40). -
Page 25: Stopping A Recorded Event Manually
Start/Stop button twice within 5 seconds. Covert mode In Covert mode the V300 Camera makes no sound and is dark. The display backlight can light up on demand, depending on your configuration. The camera can still vibrate in Covert mode (depending on the configured alert notifications). -
Page 26: Momentary Muting Of The Audio
Getting Started Momentary Muting of the Audio Note: A configuration setting in Evidence Library controls whether you can mute your Motorola Solutions V300 Body-Worn Camera during a recorded event. Muting audio To temporarily suspend recording of audio by muting the microphone: 1. -
Page 27: Categorizing A Recorded Event
Complete categorizing the recorded event in EL. Note: V300 always adds a tag to an event if you do not tag the event. For example, NO TAG or UNCATEGORIZED is applied. -
Page 28: Docking The V300 Body-Worn Camera
Docking the V300 Body-Worn Camera Docking the V300 Body-Worn Camera In this section... Docking overview (page 29) Docking the V300 Body-Worn Camera in a Transfer Station II (page 30) Docking the V300 Body-Worn Camera in a WiFi base (page 31) Charging the battery... -
Page 29: Docking The V300 Camera Overview
You can damage files on the camera. You can dock the V300 Camera with the battery or dock the stand-alone battery in any of the available bases. Use the WiFi base for incidental charging during your shift. Charging in a vehicle base (WiFi or USB), without the vehicle running, can impact the vehicle battery and can slow charging in warmer temperatures. -
Page 30: Docking The V300 Camera In A Transfer Station
The V300 time and date synchronize with the Evidence Library (EL) system Caution: The V300 sets its internal date and time from the EL computer. If the computer date and time is set incorrectly, the camera will be set incorrectly, and your video evidence will be marked with the incorrect date and time. -
Page 31: Docking The V300 In A Wifi Base
When you undock the camera and battery from the Transfer Station II, they are ready for normal operation. Docking the V300 in a WiFi base You can dock the V300 in one direction only. The camera pairs with that base and with any other V300 Cameras that pair with the base. -
Page 32: Camera Charging Display
Two tones sound Low battery, camera shutdown If a battery error is issued, shut down the V300 Body-Worn Camera. This can leave 2 to 4 minutes of run time before the camera runs out of power. Switch to your backup, charged battery. -
Page 33: Assigning A Configuration And Officer And Checking Out
The camera vibrates when the update completes. Transfer Station II configuration You can only create a Transfer Station II configuration in EL. Some of the configuration properties you can set up for the V300 include: Agency or department name Officer preferences for indicators... -
Page 34: Upload Events
Docking the V300 Body-Worn Camera Upload Events The V300 Body-Worn Camera can upload directly to Evidence Library (EL) Cloud. You can upload recorded events from your V300 Body-Worn Camera while it is docked in: Transfer Station II Events upload automatically from a camera in the Transfer Station II. -
Page 35: Upgrading V300 Body-Worn Camera Firmware
Important! Do not remove the battery while the upgrade is in progress. WiFi base You can push an upgrade to the V300 Body-Worn Camera when it is docked in a WiFi base, only if the WiFi base has access to Evidence Library (EL) upload server. The upgrade is pushed automatically. -
Page 36: Upgrading Wifi Base Firmware
Docking the V300 Body-Worn Camera Upgrading WiFi base Firmware The Motorola Solutions V300 Body-Worn Camera automatically pulls firmware upgrades for the WiFi base from Evidence Library (EL) when V300 is docked. Note: EL can be set up to push new firmware automatically or you can pull it manually, depending on your agency's configuration. -
Page 37: Using Preevent And Record-After-The-Fact (Ratf)
Using PreEvent and Record-After-the-Fact (RATF) Using PreEvent and Record-After-the-Fact (RATF) In this section... PreEvent and RATF overview (page 27) PreEvent capture (page 38) Record-After-the-Fact (Record-After-the-Fact) (page 39) Force Microphone On (page 39) V300 Body-Worn Camera User Guide WGD00169, Revision B... -
Page 38: Preevent Capture
Audio Audio is NOT included with PreEvent video unless your agency enables Force Microphone On (page 39). Typically, the V300 Body-Worn Camera only begins to record audio when you start a recorded event. V300 Body-Worn Camera User Guide WGD00169, Revision B... -
Page 39: Record-After-The-Fact (Ratf)
RATF in Evidence Library (EL). The V300 works as a DVR and camera combination to record events. When you start and stop a recording (manually or automatically), the camera protects the segment between the recording start and stop as the recorded event. -
Page 40: Using V300 In A Recording Group
Using V300 in a recording group Using V300 in a recording group In this section... Recording group overview (page 41) Recording group members and functions (page 41) V300 Camera (page 41) Smart Power Switch (page 42) 4RE DVR (page 43) -
Page 41: Recording Group Overview
Recording Group Overview Recording Group Overview When you dock V300 in the WiFi base, the camera pairs with the base. This pairing lets the camera associate with other V300 Cameras as a local recording group. The decision to create an event for the group recording is made by each device in the local recording group network. -
Page 42: Smart Power Switch (Sps)
The base then notifies the cameras and a camera can start or stop its own recorded event with the recording group. Tip: If the 4RE DVR or V300 Cameras are members of the same recording group, 4RE can initiate group event starts, stops, and categorization and V300 can join in on the group actions depending on the EL configuration. -
Page 43: 4Re
Other members can choose to enter or exit Covert mode. There can only be one 4RE DVR in a recording group. For more information about the 4RE DVR and group recordings, see the 4RE DVR In-Car Video User Guide. V300 Body-Worn Camera User Guide WGD00169, Revision B... -
Page 44: Group Events
V300 Camera Behavior What happens when: You try to manually start a recorded event on V300 just after it automatically starts an event as part of a group event? If you press the Record Start/Stop button within 10 seconds of the automatic group event start, V300 asks you to confirm that you want to STOP the recorded event with your Record Start/Stop button press. -
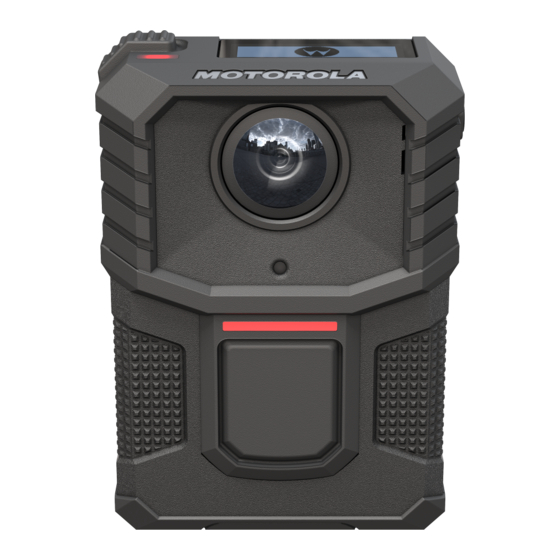
Page 45: About The Features Of The V300 Camera
About the Features of the V300 Camera About the Features of the V300 Camera In this section... Overview (page 46) (page 46) Feedback indicators (page 49) V300 user-removable battery (page 50) Video, audio, and subtitle evidence (page 53) Recording reminder alert... -
Page 46: V300 Camera Features Overview
You can dock the V300 in any one of three bases: WiFi base (upload) Transfer Station II (Transfer Station 2) (upload) USB base (for charging only) The camera can be paired with the WiFi base to associate with other V300 Cameras to form a recording group (page 40). -
Page 47: Microphone
Continuously records audio (default setting) Only records audio when you press the Function button Buttons V300 has four buttons that control the camera functionality. Power button Use the Power button only to power the camera on or off. The Power button is on the bottom of the camera. -
Page 48: V300 Display
V300 display The display on the V300 shows icons and messages to indicate the status of the camera. The icons show in the top half of the display. The messages show in the 8-character area on the bottom half of the display. -
Page 49: Display In Different Modes
Display in different modes Wi-Fi or GPS signal status The Wi-Fi Signal Strength icon shows the status of the V300 Wi-Fi connection with the WiFi base. Display in different modes When the camera is not recording, the default message shown on the display is the number of recorded events in storage. -
Page 50: V300 User-Removable Battery
The battery can get from 10 - 12 hours on a shift depending on the configuration. The replaceable battery can extend that time for another 10-12 hours. The V300 battery recharges in about 4 hours. When the battery is getting close to shutting down: An audio chime plays and the battery icon blinks when the battery gets close to a critical level. -
Page 51: V300 Camera Battery Maintenance
Random rebooting or random power off The V300 powers off or reboots when docked or undocked or other shock type events occur. An abrupt reboot causes the camera to initiate a System Recovery message. The recovery can take up to 4 minutes to complete. -
Page 52: Corrective Actions
If replacing the battery does not resolve the issue, re-clean the camera contacts If re-cleaning does not resolve the issue, contact Customer Service to replace the camera See the Motorola Solutions Technical Notification (MTN), MTN-0134-20-NA issued 09/2020 at: https://www.motorolasolutions.com/en_us/support/technical-notifications.html Contact customer service at 1-800-605-6734. -
Page 53: Video, Audio, And Subtitle Evidence
Video, Audio, and Subtitle Evidence Video, Audio, and Subtitle Evidence The V300 works as a DVR and camera combination to collect evidence in a recorded event. A recorded event is a unique, protected segment(page 53)composed of: Video Audio (page 53) -
Page 54: Recording Reminder Alert
Using V300 in a recording group on page 40 Recording Reminder Alert The V300 notifies you at regular intervals that it is still capturing an event. Configure Recording Reminder Alert in Evidence Library (EL) to remind you periodically that V300 is recording an event. Reminders include:... -
Page 55: Storage
Storage Storage The V300 Camera stores 24 to 36 hours of HD video at 1080 pixels. The camera uses a 128 GB SD Card. When you need to free up storage space on the camera, upload recorded events (page 34) from the camera to Evidence Library (EL). -
Page 56: Wifi Base
WiFi base The Motorola Solutions V300 includes built-in Wi-Fi (802.11n). You can dock the V300 Camera and battery or just the stand-alone battery in the WiFi base. The camera pairs with the base to: Associate with a local recording group The WiFi base acts as the Wi-Fi access point (802.11n) for the... -
Page 57: Leds For Wifi Base
In shutdown or wireless upload timeout period The left LED on the WiFi base blinks green when it successfully pairs with a V300. The LED blinks red if the pairing was not successful. Note: If you get a solid red light, try undocking and redocking your camera and battery. If solid red appears repeatably, contact Customer Service. -
Page 58: Connections
The upgrade file for the WiFi base is downloaded while the V300 Body-Worn Camera is docked in the transfer station. The WiFi base initiates the upgrade and pulls the information when the V300 is docked with the base. -
Page 59: V300 Lcd Flow
V300 LCD Flow V300 LCD Flow V300 Body-Worn Camera User Guide WGD00169, Revision B... -
Page 60: V300 Lcd Flow (Cont.)
About the Features of the V300 Camera V300 LCD Flow (cont.) Disk full When the camera has less than 2% of storage available, the SD card element flashes (1 second ON, 1 second OFF). After the camera fills completely, any attempt to record is blocked and the screen displays FULL. -
Page 61: Charge The Battery
Associate with a group When the V300 has successfully associated with the WiFi base, the screen displays Association Complete for 2 seconds. The V300 displays Associated for 2 seconds after undocking, to indicate that Group Recording is enabled. V300 Body-Worn Camera User Guide... -
Page 62: Error Code
About the Features of the V300 Camera Error code When an error appears, the screen displays a number. If after you reboot the Error Code remains, contact technical support and give them the Error Number. V300 Body-Worn Camera User Guide... -
Page 63: Transfer Station Ii And Wifi Base Leds
WiFi LED off Activity LED amber Activity LED green Camera docked solid WiFi LED off Activity LED amber Activity LED green solid Backend server connected, if camera docked solid Upload LED green solid V300 Body-Worn Camera User Guide WGD00169, Revision B... -
Page 64: Transfer Station Ii Front Led Indicators
About the Features of the V300 Camera Activity LED amber blinks Activity LED green Upload in progress, if camera docked Network upload blinks activity on ethernet interface Backend server disconnected or Error, if camera Activity LED off Activity LED red... -
Page 65: Smartcontrol
Enabling SmartControl (page 67) Connecting to SmartControl (page 68) Categorizing and event (page 69) Starting a state capture (page 70) Supported versions SmartControl runs any Android phone running Android 6 or higher. V300 Body-Worn Camera User Guide WGD00169, Revision B... -
Page 66: Smartcontrol Overview
SmartControl SmartControl Overview SmartControl is the companion smartphone app for the Motorola Solutions V300 Body-Worn Camera. Android requires location information (GPS) to enable Bluetooth and WiFi. It lets officers view evidence and tag videos on the phone. The SmartControl app makes V300 functionality available on your smartphone:... -
Page 67: Enabling Smartcontrol
If you decline the location access a second time, Try Again does not work. You have to reset location access outside the app in your phone. (4) To continue turn on device location which uses Google's location service—OK V300 Body-Worn Camera User Guide WGD00169, Revision B... -
Page 68: Connecting To Smartcontrol
(Searching times out after 30 seconds. Try again if this happens.) (3) The app finds any close camera. Check the screen on the V300 UI for your camera name. Touch the area with the camera ID on the screen to select your camera. -
Page 69: Categorizing An Event
If the camera doesn't connect or if there is an error, the app sends you back to number 1 and you just start over. Categorizing an event You can use the SmartControl app to categorize a recorded event on your smartphone. V300 Body-Worn Camera User Guide WGD00169, Revision B... -
Page 70: Starting A State Capture
The tags below Category are secondary tags your agency has configured to appear. They can be drop- down lists or text answers. Starting a state capture You can request that your V300 Camera perform a state capture and save it to the V300 for use by Motorola Solutions technical services. To start a state capture: (1) Touch About the connected device. -
Page 71: Appendix: Transfer Station Ii
Transfer Station II setup overview (page 72) Setting up the Transfer Station II (Transfer Station 2) hardware (page 1) Configuring the Transfer Station II for use with Evidence Library Software (page 74) V300 Body-Worn Camera User Guide WGD00169, Revision B... -
Page 72: Transfer Station Ii Setup Overview
When the transfer station is on, the power LED is on. To set up the Transfer Station II: 1. Set up the Transfer Station II hardware. (page 1) 2. Configure the Transfer Station II in Evidence Library (EL) so the V300 Cameras docked in it will upload to EL. (page 74) Important! An administrator should set up the Transfer Station II, or your IT administrator should be on-call. -
Page 73: About The Transfer Station Ii
You can dock the camera and battery together or dock the battery alone in the Transfer Station II. When you dock the V300 Body-Worn Camera, the camera automatically starts charging, if needed. The camera also uses the Transfer Station II to:... -
Page 74: Transfer Station Ii Configuration Settings
4. Enter the Username and Password (Admin, V1$T@xfr). 5. Click login. Transfer Station II Configuration The Current Transfer Station II Configuration web page opens with the Transfer Station II default settings. Note: Transfer Station II supports only IPv4 networking. V300 Body-Worn Camera User Guide WGD00169, Revision B... - Page 75 In the example, Transfer Station II uses Building 415 as the location and B as the Station ID. EL uses these names to identify the individual V300 Cameras and location of the cameras. Note: Motorola Solutions provides labels that assume an alphabetic Station ID combined with slot numbers 1 through 8.
-
Page 76: V300 Settings
Because the Transfer Station II IP address changed, the default configuration web page is no longer valid and the system logs you out. V300 Settings 1. Complete the V300 Settings. 2. Enter your Static IP addresses for each slot. This window does not appear if you choose DHCP server assigned address. -
Page 77: Upgrade Transfer Station Ii
Tip: The upload server for Evidence Library can also be called the Wireless Import Service. Upgrade Transfer Station II To upgrade software or firmware, choose your files from the computer connected to the network and click Upgrade for the one you want to upgrade. V300 Body-Worn Camera User Guide WGD00169, Revision B... -
Page 78: Administrative Functions
Note: To reset the Transfer Station II to factory defaults, use a pin or paper clip, press and hold the Reset button for at least 7 seconds. The button is on the bottom of the Transfer Station II. V300 Body-Worn Camera User Guide WGD00169, Revision B... -
Page 79: Restart Transfer Station Ii
Restart Transfer Station II 1. Click Restart to restart the Transfer Station II. Restarting interrupts any in-progress transfers between docked V300 Cameras and the EL upload server. 2. Return to the login screen after restart and wait for the reboot to complete. - Page 80 Appendix: Transfer Station II This page intentionally left blank. (Undefined variable: Variables.ProductShortName) V300 Body-Worn Camera User Guide WGD00169, Revision B...
Need help?
Do you have a question about the V300 and is the answer not in the manual?
Questions and answers