
Related Manuals for ben-e-bike TWENTY E-POWER 2020


Summary of Contents for ben-e-bike TWENTY E-POWER 2020
- Page 1 User manual for the Model Year 2020 TWENTY E-POWER TWENTYFOUR-SIX E-POWER TWENTYFOUR E-POWER PRO TWENTYSIX E-POWER PRO TWENTYSEVEN E-POWER PRO...
- Page 2 Please read all warnings and cautions in this manual carefully before your child uses the BEN-E-BIKE for the first time. Explain to your child the contents of this manual and do not allow it to use the BEN-E-BIKE until it has fully understood all the safety-related aspects.
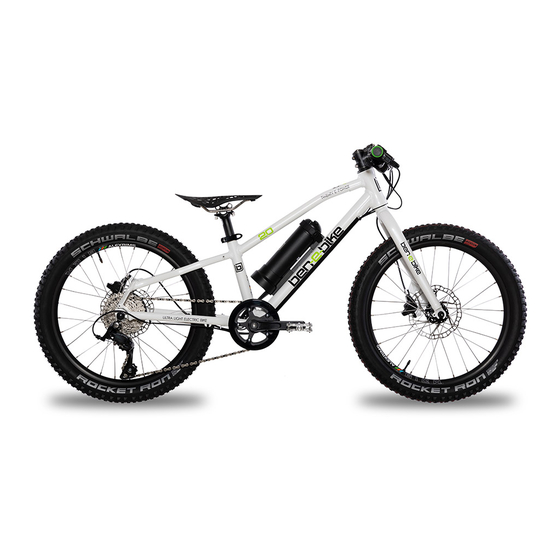
- Page 3 BEN-E-BIKE INSTRUCTION MANUAL The word „NOTE“ warns of possible material damage. NOMENCLATURE The following figure shows an example of the most important components of a BEN-E-BIKE: This is just a schematic illustration - the respective model may differ slightly! www.ben-e-bike.net AMPERUM GmbH info@ben-e-bike.com...
- Page 4 Explain to your child how to operate this bike. • Do not leave your child on the road with the BEN-E-BIKE until he or she is able to handle it properly. Danger for children and for people with insufficient knowledge or skills! Incorrect use of a BEN-E-BIKE may result in an accident or injury.
- Page 5 BEN-E-BIKE INSTRUCTION MANUAL SAFETY ADVICE FOR USE The braking distance may be prolonged or the BEN-E-BIKE could slip away in corners, e.g. in the wet or if the track is covered by leaves, dirt or snow. • Explain to your child that he or she has to adapt his or her driving style and speed to the weather and road conditions.
- Page 6 If your child does not wear a helmet, severe head injuries may occur in the case of an accident. • Only allow your child to use the BEN-E-BIKE when wearing a bicycle helmet (see chapter "Notes >> Road Traffic >> Bicycle Helmets").
-
Page 7: Residual Risks
• Only install accessories that meet the specifications and quality of the original equipment. RESIDUAL RISKS The use of a BEN-E-BIKE is subject to the following unpredictable residual risks despite the observance of all warnings: Risk of accidents and injury •... -
Page 8: Intended Use
Not all images on our website show a BEN-E-BIKE during intended use. We test our bikes in a controlled manner even in case of overloading, thereby accepting premature material fatigue. Under no circumstances should this lead to the same driving manoeuvres with your own BEN-E-BIKE! •... - Page 9 Only let your child drive alone in public road traffic, if it is permitted by the legal regulations and if you are convinced that your child can participate in the traffic. • Explain to your child which lane it is allowed to use with a BEN-E-BIKE. In many countries this is the sidewalk for young children. •...
- Page 10 Have your BEN-E-BIKE inspected regularly by your dealer, especially during heavy use. • Do not let your child use the BEN-E-BIKE if you notice excessive wear or loosened screw joints. Like all mechanical components, bicycle components are wearing parts. High stress and incorrect use significantly increases wear.
-
Page 11: Luggage Rack
BEN-E-BIKE INSTRUCTION MANUAL Brake wear The brake pads are subject to constant wear. Maintain and check the brakes regularly (see chapter "Before each trip >> Inspection instructions" and "Maintenance >> Brakes"). Wear of spokes and gear shift cable Spokes and gear shift cables expand with use and must be adjusted or replaced when worn. -
Page 12: Theft Protection
Explain to your child how a BEN-E-BIKE can be effectively protected against theft. • Give your child a sturdy chain- or U-lock that allows the BEN-E-BIKE to be fastened to a fixed object, such as a bicycle stand. 6 TRANSPORT If you cannot safely transport the BEN-E-BIKE in the boot of your car, please use a suitable bicycle carrier. - Page 13 Tires and tubes are no household waste. Dispose them at a collection station in your city or community. Bike • Dispose the BEN-E-BIKE as electronic waste at a collection station in your city or community. Battery • Never dispose a no longer usable battery in the household waste. Batteries in general and lithium-ion batteries in particular must be disposed separately.
- Page 14 BEN-E-BIKE INSTRUCTION MANUAL NOTES ABOUT THE BRAKES Each BEN-E-BIKE is equipped with independent brakes on the front and rear wheels. All BEN-E-BIKE models are exclusively equipped with disc brakes. Disc brake: The braking force is transferred by pulling the brake lever via a hydraulic hose to the callipers. When air enters the system, the braking force can be reduced or lost completely.
- Page 15 NOTES ON THE LIGHTING The motor controller of the BEN-E-BIKE is equipped ex-factory with a 6 volt output, which can be used to power an optional lighting system. So It is therefore not mandatory to use battery-powered headlamps or to install a dynamo.
-
Page 16: Before Every Ride
BEN-E-BIKE INSTRUCTION MANUAL BEFORE EVERY RIDE The BEN-E-BIKE is exposed to constant vibration during use. As a result, excessive wear can occur or it can loosen screw joints. • If in doubt, ask your dealer to show you how to test the BEN-E-BIKE. - Page 17 BEN-E-BIKE INSTRUCTION MANUAL PROCEDURE FOR SAFELY FASTENING THE FRONT WHEEL • Open the quick release. • Move the lever towards the final clamping position. At the beginning of the closing travel to about half of the lever travel, you hardly need any force to move the lever.
- Page 18 PRIOR YOUR FIRST RIDE In the event of unexpected behaviour of the BEN-E-BIKE, your child may not be able to concentrate on the road traffic, e.g. when braking or shifting the gears. There is an increased risk of accidents and injury.
- Page 19 AFTER A FALL After a fall or accident it hidden damage to the BEN-E-BIKE may arise, e.g. hairline cracks. Components made of carbon, which have suffered a shock impact, as well as bent parts made of aluminium can break suddenly. It is not allowed to straighten bent parts because those are then prone to break or fail.
- Page 20 • Pay attention while driving - if the carbon handlebar makes any crackling noises, this can be an indication of an imminent material defect. Stop using the BEN-E-BIKE and contact your specialized dealer. • For your child's safety - never have the carbon handlebar repaired! •...
- Page 21 BEN-E-BIKE INSTRUCTION MANUAL OPERATION OF THE BRAKES If there is insufficient grip, the braking distance will be extended and the tires may become blocked, e.g. in frost, rain, sandy roads or leaves on the track. • Explain to your child that it is necessary to adapt the driving style to road conditions.
- Page 22 (see chapter "Before the first ride" or "Warranty"). When handing over the BEN-E-BIKE, check that your child can ride comfortably and safely with the bike and that all settings are adapted to your child. If you make adjustments by yourself, consult your dealer for the tightening torques or check the appendix of this manual, and always use a torque wrench when screwing.
- Page 23 BEN-E-BIKE INSTRUCTION MANUAL SETTING THE SEAT POSITION The seat post may break during use due to improper mounting. If you adjust the seat post, make sure that the lower mark on the seat post (minimum insertion depth) is not visible (see arrow).
- Page 24 Never clamp the saddle in the arches of the saddle rails, but always in the straight area. The saddle of the BEN-E-BIKE may look "uncomfortable" at first glance, but has been rated in various test drives as significantly more comfortable compared to conventional saddles. The seat allows much more "travel" than conventional upholstery due to its very flexible structure.
- Page 25 • Let your dealer check and adjust the air pressure if necessary. The correct air pressure is essential for the rolling resistance of the BEN-E-BIKE. • Read the permissible minimum and maximum air pressure on the side walls of the tire.
- Page 26 An incorrectly adjusted derailleur can damage the gearshift. For adjustments of the derailleur, contact your dealer. The derailleur on the BEN-E-BIKE was carefully adjusted before shipment. Within the first few kilometres, however, the shifting cable can lengthen, making the switching operations imprecise. The chain climbs reluctantly on the next larger sprocket on the cassette.
- Page 27 BEN-E-BIKE INSTRUCTION MANUAL However, once the BEN-E-BIKE tips over on the gear side, there is a risk that the rear derailleur or its attachment (derailleur hanger) will be bent. After such incidents, you should check the swivel range of the derailleur.
- Page 28 BEN-E-BIKE INSTRUCTION MANUAL ACTIVATION OF THE DERAILLEUR DAMPER Bouncing movements of the chain often lead to strong noise when the chain strikes the chainstay from above or from below. Under extreme conditions the chain may even jump off the front chain wheel. The Sunrace derailleur offers an additional damper / stabilizer for the derailleur cage, which can be activated via a small lever.
- Page 29 BEN-E-BIKE INSTRUCTION MANUAL ADJUSTMENT OF THE BRAKES Incorrectly adjusted brakes can lead to reduced or excessive braking power or even failure of the brake. Only adjust the brakes by yourself if you are familiar with the setup of bicycle brakes. If necessary, contact your specialized dealer for assistance.
- Page 30 BEN-E-BIKE INSTRUCTION MANUAL New brake pads require a "run-in" before they reach the maximum braking force! Let your child brake 10x to 20x from approx. 20 km/h to zero. Disc brakes can extremely heat up while braking. Therefore, do not touch the brake rotor or the brake calliper if you have frequently used the brakes just before.
- Page 31 ADJUSTMENT OF THE SUSPENSION FORK If your BEN-E-BIKE is not equipped with a rigid but an air suspension fork, the stiffness of the fork can be adapted to the driver's weight by changing the air pressure in the air chamber of the left fork leg.
- Page 32 • Ex works the fork of the BEN-E-BIKE is set to a driver's weight of about 30 kg (air pressure 25 psi). The fork must be tuned so that it bottoms only in extreme cases. You can detect a too soft spring (too little air pressure) by knocking noises when riding in rough terrain or when heavily using the front brake.
- Page 33 BEN-E-BIKE INSTRUCTION MANUAL The compression damping as well as the "LockOut" will be adjusted via the blue lever on top of the right fork leg: If the lever is set to the maximum left position (counter clockwise - CCW), the damping is low. If you turn the lever clockwise to the right, the compression damping will increase until the front fork is completely blocked ("LockOut").
-
Page 34: Maintenance
BEN-E-BIKE INSTRUCTION MANUAL If the knurled screw is completely turned to the left (counter clockwise - CCW), the damping is low (delivery condition). If you turn the knurled screw clockwise to the right, the damping will increase during rebound. LOCKOUT If you drive uphill for a long time standing up, it may be advisable in this particular case to block the front fork via the "LockOut". -
Page 35: Removal Of The Rear Wheel
BEN-E-BIKE INSTRUCTION MANUAL REMOVAL OF THE REAR WHEEL Unlike the front wheel, the rear wheel is not attached with a quick release on the rear end, but by two nuts (wrench size 17mm). The solid fixation is required to support the torque of the hub motor against the frame. If you want to remove the rear wheel, then please proceed as follows: •... -
Page 36: Refitting The Rear Wheel
BEN-E-BIKE INSTRUCTION MANUAL REFITTING THE REAR WHEEL When reinstalling the rear wheel, proceed in the reverse order as for removal. The following points have to be considered additionally: • When inserting the rear wheel, make sure that the brake rotor does not touch the left chainstay and scratch it. -
Page 37: Cleaning And Maintenance
Make sure that your fingers do not get in touch with rotating components (chain, cassette, chain wheel, etc.) • Wear protective gloves. Improper cleaning of the BEN-E-BIKE can lead to damage of the bike. • Never use aggressive cleaning agents, sharp or metallic cleaning items such as knives, hard spatulas or similar. -
Page 38: Required Tools
BEN-E-BIKE INSTRUCTION MANUAL If you trust your child to clean and care, explain how it has to clean and maintain the BEN-E-BIKE. Explain to your child the risk of injury when cleaning and maintaining. REQUIRED TOOLS • cleaning cloths •... - Page 39 • Remove any dirt on the brake components and rims immediately with a damp cloth. • Brake disc brakes dry when you have cleaned the BEN-E-BIKE with water. CARE INSTRUCTIONS FOR THE SUSPENSION FORK (if installed) • Immediately remove any dirt on the sliding surfaces of the stanchion tubes with a clean, slightly oiled cloth.
- Page 40 Incorrect or inadequate maintenance and inspection can lead to malfunction, e.g. failure of the brakes. • Have the BEN-E-BIKE inspected by your specialized dealer at least once a year. • If you do not have the necessary knowledge and tools for maintenance, contact your dealer for the service.
-
Page 41: Regular Maintenance
• Perform the following checks after a fall. • If your child heavily uses the BEN-E-BIKE in tough conditions or drives more than 1,000 km per year, shorten the maintenance intervals and have your dealer inspect every 6 months. •... -
Page 42: Rims And Spokes
If you can move the wheel sideways or the wheel nuts move, contact your dealer immediately. • Lift the BEN-E-BIKE slightly and turn the front or rear wheel. Check that the wheel does not have any significant lateral or radial deflection. -
Page 43: Chain Tension
If the distance is clearly less than 10mm, adjust the brake (see chapter "Settings >> Brake"). • Check that the BEN-E-BIKE cannot be pushed forward when the brakes are applied. • If you notice a too low braking force, adjust the brake (see chapter "Settings >> Brake"). Pay attention to unexpected noise when operating the brakes. - Page 44 BEN-E-BIKE INSTRUCTION MANUAL • Check that all gears are switched correctly and that no unusual noises occur. If the gears are not switched correctly or you hear unusual noises when changing the gears, consult your dealer. • Lubricate the chain and derailleur (see chapter "Cleaning and Care").
- Page 45 BEN-E-BIKE INSTRUCTION MANUAL THE TFT COLOUR DISPLAY The TFT colour display of the BEN-E-BIKE (for the TWENTY E-POWER only available as an option) controls all functions of the electric drive. The three pushbuttons switch on the motor and regulate its power output.
- Page 46 Likewise, this button must be pressed for more than 2 seconds to turn off the system again. If the Ben-E-Bike is parked and no button is pressed on the display or the crank isn't spun for more than 5 minutes, the display automatically shuts off to save the battery.
- Page 47 After switching on, the assistance level is always set to "0". This means that the motor is still off and the BEN-E-BIKE drives like a normal bike. Remember that a BEN-E-BIKE can be pedalled more easily than most children's bicycles, even without motor support. So you do not always have to choose one of the levels 1 - 5 to drive fast enough! Now choose an appropriate support level depending on the path conditions.
- Page 48 Turning the lights on If your bicycle dealer has installed a front and tail light on your BEN-E-BIKE and connected it to the 6Volts output of the motor controller, you can turn it on or off via the display. To do this, press the "+"...
- Page 49 BEN-E-BIKE INSTRUCTION MANUAL e) Battery status The display of the BEN-E-BIKE indicates the charging status of the battery. If all five segments are shown, the battery is fully charged: If the battery is discharged while driving, the length of the bar is reduced and its colour also changes.
- Page 50 BEN-E-BIKE INSTRUCTION MANUAL These display features should not be called while driving - this distracts your child too much. So please check the average speed and the maximum speed only when stationary! g) "Display Setting" menu With the display switched on, hold down the "+" and "-" buttons simultaneously to access the "Display Setting"...
-
Page 51: The Led Display
BEN-E-BIKE INSTRUCTION MANUAL THE LED DISPLAY The LED display of the BEN-E-BIKE (standard only with the TWENTY E-POWER) controls all functions of the electric drive. The three pushbuttons switch on the motor and regulate its power output. The functions that are important for daily use are explained below. - Page 52 After switching on, the assistance level is always set to "0". This means that the motor is still off and the BEN-E-BIKE drives like a normal bike. Remember that a BEN-E-BIKE can be pedalled more easily than most children's bicycles, even without motor support. So you do not always have to choose one of the levels 1 - 5 to drive fast enough! Now choose an appropriate support level depending on the path conditions.
- Page 53 Turning the lights on If your bicycle dealer has installed a front and tail light on your BEN-E-BIKE and connected it to the 6Volts output of the motor controller, you can turn it on or off via the display. To do this, press the "+"...
- Page 54 Activating the "walk-assist" Every BEN-E-BIKE is equipped with a so-called "walk-assist". This can be very convenient if the bike is needs to be pushed up a hill that is so steep that your child can not drive it anymore. To do activate the walk-assist, press the "-"...
- Page 55 THE PC SOFTWARE All parameters of the motor control of all BEN-E-BIKE's of the model year 2020 can be set via an easy- to-use PC software. The interface between the PC and the controller of the Ben E-Bike is a USB dongle which is included in delivery of each bike.
- Page 56 BEN-E-BIKE INSTRUCTION MANUAL Download the file and save it on your PC: Installation of the software "MControl" Run the installer by confirming the hint below: Select the language for the installation routine - this setting has no effect on the displayed language of the software HMI.
- Page 57 Choose the location on the hard drive of your PC where the software shall be installed - this completes the installation process: Connecting the USB interfaces to your PC The following interface can be found in the accessory pack of your Ben-E-Bike: www.ben-e-bike.net AMPERUM GmbH info@ben-e-bike.com...
- Page 58 Neither the USB interface nor the "MControl" software are suitable for the LC-display! Starting the "MControl" software The battery on the Ben-E-Bike must be switched on, so that the motor controller and the interface are supplied with power. If the red switch on the battery was already switched on and the battery was not used for more than 30 minutes, the red switch must be switched off and on again after approx.
- Page 59 BEN-E-BIKE INSTRUCTION MANUAL Then you have to start the software - the installation routine should have created a "shortcut" on the desktop of your PC: Simply press the shortcut with your computer mouse twice and you are ready to go.
- Page 60 BEN-E-BIKE INSTRUCTION MANUAL The individual function blocks of the "MControl" software After starting the software, you should first read out the controller so you can see what values are stored there. At the same time, the software recognizes which type of battery is installed and adapts the HMI accordingly.
- Page 61 The adjustable maximum value depends on the battery of the BEN-E-BIKE (20 km/h for all TWENTYFOUR models and 25 km/h for the TWENTYSIX) and is adjusted automatically as soon as the software recognizes the battery type. To do this, the button "Read Controller"...
- Page 62 When switched off, the battery terminals are powered-off. Always turn off the battery when the BEN-E-BIKE is not in use or before removing the battery. The battery also recognizes by itself whether it is in use or not. As soon as no current is drawn for more than 60 minutes, the battery output switches off automatically.
-
Page 63: Charging The Battery
- but if you realize that the battery gets so hot that you can hardly touch it, stop the charging process immediately and contact a specialist dealer for assistance. Using a charger other than the one supplied with the BEN-E-BIKE can not only destroy the battery, but also set it on fire! www.ben-e-bike.net... -
Page 64: Removal Of The Battery
However, this protection circuit is ineffective against excessive ambient temperatures. We recommend to park the BEN-E-BIKE always in the shade during summer. If that isn't possible, remove the battery, take it with you and keep it safe. -
Page 65: Storing The Battery
STORING THE BATTERY If the BEN-E-BIKE isn't used for a long time, it is best to remove the battery and store this in a cool place (between 10 - 20 ° C). The battery gradually discharges even when not in use - so recharging every 6 months is highly recommended. - Page 66 TAKING A BEN-E-BIKE ALONG IN PUBLIC TRANSPORTATION You can transport a BEN-E-BIKE easily in the car or in buses and trains. However, taking a e-bike on board of an aircraft is in most cases prohibited because e-bike batteries* are classified as "Class 9 dangerous goods"...
- Page 67 Elektromotorisch unterstütztes Fahrrad / Electric power assisted cycle Typbezeichnung / BEN-E-BIKE TWENTY E-POWER Type designation: BEN-E-BIKE TWENTYFOUR-SIX E-POWER BEN-E-BIKE TWENTYFOUR E-POWER PRO BEN-E-BIKE TWENTYSIX E-POWER PRO BEN-E-BIKE TWENTYSEVEN5 E-POWER PRO BEN-E-BIKE TWENTYFOUR-SIX FS Modelljahr / Model year: 2020 Der Hersteller erklärt hiermit, dass die oben aufgeführten Produkte den Bestimmungen der Maschinenrichtlinie 2006/42/EG sowie der Richtlinie für Elektromagnetische Verträglichkeit 2004/108/EG...
- Page 68 BEN-E-BIKE INSTRUCTION MANUAL www.ben-e-bike.net AMPERUM GmbH info@ben-e-bike.com Stuttgarter Str. 72 D-78628 Rottweil...
Need help?
Do you have a question about the TWENTY E-POWER 2020 and is the answer not in the manual?
Questions and answers