Table of Contents
Advertisement
Advertisement
Table of Contents

Related Manuals for Sunbeam F1


Summary of Contents for Sunbeam F1
- Page 1 User Manual for F1...
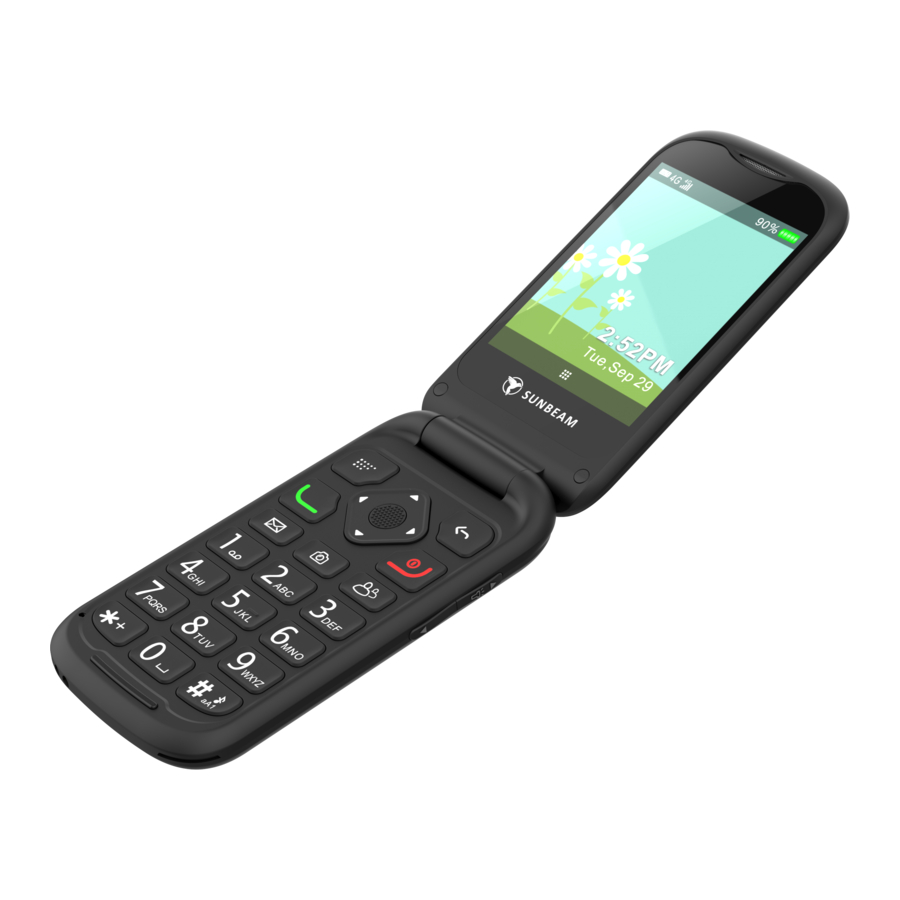
- Page 4 Instructions of button and telephone appearance 1. Earpiece 2. Front-facing camera 3. Up arrow key 4. Left-section key 5. Call key 6. WhatsApp 7. Camera/ Amplification key 8.Voice mail 9. Right-section key/Back key 10. + Volume key/Torch key 11. End call key/Power on/Power off 12.
-
Page 5: Table Of Contents
Instructions of main menu: WhatsApp Message Photo Gallery Alarm Phonebook Camera Call logs contacts Voice Settings Multimedia Social Tools Magnifier memos media Contents... - Page 6 Installation ........................7 Installing T-FLASH memory card ................... 7 Installing the SIM card ....................9 Installing the battery ....................... 11 WhatsApp ........................12 Messages ........................13 Call logs ......................... 13 Photo contact ........................ 14 Phonebook........................15 Camera ........................... 16 Gallery..........................17 Alarm ..........................
- Page 7 Recorder ......................... 20 Music ..........................20 Video ..........................21 SOS ..........................21 Tools..........................23 Calendar ........................23 Caculator ........................24 Note ........................... 24 File Manager ......................24 SIM Toolkit ....................... 25 Cell Broadcasts ......................25 Settings ........................25 Airplane mode ......................25 WLAN........................
- Page 8 Talking keys ......................27 Tone and volume ....................... 27 Common functions ....................28 Call settings ....................... 28 Display ........................28 Language ........................28 LED settings ......................28 External clock style ......................29 Special functions ...................... 29 Low battery notifications ..................29 Amplify receiver volume ..................
-
Page 9: Installation
Installation IMPORTANT Turn off the phone and disconnect the charger before removing the battery cover. Installing T-FLASH memory card Insert the memory card into the slot under the SIM card holder, make sure card's contacts face downwards, take care and please do not scratch or bend the contacts on the card. You can check the pictures as below:... -
Page 11: Installing The Sim Card
T-Flash card is used as phone storage, when connect to computer by USB cable, You can copy Music, Picture or Photos inside. Installing the SIM card 1. Insert SIM Card into the SIM card slot upon the memory card holder. (Make sure the SIM card’s contacts are facing inwards.) 2. -
Page 13: Installing The Battery
Installing the battery For the first time use, please use up the battery and charge for 4 hours to achieve the best state of battery. Remove the battery cover,insert the battery into the battery compartment, replace the battery cover. -
Page 14: Whatsapp
WhatsApp AGREE AND CONTINUE to Verify your phone number first. Select the contact you want to send a text to and start writing a message. Tap the send icon when you’re done. Remark: Notification ticks You will notice different coloured check marks next to each message. One grey tick means that the message has been successfully sent from your phone. -
Page 15: Call Logs
Messages 1. Press New to establish New message; Scroll or touch this icon to choose the Recipient from the Phonebook or you can input the contact number directly. 2. Input your message then press Send to send out the message. 3. -
Page 16: Photo Contacts
blacklist. 2.5 Delete: You can delete all received, missed, or dialed calls in Call logs. Photo contacts 1. Press Edit, enter a name and number for new contact or press Import from phonebook to enter a saved contact automatically. 2. Caller photo(OptionsTake photo from Camera or Choose photo from Gallery).This picture will be displayed when you call the corresponding contact or when they are calling you. -
Page 17: Phonebook
voice to record customized ringtone and press Save to finish it. 4. When there’s saved photo contact, you can press Options to choose Send SMS, Call, Edit, Delete, and Import from phonebook. Phonebook Options 1. Add contact You can add the new contact To Phone or To SIM, enter Name and Phone number, by press Save to confirm. -
Page 18: Camera
5. When there are saved contacts, you can View, Send SMS, Edit, Delete, Copy to SIM card from Options. Camera 1. Press Options to choose Rear camera or Front camera to take the photos. 2. Press Flash icon and choose On or Off to open or close the flash. 3. -
Page 19: Gallery
(3) Press left or right navigation key to switch take photo or take video; (4) Press up or down navigation key to zoom in or zoom out the focus. Gallery All pictures, Vedio, Media, Podcasts, Photos, all received photos will be displayed here. Alarm Press New to edit an alarm: Alarm name, Time, Repeat, Sound, Vibrate(Off/On) and press Save. -
Page 20: Magnifier
Due time, Repeat, Sound loop (default:10 times) and Remind interval (default: 5 mins). You can use Remind sound to record what you want to be reminded instead of traditional input tasks.This will make elderly more easily to operate. Remark: 1. When preset time is coming,the phone will play the recorded sound, and there is a pop-up of task with options: Know and Repeat. -
Page 21: Social Media
Social media 1. YouTube 1) Video sharing where you can watch, like, share, comment and upload your own videos. 2) Search for or watch video you like. 2. Browser 1) Visit websites and do activities within them like login, view multimedia, link from one site to another, visit one page from another. -
Page 22: Multimedia
Multimedia 1. FM radio 1) Press left arrow and right arrow to adjust the channel lists; 2) Press Options, you will view Auto search and save, Pause(default)/Play, choose the action you need. 3) Press Back to Quit or background play. 2. -
Page 23: Video
choose the action you need. 4. Video You can check all video you take by camera here. 1. Make sure SOS Enable to work. 2. Scroll to Emergency contacts to setup SOS number, here you can setup 5 numbers. 3. Scroll to Warning Tone to control warning tone status On or Off. 4. - Page 24 Remarks: 1) There are 3 kinds of positioning: LBS(Location Base Station),Wi-Fi and GPS. LBS and Wi-Fi positioning are using indoor. GPS positioning is using outdoor. The positioning accuracy:LBS about 200m,Wi-Fi about 20m,GPS about10m. 2) When SOS function activated,the phone will automatically turn on GPRS mobile data and connect to pre-stored Wi-Fi(if stored in phone in advance) for the purpose of more precise positioning.If not pre-stored Wi-Fi,the phone only turn on GPRS mobile data.
-
Page 25: Tools
Tools 1. Calendar 1) Today's day and date is shown on the display. 2) Touch the date on the display to Add Event A. Input Title for the event. B. Enter a Start Date and End Date for the event. C. -
Page 26: Caculator
6) Month view Shown the month date’s of this year. Remark: If you choose All-day Event, you don’t need to enter Start Time and End Time. 2. Calculator 1) Calculate the number according to following steps: 2) Input numbers. to select +,-,=,× ,÷ . 3) Use arrow key 4) Then press OK key. -
Page 27: Sim Toolkit
2) You can check all saved documents such as Audio, My music, Photos, Video etc. from Internal shard storage or SD card. 5. SIM Toolkit Enables the Subscriber Identity Module (SIM) to initiate actions which can be used for various value-added services. 6. -
Page 28: Mobile Data
Power On/Off: Touch or select OK key On/Off to enable or disable WLAN. Remarks: 1) When WLAN is turned on, your device will automatically scan for available networks and display them. 2) Tap the network you want to connect to.When you select an open network, you are automatically connected to the network. -
Page 29: Flip Answers
3) You can transfer files, video, etc. between your devices and another Bluetooth device. Remark: Pairing between two Bluetooth devices is a one-time process. Once a pairing is created, the devices will continue to recognize their partnership and exchange information without having to re-enter a pairing code. 5. -
Page 30: Common Functions
2) Tab Also vibrate for calls to open or close the vibration. 3) Tab Phone ringtone to select ringtone type from the phone. 4) Tab Advanced for more steps, for example, open or close the Touch sounds. 8. Common functions 1) Call settings: You can set Calling accounts, Voicemail, Fixed Dialing Numbers, Call forwarding, Call barring, Additional settings . -
Page 31: External Clock Style
5) External clock style: There are two clock style( Analog, Digital) here, you can choose one style you like to show on front display. 9. Special functions 1) Low battery notifications Status: On/Off Notified contacts: 3 numbers Notification SMS When battery capacity is lower 10%,the phone will automatically send message to 3 preset Notified contacts to remind them to ask the user to charge the phone in timely. -
Page 32: Android System
This mobile telephone has a loud ringer. Moreover, there is a amplified function to increase extra 25dB volume with amplified key. This useful feature make a highly suitable telephone for the elderly with hard of hearing without using extra hearing aid device or people in very noisy surrounding. - Page 33 3) Apps & notifications Check all systems’ Apps, file manager and notifications here. 4) Battery Check battery status here. 5) Display Check Page 28. 6) Sound Check Tones and volume(Page 27). 7) Storage Check Device storage and SD card storage here. 8) Security &...
-
Page 34: Safety And Attentions
provides medium to high security. None: Never use a Lock screen. SIM card lock: Use a SIM PIN to lock SIM card. 9) Users & accounts You can check add account, Emergency information, refresh Automatically sync data, Add users from lock screen here. 10) System You can set Languages &... - Page 35 Hearing Aid Compatible This device can reach to highest HAC standard: M4/T4 rating of the ANSI C63.19 test method.Most hearing aids on the market should be compatible with this phone but compatibility is not guaranteed. Please consult with your Doctor or hearing aid manufacturer before using a hearing aid with this product.
- Page 36 obey relevant rules before using. Please power off your mobile phone before the plane taking off so as not to disturb flying. It is dangerous and illegal to use mobile phone on board. Please place your mobile phone and all accessories where is untouchable for kids. ...
- Page 37 Not throw, fall and beat the phone so as not to destroy the internal and external phone. Authorized Service: install and maintain the phone by professional people. Please not tear off the phone on your own.
- Page 38 FCC Statement 15.19 Labeling requirements. This device complies with part 15 of the FCC Rules. Operation is subject to the following two conditions: (1) This device may not cause harmful interference, and (2) this device must accept any interference received, including interference that may cause undesired operation.
- Page 39 guarantee that interference will not occur in a particular installation. If this equipment does cause harmful interference to radio or television reception, which can be determined by turning the equipment off and on, the user is encouraged to try to correct the interference by one or more of the following measures: -- Reorient or relocate the receiving antenna.
- Page 40 W/kg averaged over one gram of tissue. This device was tested for typical body-worn operations with the back of the handset kept 10mm from the body. To maintain compliance with FCC RF exposure requirements, use accessories that maintain a 10mm separation distance between the user's body and the back of the handset.
- Page 41 IC STATEMENT This device complies with Industry Canada’s licence-exempt RSSs. Operation is subject to the following two conditions: This device may not cause interference; and This device must accept any interference, including interference that may cause undesired operation of the device. Le présent appareil est conforme aux CNR d'Industrie Canada applicables aux appareils radio exempts de licence.
- Page 42 safety of all persons regardless of age or health. IC RF Exposure Information and Statement The SAR limit of USA (IC) is 1.6 W/kg averaged over one gram of tissue. This device was tested for typical body-worn operations with the back of the handset kept 10mm for body worn. To maintain compliance with IC RF exposure requirements, use accessories that maintain a 10mm for body worn.
Need help?
Do you have a question about the F1 and is the answer not in the manual?
Questions and answers