Table of Contents
Advertisement
Quick Links
ITEM NUMBER: CPD200PRO
Parts & Hardware
K
B
J
Parts Description
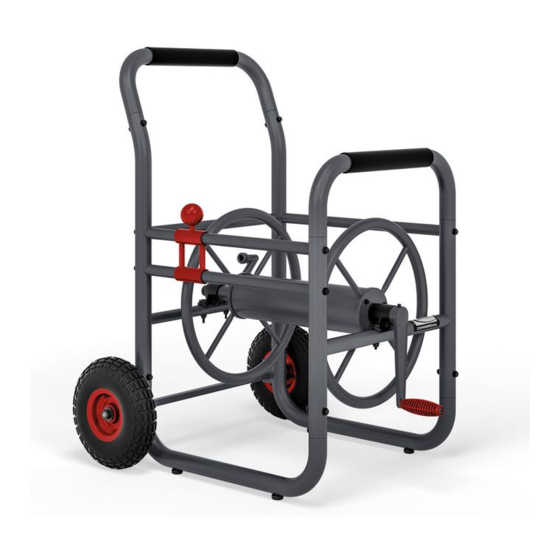
A
Rear Frame
B
Tracker Assembly
C
Bottom Tubes
D
Front Frame
E
Rear Flange
F
Drum
G
Front flange
H
Crank
I
Side Bar
J
Wheels
K
Axle
T
Leader Hose
2018 Suncast Corporation, Batavia, IL
To learn about other Suncast products, please call
1-855-477-1260 or 1-630-879-2050.
Product Feedback? Go To: Suncastcommercial.com/feedback
OR email us at: feedback@suncastcommercial.com
A
E
C
Quantity
1
1
2
L
x1
1
1
1
1
1
1
Axle Hardware plus extra washers if needed for axle.
2
P
1
x2
1
I
J
C
G
F
T
N
x6
M
x16
R
x10
S
x2
D
H
Q
x22
TOOLS NEEDED
U
x2
0660203A
Advertisement
Table of Contents

Related Manuals for Suncast CPD200PRO


Summary of Contents for Suncast CPD200PRO
- Page 1 To learn about other Suncast products, please call 1-855-477-1260 or 1-630-879-2050. Product Feedback? Go To: Suncastcommercial.com/feedback OR email us at: feedback@suncastcommercial.com ITEM NUMBER: CPD200PRO Parts & Hardware Parts Description Quantity Rear Frame Tracker Assembly Bottom Tubes Front Frame Rear Flange...
- Page 2 This kit contains parts that can be damaged if assembled incorrectly or in the wrong sequence. • Please follow instructions. Suncast is not responsible for replacing parts lost or damaged due to incorrect assembly. • Check for all parts before you begin assembly.
- Page 3 Pre Assembly Remove hardware (N) from Drum (F). Attach flanges (E) and (G) to drum using six screws (N). Attach crank (H) to flange (G) using one bolt (L). Insert bolt (L) through clearance hole, then thread into welded nut. Once assembled set aside.
- Page 4 Assembly Remove hardware from Front frame (D). Insert Front Frame (D) into bottom tubes (C). Attach using 2 bolts (M), 2 washers (Q) and 2 nuts (R). Temporarily remove Front Handle of (D). Set aside until step 11. Remove hardware from Reel Bracket, both sides. Attach reel assembly to cart using four bolts (M), four washers (Q) and four nuts (R).This is the same hardware previously removed in step 9.
- Page 5 Assembly Lower Front Handle, from step 8, and insert into (D). Remove hardware from tracker assembly (B). Attach (B) to cart using four bolts (M), and four washers (Q). Remove screws from side bar (I). Attach side bar (I) to cart using two bolts (M) and two washers (Q).
- Page 6 Assembly Remove all hardware from axle (K). This hardware will be used in step 19. Insert axle (K) into holes on lower rear of cart. Longer section of hub (W) must always face inward toward hose reel. Shorter section of hub (V) should always face outward when placed on axle.
- Page 7 Assembly See note on previous step regarding wheel orientation Insert one sleeve (P) on each side of the axle. Place each wheel onto axle. Place rubber washer (U) on outside of each wheel and finish by threading nut (S) onto the axle on each side and tightening. DO NOT over-tighten axle nuts. Wheels should spin freely, without excessive wobble. Your hose reel is complete.
- Page 8 Painting, sandblasting, cleaning with harsh chemicals not recommended for plastics voids the warranty on resin components. Modification of the original product voids all warranties. Suncast assumes no liability for any modified product or consequences resulting from failure of a modified product. Disassembly of this unit for reasons other than authorized repair voids the warranty.
Need help?
Do you have a question about the CPD200PRO and is the answer not in the manual?
Questions and answers