
Related Manuals for eTactica EG-200

Summary of Contents for eTactica EG-200
- Page 1 MODERN ENERGY MONITORING User Manual eTactica Gateway – EG-200 V4.5 WE MAKE ENERGY 2.22.1-2020 MONITORING SIMPLE...
- Page 2 Borgartun 27, 105 Reykjavik, Iceland +354 535 3000 eTactica Gateway – EG-200...
-
Page 3: Table Of Contents
Borgartun 27, 105 Reykjavik, Iceland +354 535 3000 Table of Contents 1 Introduction............................5 2 Connecting to Gateway........................10 3 Basic Configuration.........................13 4 Device Configuration........................17 5 Channel Monitor..........................21 6 Device Plugins...........................24 7 Modbus Settings..........................26 8 Network Settings..........................30 9 Password Settings...........................42 10 Configure remote MQTT bridges....................46... -
Page 4: Introduction
+354 535 3000 1 Introduction The eTactica Gateway (EG) is a part of the eTactica line of products, including the eTactica Power Meter (EM) and the eTactica Power Bar (EB). The EG collects and analyses your energy data, measured by the EM and the EB. The EG reads live data from connected devices via its device bus, using Modbus/RTU protocol on RS485 network (default settings: 19200, 8, E, 1). - Page 5 Most commonly, this is Outbound access to TCP port 8883 for MQTT(S) based packages (Eg, SenseOne) Outbound access to TPC port 443 for HTTPS based packages. (Eg, Dexma, eTactica Updates) NTP access (Network Time Protocol) To send data with reliable time stamps an NTP server is needed. If there is outbound access on UDP port 123, this will happen automatically, but you can also edit the list of NTP servers used and provide one in your own network if you prefer.
- Page 6 Borgartun 27, 105 Reykjavik, Iceland +354 535 3000 EG-200 32-bit Linux Network communication Ethernet TCP/IP (10/100Mbit) Wi-Fi (802.11b/g/n) Device bus protocol Modbus/RTU 19200, 8, E, 1 (default settings) Device bus interface RS485, 2-wire, shielded twisted pair, Multi stranded...
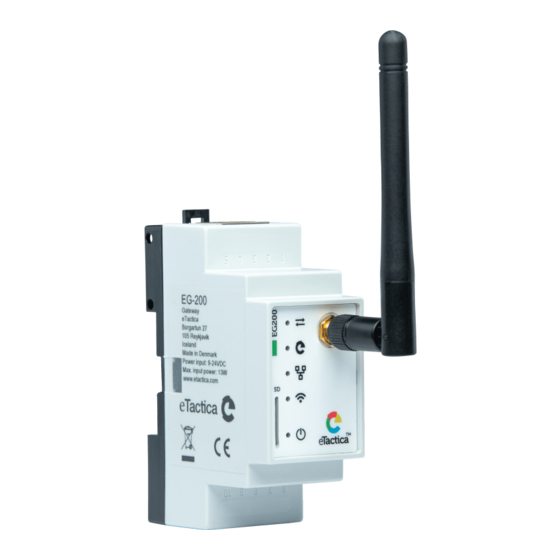
- Page 7 Borgartun 27, 105 Reykjavik, Iceland +354 535 3000...
- Page 8 2. Power input 9-24VDC 3. Device-bus connector 4. Status LEDs (7 - Modbus, 8 - eTactica online, 9 - Ethernet link, 10 – Wi-Fi, 11 - Power) 5. External Wi-Fi antenna 6. Reset button (accessed through an opening on the enclosure)
-
Page 9: Connecting To Gateway
+354 535 3000 2 Connecting to Gateway In this chapter, you find a description of how to connect to the eTactica Gateway (EG) and how to do a basic setup. Most commonly, this is done using the Wi-Fi interface. By default, every Gateway comes with a secure Wi-Fi hotspot for initial configuration. - Page 10 Simply double click the name of the device you wish to connect to and you will automatically be directed to the administration web console page of the gateway, via your web-browser. The name of the device shown here, will also match "eTactica eg_xxxxxx", where -xxxxxx is a unique number for each gateway device. OS X On OS X, support for browsing natively in Safari was unfortunately removed in version 11.
-
Page 11: Basic Configuration
The following chapter describes the steps needed for a basic configuration of your eTactica gateway. If you need to do some further configuration, you may simply proceed as documented in the rest of this manual. However, for the vast majority of installations it should be enough to go through the steps in this chapter. - Page 12 Borgartun 27, 105 Reykjavik, Iceland +354 535 3000 Step 3 - Configure Network The recommended networking setup is to connect the Ethernet port to a regular DHCP network, as this requires the least configuration. Simply leave the mark on DHCP, press [Apply] and then [Continue] when settings have been saved .
- Page 13 This is required for the PowerSync network to function with eTactica EB devices. The cabinet model data is also used in most data output services to provide meaningful labels on datapoints. The breaker sizes are...
- Page 14 Borgartun 27, 105 Reykjavik, Iceland +354 535 3000 From the top menu choose Setup Cabinet Model. There is a list of configured devices, → ordered by their Modbus addresses ( Unitid ), the first one will be flashing, showing that it is the one being worked on (1).
- Page 15 The standard CTs for EBs are 63A solid core CTs, type EC-63, but it is also possible to use eTactica 80A, 200A and 500A split core CTs. EM-SC can use the same split core CTs. EM-FC can use eTactica 1000A, 2000A and 3000A flexible coil CTs.
- Page 16 Borgartun 27, 105 Reykjavik, Iceland +354 535 3000 Click on the [Administration] link near the bottom of the page. From the top menu, click Services, and choose your provider. On the page, fill in the necessary fields and put a tick mark at “Enable this output service”...
-
Page 17: Device Configuration
For each device fill in the address in either decimal or hex, the other will then be filled in automatically. The Modbus addresses are fixed for all eTactica devices and are based on the Device ID (unique ID) of the device. - Page 18 Borgartun 27, 105 Reykjavik, Iceland +354 535 3000 You need to read the last two letters/digits (hexadecimal) from the unique ID of each device that represent the Modbus address. Example: If the unique ID for your EB-312 device is “47.C1.C1.98.AA.5B”, then the Modbus address is 5B.
- Page 19 Step 2b - Automatically scan for devices If you have many devices, you can attempt to scan for all connected devices. Please note that this only works for eTactica devices and only for devices that are properly connected. You should always review the scan results to be sure they match the devices you expected to be found.
- Page 20 If you had third party devices already in your list, or if you have eTactica devices you plan on connecting later that you had manually entered in the previous step, then press the [Merge with existing address list] button to merge a combined device list.
-
Page 21: Channel Monitor
Borgartun 27, 105 Reykjavik, Iceland +354 535 3000 5 Channel Monitor The Channel Monitor lists all connected devices and displays all measurements. Step 1 - Connect to your Gateway Connecting to If you are not connected to your gateway device, please see chapter 2,... - Page 22 Borgartun 27, 105 Reykjavik, Iceland +354 535 3000 Step 3 - Go to the Device detail page Click on the Device ID (serial number) of device of interest. Here you can see various information about that device, all measurements, both in numbers and also in small...
- Page 23 Borgartun 27, 105 Reykjavik, Iceland +354 535 3000 Step 4 - Go to the tabulated data page Click on the [Data] button to see all measurements in tabulated form. The newest measurements are added to the top of the list, with the last 50 readings...
-
Page 24: Device Plugins
The eTactica gateway uses plugins to support all data collection devices, both 3rd party and our own eTactica devices. These plugin scripts tell the gateway how to access a particular device, and what values to read from that device. The administration console lists all the plugins, allows you to add new plugins to support new devices, create new plugins, edit plugins that are installed and delete plugins that might conflict. - Page 25 Borgartun 27, 105 Reykjavik, Iceland +354 535 3000 The latest versions of all plugins maintained by eTactica are available http://packages.etactica.com/plugins and are included automatically in all new firmware updates. You can create your own plugin, either from scratch by pressing the [Create new file] button or by modifying an existing plugin by clicking [Edit] for the plugin you want to modify.
-
Page 26: Modbus Settings
+354 535 3000 7 Modbus Settings The eTactica gateway, as a data collecting device, uses the Modbus/RTU protocol over an RS485 serial line to communicate with one or many connected measurement devices. Up to 32 devices can be connected at once. - Page 27 When done, press the [Save & Apply] button to keep and apply the new settings. Modbus/TCP By default, the eTactica gateway is pre-configured to poll all devices and publish data to it’s onboard MQTT broker.. However, the gateway also provides a Modbus/TCP to Modbus/RTU bridge interface on TCP port 1502.
- Page 28 Borgartun 27, 105 Reykjavik, Iceland +354 535 3000 This is the timeout used on the serial side and if your TCP master waits for less than this time, you may timeout when the device is still sending a valid reply.
- Page 29 Borgartun 27, 105 Reykjavik, Iceland +354 535 3000 Step 4 - Save settings When done, press the [Save & Apply] button to keep and apply your settings.
-
Page 30: Network Settings
Static IP address In some installations, the network facilities require the use of statically configured networking. The eTactica gateway supports this, but it requires manual configuration. Required Information The following details are required from the network manager: Required Information... - Page 31 Borgartun 27, 105 Reykjavik, Iceland +354 535 3000 DHCP will be on by default, click on the Static button and you will get all the fields needed to set up the static IP address. Fill in all the fields as instructed by your network manager and click [Apply] to save the settings.
- Page 32 Borgartun 27, 105 Reykjavik, Iceland +354 535 3000 Switch the interface protocol from DHCP to “Static address” . Confirm that you want to switch protocol by pressing [Switch protocol] button.
- Page 33 Borgartun 27, 105 Reykjavik, Iceland +354 535 3000 Fill in the form with the details you were provided. You would also like to disable DHCP for the interface. In almost all cases, if you are configuring a static IP for your Gateway, you will want to disable DHCP for the interface.
- Page 34 Borgartun 27, 105 Reykjavik, Iceland +354 535 3000 Step 4 - Save settings When done, press the [Save & Apply] button to keep and apply your changes. Enable/Disable Wi-Fi In some installations, once configuration has been completed, you want to completely disable Wi-Fi access and do any future configuration via the Ethernet interface.
- Page 35 [Disable] button is now an [Enable] button. Internet connection via Wi-Fi (No Ethernet Connection) By default, the eTactica gateway is configured as a wireless access point that you can use for configuration, with the Ethernet port preconfigured to be plugged into your existing network and receive address information via DHCP.
- Page 36 Borgartun 27, 105 Reykjavik, Iceland +354 535 3000 Step 2 - Go to "Preset networking" Choose RME Preset Networking from the top menu. → Step 3 - Switch network You want to switch your network completely over to being an Access Point on the Ethernet port.
- Page 37 Step 5 - Configure Wireless Interface In the following example, the Gateway is being configured to connect to a network named “Etactica Staff” . From the home page, click on the [Administration] link near the bottom of the page. Choose Network Wireless from the top menu.
- Page 38 Borgartun 27, 105 Reykjavik, Iceland +354 535 3000 Now press the [Submit] button to continue and you will get some more options.
- Page 39 Borgartun 27, 105 Reykjavik, Iceland +354 535 3000 In most of the cases, there is no need to change anything here. Step 6 - Save settings Press the [Save and Apply] button to keep and apply your settings and you should be connected to your chosen Wi-Fi network.
- Page 40 Borgartun 27, 105 Reykjavik, Iceland +354 535 3000 Step 4 - TX Power / Wi-Fi Channel The channel assignment and transmit power are set in the first section, but it is entirely site-specific configuration, so no advice or sensible defaults can be given here.
- Page 41 Borgartun 27, 105 Reykjavik, Iceland +354 535 3000 Step 4 - Additional SSID configuration Additionally, if you select the General Setup tab, you can edit the following SSID settings: 1. Change the (E)SSID to make it discoverable under your desired name 2.
-
Page 42: Password Settings
Borgartun 27, 105 Reykjavik, Iceland +354 535 3000 9 Password Settings In this chapter, you find information on how to change password settings: Gateway root password Wi-Fi secure access Gateway Root Password The default root username is “root” and on a new gateway there is no password set. - Page 43 Borgartun 27, 105 Reykjavik, Iceland +354 535 3000 You can also edit SSH settings here, for example to add a public key and disable password-based access altogether, or to ban SSH access from the Internet. For more information, we kindly ask you to see the OpenWRT wiki (the linux distribution wiki), for example the pages on securing access: https://openwrt.org/docs/guide-user/security/secure.access...
- Page 44 Borgartun 27, 105 Reykjavik, Iceland +354 535 3000 Wi-Fi Password The gateway comes with a preconfigured Wi-Fi password that is on a label on the side of the gateway. The following covers how to change the Wi-Fi security password.
- Page 45 Borgartun 27, 105 Reykjavik, Iceland +354 535 3000 Step 4 - Save settings When done, press the [Save and Apply] button at the bottom of the page, to keep and apply your new settings.
-
Page 46: Configure Remote Mqtt Bridges
Borgartun 27, 105 Reykjavik, Iceland +354 535 3000 10 Configure remote MQTT bridges The onboard MQTT message broker, mosquitto, allows configuring multiple remote bridges to send/receive topic trees to an external broker. The UI provides some limited support for configuring these. - Page 47 Borgartun 27, 105 Reykjavik, Iceland +354 535 3000 You can add as many extra bridges here as you like (you only need one bridge per remote server, the bridge configuration can map as many topic trees as you like). The options here are a mostly a full reflection of those described in the mosquitto.conf man...
-
Page 48: Snmp Support
Borgartun 27, 105 Reykjavik, Iceland +354 535 3000 11 SNMP Support The eTactica gateway supports queries via SNMP v2c, to get live measurement readings. In the following, the steps to enable this feature are described. Enabling SNMP The live measurement readings from all configured devices can be queried via SNMP v2c, on the standard UDP port 161, with the read-only community "public". - Page 49 Borgartun 27, 105 Reykjavik, Iceland +354 535 3000 If you want disable SNMP, you just follow the same procedure and use the [Stop and disable all] button. Configuration (basic) The SNMP daemon has many configuration settings, and they are all considered advanced topics.
- Page 50 Note that all the data in the eTactica MIB is read-only, regardless of which community string is used to access the MIB. If you scroll down there is a basic UI for other settings. You could for instance delete the section for public_v1 to only allow SNMP v2c queries if desired.
- Page 51 Borgartun 27, 105 Reykjavik, Iceland +354 535 3000 Configuration (advanced) If you want to make more detailed configuration changes to the SNMP daemon, you need to edit the configuration files directly, or have a deeper understanding of the options available.
- Page 52 Borgartun 27, 105 Reykjavik, Iceland +354 535 3000 To query the readings of every point on each device...
-
Page 53: Update Firmware
(EB-3xx and EM-SC/EM-FC) and it will not work on older devices, they will just function as before. All new releases of the firmware are provided and shared by eTactica at this location: https://packages.etactica.com/releases/ The update procedure has been mostly automated, so only a few clicks are needed but there is also a manual way. - Page 54 Borgartun 27, 105 Reykjavik, Iceland +354 535 3000 network arrangements, password settings, etc. This should only be done if you’re setting the gateway up in a new installation or the configuration has become corrupted for some reasons.
- Page 55 Borgartun 27, 105 Reykjavik, Iceland +354 535 3000 Step 2 - Go to the update page From the top menu, choose System Backup/Flash Firmware. → Step 3 - Get image file Locate the “Flash new firmware image” section and follow this procedure: 1.
- Page 56 Borgartun 27, 105 Reykjavik, Iceland +354 535 3000 Confirm integrity Before you proceed, please use the “sha256sums ” file you downloaded earlier to compare with the checksum presented. Flash the new image If the checksum matches, press the [Proceed] button and the gateway will install the new firmware image.
- Page 57 Borgartun 27, 105 Reykjavik, Iceland +354 535 3000 You will see a list of all the eTactica devices that are configured on your gateway, the version number of the current firmware and newest firmware version that is available. For each device there is a [Upgrade] button.
- Page 58 Borgartun 27, 105 Reykjavik, Iceland +354 535 3000 Use the default Modbus Host of . Type in the Modbus Address of your device in either decimal or hex. Click [Choose File] and locate the firmware image file and open it.
-
Page 59: Using An Sd Card For Buffering Network Outages
Borgartun 27, 105 Reykjavik, Iceland +354 535 3000 13 Using an SD Card for buffering network outages A micro SD card can be inserted and used to increase the buffer depth to help avoid gaps due to network outages. Some third party applications or future features may also require or benefit from the SD card. - Page 60 Borgartun 27, 105 Reykjavik, Iceland +354 535 3000 Step 2 – Choose “Reformat disk” The disk will reformatted for exclusive use by the gateway. This may take a few minutes depending on the size of the disk. The gateway will automatically start using...
-
Page 61: Data Output: Dexma
Dexma provides cloud based energy and environmental monitoring, reporting, alerting. The eTactica gateways have Dexma integration built in, just enter your Dexma account details! Once enabled, the gateway will automatically send all selected variables to Dexma every 15 minutes so you always have the latest information in your account. - Page 62 Borgartun 27, 105 Reykjavik, Iceland +354 535 3000 2. Go to Administration page Click on the [Administration] link near the bottom of the page. 3. Go to the Output-Dexma page From the top menu, choose Services Output-Dexma →...
- Page 63 Borgartun 27, 105 Reykjavik, Iceland +354 535 3000 Custom data points If you need variables not preconfigured, then the “Custom Variables” section can be used. This might be the case if you have written your own device plugins, for new types of data.
-
Page 64: Data Output: Senseone
Figure 2: Example Dashboard The eTactica gateways have SenseOne integration built in, just enter your SenseOne account details! Once enabled, the gateway will automatically send all variables to SenseOne every 15 minutes so you always have the latest information in your account. - Page 65 Borgartun 27, 105 Reykjavik, Iceland +354 535 3000 Enter your username and password you received from SenseOne, and be sure to enable the service. No further configuration is required on the gateway, you can now just scroll...
-
Page 66: Data Output: Database Writer
Borgartun 27, 105 Reykjavik, Iceland +354 535 3000 16 Data Output: Database Writer The Output-DB service allows writing any of the aggregate interval data to be sent directly to a compatible SQL server. If the Cabinet Model has been completed, then this data will also be sent, whenever it changes. - Page 67 Borgartun 27, 105 Reykjavik, Iceland +354 535 3000 Simple Installation 1. Prerequisites 1. You are successfully connected to your gateway. If you are not connected yet, please Connecting to Gateway see chapter 2, 2. You have the connection details (hostnames, usernames, passwords, database names) for the destination database.
- Page 68 Borgartun 27, 105 Reykjavik, Iceland +354 535 3000 Extra Instances If you want to run an extra instance of the database writing, choose a name for the new instance, and click the green “Add” button at the bottom of the page. A complete new copy of configuration settings will become available.
- Page 69 Borgartun 27, 105 Reykjavik, Iceland +354 535 3000 Create the database If you like, the service can attempt to create the database if it doesn’t already exist. You should exercise caution here, if you have your own existing database. View the default schema on the “Database Schema”...
-
Page 70: Data Outputs: Other
Output StatsD demonstrates dumping all the live instant high resolution data to a StatsD server, but does not include any diagnostics or cabinet metadata. Contact eTactica if any of the other Output packages appear interesting. Figure 4: StatsD export to Grafana demo... -
Page 71: Alert Emailer
Borgartun 27, 105 Reykjavik, Iceland +354 535 3000 18 Alert emailer If the cabinet model has been configured, then the gateway will automatically make alert messages available in the Message Streams. If you have an email server, you can enable having these alert messages mailed out. - Page 72 Borgartun 27, 105 Reykjavik, Iceland +354 535 3000 There are many options on this page, as email servers have many ways of being configured and allowing mail to be sent. The top section contains details about the connection to the mail server.
- Page 73 Description pairs Standard lua iterator strftime from luaposix gmtime from luaposix localtime from luaposix Note that due to global email server restrictions, eTactica does not provide any open email server for general use, you must provide your own email server.
-
Page 74: Nearby Gateways
Borgartun 27, 105 Reykjavik, Iceland +354 535 3000 19 Nearby Gateways With larger installations, you may have many gateways installed in the same network. To make it easier to find these, a page is available that lists all nearby gateways. This... -
Page 75: Api Documentation And Integration
Borgartun 27, 105 Reykjavik, Iceland +354 535 3000 20 API Documentation and Integration In addition to all standard functionality, the gateway offers a variety of integration APIs and data sources. These are more fully explained in the “3 Party Software Integration Guide”... -
Page 76: Troubleshooting
If you want to check that everything is working properly, or to investigate why something isn't, the home page is the best place to start. You can always get to this page by clicking on the "eTactica" logo in the top banner. The diagnostics run continuously, covering three main tests: Time Synchronization, that tells you if you have access to an NTP server and ... - Page 77 Borgartun 27, 105 Reykjavik, Iceland +354 535 3000 Prerequisites You are successfully connected to your gateway. If you are not connected yet, please Connecting to Gateway see chapter 2, Step 1 - Go to Administration page Click on the [Administration] link near the bottom of the page.
- Page 78 that manufacturers use different convention of labeling the RS485 data pins (A and B) so if you are using a non eTactica device you can try to switch the A and B wires Configured Modbus address is incorrect ...
- Page 79 Borgartun 27, 105 Reykjavik, Iceland +354 535 3000 Modbus device is not supported. Third party devices need plugins and your device may not be supported. Multiple addresses fail to respond Normally you should treat this as many single failures, but this can also be caused by the wiring not being properly connected beyond a certain point on the cable.
- Page 80 The home page should be your first step in troubleshooting, but if it is not helpful, you can have look at the logs to see if there something of use there. If you’re asking an eTactica technician for help, please send a screenshot of the main page and copy of the logs.
- Page 81 Borgartun 27, 105 Reykjavik, Iceland +354 535 3000 Step 2 - Go to the Kernel/System log pages From the top menu, choose Status System Log or Status Kernel Log . Select all the → → text in the log (not just one page), copy it and save it as a .txt file or paste it directly in an...
-
Page 82: Revision History
2.8.1, MQTT chapter added back in, EG-100 removed. 20.3.2019 Technical specs corrected Ragnar Einarsson 10.3.2020 Removed legacy eTactica cloud software, Karl Palsson added all third party Data Outputs, added Disk, added APIs, added emails, added nearby gateways.
Need help?
Do you have a question about the EG-200 and is the answer not in the manual?
Questions and answers