
Related Manuals for Tritech MicronNav

Summary of Contents for Tritech MicronNav
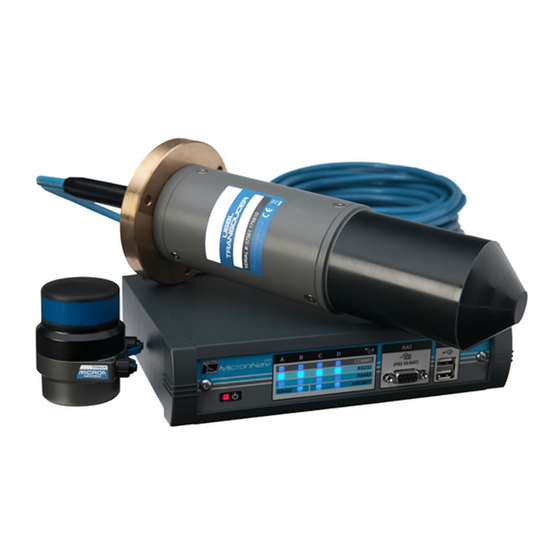
- Page 1 MicronNav System MicronNav System Product Manual 0656-SOM-00001-07 0656-SOM-00001-07 © Tritech International Ltd.
- Page 2 The copyright in this document is the property of Tritech International Ltd. The document is supplied by Tritech International Ltd on the understanding that it may not be copied, used, or disclosed to others except as authorised in writing by Tritech International Ltd.
-
Page 3: Table Of Contents
4.2.1. User Controls .................. 78 4.2.2. The Readings Explained ..............79 4.2.3. User Features ................. 79 4.2.4. Other Controls ................. 84 4.3. Logging and Replay ................... 86 4.4. Shutting Down the System ................86 5. Maintenance ......................87 0656-SOM-00001-07 © Tritech International Ltd. - Page 4 8. Using with Other Tritech Sonars ................127 9. Adding a Micron Echosounder ................128 10. Adding a Micron INS ..................130 11. Conversion Between MicronNav Responder and Transponder ......131 11.1. Seanet Setup for Conversion ..............131 11.2. Conversion to Transponder ..............133 11.2.1.
-
Page 5: Help & Support
Under no circumstances should a product be returned that is contaminated with radioactive material. The name of the organisation which purchased the system is held on record at Tritech International Ltd and details of new software or hardware packages will be announced at regular intervals. -
Page 6: Warning Symbols
Where this symbol is present there is a serious risk of injury or loss of life. Care should be taken to follow the instructions correctly and also conduct a separate Risk Assessment prior to commencing work. 0656-SOM-00001-07 © Tritech International Ltd. -
Page 7: Introduction
The system can be used stand-alone in Transponder mode in which case the subsea unit only requires power, or it can be used with Tritech's range of imaging Sonars (Micron MKII or MKIII, Super SeaKing and Gemini) in responder mode in which case the subsea unit is powered by and communicated with through the Sonar Aux port. -
Page 8: Technical Specification
Plan Position Indicator (PPI) display and optional user bitmap chart display Data Recording All Data recorded in standard Seanet Format for Replay or Analysis Surface Navigation NMEA 0183 GPS and Heading/Attitude Sensors supported. Position of Surface vehicle displayable. 0656-SOM-00001-07 © Tritech International Ltd. -
Page 9: Surface Micronnav100 Interface Hub
Avoid USB hubs and cables exceeding 5m. RAT Connection A single DE-9 female front panel connector for connection to a “V2” Remote Access Terminal. Transducer Connection DB-25 female port on rear panel for connecting the MicronNav USBL Dunking Transducer. Status Indicators 1 x Power/Status Indicator... -
Page 10: Surface Usbl Dunking Transducer
270mm (10.63 inches) Weight in Air 1.96kg (3lbs 15oz) Weight in Water 810g (1lb 12oz) Material Mounting Flange: Marine Brass Housing: Grey ABS Transducer: Polyurethane Operating Temperature -10°C to +35°C Storage Temperature -20°C to +50°C 0656-SOM-00001-07 © Tritech International Ltd. -
Page 11: Subsea Modem Head
DC with the exception of the Micron Data Modem which uses 12-24V DC. If you are unsure which product you are using either opt for a lower voltage or contact Tritech International Ltd to discuss product options. 0656-SOM-00001-07 © Tritech International Ltd. -
Page 12: Installing The System
The Tritech Micron INS has been designed to be fully compatible with the MicronNav System and can be integrated in a variety of ways. For full details of how to install a Tritech Micron INS with the MicronNav please refer to the Micron INS Product Manual (document reference: 0722-SOM-00001) alongside this document. -
Page 13: Mounting The Surface Usbl Dunking Transducer
The USBL Dunking Transducer contains an integral Magnetic Heading and Pitch/Roll Sensor that enables the MicronNav Seanet application software running on the surface computer to make corrections to world axis, this is particularly effective when operating from a non- magnetic mobile platform/vessel or fixed dockside. - Page 14 “Ships Head Up”. If operating from a fixed platform/dockside this would normally be facing away from the platform/dockside and if operating from a mobile platform this would normally align with the front of the vessel. 0656-SOM-00001-07 © Tritech International Ltd.
-
Page 15: Electrical Connections To The Subsea Modem Head
In Responder mode there is no direct connection from the ROV to the sub-sea Modem head - in this configuration the ROV connects to the Tritech Sonar head (Main port) using the cable supplied with the Sonar, and the MicronNav sub-sea Modem head (Main port) connects to the (Auxiliary port) of the Sonar using the Double Ended Interconnect cable supplied with the MicronNav system. -
Page 16: Electrical Connection To The Surface Usbl Dunking Transducer
3.1.7. External Computer Data Link Electrical Connections If the MicronNav data is required by a third party software package running on an external PC then connection from the Surface MicronNav100 Interface Hub to the external PC is made via one of the four serial interface connectors located at the rear of the unit, Port A, B, C or D. -
Page 17: Installation
Seanet Pro is supplied on a CD-ROM which has been designed to auto-run upon disc insertion. The latest commercial release of software is always available from www.tritech.co.uk. Once loaded, the main menu of the CD will be shown on screen. 0656-SOM-00001-07 © Tritech International Ltd. - Page 18 • Seanet Pro using AIF Card - select this option if you are using a SCUv4, or PC equiped with a PCI AIF card. • Seanet Pro using RS232 - select this option if you are using a SeaHub, MicronNav Hub, PC or Laptop with either hardware COM Ports or USB converters.
-
Page 19: Surface Hardware Installation And Configuration
YES. The Channel Setup page will then automatically add and enable the ports that are required as shown below. Note Port numbers may differ on different computers dependent on Windows setup. 0656-SOM-00001-07 © Tritech International Ltd. - Page 20 Port number with the spin edit button until the Type=”SeaHubB” as shown below, click the check box to enable and close the ‘Channel Setup’ page by clicking the ‘X’ at the top right of the window. 0656-SOM-00001-07 © Tritech International Ltd.
-
Page 21: Subsea Hardware Responder Configuration
As of Seanet Pro V2.23 Build 539 the MicronNav Responder unit can be connected in a variety of different ways: • Through the AUX Port of a Sonar connected on Port B of the MicronNav Hub - this is the factory default option •... - Page 22 Micron Responder without first seeking help and advice from Tritech International Ltd. Ensure the Tritech International Ltd Sonar has been installed on the ROV as detailed in the appropriate product manual. Install the MicronNav sub-sea Modem Head on the ROV as detailed in Section 3.1.2, “Mounting the Subsea Modem Head”...
- Page 23 Tritech International Ltd Sonar, Seanet Pro will need to be setup to work with the ROV communications link. For the appropriate Port on the MicronNav Hub (Port B or Port D) - select Utilities from the top menu bar followed by Com Setup to open the Channel Setup...
- Page 24 Sonar to Sub-sea Modem Communication Configuration The Sonar Aux port now need to be configured for the MicronNav sub-sea Modem Head - click the action arrow in the MICRON row followed by Setup from the sub-menu, you will be...
- Page 25 Confirm the settings and close the Comms Setup page by clicking the Ok button and then confirm the Sonar Setup and return to the Seanet Setup page by clicking the Ok button on the Digital Sonar Setup page. 0656-SOM-00001-07 © Tritech International Ltd.
- Page 26 USBL DUNKING TRANSDUCER MICRON RESPONDER The MicronNav Responder can be directly connected to either Port B or Port D of the MicronNav Hub and provide direct communications to it. Select Utilities from the top menu bar followed by Com Setup to open the Channel Setup page.
- Page 27 Configure the Direct Responder device to point to either the SeaHubB or SeaHubD port and ensure that the port settings are correct for establishing direct communication with the MicronNav Responder itself. Note Seanet Pro will not show a Node number for any connected MicronNav Responder. 0656-SOM-00001-07 © Tritech International Ltd.
-
Page 28: Subsea Hardware Transponder Configuration
OF GEMINI 720is USBL DUNKING TRANSDUCER MICRON RESPONDER The MicronNav Responder can be connected to the AUX Port of a Gemini unit (720i, 720id or 720is) so long as the Gemini unit is identified as being Node 100. Caution When utilising the AUX Port of a Gemini Sonar, care should be taken to ensure that the power supplied to the unit does not exceed the rating of the Responder unit. -
Page 29: Connecting Optional Third Party Gps Receiver
Modem head. 3.2.6. Connecting optional third party GPS Receiver The MicronNav system can be configured to accept a NMEA GPS input string from an external third party GPS receiver enabling synchronisation of the Seanet display and ROV tracked position to true world position. - Page 30 The above example shows the GPS receiver on COM 1 which in this case is a Generic COM Port device (e.g. DE-9 port) which creates its own virtual COM port. Note Virtual COM ports can be identified using Device Manager from the Windows Control Panel. 0656-SOM-00001-07 © Tritech International Ltd.
-
Page 31: Connecting Optional Third Party High Accuracy Heading/Pitch/Roll Mru Sensors
MRU Sensors The USBL Dunking Transducer integral Magnetic Heading and Pitch/Roll sensor that enables the MicronNav application to make corrections to world axis is particularly effective when operating from a non-magnetic mobile platform/vessel or fixed dockside, however when operating from a steel hull vessel the integral sensor will be affected by magnetic interference from the vessel and it is recommended in this type of installation that an external ships Compass &... - Page 32 The above example shows the external Heading & Pitch/Roll sensor on COM 3 which in this case is Port A on the MicronNav100 Hub. Check the integral sensor is switched off in Seanet Setup - Node 75 (MINIATTSEN) should no longer appear in the device list. 0656-SOM-00001-07 © Tritech International Ltd.
- Page 33 Attitude Sensor row to open the Comms Settings panel and adjust the baud rate accordingly, click Ok to confirm the setting and close the form and then close the Channel Setup form. 0656-SOM-00001-07 © Tritech International Ltd.
- Page 34 Port A on the MicronNav100 Hub and the external MRU (pitch/roll) on COM 5 which in this case is Port C on the MicronNav100 Hub. Check the integral sensor is switched off in Seanet Setup - Node 75 (MINIATTSEN) should no longer appear in the device list. 0656-SOM-00001-07 © Tritech International Ltd.
- Page 35 Edit Job (N.B. The same selection controls will be found when Creating a new Job). To apply External Heading/Pitch/Roll data, select MicronNav from the top menu bar and select Job – Edit Job to open the Edit Job panel (as shown below - if this menu option is not displayed click inside the Navigation window first).
- Page 36 Installing the System MicronNav System Step 2: Next, in the MicronNav USBL tab-page, set the Attitude Sensor drop-down to No Attitude Sensor, Use Platform 0656-SOM-00001-07 © Tritech International Ltd.
- Page 37 Compass row to open the Comms Settings panel and adjust the baud rate accordingly, click Ok to confirm the setting and close the form and then close the Channel Setup form. 0656-SOM-00001-07 © Tritech International Ltd.
- Page 38 A on the MicronNav100 Hub. Selecting External Heading data in Job After configuring a COM Port for the External Compass data input, to then apply External Heading, i.e. from a Ship Compass, it must be selected in the Job. 0656-SOM-00001-07 © Tritech International Ltd.
- Page 39 To apply only External Heading data, whilst using Pitch/Roll from the Integral Sensor, select MicronNav from the top menu bar and select Job – Edit Job to open the Edit Job panel (as shown below - if this menu option is not displayed click inside the Navigation window first).
- Page 40 Installing the System MicronNav System Step 2: Next, in the MicronNav USBL tab-page, ensure the Attitude Sensor drop-down is set to MicronNav100 Attitude Sensor. Step 3: Click on Save Exit to immediately update the Job and apply changes. The Integral Attitude Sensor Pitch/Roll will still be applied and the External Compass data input(s) will now be used in place of Integral Sensor Compass data.
-
Page 41: Data Input From An Rov
Choose between Use USBL Depth, Use Seanet Depth Gauge, Use SK701/704 Bathy (if a SeaKing 700 Series (Bathy) is available on the system) or INS Depth (if a Micron INS is avalable). 0656-SOM-00001-07 © Tritech International Ltd. - Page 42 ROV attributes to be displayed (Depth, Heading and Pitch/ Roll) or hide the display completely. When enabled a Vehicle Position display will be shown in the bottom right of the screen: 0656-SOM-00001-07 © Tritech International Ltd.
-
Page 43: Connecting Optional Third Party Video Camera
3.2.9. Connecting optional third party Video Camera The MicronNav system can be configured to accept a Video Input from an external USB Video Adaptor receiving PAL/NTSC video from a composite source and display the video in a window adjacent to the MicronNav display. (e.g. select Sonar Nav Video or Nav Video from Applications menu list, or create a new Application with Video using the Application Wizard). - Page 44 Figure 3.4. 0656-SOM-00001-07 © Tritech International Ltd.
- Page 45 Recording the Video The input video can be recorded alongside other device data such as Sonar and MicronNav. All device data is stored in the .V4Log log file. The video is recorded into a separate “.AVI file which is saved in the same root folder as the log file. The AVI file will be given the same filename as that of the log file.
- Page 46 Selection of the correct codec will greatly reduce AVI file sizes. Microsoft Windows is bundled with several video codecs. Some of these have limited functionality and limiting performance. In tests with Seanet Pro by Tritech International Ltd the best performance was obtained with the Cinepak® codec (developed for Microsoft by Radius).
-
Page 47: Remote Beacons
It is possible to receive tracked position strings from an external computer. These strings can be received through a COM port which is configured in Seanet Pro for Remote Beacon Input. The tracked positions can be displayed in the MicronNav chart, all operating alongside other device data such as Sonar and Video. - Page 48 For a mobile datum point such a ship, the ship GPS position can be input into the system, via an NMEA input string for example, and this tracked position also plotted on the MicronNav chart. If a fixed datum/reference point is to be used then it is coordinates must first be entered in the Job Setup after selecting Fixed Platform.
- Page 49 (to create a new job navigate to MicronNav -> Job -> Create New Job). If a job already exists it can be edited instead. In the Job Setup, first select either a Mobile Platform (i.e., a ship) or Fixed Platform (i.e.
-
Page 50: Dry System Check
Modem Heads being used with the system - select MicronNav from the top menu bar and select Setup Application to open the Nav Setup panel (if this menu option is not displayed click inside the Navigation window first), then check the appropriate check boxes for the Heads to be addressed - i.e. - Page 51 SeaNav100 tab and ensure the Has Transmit checkbox is checked and Receiver checkboxes Rx0, Rx1, Rx2 & Rx3 are also checked. Confirm the settings and close the SeaHub Setup page by clicking the OK button. 0656-SOM-00001-07 © Tritech International Ltd.
-
Page 52: Optional Third Party Gps Comms Check
3.4.4. Optional third party Heading & MRU Check If using optional third party Heading and MRU sensors check the compass display at the top of the MicronNav window is present and updating and check the artificial horizon box is present and updating. -
Page 53: Optional Third Party Video Check
To complete the reset operation disconnect the unit from the power supply, re-open the housing as above, set switch 1 back to the OFF position and reassemble the unit. Note: If this is not done the unit will not be able to store any new settings. 0656-SOM-00001-07 © Tritech International Ltd. - Page 54 SeaNav100 tab and check the Has Transmit checkbox and Receiver checkboxes Rx0, Rx1, Rx2 & Rx3, also ensure that “MiniAttSenV2” is set in the drop down box. confirm the settings and close the SeaHub Setup page by clicking the OK button. 0656-SOM-00001-07 © Tritech International Ltd.
-
Page 55: Operation
Prior to the system going in the water the Pre Dive checks should be carried out to ensure maximum reliability and performance from the system. Ensure the subsea MicronNav head has been mounted such that the transducer is proud of the ROV fairing with a clear view... -
Page 56: Creating A New Job (Using Wizard)
Job containing all the installation offsets between each part of the navigation system as measured in the previous section. Select MicronNav from the top menu bar (if this menu option is not displayed click inside the Navigation window first) followed by Job → Create New Job to open the ‘Job Setup’ window and Setup Wizard (if the Job Setup panel is too small to show the whole form then press F2 to maximise the MicronNav application). - Page 57 If the USBL Dunking Transducer is mounted to a Fixed Platform, then select this from the ‘Platform’ drop-down list. Now enter the Position co-ordinates for the Fixed Platform. This can be entered in Latitude/Longitude or UTM Grid formats. 0656-SOM-00001-07 © Tritech International Ltd.
- Page 58 Operation MicronNav System Alternatively, if there is a GPS receiver on the Fixed Platform then tick the ‘Is GPS Present’ check-box and select GPS message input types in the ‘GPS’ panel and Coordinate formats. 0656-SOM-00001-07 © Tritech International Ltd.
- Page 59 Operation MicronNav System Click ‘Next’ when complete. The next page of the Wizard allows the user to select a Magnetic Compass correction. 0656-SOM-00001-07 © Tritech International Ltd.
- Page 60 Seanet Depth Gauge, of if a SeaKing Bathy is fitted to the system the data can be used by selecting SK701/704 Bathy.If a Micron INS is present it can be used by selecting INS Depth 0656-SOM-00001-07 © Tritech International Ltd.
- Page 61 If a GPS is Present then an Antenna Offset can be entered to apply a position correction. The USBL Dunking Transducer installation offset should also be entered here (as measured earlier). The last page of the Wizard lets the user set the offsets for the USBL Dunking Transducer and Attitude sensor. 0656-SOM-00001-07 © Tritech International Ltd.
-
Page 62: Editing An Existing Job
Select MicronNav from the top menu bar (if this menu option is not displayed click inside the Navigation window first) followed by Job – Edit Job to open the ‘Edit Job’ window (if the Edit Job panel is too small to show the whole form, press the F2 key to maximise the MicronNav application). -
Page 63: Loading An Old Job
It is possible to load up Jobs transferred from another computer or from an earlier Seanet Pro installation. Select MicronNav from the top menu bar (if this menu option is not displayed click inside the Navigation window first) followed by Job – Load Job to open the ‘Select the location of a job folder...’... -
Page 64: Job Settings For Mobile Or Fixed Platforms
The following sections explain the parameter setup options for both Mobile and Fixed Platform operation. The ‘Edit Job’ / ‘Job Setup’ Page is used as reference which is a page opened from the MicronNav – Job – Edit Job menu to preview parameters in a current or previous Job configuration. - Page 65 If the USBL compass proves unusable then an external compass should be selected by choosing Use Ship Compass. See Section 3.2.7, “Connecting optional third party High Accuracy Heading/Pitch/Roll MRU Sensors” for more details on how to configure an external compass. 0656-SOM-00001-07 © Tritech International Ltd.
- Page 66 True North. Mag Compass Grid North When using a Magnetic compass this allows a deviation to be entered to allow the display to be referenced to Grid North. 0656-SOM-00001-07 © Tritech International Ltd.
- Page 67 Once the details have been entered on the Mobile Platform tab click the Save button to confirm the details and select the MicronNav USBL tab. Enter the previously measured installation offsets of the USBL Dunking Transducer and select the source of the Pitch and Roll data.
- Page 68 Firstly enter the details on the Job Setup tab. The details will be similar to a mobile setup and the steps from the previous section can be followed. Note Make sure that the Platform variable is set to Fixed Platform. 0656-SOM-00001-07 © Tritech International Ltd.
- Page 69 If this tab has been edited click the Save button to confirm the details. Now select the MicronNav USBL tab page and enter the previously measured installation offsets of the USBL Dunking Transducer and set the Pitch and Roll data source to the USBL Dunking Transducer integral sensor.
-
Page 70: Applying A Geodetic Datum Shift To The Reference Co-Ordinates
Job Setup window. 4.1.8. Applying a Geodetic Datum Shift to the reference co-ordinates 1. In Seanet Pro, open the ‘Edit Job’ page by clicking on MicronNav in the program menu and selecting Job - Edit Job. - Page 71 (“Aratu ES”) specific to a region in Brazil (UTM Zone 24S). The output co-ordinates are Aratu ES corrected WGS84 Lat/Lon. Here is quick procedure: In the ‘Job Setup’ page, the ‘User Defined Datum Shift’ tick-box is ticked 0656-SOM-00001-07 © Tritech International Ltd.
- Page 72 Clicking on the ‘Edit’ button to the right of the ‘User Defined Datum Shift’ tick-box, will open a ‘User Defined Geodetic Shift’ panel on top. This panel is used to enter the datum shift parameters 0656-SOM-00001-07 © Tritech International Ltd.
- Page 73 ‘Save Exit’ on the bottom-right of the page to apply the new Job settings. The following screen shots show the Aratus ES datum shift before and after application A. User Defined Datum Shift = Off 0656-SOM-00001-07 © Tritech International Ltd.
- Page 74 In this Example, the incoming GPS WGS84 Lat/Lon position data is corrected with a Datum shift (“Aratu ES”) specific to a region in Brasil (UTM Zone 24S). The output co-ordinates are UTM projected using the ‘International 1924’ Ellipsoid with Aratu ES datum corrections. 0656-SOM-00001-07 © Tritech International Ltd.
- Page 75 Defined Datum Shift’ tick-box is ticked. Clicking on the ‘Edit’ button to the right of the ‘User Defined Datum Shift’ tick-box, will open a ‘User Defined Geodetic Shift’ panel on top. This is used to enter the datum shift parameters. 0656-SOM-00001-07 © Tritech International Ltd.
- Page 76 ‘Save Exit’ button on the bottom-right of the page to apply the new Job settings. The following screen shots show the UTM output co-ordinates which have been datum shifted. A. User Defined Datum Shift = On (“Aratu ES”). UTM Output using ‘International 1924’ ellipsoid. 0656-SOM-00001-07 © Tritech International Ltd.
-
Page 77: Launching The Subsea Installation
4.1.9. Launching the Subsea Installation The system is now setup and the ROV can be launched into the water. Fly the ROV around the USBL Dunking Transducer and check its position is correctly tracked on the system. 0656-SOM-00001-07 © Tritech International Ltd. -
Page 78: Operating The System
1000m, this should be selected appropriately depending on the distance of the ROV from the USBL Dunking Transducer. Note The normal max operating range of the MicronNav USBL system is 500m. The controls allow for a longer range should conditions permit. Interrogation Rate Control The interrogation rate of the system (i.e., time between subsequent acoustic transmissions) -
Page 79: The Readings Explained
Operation MicronNav System 4.2.2. The Readings Explained 4.2.3. User Features These are selected from a popup menu that is opened by clicking on the Tools button (or by right-clicking on the PPI display). 0656-SOM-00001-07 © Tritech International Ltd. - Page 80 Repeat this 0656-SOM-00001-07 © Tritech International Ltd.
- Page 81 A bitmap can be created of any boat image and copied into the Seanet application folder. This will enable an option in the Chart menu to be able to display the boat image as the ship marker. The correct dimensions of the Ship must also be configured in the MicronNav job settings.
- Page 82 Bow must be top centre, e.g. as follows: 4. The scaling of the boat image will be applied from the MicronNav Job settings. As the boat image is square then only one dimension needs to be used for the scaling and this is the ‘Length’...
- Page 83 Operation MicronNav System 5. Once complete, the boat image will appear on the chart when the ship trail is active, e.g. 0656-SOM-00001-07 © Tritech International Ltd.
-
Page 84: Other Controls
MicronNav System 4.2.4. Other Controls These are selected by clicking on MicronNav on the Main Menu. If this option does not appear in a multi-window application, then first click on the MicronNav display to give it the focus and try again. - Page 85 (PPI display mode) of the MicronNav display If not this needs to be set to show by selecting MicronNav from the top menu bar followed by VOS → Use System VOS / Use Job VOS. When active, a tick will appear next to the selected option.
-
Page 86: Logging And Replay
4.3. Logging and Replay Logging – The MicronNav data can be logged to the computers hard disk for replay at a later date. It is enabled by clicking the Log option in the top menu bar followed by Record from the sub-menu, the required directory and file name should then be selected/entered in the Log On panel now being displayed, clicking the Save button will begin the logging. -
Page 87: Maintenance
The cables are high quality with low halogen jackets, which should provide long service life without problems. Care should be taken to ensure that they are properly sited during installation to avoid movement and fatigue, but otherwise no maintenance is required. 0656-SOM-00001-07 © Tritech International Ltd. -
Page 88: Adding And Using User Bitmap Charts
• The ellipsoid code to be used (if using UTM coordinates) • The UTM zone to be used (if using UTM coordinates) Open the Chart Editor by selecting from the Main menu, MicronNav – Charts – Add Chart. This will bring up the Create Overlay Chart editor. - Page 89 “Save To” folder. If the bitmap is stored in a different place a copy will be created in the “Save To” folder. Once the Chart is Saved, it will be added to the Chart Selection drop-down list on the main page. 0656-SOM-00001-07 © Tritech International Ltd.
-
Page 90: Editing A Chart
If a Chart has already been created and added into the system, it is possible to make changes to this at a later date. To make any edits to existing charts, Open the Chart Editor by selecting from the Main menu, MicronNav – Charts – Edit Chart. 0656-SOM-00001-07... -
Page 91: Deleting A Chart
6.3. Deleting a Chart Any Chart that has been loaded into the system can be removed by selecting from the Main menu, MicronNav – Charts – Delete Chart. The Chart to be deleted should then be selected from ‘Current Chart’ drop-down list. -
Page 92: Markers
1. A full, comma separated file format with the filename extension .mrk 2. A shortened, comma separated format with the filename extension .csv 6.5.2. Creating and Laying a Marker Double-clicking anywhere on the chart will open the Add Marker dialog: 0656-SOM-00001-07 © Tritech International Ltd. -
Page 93: Saving The Markers
For the .mrk file this will always be output in UTM Easting. Y Coordinate For the .mrk file this will always be output in UTM Northing. Altitude This is UTM Altitude and is currently unused. 0656-SOM-00001-07 © Tritech International Ltd. - Page 94 Alternatively can be full path and name of an image file (e.g. 'C: \Image1.bmp'). Comment Comment text. For example, the following two markers would produce a two line .mrk file as shown: mk41149.5595988657,0,548699.614997778,6313221.96999907,-5.3544902067987E-76,V,30,9,0, 28/08/2012 13:25:51,4,00000000,00FFFFFF,00000000,7,Red Flag,Possible Wreck Site mk41149.5605201736,0,548724.213265236,6313198.87994614,-5.3544902067987E-76,V,30,9,0, 28/08/2012 13:27:48,4,00000000,00FFFFFF,00000000,7,Rock,WARNING! ROCKS 0656-SOM-00001-07 © Tritech International Ltd.
- Page 95 Date & Time in English(GB) Locale. Format is "dd/mm/yyyy hh:mm:ss" For example, the following two markers would produce a two line .csv file as shown: mk41149.5595988657,-2.1991799999203,56.9600300036883,Possible Wreck Site,4,Red Flag, 28/08/2012 13:25:51 mk41149.5605201736,-2.19877999992026,56.9598200036882,WARNING! ROCKS,4,Rock, 28/08/2012 13:27:48 0656-SOM-00001-07 © Tritech International Ltd.
-
Page 96: Loading The Markers
When the Form is toggled between displaying a Chart or the PPI form (e.g. ‘Display Chart’ check-box toggles this), the Tools button will be populated with different options in Chart and PPI display modes. Configuration Clicking on ‘Configuration’ will open the Chart Config page. 0656-SOM-00001-07 © Tritech International Ltd. - Page 97 The sub and ship trails can be saved to a comma separated ASCII file, with the .trl extension. To import into GIS or other applications, this extension can be renamed as .csv or any other compatible extension type. 0656-SOM-00001-07 © Tritech International Ltd.
- Page 98 Ship Trail in the pop-up menu of Step 1 shown below. Procedure 1. In the MicronNav application, right-click on the chart window and select Sub Trail – Save Sub Trail. 2. Next, in the Save As dialog, enter a name for the output file and click Save.
- Page 99 36.127482500867,-114.888399999666,0 On Chart Meaurements A Left click and drag operation anywhere on the chart will bring up an “elastic band” measuring line which can be used to display Distance and Bearing between two reference points. 0656-SOM-00001-07 © Tritech International Ltd.
-
Page 100: Load Bsb Charts
MicronNav System 6.7. Load BSB Charts Seanet Pro V2.21 (build 494) onwards has the capability to import BSB charts for use with the MicronNav chart application. It will open any compatible Version 3 BSB chart with the .KAP file extension. Procedure 1. - Page 101 Adding and Using User Bitmap Charts MicronNav System 3. The select the required .KAP file from the Load dialog 0656-SOM-00001-07 © Tritech International Ltd.
- Page 102 5. Once the page is populated from the cartographic information it is possible to make edits to the chart configuration at this point or at a later stage by selecting MicronNav - Charts - Edit Chart from the Seanet Pro menu bar.
- Page 103 6. Once the chart has been loaded an any necessary edits made, click on Save Chart to close the dialog and return to the main screen. The chart will be selected and displayed. 0656-SOM-00001-07 © Tritech International Ltd.
- Page 104 Adding and Using User Bitmap Charts MicronNav System 0656-SOM-00001-07 © Tritech International Ltd.
-
Page 105: Using The External Computer Data Link
7. Using the External Computer Data Link The MicronNav data can be made available for use by third party software packages running on an external PC and this section gives details on how to set this up. The external computer data link should be connected as detailed in Section 3.1, “Preparation”... - Page 106 1 beacon. Therefore a beacon ID must be selected from the ‘ID:’ drop-down list for each format (‘R0’ = Responder, ‘T1’..’T15’ = Transponders, 'INS' = Micron INS, ‘Auto’ = will auto-set to first ID detected). 0656-SOM-00001-07 © Tritech International Ltd.
- Page 107 Channel Setup’ page (‘Settings’ – ‘Channels’) and configure the Channel that was selected in the step above. 5. To use a Com port from the MicronNav Hub to output the REMV4 data proceed as follows. (The example below shows the MicronNav Hub Port A being configured for REMV4) 6.
-
Page 108: List Of Current String Formats
Node 90 and Click on ACTION Setup as indicated below. 8. Configure “Port A Mode” to RS232 using the drop down and press OK to program this setting into the SeaNav Hub 7.2. List of Current String Formats 0656-SOM-00001-07 © Tritech International Ltd. -
Page 109: Proc Xyz
1, Send Processed Data = 0 (*Not applicable) Example: Byte Count = Hex 0049 (73) Slot = 08 = MicronNav Sourcetype = 32(Hex 20) = Null (not defined for MicronNav) Data reply mode is ASCIIText Send data = 0 = Proc XYZ ALWAYS Hex e.g., “0049082000”... - Page 110 Unit ID = 0 (Responder), World X co-ordinate (Easting) of 503868.427, World Y co-ordinate (Northing) of 6025011.669,Vertical Z co-ordinate of 4.102m, Quality Flag = 0.8, Valid reply Set = 30 (all valid),Fix taken at 15:31:56. ASCII Text = "%D004B082000000+5.03868427E+05+6.02501167E+06+ 0000004102+0.80000E +0003015315632<CR><LF>" CSV = "%D003E082030,0,503868.427,6025011.669,+4102,0.8,30,15315632<CR><LF>" 0656-SOM-00001-07 © Tritech International Ltd.
-
Page 111: Raw Xyz
*Not applicable Example: Byte Count = Hex 0049 (73) Slot = 08 = MicronNav Sourcetype = 32(Hex 20) = Null (not defined for MicronNav) Data reply mode is ASCIIText Send data = 1 = Raw XYZ ALWAYS Hex e.g. “0049082001”... - Page 112 Unit ID = 0 (Responder), Relative X co-ord of -18.686m, Relative Y co-ord of 4.764m, Relative Z co- ord of 4.1m, Quality Flag = 0.8, Valid reply Set = 30 (all valid), Fix taken at 15:31:56. ASCII Text = “%D0049082001000-0000018686+0000004764+0000004100+0.80000E +0003015315632<CR><LF>” CSV =“%D0033082031,0,-18686,+4764,+4100,0.8,30,15315632<CR><LF>” 0656-SOM-00001-07 © Tritech International Ltd.
-
Page 113: Tp-2Ec
503871.9, Y Co-ord (North) of 602501.0, Z Co-ord (Depth) of 13.0m, No Error. ASCII Output Always (on a single line) = “0*15:33:02*337*277.6****20.8*503871.9* 602501.0****13.0******0.0***<CR><LF>” Where; “*” is a space (ASCII code 32), “<CR>” is Carriage Return (ASCII code 13), “<LF>” is Line Feed (ASCII code 10). 0656-SOM-00001-07 © Tritech International Ltd. -
Page 114: Simrad Hpr 300P
Co-ord (East) of 339080, Y Co-ord (North) of 497512, Z Co-ord (Depth) of 13.7m, No Error. ASCII Output Always = “0**1**W***OK**119.5*339080*497512***13.7***0.0<CR><LF>” Where; “*” is a space (ASCII code 32), “<CR>” is Carriage Return (ASCII code 13),“<LF>” is Line Feed (ASCII code 10). 0656-SOM-00001-07 © Tritech International Ltd. -
Page 115: Simrad Hpr 410
-9.99999E-37 to +9.99999E+37 Real Td beam 0 = wide, 1 = narrow ShortCard Td type Not used, Always 0 ShortCard Td num Always 1 Cardinal Diagnostic Not used, Always 0 Cardinal Standard deviation, unused Always 0.0 Real 0656-SOM-00001-07 © Tritech International Ltd. - Page 116 Not used, Always 0 Real Footer Tail Checksum(Sum of all bytes excluding 1 to 65536 Cardinal Checksum and Stop Character) Stop Character Always AAh ShortCard Example: The output telegram is binary so a viewable example is not given. 0656-SOM-00001-07 © Tritech International Ltd.
-
Page 117: Nmea $Rattm
“TARGET1” Comma separator Always ‘,’ Target Status ‘L’ or ‘T’ L = Lost, Q = Query in process, T = Tracking Comma separator Always ‘,’ Target ? Always null R = Reference Target, otherwise null 0656-SOM-00001-07 © Tritech International Ltd. - Page 118 Relative Target Bearing = 326.0º, UTC Time of reading = 005940.13. ASCII Output Always (on a single line) = “$RATTM,00,0.0011,326.0,R,0.0,0.0,R,0.0,0.0,N, TARGET1,T,,005940.13,A*5B<CR><LF>” Where; “<CR>” is Carriage Return (ASCII code 13), “<LF>” is Line Feed (ASCII code 10). 0656-SOM-00001-07 © Tritech International Ltd.
-
Page 119: Nmea $Gpgga
Units Identifier ‘M’ for metres Comma separator Always ‘,’ Age of Differential GPS data Always 1.2 Comma separator Always ‘,’ Differential Reference Station ID Always 1234 xxxx Comma separator Always ‘,’ Delimiter (asterisk) Always ‘*’ 0656-SOM-00001-07 © Tritech International Ltd. - Page 120 UTC Time of reading = 144014.71, Target Latitude = 54º 22’ 21.74” (N), Target Longitude = 2º 56’ 25.07” (W). ASCII Output Always (on a single line) = “$GPGGA,144014.71,5422.3624,N,00256.4178,W,2,07,2.2,0.0, M,0.0,M,1.2,1234*5C<CR><LF>” Where; “<CR>” is Carriage Return (ASCII code 13), “<LF>” is Line Feed (ASCII code 10). 0656-SOM-00001-07 © Tritech International Ltd.
-
Page 121: Nmea $Gpgll
Latitude / Longitude format. The full string format is as follows: ‘$GPRMC’ Reply Data Structure Data Description Data Range Field Range NMEA string header Always ‘$GPRMC’ hhhhhh 0656-SOM-00001-07 © Tritech International Ltd. - Page 122 Target Latitude = 54º 22’ 22.30” (N), Target Longitude = 2º 56’ 25.51” (W), UTC Time of reading = 143221.57, Date of reading = 9th May 2008. ASCII Output Always (on a single line) = “$GPRMC,143221.57,A,5422.3717,N,00256.4252,W, 0.00,000.00,090508,,*0F<CR><LF>” Where; “<CR>” is Carriage Return (ASCII code 13), “<LF>” is Line Feed (ASCII code 10). 0656-SOM-00001-07 © Tritech International Ltd.
-
Page 123: Psimssb
Comma separator Always ‘,’ Expected Accuracy, unused Always 0.0 Comma separator Always ‘,’ Additional information Always ‘N’ Comma separator Always ‘,’ 1st Additional value Always blank Comma separator Always ‘,’ 2nd Additional value Always blank 0656-SOM-00001-07 © Tritech International Ltd. - Page 124 X Co-ord (East) of 538087.76, Y Co-ord (North) of 7039253.894, Z Co-ord (Depth) of 56.486m, Status = Okay. ASCII Output Always (on a single line) = “$PSIMSSB,204854.17,00,A,,C,H,M,538087.760, 7039253.894,56.486,0.0,N,,*26<CR><LF>” Where; “<CR>” is Carriage Return (ASCII code 13), “<LF>” is Line Feed (ASCII code 10). 0656-SOM-00001-07 © Tritech International Ltd.
-
Page 125: Nmea $Gpdbt
'$' and '*') (Carriage Return + Line Feed) <CR><LF> Example: Z (Depth) value = 54.12 metres. ASCII Output Always = “$GPDBT,177.55,f,54.12,M,29.59,F*32<CR><LF>” Where; “<CR>” is Carriage Return (ASCII code 13), “<LF>” is Line Feed (ASCII code 10). 0656-SOM-00001-07 © Tritech International Ltd. -
Page 126: Notes
<1..12> “Nn” (“01” to “0C”) “01” to “12” SOURCEN <0..99> “Nn” (“00” to “63”) “00” to “99” DEVICEN <0..99> “Nn” (“00” to “63”) “00” to “99” NODEN <1..15> “Nn” (“01” to “63”) “01” to “99” 0656-SOM-00001-07 © Tritech International Ltd. -
Page 127: Using With Other Tritech Sonars
MKII/MKIII Micron and SeaSprite DST Sonars and throughout this manual this is the Sonar referred to, it is possible however to operate the MicronNav with other Tritech Sonar in the same way as that detailed for the MKII/MKIII Micron and SeaSprite DST. The following list provides details on MicronNav compatibility with the other Tritech Sonars. -
Page 128: Adding A Micron Echosounder
MicronNav System 9. Adding a Micron Echosounder When operating the MicronNav System in Responder mode in conjunction with a Tritech International Ltd Sonar, a Micron Echosounder can be added to the subsea installation. The Micron Echosounder is a sonar ranging device which mounted vertically gives altitude above the seabed or in any other attitude provides a subsea distance measurement (see Micron Echosounder Product Manual for further details). - Page 129 Adding a Micron Echosounder MicronNav System 0656-SOM-00001-07 © Tritech International Ltd.
-
Page 130: Adding A Micron Ins
MicronNav System 10. Adding a Micron INS A Micron INS can be used with the MicronNav System and full details of how to configure the two products together can be found in the Micron INS Product Manual (document reference: 0722-SOM-00001). -
Page 131: Conversion Between Micronnav Responder And Transponder
MicronNav System 11. Conversion Between MicronNav Responder and Transponder 11.1. Seanet Setup for Conversion Connect the MicronNav100 Hub to the USBL Transducer head and computer and ensure the communications link to the Transponder/Responder is disconnected from Port B on the MicronNav100 Hub. - Page 132 Conversion Between MicronNav Responder and Transponder MicronNav System in the SEAHUBNAV100 row followed by Setup from the drop-down menu that appears to display the SeaHub Setup page. Set Port B to RS232. Confirm the settings and close the SeaHub Setup page. After a few seconds, the reprogramming of the unit will be complete and "Node 90, Prog Cfg Done"...
-
Page 133: Conversion To Transponder
Conversion Between MicronNav Responder and Transponder MicronNav System Switch off the power supply to the MicronNav100 Hub, connect the Transponder/Responder Main port to Port B of the MicronNav100 Hub. Position a magnet against the body of the unit as shown below and re-apply power to the system. -
Page 134: Enabling The Usbl Transducer Transponder Transmitter
Conversion Between MicronNav Responder and Transponder MicronNav System confirm the settings and close the AM100 ModemCfgSetup page. After a few seconds the reprogramming of the unit will be complete and "Node 85, Prog Cfg Done" will be displayed in the status bar. - Page 135 Conversion Between MicronNav Responder and Transponder MicronNav System shots below, select Sonar Nav from the Applications menu (or Sonar Nav Video if video is also required). Click inside the tracking window to display the AMNav menu option in the main menu par.
-
Page 136: Conversion To Responder
Conversion Between MicronNav Responder and Transponder MicronNav System Confirm the settings and close the setup page. This completes the conversion to Transponder mode. Position the Transponder unit near the USBL Transducer will confirm operation and "Ping T1 ok" should be displayed at the top- right of the MicronNav window. -
Page 137: Connect The Micron Sonar And Responder
Conversion Between MicronNav Responder and Transponder MicronNav System Confirm the settings and close the AM100 ModemCfgSetup page. After a few seconds the reprogramming of the unit will be complete and "Node 85, Prog Cfg Done" will be displayed in the status bar. - Page 138 Conversion Between MicronNav Responder and Transponder MicronNav System Confirm the settings and close the SeaHub Setup page. Apply power to the Micron Sonar/ROV and once the sonar has initialised the Main Setup page should list three Node numbers in the table - the MicronNav100 Hub (SEAHUBNAV100), the USBL Head (MINIATTSEN) and the Micron Sonar (MICRON).
-
Page 139: Configure Seanet Pro Responder Mode
Conversion Between MicronNav Responder and Transponder MicronNav System At the bottom-right of the page is the Comms Mode selection panel. Set the Aux to RS232 and click the Baud Rates button at the bottom-left of the page to open the Comms Setup window. - Page 140 Conversion Between MicronNav Responder and Transponder MicronNav System Click inside the tracking window to display the AMNav menu option in the main menu bar. Select AMNav from the main menu bar followed by Setup App from the sub-menu to open the Nav Setup page.
- Page 141 Confirm the settings and close the setup page. This completes the conversion to Responder mode. Positioning the Responder unit near the USBL Transducer head will confirm operation and Ping R0 ok should be displayed at the top-right of the MicronNav window. Note...
-
Page 142: Glossary
English alphabet. Short for "auxiliary". Bathy Alternate name for the Tritech International Ltd SeaKing 700 Series Integrated Oceanographic Sensor Suite which outputs data about the conditions of the seawater and water column which may have an affect on the sonar (temperature, depth, etc.,) - Page 143 MicronNav An Ultra Short Baseline (USBL) system for location and tracking of ROVs, divers, etc. Consists of the MicronNav 100 surface control unit (similar to the SeaHub but with different functionality) a "dunking transducer" which is mounted on the vessel/dockside under the waterline and a responder which is mounted on the ROV or Hammerhead tripod.
- Page 144 (in RS232, RS485 or ARCNET) and converts it into a signal suitable for the USB port of the computer. SeaKing A specific sonar produced by Tritech International Ltd but also refers to the family of sonar equipment manufactured by Tritech International Ltd comprising of the SeaKing, SeaKing DST scanning and profiling sonars and the Hammerhead survey sonar.
Need help?
Do you have a question about the MicronNav and is the answer not in the manual?
Questions and answers