Table of Contents
Advertisement
Available languages
Available languages
Quick Links
Advertisement
Chapters
Table of Contents

Related Manuals for TECHNO-GAZ MASTER FLUX PLUS

Summary of Contents for TECHNO-GAZ MASTER FLUX PLUS
- Page 1 MANUALE UTENTE USER MANUAL ANWENDERHANDBUCH Art. 1601AS: a parete; wall‐type; wandausführung Art. 1600AS: a stativo; with cabinet; schrank ITALIANO ENGLISH DEUTCH MMF0002...
-
Page 3: Table Of Contents
ITALIANO Dichiarazione di Conformità Condizioni di garanzia Decadenza della garanzia Modalità di reso Avvertenze generali e di sicurezza Contatti e indirizzi utili Simbologia Avvertenze e nozioni utili Caratteristiche tecniche Imballaggio, trasporto e stoccaggio Demolizione e smaltimento Accessori Impiego Figure Istallazione e collegamenti Istruzioni per l’uso Pulizia e manutenzione... -
Page 4: Dichiarazione Di Conformità
ITALIANO DICHIARAZIONE DI CONFORMITA’ Questo apparecchio assolve ai criteri di conformità CE in quanto conforme alla Direttiva Dispositivi Medici 93/42/CEE. La dichiarazione di conformità originale è fornita in allegato al manuale. -
Page 5: Condizioni Di Garanzia
ITALIANO CONDIZIONI DI GARANZIA 1) DURATA: il prodotto è coperto da un periodo di garanzia di 12 (dodici) mesi. 2) ESCLUSIONE: sono da escludersi dalla garanzia: a) le avarie causate da mancata manutenzione ordinaria dovute a trascuratezza dell’Utilizzatore o ad un uso improprio del prodotto; b) controlli periodici e manutenzione;... -
Page 6: Decadenza Della Garanzia
ITALIANO DECADENZA DELLA GARANZIA La garanzia decade se: a) l’apparecchiatura presenta danneggiamenti dovuti a caduta, esposizione a fiamme, rovesciamenti di liquidi, fulmini, calamità naturali, eventi atmosferici, o comunque da cause non imputabili a difetti di fabbricazione; b) l’installazione non é conforme alle istruzioni del fabbricante ed é stata eseguita da personale non autorizzato;... -
Page 7: Modalità Di Reso
ITALIANO MODALITA’ DI RESO 1. Tutti i resi devono essere eseguito con prodotti imballati nel loro imballo originale, in caso di reso eseguito con imballo non originale sarà addebitato il prezzo del ripristino dello stesso; 2. Tutti i resi dovranno essere effettuati in PORTO FRANCO ; 3. -
Page 8: Avvertenze Generali E Di Sicurezza
ITALIANO AVVERTENZE GENERALI E DI SICUREZZA Assicurarsi che l’apparecchio sia alimentato con tensione corretta indicata sulla targhetta. Non rimuovere la targhetta Assicurarsi che l’impianto sia provvisto di messa a terra. Pulire la macchina con panno asciutto. Prima di qualsiasi intervento disinserire il cavo d’alimentazione dalla ... - Page 9 ITALIANO TERRA (di funzionamento). Corrente alternata. Attenzione alta tensione pericolo di folgorazione! Leggere attentamente il manuale istruzioni Parte applicata. Posizione (numero a cui corrisponde il componente nelle figure o POS. schemi). Figura. Ω Ohm (unità di misura della Resistenza Elettrica). Secondi (unità...
-
Page 10: Avvertenze E Nozioni Utili
ITALIANO AVVERTENZE E NOZIONI UTILI 1. A FINE TERAPIA SOMMINISTRARE SEMPRE OSSIGENO PURO PER DUE MINUTI 2. Il paziente deve sempre mantenere la mascherina sul naso indipendentemente dalla durata dell’intervento. 3. Il paziente va trattato in ambiente tranquillo privo di rumori con meno persone possibile attorno. - Page 11 ITALIANO 12. Se il paziente accusa sintomi di malessere (nausea, FIG.2 vertigine, mal di testa) sulla scatola flussometrica è previsto pulsante “FLUSH” Pos. (Cod.SMFA032).Vedi Fig. 2 Premendo il pulsante “FLUSH” il pallone (Cod. CM84001) si riempirà di ossigeno che andremo a somministrare manualmente al paziente;...
-
Page 12: Caratteristiche Tecniche
ITALIANO CARATTERISTICHE TECNICHE Pressione massima d’alimentazione: 6 Bar ≅ 50 PSI Portata massima erogabile: 10 l/min. (litri al minuto) INGOMBRI MASTER FLUX PLUS A MOBILE: FIG.3 Peso senza bombole: 42 Kg Peso con bombole capacità 5 Lt: 63 Kg Peso con bombole capacità 10 Lt:... - Page 13 ITALIANO INGOMBRI MASTER FLUX PLUS A PARETE: FIG.4 Massa complessiva della scatola flussometrica (comprensiva di pallone): 6.27Kg. CONSUMI: A seguire è indicato un esempio di consumo da prendere come riferimento teorico BOMBOLA OSSIGENO CON CAPACITA’ 10Lt. CARICATA ALLA PRESSIONE DI 200 Bar: Volume d’ossigeno disponibile:...
- Page 14 La scatola flussometrica, chiusa in un sacchetto di cellophane è inserita in due sagome di polistirolo espanso a loro volta richiuse in una scatola di cartone ondulato. Il Kit MASTER FLUX PLUS a mobile è composto dagli accessori da usare, chiusi in una scatola di cartone ondulato.
-
Page 15: Demolizione E Smaltimento
ITALIANO DEMOLIZIONE E SMALTIMENTO DECRETO LEGISLATIVO 25 luglio 2005, n. 151: Attuazione delle direttive 2002/95/CE, 2002/96/CE e 2003/108/CE, relative alla riduzione dell’uso di sostanze pericolose nelle apparecchiature elettriche ed elettroniche, nonché allo smaltimento rifiuti. Direttiva sui rifiuti di apparecchiature elettriche ed elettroniche (RAEE) Ai sensi della DIRETTIVA 2002/96/CE questo simbolo indica che il prodotto, alla fine della sua vita utile, non deve essere... -
Page 16: Accessori
ITALIANO ACCESSORI ACCESSORI IN DOTAZIONE NEL MASTER FLUX PLUS A MOBILE art. 1600AS: - N.1 Scatola flussometrica che comprende: N.1 Manuale Istruzioni N.1 Pallone 2.7 litri - N.1 Mobile Master Flux Plus che comprende: N.1 Filtro evacuazione gas esalati completo N.1 Tubo per l’evacuazione gas... -
Page 17: Impiego
La sedazione è un trattamento che il medico esegue sul paziente, facendolo sentire disteso e rilassato. È utile anche al medico, in quanto potrà lavorare con minori perdite di tempo e maggiore tranquillità. Il MASTER FLUX PLUS permette di somministrare PROTOSSIDO D’AZOTO (N O) come sedativo, miscelato a OSSIGENO (O ) in percentuale dallo 0 a circa il 70%, graduabile a seconda dell'ansia e della paura del paziente. -
Page 18: Figure
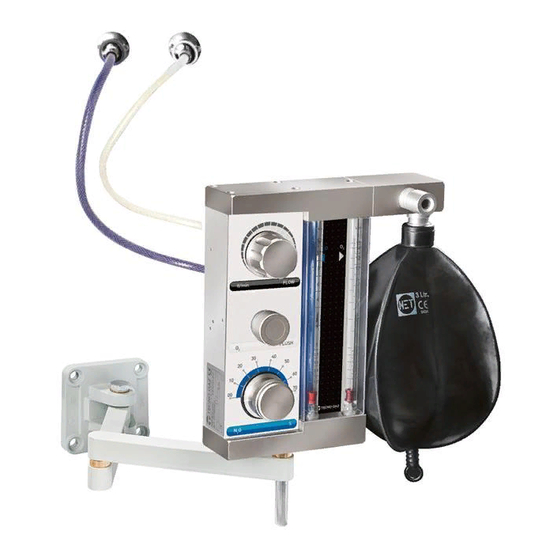
ITALIANO FIGURE MASTER FLUX PLUS A PARETE, COD. 1601AS: Piastra fissaggio FIG.6 a muro Tubo N SMFA501 SMFA365 Scatola flussometrica SMFA500 Tubo O SMFA364 Impugnatura -Perno a muro SMFA313 Supporto MASTER FLUX A Maschera MURO Cod.1605A (Grande) Cod. 1607A (Piccola) - Page 19 ITALIANO SCATOLA FLUSSOMETRICA, COD.SMFA500: FIG.7 PORTAGOMMA MANOPOLA TUBO SPIRALATO ”FLOW” Cod. SMFA088 Cod. SMFA001 PULSANTE “FLUSH” Cod. SMFA032 PORTAGOMMA PALLONE Cod.SMFA088 MANOPOLA “N2O%” Cod. SMFA040 INDICATORI DI PORTATA Cod. CM87047 (N Cod. CM87048 (O...
- Page 20 ITALIANO INSTALLAZIONE E COLLEGAMENTI INSTALLAZIONE MASTER FLUX PLUS A MOBILE, COD. 1600AS: 1) - MONTAGGIO ROTELLE (Vedi Fig.8) A - Togliere dall’imballo il mobile. B - Posizionare il mobile ‘C’ orizzontalmente su un piano morbido (tappeto, ecc.) per il montaggio delle rotelle.
- Page 21 ITALIANO D - Inserire le bombole nel mobile seguendo la figura 16. E - Bloccare le bombole al mobile utilizzando le apposite catenelle o molle (POS.E), (Vedi Fig. 16). F - Collegare il dado del tubo riduttore protossido con il nipplo di alimentazione protossido posto in alto della scatola flussometrica (Vedi Fig.16) e SERRARE con chiave da 18 mm.
- Page 22 ITALIANO FIG.12 FIG.10 FIG.11 FIG.13 FIG.14 BOMBOLA N 1515/A3 1513A4 FIG.15 BOMBOLA O FIG.16...
- Page 23 ITALIANO FIG.17 Nipple N Nipple O BOMBOLA N BOMBOLA O 5 LITRI 5 LITRI DIAMETRO 140 mm DIAMETRO 140 mm ALTEZZA CON ALTEZZA VALVOLA 550 mm VALVOLA 550 mm 10-14 LITRI DIAMETRO 140-160 mm ALTEZZA CON VALVOLA 920 - 900 mm...
- Page 24 FIG.19 FIG.20 SMFA301 3. Togliere dall’imballo la Piastra fissaggio a muro MASTER FLUX PLUS (SMFA501) (Vedi Fig. 22) e fissarla al muro con n.4 tasselli per muro Ø 8 (mm). Per eseguire la foratura vedere Fig.18 e 21. PRESA SMFA501...
- Page 25 ITALIANO Togliere dall’imballo la scatola flussometrica (SMFA500), avvitare alla base della scatola flussometrica il perno a muro (SMFA313) (Vedi Fig. 23). 4. Inserire il perno a muro (SMFA313) nella parte finale (POS.A) del supporto a muro (SMFA301) (Vedi Fig.23). 5. Bloccare il perno al supporto (SMFA301) con la manopola filettata (CM15113) (Vedi Fig.
- Page 26 ITALIANO Nella figura seguente è riportato un esempio di installazione dell’impianto centralizzato. FIG.25 N.B.: I RIDUTTORI COMPLETI DI TUBI E RACCORDI SONO COMPRESI NEL 1601AS A – Bombola ossigeno F – Tubo blu B – Bombola protossido G - Raccordo maschio 1/8”G C –...
- Page 27 - Regolare l’anello aria del rubinetto ELIMINAZIONE GAS B) SCARICO DEI GAS ALL’ESTERNO TRAMITE IL MOBILE; solo nel modello ART.1600AS - Connessione a mobile, vedi Fig. 29 - Avvitare un portagomma (SMFA237) al mobile MASTER FLUX PLUS nella posizione B (Vedi Fig. 29).
- Page 28 ITALIANO - Collegare il tubo d’esalazione (scarico) della mascherina al mobile togliendo il rubinetto (Vedi Fig. 29). - Avvitare un raccordo SMFA237, compreso nel mobile nel foro posizione C. - Collegare il tubo spiralato evacuazione gas (SMFA197) al mobile nella (POS. C) utilizzando il portagomma (SMFA237), (Vedi Fig.
- Page 29 ITALIANO ISTRUZIONI PER L’USO INIZIO TERAPIA: (Per riferimenti e posizioni Vedi Fig.32) N.B.: Le seguenti fasi si effettuano con lo scarico della mascherina libero (Non collegato ai sistemi di evacuazione). 1. Aprire le bombole, ruotando molto lentamente in senso antiorario il rubinetti delle bombole.
- Page 30 ITALIANO SPECIFICHE DI TERAPIA PER BAMBINI: (Per riferimenti e posizioni Vedi Fig. 32) 1. Trovare, come detto in precedenza il giusto flusso del quale ha bisogno il bambino. 2. Per fare questo, ruotare in senso orario la manopola “FLOW” (Pos. A) e lasciare inspirare per circa 1 minuto.
- Page 31 ITALIANO 7. Fare sostare il paziente in sala d’attesa, tenendolo sotto controllo discretamente, per circa (5÷10) minuti (se necessario anche di più). 8. Dimetterlo tranquillamente. SITUAZIONI CHE SI POSSONO VERIFICARE DURANTE IL FUNZIONAMENTO: - Mancanza di ossigeno ad inizio terapia: nessuna erogazione di Protossido - Mancanza di ossigeno durante la terapia: arresto erogazione Protossido;...
- Page 32 ITALIANO STABILITA’ DURANTE L’USO: Prima di iniziare l’utilizzo del dispositivo MASTER FLUX PLUS nella versione a mobile, bloccare le ruote munite di freno premendo verso il basso le apposite linguette A (Fig.33). Nel caso si rendesse necessario spostare l’apparecchio (ad esempio da una stanza ad un’altra), sbloccare le ruote tirando le...
- Page 33 ITALIANO RIANIMAZIONE CON IL MASTER FLUX PLUS UTILIZZANDO IL KIT Art. 1504/A “Kit per rianimazione con MASTER FLUX PLUS” (Non in dotazione): (Per riferimenti e posizioni Vedi Fig. 35) N.B.: Le seguenti operazioni dovranno essere effettuate con manopola regolazione percentuale in posizione 0. (0% Protossido d’azoto) 1.
- Page 34 (NV = non valutabile in quanto i componenti in metallo non subisco stress dalla pulizia) OGNI 24 MESI D’UTILIZZO FARE RIENTRARE IL MASTER FLUX IN TECNO-GAZ PER UN CONTROLLO GENERALE. 1) Nel caso il MASTER FLUX PLUS rimanga fermo per più di un mese, eseguire un controllo funzionale.
- Page 35 ITALIANO - Aprire le valvole delle bombole di Ossigeno e Protossido e rilevare i valori indicati dai manometri; - Chiudere le valvole delle bombole - Lasciare trascorre 5 minuti e rilevare i nuovi valori. Se i valori sono uguali, non vi sono perdite. In caso contrario, spedire la scatola flussometrica ed i riduttori di Ossigeno e Protossido presso la sede TECNO-GAZ.
- Page 36 ENGLISH Declaration of conformity Warranty condition Loss of warranty Delivery terms General warnings and safety rules Useful contacts and addresses Symbols Warnings and useful information Technical features Packaging, transport and storage Demolition and dismantling Equipment Application Pictures Installation and Connections Instruction for the use Maintenance and troubleshooting...
-
Page 37: Declaration Of Conformity
ENGLISH DECLARATION OF CONFORMITY ( according to ISO/IEC 17050-1) This device compliance to Directive 93/42/EEC . The original declaration of conformity is provided in attached to the manual. -
Page 38: Warranty Condition
ENGLISH WARRANTY CONDITION 1) DURATION: the product is covered by a 12-month (twelve) guarantee. 2) EXCLUSION: the guarantee excludes: a) faults originating from non-performance of scheduled maintenance and due to negligence or improper use of the product by the User; b) periodic checks and maintenance;... -
Page 39: Loss Of Warranty
ENGLISH LOSS OF WARRANTY The guarantee becomes null and void in the event that: a) the equipment presents damage caused by a fall, exposure to flames, liquid spillage, natural events, bad weather conditions or by any other cause that is not due to manufacturing defects;... -
Page 40: Delivery Terms
ENGLISH DELIVERY TERMS 1. All goods delivered must be packaged in their original packaging. If the goods are delivered in a non-genuine packaging, a charge will be applied to restore the original packaging. 2. All goods must be delivered CARRIAGE PAID. 3. -
Page 41: General Warnings And Safety Rules
ENGLISH GENERAL WARNINGS AND SAFETY RULES Make sure that the equipment is supplied with the correct voltage as shown in the plate. Do not remove the plate. Make sure that the machine is equipped with a grounding system. ... - Page 42 ENGLISH (Operating) GROUNDING SYSTEM. Alternate current. Warning: high voltage. Risk of electrocution! Read the instruction manual carefully. POS. Position (number identifying a component in the figures or diagrams). Figure Ω Ohm (Electric Resistance unit). Seconds (time unit). Watt (Power unit). Hertz (Frequency unit).
-
Page 43: Warnings And Useful Information
ENGLISH WARNINGS AND USEFUL INFORMATION 1. ALWAYS ADMINISTER THE PATIENT PURE OXYGEN FOR TWO MINUTES AT THE END OF THE THERAPY 2. The patient has to wear always the mask no matter how long the operation last. 3. Make sure the ambient where the patient is going to be treated is relaxing and noiseless and also make sure only the strictly necessary personnel is present. - Page 44 ENGLISH 12. The flux meter is equipped with a “FLUSH” push- PCT.2 button POS.D (Cod.SMFA032) to be used in case the patient shows malaise symptoms (nausea, giddiness, headache) See PICT.2. At the pressure of the “FLUSH” button the bag (Cod.SMFA032) is filled with oxygen to be manually delivered to the patient;...
-
Page 45: Technical Features
ENGLISH TECHNICAL FEATURES Maximum supply pressure: 3.5 Bar ≅ 50 PSI Maximum capacity supplied: 10 l/min. (litres per minute) OVERALL DIMENSIONS OF THE MASTER FLUX PLUS SUPPLIED WITH CABINET: PICT.3 Weight without bottles: 42 Kg Weight with bottles having capacity of 5 Lt:... - Page 46 ENGLISH OVER-ALL DIMENSIONS OF THE WALL-TYPE MASTER FLUX PLUS: PCT.4 Total weight of the flow-meter box (including ball and spiral pipe): 6.27Kg. CONSUMPTION: Here below you find an example of consumption to be considered as theoretical reference OXYGEN BOTTLE WITH A CAPACITY OF 10Lt. CHARGED TO A PRESSURE OF 200 Bar: Available oxygen volume Gas litres 2000.
-
Page 47: Packaging, Transport And Storage
The flow-meter box is wrapped in a cellophane bag, placed inside an foam polystyrene form and in a corrugated card board box. The MASTER FLUX PLUS kit is composed by equipment to be used placed in a corrugated card board box. - Page 48 ENGLISH DEMOLITION AND ELIMINATION Implementation of Directives 2002/95/EC, 2002/96/EC and 2003/108/EC on the reduced use of hazardous substances in electrical and electronic equipment, and disposal of waste Directive on waste from electrical and electronic equipment (WEEE) Pursuant to DIRECTIVE 2002/96/EC, this symbol shows that the product must not be disposed of as urban waste at the end of its operating life.
-
Page 49: Equipment
EQUIPMENT SUPPLIED WITH WALL-TYPE MASTER FLUX art. 1601AS: - N.1 Flow-meter box including: N.1 Instructions manual N.1 Ball 3 litres capacity (CODE CM84001) - Kit wall-type Master Flux Plus (CODE SMFA497) including : N.1 N O reducer for wall-type MATER FLUX (CODE SMFA 360) N.1 N O reducer for wall-type MATER FLUX (CODE SMFA 359) N.1 Wrench Ø22 (CODE CM45005) -
Page 50: Application
ENGLISH APPLICATION ONLY WELL TRAINED PERSONNEL (DENTIST AND NURSING PERSONNEL) IS TO BE ALLOWED TO USE THE MEDICAL DEVICE MASTER FLUX. MAIN CONCEPTS ON SEDATION: Sedation is a particular technique developed by Dr.LANGA; he has discovered that administering the patient a mixture of oxygen and nitrogen monoxide all the effects caused by ANXIETY and FEAR, which several patients suffer from before starting dentistry treatment, disappear. -
Page 51: Pictures
ENGLISH PICTURES WALL-TYPE MASTER FLUX, CODE 1601AS: Wall fixing plate PCT.6 SMFA501 O Pipe SMFA365 Flow-meter SMFA500 Pipe SMFA364 Handle- Wall pin SMFA313 WALL-TYPE MASTER FLUX SUPPORT MASTER FLUX Mask SMFA301 1605A (BIG) 1607A (LITTLE) RUBBER BALLOON CM84001... - Page 52 ENGLISH FLOW-METER BOX, CODE SMFA500: PCT.7 SPIRAL PIPE RUBBER- HANDLE HOLDER ”FLOW” Code SMFA088 Code SMFA001 PUSH-BUTTON “FLUSH” BALLOON Code SMFA032 RUBBER-HOLDER Code SMFA088 “N O%” HANDLE Code CAPACITY SMFA040 INDICATOR Code CM87047 Code CM87048 (O...
-
Page 53: Installation And Connections
Look for gas supplier in the telephone book, in the section technical gas or technical retailer (THE BOTTLES ARE NOT SUPPLIED WITH THE MASTER FLUX PLUS) B - Mount the reducers on the bottles. Use the wrench Ø 30 to fasten the ring nut of the reducer N O (CODE CM45006) (See Pict. - Page 54 ENGLISH E - Fasten the bottles to the cabinet by using the relative chains or springs (POS.E), (See Pict.16). F - Connect the nut of the protoxide reducer pipe to the protoxide supplying nipple set on the top of the flow-meter box, (See Pict. 16) and TIGHTEN by a 18 mm wrench. G - Connect the nut of the Oxygen reducer pipe to the Oxygen supplying nipple set in the low part of the flow-meter box, (See Pict.
- Page 55 ENGLISH Pct. 13 Pct.14 Bottle N 1515/A3 1513A4 Pct.15 Bottle O Pct.16...
- Page 56 ENGLISH PCT.17 Nipple N Nipple O BOTTLE 5 LITRES O BOTTLE DIAMETER 140 5 LITRES DIAMETER 140 mm HEIGHT WITH HEIGHT WITH VALVE 550 mm VALVE 550 mm 10 – 14 LITRES DIAMETER 140 - 160 mm HEIGHT WITH VALVE 920 - 900 mm...
- Page 57 PCT.19 PCT.20 SMFA301 3. Take the MASTER FLUX PLUS wall fixing plate (SMFA501) out of the packaging (See pict.22) and fix it to the wall using n.4 dowels Ø 8 (mm); to carry out the drilling see pict.18 and 21.
- Page 58 ENGLISH SMFA501 VALVE AFNOR VALVE AFNOR PCT.21 PCT.22 4. Take the flow-meter box (SMFA500) out of the packaging, screw the pin to the base of the flow-meter box (SMFA313), (See pict.23). 5. Insert the pin (SMFA313) in the final part (POS.A) of the wall support (SMFA301) (See pict.23).
- Page 59 ENGLISH The O adpater port (with white plate) fits a hose to the end of which a male fitting is stapled with 1/8 ”G thread (Pict. 25 Pos. G.) 11. Connect the socket to the laboratory electric system equipotential point by means of the supplied looped connectors (Sez.
- Page 60 ENGLISH CONNECTING THE RUBBER BALLOON: 1. Connect the rubber balloon (CM84001) to the flow- meter box (SMFA500), placing it in the rubber-holder see pict.26. CONNECTING THE MASK (CODE 1607A & 1605A): 1. Choose the mask that best fits the patient nose. 2.
- Page 61 ENGLISH - Connect the spiral gases exhale pipe (SMFA197) to the cabinet in the (POS.C) using rubber-holder (SMFA237), see pict.29 PCT.29 - Connect the final part of the gases exhale spiral pipe to the final filter MASTER FLUX (SMFA260), see pict.29 CABINET - Position the final filter so that it communicates with the outside...
-
Page 62: Instruction For The Use
ENGLISH INSTRUCTIONS FOR THE USE BEGINNING OF THERAPY: (See pict.32 for any reference and position) N.B.: The following phases are to be carried out with the mask drain free (Not connected to draining systems). 1. Open the bottles turning the tap counter clock-wise. 2. - Page 63 ENGLISH SPECIAL THERAPY FOR CHILDREN: (See pict.32 for any reference and position) 1. Find the proper flow the child needs, as before described. 2. To do this turn the handle “FLOW” (POS.A) clock-wise and let the patient inspire at list for one minute. 3.
- Page 64 ENGLISH 7. Keep the patient in the waiting room, look after him with discretion for at list (5÷10) minutes (if necessary more). 8. Discharge the patient. PCT. 32 Flow Handle Capacity indicator Rubber Ballon Handle for percentage regulation Capacity indicator SITUATIONS WHICH MAY OCCUR DURING THE FUNCTIONING: - Oxygen missing at the beginning of the therapy: Protoxide supply off - Oxygen missing during the therapy: Protoxide supply is off, the indicator in the...
- Page 65 PCT. 33 Block the wheels equipped with brake by pressing the suitable tangs down A (pict.33) before starting to use MASTER FLUX PLUS equipped with cabinet. In case the appliance has to be moved over (i.e. from a room to another one), unblock...
- Page 66 ENGLISH REANIMATION WITH MASTER FLUX PLUS USING THE KIT Art. 1504/A “Kit for reanimation with MASTER FLUX PLUS” (Not supplied): (For further information see pict.35) N.B.: Before carrying out the following operations set the percentage regulating handle to 0. (0% Protoxide d’azoto) 1.
- Page 67 1) EVERY 24 WORKING MONTHS SEND MASTER FLUX TO TECNO-GAZ FOR A GENERAL CHECK. 2) If MASTER FLUX PLUS is not used for more than one month, carry out a functioning check. (See point 3: Leak..). In case of wrong functioning send the appliance to TECNO-GAZ...
- Page 68 ENGLISH - Open the Oxygen and Protoxide bottles valve and check the relative values on the pressure gauges; - Close the bottles valves; - Five minutes later, measure the new values. If the values are unchanged it means that there are not leaks. If there are leaks send the flow-meter box and Oxygen and Protoxide reducers to TECNO-GAZ Technical Department.
- Page 69 DEUTSCH Konformitätserklärung Garantiebedingungen Verfall des Garantieanspruchs Warenrücksendungen Allgemeine Hinweise und sicherheitshinweise Kontaktaufnahme und nützliche Adressen Symbolik Bemerkungen und nützliche auskünfte Technische merkmale Verschrottung und Entsorgung Nutze Bilder Montage und verbindungen Hinweisen über das gebrauch...
-
Page 70: Konformitätserklärung
DEUTSCH KONFORMITÄTSERKLÄRUNG Das Gerät stimmt mit CE Norm. Es beachtet die Norm 93/42/CEE. Die Original Konformitätserklärung ist der Gebrauchsanleitung beigefügt. -
Page 71: Garantiebedingungen
DEUTSCH GARANTIEBEDINGUNGEN 1) DAUER: Auf das Produkt wird eine Garantie von 12 Monaten (zwölf) gewährt. 2) AUSSCHLIESSUNGEN: Von der Garantie ausgeschlossen sind: a) Auf fehlende Wartung oder Nachlässigkeit des Anwenders oder auf einen unsachgemäßen Gebrauch des Produkts zurückführbare Störungen und Anomalien; b) Regelmäßige Kontrollen und Wartung;... -
Page 72: Verfall Des Garantieanspruchs
DEUTSCH VERFALL DES GARANTIEANSPRUCHS Der Garantieanspruch verfällt in folgenden Fällen: a) wenn das Gerät Beschädigungen aufweist, die auf Sturz, Feueraussetzung, ausgegossene Flüssigkeiten, Blitzschlag, Naturereignisse oder Witterungseinflüsse oder auf andere nicht auf Fabrikationsmängel zurückführbare Schäden zurückzuführen sind; b) wenn die Installation nicht gemäß den Anleitungen von TECNO-GAZ erfolgt und durch nicht autorisiertes Personal durchgeführt wird;... -
Page 73: Warenrücksendungen
DEUTSCH WARENRÜCKSENDUNGEN 1. Alle Warenrücksendungen müssen in der Originalverpackung erfolgen. Bei nicht in der Originalverpackung zurückgesandten Geräten werden die Kosten für die Wiederherstellung der Originalverpackung in Rechnung gestellt. 2. Alle Warenrücksendungen müssen FREI UNSER WERK erfolgen ; 3. Der Kunde Handelsabteilung TECNO-GAZ bezüglich... -
Page 74: Allgemeine Hinweise Und Sicherheitshinweise
DEUTSCH ALLGEMEINE HINWEISE UND SICHERHEITSHINWEISE Sicherstellen, dass das Gerät mit der korrekten Spannung versorgt wird.. Das unter der Arbeitsebene. Sicherstellen, dass die Anlage geerdet ist.. Die Maschine mit einem trockenen Tuch reinigen. Vor jeglichem Eingriff am Gerät den Netzstecker ziehen. ... - Page 75 DEUTSCH Schutzerdung. Betriebserdung. Wechselstrom. Achtung: Stromschlaggefahr! Position (Nummer, der das Bauteil auf den Abbildungen oder den POS. Plänen entspricht). Abbildung. Ω Ohm (Maßeinheit des elektrischen Widerstands). Sekunden (Maßeinheit der Zeit). Watt (Maßeinheit der Leistung). Hertz (Maßeinheit der Frequenz). Millimeter (Maßeinheit der Länge). Amperé...
-
Page 76: Bemerkungen Und Nützliche Auskünfte
DEUTSCH BEMERKUNGEN UND NÜTZLICHE AUSKÜNFTE 1. WENN DIE THERAPIE FERTIG IST, VERABREICHEN SIE IMMER REINER SAUERSTOFF FÜR ZWEI MINUTEN. 2. Der Patient/die Patientin soll immer die Maske auf die Nase unabhängig von der Eingriffdauer tragen. 3. Der Patient/die Patientin soll immer in einem ruhiger Raum operiert werden. Der Raum soll Geräuschlos sein. - Page 77 DEUTSCH 12. Falls sich der Patient/die Patientin Unwohlsein BILD.2 (wie z. B. Kopfschmerz, Übelkeit, Schwindel) fühlt, gibt es auf die Durchflusskiste ein FLUSH Druckknopf pos. D (Matrikel-Nr. SMFA032). S. Bild Wenn Sie den FLUSH Druckknopf drücken, füllt sich den Ball (Matrikel-Nr. CM84001) mit Sauerstoff.
-
Page 78: Technische Merkmale
DEUTSCH TECHNISCHE MERKMALE Max. Druckeinlauf: 3.5 Bar = 50PSI Max. Durchflusslieferung: 10 l/Min (Liter/Minute) ABMESSUNGEN VON BEWEGBARE MASTER FLUX PLUS A: BILD.3 Gewicht ohne Flasche: 42 Kg Gewicht mit 5,0 l Flasche: 63 Kg Gewicht mit 10,0 l Flasche: 81 Kg Max. - Page 79 DEUTSCH Abmessungen von Wandanlage MASTER FLUX PLUS A: BILD.4 Gesamtgewicht der Durchflusskiste (das Gewicht enthaltet den Ball und das Spiralrohr): 6.27 kg. VERBRAUCHE: Als Beispiel folgt eine Verbrauchliste, die als theoretischer Verweis gilt. 10,0 l SAUERSTOFFFLASCHE MIT EINEM DRUCK VON 200 BAR : VERFÜGBARE SAUERSTOFFMENGE...
-
Page 80: Verschrottung Und Entsorgung
DEUTSCH VERSCHROTTUNG UND ENTSORGUNG Richtlinie 2002/96/EG über Elektro- und elektronische Altgeräte (RAEE). Gemäß der RICHTLINIE 2002/96/EU weist dieses Zeichen darauf hin, dass da Gerät am Ende seiner Lebensdauer nicht als Hausmüll entsorgt werden darf. Das Gerät kann den entsprechenden Entsorgungsstellen für elektrische und elektronische Altgeräte übergeben oder dem Händler beim Kauf eines gleichwertigen Produkts zurückgegeben werden. -
Page 81: Nutze
DEUTSCH NUTZE DIE ANLAGE MASTER FLUX DARF NUR VON ZAHNÄRZTE ODER KRANKENSCHWESTER BENUTZT WERDEN, DIE DIE ENTSPRECHENDE SCHULUNG BESUCHEN HABEN. HAUPTPUNKTE ÜBER DIE BERUHIGUNGSPHASE: Wir möchten zuerst darauf hinweisen, dass als Beruhigungsphase meinen wir, eine von Herr Dr. Langa entwickelte Technik. Herr Dr. Langa bemerkte, dass wenn man dem Patient/die Patientin eine Mischung von Sauerstoff und Stickstoffsprotoxid verabreicht, verschwindet das Sorge- bzw. -
Page 82: Bilder
DEUTSCH Wenn der Patient/die Patientin fühlt Kribbeln, den Armen und den Beinen ist warm oder er/sie fühlt leicht, dann ist er/sie richtig beruhigt. Es wurde das sogenannte BASE LINE erreicht. Normalerweise das Niveau eines/einer Patient/in von BASE LINE ändert nicht. Man kann das Wert in der Karte von dem/der Patient/in notieren, und am nächsten Mal kann man aus den notierten Werten anfangen. - Page 83 DEUTSCH DURCHFLUSSKISTE – Matrikel-Nr. SMFA500: BILD.7 GUMMITRÄGER FÜR SPIRALROHR DURCHFLUS Matrikel-Nr. SMFA088 S KNOPF Matrikel-Nr. SMFA001 „FLUSH“ KNOPF Matrikel-Nr. GUMMITRÄGER FÜR SMFA032 BALL Matrikel-Nr. SMFA088 N2O% KNOPF Matrikel-Nr. SMFA040 DURCHFLUSSZEIGER Matrikel-Nr. CM87047 für N2O Matrikel-Nr. CM87048 für O2...
-
Page 84: Montage Und Verbindungen
DEUTSCH MONTAGE UND VERBINDUNGEN MONTAGE VON DER BEWEGBAREN ANLAGE MASTER FLUX A – Matrikel-Nr. 1600AS 1) - RÄDCHENEINBAU (s. Bild 8) A - Nehmen Sie den Schrank von der Verpackung aus. B - Legen Sie den Schrank „C“ auf einen weichen Boden, wie z. B. ein Teppich, um die Rädchen einzubauen. - Page 85 DEUTSCH für 30 mm Matrikel-Nr. CM45006 (s. Bild 16). C - Legen Sie den Regal „C“ auf den Regal „M“, wenn Sie 5,0 l Flaschen benutzen. D - Stellen Sie die Flaschen in den Schrank, wie im Bild 17 gezeigt. E - Machen Sie dem Schrank die Flaschen mit die Kettchen oder die Feder (Pos.
- Page 86 DEUTSCH BILD.12 BILD.10 BILD.11 BILD.13 BILD.14 1515/A3 1513A4D BILD.15 BILD.16...
- Page 87 DEUTSCH BILD.17 Nippel N Nippel O FLASCHEO FLASCHE N DURCHMESSER 5 LITRI 140 mm DURCHMESSER 140 mm HOHE INKL. HOHE INKL. VENTIL 550 VENTIL 550 mm 10 - 14 l DURCHMESSER 140 - 160 HOHE INKL. VENTIL 900 - 920 mm...
- Page 88 2. Nehmen Sie den Träger Matrikel- Nr. SMFA301 für die Anlage MASTER FLUX PLUS A aus der Verpackung aus (s. Bild 20). Machen Sie den Träger mit 4 Gummigreifer für Wand Ø 14 mm fest. Um die entsprechenden Lochern durchzuführen, sehen Sie Bild 19.
- Page 89 SMFA500. Verbinden Sie die Kupplung vom Rohr Pos. H mit der Rückschlagventil Pos. I, die am Wandplatte Matrikel-Nr. SMFA501 (s. Bild 23). BILD. 23 9. Im Kit von der Anlage MASTER FLUX PLUS, Wand typ finden Sie 2 Membranreduzierstücke, die Sie mit den Flaschen von der Zentralanlage verbinden sollen.
- Page 90 DEUTSCH 11. Verbinden Sie die Wandstecker mit dem äquipotentiellen Punkt von der elektrische Anlage im Labor. Benutzen Sie die mitgelieferten Ösenstecker (2.5 mm2). S. Bild 24 – Pos. A u. B. 12. Die Wandplatte wird der zentralisierten Anlage mit Buchsen und Schweißdüse für Kupferrohr Ø...
- Page 91 DEUTSCH VERBINDUNG VOM GUMMIBALL: 1. Verbinden Sie den Gummiball Matrikel-Nr. CM84001 mit der Durchflusskiste Matrikel-Nr. SMFA500, stellen Sie den Gummiball in den Gummiträger Pos. B. (s. Bild 26) VERBINDUNG VOM LIEFERROHR Verbinden Sie die Maske. Stellen Sie den Anschluss vom Spiralrohr Matrikel-Nr.
- Page 92 DEUTSCH - Verbinden Sie den Evakuierungrohr von der Maske mit dem Schrank mit dem Gummiträger - Schrauben Sie den Anschluss Matrikel-Nr. SMFA237, der zu dem Schrank gehört, im Loch Pos. C. - Verbinden Sie den Spiralrohr für die 1600AS Gasevakuierung Matrikel-Nr. SMFA197 mit Schrank Pos.
-
Page 93: Hinweisen Über Das Gebrauch
DEUTSCH HINWEISEN ÜBER DAS GEBRAUCH THERAPIEANFANG: (s. Bild 32) N.B.: Führen Sie die folgenden Phase durch, wenn die Maskenevakuierung nicht mit dem Evakuierungsystem verbindet ist. 1. Drehen Sie sehr langsam linksdrehend die Flaschenventile. 2. Wählen Sie die richtige Maske für den/die Patient/in, und legen Sie ihm/ihr die Maske auf die Nase. - Page 94 DEUTSCH THERAPIENORMEN FÜR KINDER: (sehen Sie Bild 32) 1. Wie oben geklärt, suchen Sie die richtige Gasfluss, das das Kind braucht. 2. Drehen Sie rechtdrehend den Drehknopf FLOW (Pos. A), und lassen Sie das Kind ein Minutenlang einatmen. 3. Normalerweise brauchen Kinder 4 – 5 l/Min, sehen Sie den Säulenzeiger für O2 (Pos.
- Page 95 DEUTSCH BILD. 32 DREHKNOPF FLOW DURCHFLUßI NDIKATOR GUMMIBALL DREHKNOPF FÜR DIE PROZENTEIN STELLUNG DURCHFL USSZEIGE MÖGLICHE DEFEKTEN: - Am Therapieanfang wird kein Sauerstoff geliefert. Der Protoxid wird nicht geliefert. - Während der Therapie wird kein Sauerstoff geliefert. Die Protoxidlieferung wird gehalten.
- Page 96 DEUTSCH STABILITÄT WÄHREND DER GEBRAUCH: Bevor Sie die bewegbare Anlage MASTER FLUX anfangen zu benutzen, blockieren Sie die Rädchen mit der Bremsen, drücken Sie nach unten die entsprechenden Feder Pos. A (Bild 33). Falls es notwendig wäre, die Anlage zu verstellen, befreien Sie die Rädchen.
- Page 97 NOTE...
- Page 98 NOTE...
- Page 99 ...
- Page 100 TECNO‐GAZ S.p.A. Strada Cavalli N°4 43038 Sala Baganza Parma ITALIA Tel. +39 0521 83.80 Fax. +39 0521 83.33.91 www.tecnogaz.com Dieses Handbuch ist Il presente manuale This manual must always Ce manuel doit être Este manual debe nach den CEE Normen deve sempre be kept with the gardé avec le produit, siempre acompañar el immer mit dem Produkt accompagnare ...
Need help?
Do you have a question about the MASTER FLUX PLUS and is the answer not in the manual?
Questions and answers