
Summary of Contents for Citrix SD-WAN Series
- Page 1 Citrix SD-WAN Platforms Citrix Product Documentation | docs.citrix.com March 15, 2021...
-
Page 2: Table Of Contents
Citrix SD-WAN Platforms Contents Product Datasheet Platform Editions WANOP Citrix SD-WAN 800, 1000, 2000 and 3000 WANOP appliances Citrix SD-WAN WANOP 800 Citrix SD-WAN WANOP 1000 Citrix SD-WAN WANOP 2000 Citrix SD-WAN WANOP 3000 Summary of Hardware Specifications Citrix SD-WAN 800, 1000, 2000 and 3000 WANOP appliances... - Page 3 Summary of Hardware Specifications 6100 Standard Edition and Premium Edition appliance Citrix SD-WAN 1100 Standard Edition and Premium Edition Factory Reset Premium (Enterprise) Edition Citrix SD-WAN 1000, 2000, and 2100 Premium (Enterprise) Edition Appliances © 1999-2021 Citrix Systems, Inc. All rights reserved.
- Page 4 Citrix SD-WAN 5100 Premium (Enterprise) Edition Appliance Citrix SD-WAN 5100 PE Summary of Hardware Specifications 6100 Standard Edition and Premium Edition appliance Citrix SD-WAN 1100 Standard Edition and Premium Edition Factory Reset VPX models Citrix SD-WAN VPX Standard Edition Prerequisites...
- Page 5 Citrix SD-WAN on Oracle Cloud Infrastructure (Technical preview) Installing SD-WAN VPX Standard Edition AMI on AWS Deploy Citrix SD-WAN Standard Edition Instance on Azure - Release Version 10.2 and above 294 Citrix SD-WAN Standard Edition Virtual Appliance (VPX) high availability Support for AWS...
- Page 6 Deploy SD-WAN Standard Edition instances in High Availability mode in Azure - Release Version 10.2 and above Deploy a Citrix SD-WAN VPX instance on a Citrix ADC SDX appliance Standard Edition in AWS for Cloud watch Support Citrix SD-WAN VPX WANOP...
-
Page 7: Product Datasheet
Citrix SD-WAN Platforms Product Datasheet June 19, 2020 The Citrix SD-WAN product data sheet is available on www.citrix.com. Click Products, and in the Net- working list, select Citrix SD-WAN. In Platforms, select SD-WAN platforms to review the complete list of available SD-WAN platforms. -
Page 8: Wanop
WANOP April 8, 2020 Important The NetScaler SD-WAN product is rebranded to Citrix SD-WAN. All references to the term NetScaler SD-WAN is applicable to the new product term Citrix SD-WAN. The Citrix SD-WAN WANOP appliances include the following editions: •... -
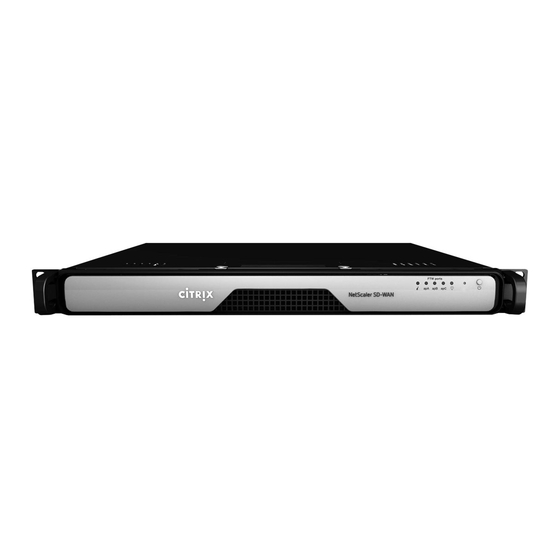
Page 9: Citrix Sd-Wan Wanop 800
Citrix SD-WAN WANOP 800 May 23, 2019 The Citrix SD-WAN WANOP 800 platform has a dual-core processor and 8 GB of memory. The platform has a bandwidth of up to 6 Mbps and up to 10 Mbps, respectively. The following figure shows the front panel of an SD-WAN WANOP 800 appliance. - Page 10 • Power—When blinking, indicates that the power supply unit is receiving power and operating normally. The following figure shows the back panel of an SD-WAN 800 appliance. Figure 2. Citrix SD-WAN 800 appliance, back panel The following components are visible on the back panel of an SD-WAN 800 appliance: • Cooling fan •...
-
Page 11: Citrix Sd-Wan Wanop 1000
The following figure shows the front panel of an SD-WAN 1000 appliance. The front panel of the Citrix SD-WAN WANOP 1000 appliance has a power button and five LEDs. • The power button switches main power (the power to the power supply) on or off. - Page 12 3. Power on the appliance and as it is booting, press the following key in the Putty session to enter the BIOS configuration screen. Keypress: DEL 4. When in the BIOS, navigate to, • Advanced Tab > Select • Boot Feature > Enter © 1999-2021 Citrix Systems, Inc. All rights reserved.
- Page 13 5. When in the Boot Feature screen, change the value of the parameter Restore on AC Power Loss; **from **Last State **> **Power ON. 6. Navigate to Save and Exit. • Select Save changes and Reset • Select Yes Allow the system to restart. This takes approximately five minutes. © 1999-2021 Citrix Systems, Inc. All rights reserved.
- Page 14 8. In the SD-WAN appliance GUI, navigate to Configuration > Maintenance > Reboot Appliance. Allow the appliance to fully shut down. Ensure that there are no power lights on the appliance when the shut down process has completed. © 1999-2021 Citrix Systems, Inc. All rights reserved.
-
Page 15: Citrix Sd-Wan Wanop 2000
Citrix SD-WAN WANOP 2000 June 19, 2020 The Citrix SD-WAN WANOP 2000 platform has 3 models: SD-WAN 2000-010, SD-WAN 2000-020, and SD-WAN 2000-050, with bandwidths of 10 Mbps, 20 Mbps, and 50 Mbps, respectively. Each model is a 1U appliance with 1 quad-core processor and 24 gigabytes (GB) of memory. -
Page 16: Citrix Sd-Wan Wanop 3000
Citrix SD-WAN WANOP 3000 June 19, 2020 The Citrix SD-WAN WANOP 3000 platform has 3 models: SD-WAN 3000-050, SD-WAN 3000-100, and SD-WAN 3000-155, with bandwidths of 50M bps, 100 Mbps, and 155 Mbps, respectively. Each model is a 1U appliance with 1 quad-core processor and 32 gigabytes (GB) of memory. - Page 17 Citrix SD-WAN Platforms Figure 1. Citrix SD-WAN WANOP 3000 (6×10/100/1000 Base-T copper Ethernet ports), front panel The following figure shows the front panel of an SD-WAN 3000 appliance with four 1G SX fiber ports. Figure 2. Citrix SD-WAN WANOP 3000 (4×1G SX Fiber ports), front panel The appliance has the following ports: •...
-
Page 18: Summary Of Hardware Specifications
• Single power supply, rated at 450 watts, 100–240 volts. Summary of Hardware Specifications June 22, 2020 The following table summarizes the specifications of the Citrix SD-WAN WANOP 800, 1000, 2000, and 3000 hardware platforms. Table 1. Citrix SD-WAN WANOP 800, 2000, 1000, and 3000 Platforms Summary Platform Performance ©... - Page 19 1 x 240 GB 1 x 600 GB 4 x 600 GB space 40 GB 80 GB 275 GB 1.5 TB (dedicated Compression history) 8 GB 8 GB 24 GB 32 GB © 1999-2021 Citrix Systems, Inc. All rights reserved.
- Page 20 WANOP 1000 WANOP 2000 WANOP 3000 Voltage 100/240 VAC, 100/240 VAC, 100/240 VAC, 100/240 VAC, 50-60 Hz 50-60 Hz 50-60 Hz 50-60 Hz Power 200W 200W 300 W 450 W consumption (Max.) © 1999-2021 Citrix Systems, Inc. All rights reserved.
-
Page 21: Citrix Sd-Wan 800, 1000, 2000 And 3000 Wanop Appliances
RoHS, WEEE RoHS, WEEE certifications Citrix SD-WAN 800, 1000, 2000 and 3000 WANOP appliances June 19, 2020 The SD-WAN 800, 1000, 2000 and 3000 appliances are 1U accelerators for use in datacenters and larger © 1999-2021 Citrix Systems, Inc. All rights reserved. -
Page 22: Sd-Wan 1000 Appliance With Windows Server
SD-WAN 1000 Appliance with Windows Server May 23, 2019 The Citrix SD-WAN 1000 with Windows Server platform has a quad-core processor and 32 GB of mem- ory. This platform has a bandwidth of up to 20 Mbps. The following figure shows the front panel of a SD-WAN 1000 appliance with Windows Server. - Page 23 The following figure shows the back panel of a SD-WAN 1000 appliance with Windows Server. Figure 2. Citrix SD-WAN 1000 appliance with Windows Server , back panel The following components are visible on the back panel of a SD-WAN 1000 appliance with Windows Server: •...
-
Page 24: Sd-Wan 2000 Appliance With Windows Server
SD-WAN 2000 Appliance with Windows Server May 23, 2019 The Citrix SD-WAN 2000 with Windows Server platform is a 1U appliance with 1 quad-core processor and 24 gigabytes (GB) of memory. The following figure shows the front panel of the SD-WAN 2000 appliance with Windows Server. -
Page 25: Ethernet Port Names
When configuring the appliance, you have to specify IP addresses for various Ethernet ports of the appliance. The Ethernet ports are named differently on the front panel of Citrix SD-WAN 1000 and 2000 appliances with Windows Server, in the Citrix SD-WAN instance, and in the Windows Server, as... -
Page 26: Supported Features
June 22, 2020 The following table lists various features supported on SD-WAN 1000 and 2000 appliances with Win- dows Server. Features table for Citrix SD-WAN 1000 and 2000 with Windows Server Series Appliances Citrix SD-WAN 1000 with Citrix SD-WAN 2000 with... -
Page 27: Summary Of Hardware Specifications
Platform Performance SD-WAN 1000 with Windows SD-WAN 2000 with Windows H/W Specification Server Server Bandwidth Up to 20 Mbps Up to 50 Mbps Maximum HDX sessions Up to 100 Total sessions 10,000 20,000 © 1999-2021 Citrix Systems, Inc. All rights reserved. - Page 28 8.5 lbs (3.9 kg) 32 lbs (14.5 kg) Shipping dimensions and 26 L x 18.5 W x 6.5” H; 14.5 lbs 32 L x 23.5 W x 7.5” H; 39 lbs weight Environmental and Regulatory © 1999-2021 Citrix Systems, Inc. All rights reserved.
-
Page 29: Citrix Sd-Wan 4100 And 5100 Wanop Appliances
NetScaler load-balancer, providing the performance of multiple SD-WAN WANOP appliances in a single package. Citrix SD-WAN 4100, 5100 WANOP WAN accelerators are the high end of the Citrix SD-WAN product line. They are designed to accelerate sites with WAN links with speeds more than 1 Gbps, especially busy datacenters that communicate with many branch and regional sites. -
Page 30: Architecture
• At least two accelerator instances • A management server instance that manages the GUI and other tasks • Internal networking Figure 2. SD-WAN 4100/5100 virtual machines, internal networks, and external port usage (inline de- ployment shown) © 1999-2021 Citrix Systems, Inc. All rights reserved. - Page 31 The Xen hypervisor hosts all the virtual machines. The hypervisor is not user-configurable and should not be accessed except at the request of Citrix. Internal and External Networks The external network interfaces are divided into two categories: traffic interfaces and management interfaces.
- Page 32 WCCP control channel is established. A packet that enters the appli- ance on one bridge port exits through the other bridge port. SD-WAN 4000 and 5000 appliances © 1999-2021 Citrix Systems, Inc. All rights reserved.
- Page 33 (as determined by an internal watchdog timer). Inline deployment. The bypass function allows SD-WAN 4100/5100 to be deployed in line with your WAN, typically between your LAN and your WAN router, without introducing a point of network failure. © 1999-2021 Citrix Systems, Inc. All rights reserved.
-
Page 34: Sd-Wan 4100 Wanop
Port 0/2 is present but typically not used. A Light Out Management (LOM) port is also provided. An RS-232 port can be used for management. SD-WAN 4100 WANOP June 19, 2020 © 1999-2021 Citrix Systems, Inc. All rights reserved. - Page 35 Citrix SD-WAN Platforms Citrix SD-WAN 4100 WANOP are 2U appliances. Each model has two 6-core processors for a total of 12 physical cores (24 cores with hyper-threading), and 48 gigabytes (GB) of memory. The Citrix SD-WAN 4100 WANOP has a bandwidth of 310 Mbps, 500 Mbps, and 1 Gbps, respectively.
-
Page 36: Sd-Wan 5100 Wanop
SD-WAN 5100 WANOP June 19, 2020 Citrix SD-WAN 5100 WANOP is a 2U appliance. Each model has 10-core processor with 2.80 GHz and 128 gigabytes (GB) of memory. The Citrix SD-WAN 5100 WANOP appliance has a bandwidth of 2 Gbps. -
Page 37: Summary Of Hardware Specifications
Citrix SD-WAN Platforms The following components are visible on the back panel of the Citrix SD-WAN 5100 WANOP appliance: • Six 800 GB removable solid-state drives, which store the appliance’s compression history. • Power switch, which turns off power to the appliance, as if you were to unplug the power supply. - Page 38 5%-95% non-condensing (non-condensing) Safety certifications IEC 60950-1, second Edition; IEC 60950-1, second Edition; CSA 60950-1, second Edition; CSA 60950-1, second Edition; UL 60950-1, second Edition; UL 60950-1, second Edition; AS/NZS 6050-1 AS/NZS 6050-1 © 1999-2021 Citrix Systems, Inc. All rights reserved.
-
Page 39: Lights Out Management Port Of The Sd-Wan Wanop 4100/5100 Appliance
1. In a web browser, type the IP address of the LOM port. For initial configuration, type the port’s default address. 2. In the User Name box, type nsroot. 3. In the Password box, type nsroot. © 1999-2021 Citrix Systems, Inc. All rights reserved. - Page 40 2. In the User Name and Password boxes, type the administrator credentials. 3. In the Menu bar, click Remote Control. 4. Under Options, click Power Control, and then click Power Cycle System. 5. Click Perform Action. © 1999-2021 Citrix Systems, Inc. All rights reserved.
- Page 41 3. Under Options, click Power Control, and then select one of the following options: • Reset System—Restart the appliance. • Power Off System – Immediate—Disconnect power to the appliance without shutting down the appliance. • Power On System—Turn on the appliance. © 1999-2021 Citrix Systems, Inc. All rights reserved.
-
Page 42: Troubleshooting Tips
Virtual machines in the SD-WAN 4100 and 5100. The system management subnet is not shown in this diagram. The traffic shaper manages traffic from all accelerators and is controlled via the accelerator GUI. © 1999-2021 Citrix Systems, Inc. All rights reserved. - Page 43 169.254.0.10/16 NetScaler Instance 169.254.0.11/16 XenServer 169.254.0.1/16 Private traffic subnet Function Address apA IP, accelerators 1–8 169.254.10.21/24 - 169.254.10.28/24 apA Signaling IP, accelerators 1–8 169.254.10.121/24 - 169.254.10.128/24 NetScaler Instance 169.254.10.11/24 Accelerator management subnet © 1999-2021 Citrix Systems, Inc. All rights reserved.
- Page 44 This is the standard NetScaler user interface. Using monitoring features is safe. Configuration changes should be made with caution, as the SD-WAN 4100/5100 makes undocumented assumptions about how the NetScaler instance is configured. © 1999-2021 Citrix Systems, Inc. All rights reserved.
- Page 45 Examination of the FTW Events showed that there were no actual events, indicating that the feature is probably disabled. For each warning or error, more details are available through the Details links or Show Events but- tons. © 1999-2021 Citrix Systems, Inc. All rights reserved.
- Page 46 This is recommended for monitoring, not for making permanent changes, since any parameter you set in an instance may be overwritten later by the synchronization process. To do this, use the following URLs: Accelerator Instance https://<accelerator_ip>:4001 https://<accelerator_ip>:4002 © 1999-2021 Citrix Systems, Inc. All rights reserved.
-
Page 47: Supported Features
Using individual elements of the update bundle The update bundles distributed by Citrix are in a simple .tgz format (a tar archive compressed with gzip). It is sometimes useful to extract individual components from the archive, rather than going back to the Citrix Web site and downloading them individually. -
Page 48: Standard Edition
Standard Edition June 19, 2020 Important The NetScaler SD-WAN product is rebranded to Citrix SD-WAN. All references to the term NetScaler SD-WAN is applicable to the new product term Citrix SD-WAN. The Citrix SD-WAN Standard appliances include the following editions: •... - Page 49 • Do not use mats designed to decrease static electrical discharge as protection from electrical shock. Instead, use rubber mats that have been designed as electrical insulators. • Ensure that the power supply cords include grounding plugs and are plugged into grounded electrical outlets. © 1999-2021 Citrix Systems, Inc. All rights reserved.
- Page 50 Warning There is a risk of Explosion, if the battery is replaced with an incorrect battery type. Desktop mount Citrix SD-WAN appliances can be desktop mounted using the rubber feet shipped in the appliance package. Rack mount the appliance The rackmount chassis of for SD-WAN appliances fits a standard rack and takes 1U of racking height.
- Page 51 Connect the interfaces on the appliance to the network ports on the appropriate switches by using Ethernet or fiber optic cables. Connecting multiple network ports to the same switch or VLAN can result in a network loop. © 1999-2021 Citrix Systems, Inc. All rights reserved.
- Page 52 To set up your Citrix SD-WAN appliance hardware, do the following: 1. Set up the chassis. • Citrix SD-WAN appliances are installed in a standard rack. For desktop installation, place the chassis on a flat surface. Ensure that there is a minimum of 2 inches of clearance at the sides and back of the appliance for proper ventilation.
- Page 53 1. Connect the LC-to-LC cable to the ports as shown in the figures above. 2. Insert one end of the cable into port 10/3. 3. Insert the other end of the cable into port 10/4. © 1999-2021 Citrix Systems, Inc. All rights reserved.
-
Page 54: Citrix Sd-Wan 110 Standard Edition Appliances
Citrix SD-WAN 110 Standard Edition Appliances February 9, 2021 The Citrix SD-WAN 110 SE platform is a branch side appliance that can be deployed in micro and small branch offices/ remote sites/ retail stores, and temporary worksites. A single box-in-branch solution helps to reduce the hardware footprint and eases branch deployment. - Page 55 LAN IP on port is 192.168.101.1, it also runs a default DHCP server that provides LAN clients with IP address pool starting from 192.168.0.50 to 192.168.0.250. Port Labels Type Description 1/1, 1/2, and 1/3 Traffic The data ports are used to carry network traffic. © 1999-2021 Citrix Systems, Inc. All rights reserved.
- Page 56 Orderly shut down the appliance. Press the power button and hold it for 5+ seconds: Force shut down the appliance. DC 12 V DC Power Supply Refer System Specifications for power supply information. © 1999-2021 Citrix Systems, Inc. All rights reserved.
- Page 57 Citrix SD-WAN 110-LTE-WiFi-SE The Citrix SD-WAN 110-LTE-WiFi-SE platform is a branch side appliance that can be deployed in micro and small branch offices/Remote sites/ retail stores, and temporary worksites. A single box-in-branch solution helps to reduce the hardware footprint and eases branch deployment.
- Page 58 LAN IP on port 1/1 is 192.168.101.1, it also runs a default DHCP server that provides LAN clients with IP address pool starting from 192.168.0.50 to 192.168.0.250. For LTE appliances, the LTE SIM slot is also the default WAN port. The WAN ports are configured as DHCP clients. © 1999-2021 Citrix Systems, Inc. All rights reserved.
- Page 59 Power ON state: Press the power button and release it immediately: Orderly shut down the appliance. Press power button and hold it for 5+ seconds: Force shut down the appliance. © 1999-2021 Citrix Systems, Inc. All rights reserved.
- Page 60 Citrix SD-WAN 110-WiFi-SE The Citrix SD-WAN 110-WiFi-SE platform is a branch side appliance that can be deployed in micro and small branch offices/Remote sites/ retail stores, and temporary worksites. It is a single box in branch solution that helps to reduce hardware foot print and eases branch deployment.
- Page 61 From Citrix SD-WAN version 11.1.1 and above you can use the port 1/4 as a data port or a management port per the configuration. For more information, see Configurable Management or Data port. © 1999-2021 Citrix Systems, Inc. All rights reserved.
- Page 62 The Citrix SD-WAN 110-SE appliance can be installed in the following installation modes: • Desktop mount • Wall mount • Rack mount Desktop mount The Citrix SD-WAN 110-SE appliance can be desktop mounted using the rubber feet shipped in the appliance package. © 1999-2021 Citrix Systems, Inc. All rights reserved.
- Page 63 Citrix SD-WAN Platforms Wall mount the appliance The Citrix SD-WAN 110-SE appliance can be wall mounted by placing and adjusting the appliance screw slots on the wall screws. Use two wall mount screws with the following dimensions: • Screw Length: 12 mm •...
- Page 64 3. Install the chassis fix bracket to hold the appliance in position. Place the chassis fix bracket on the slot and fix it with a screw. 4. Install the power adapter. Place the power adapter on the adapter slot. © 1999-2021 Citrix Systems, Inc. All rights reserved.
- Page 65 Installing the LTE antennas To use the Citrix SD-WAN 110-LTE-WiFi-SE appliance as an LTE modem, install the antennas to the ap- pliance. The antennas are included in the appliance package. The Citrix SD-WAN 110-LTE-WiFi-SE ap- pliance has two SMA coax male connectors at the front and rear of the appliances.
- Page 66 Configure LTE functionality on 110 SE LTE appliance. Summary of hardware specifications Specifications 110-SE, 110-LTE-WiFi-SE, and 110-WiFi-SE Regulatory Model Number SD-WAN 110, SD-WAN 110-LTE-WiFi, SD-WAN 110-WiFi Memory 4 GB Non-Volatile Storage 32 GB © 1999-2021 Citrix Systems, Inc. All rights reserved.
- Page 67 Package Weight (lbs.) 2 lbs. Package Dimensions 15.16”L x 10”W x 3.55”H System Weight (lbs.) 1.37 lbs. System Dimensions 8.5”L x 6.25”W x 1.5”H Environmental and Regulatory Operating Temperature 0–40 degree C © 1999-2021 Citrix Systems, Inc. All rights reserved.
- Page 68 Frequency Primary (in dBm) WCDMA B1 -108.2 WCDMA B2 -109.5 WCDMA B4 -108.5 WCDMA B5 -109.2 WCDMA B6 -109 WCDMA B8 -109.5 WCDMA B19 -109 LTE-FDD B1 (10M) -97.3 LTE-FDD B2 (10M) © 1999-2021 Citrix Systems, Inc. All rights reserved.
- Page 69 Part No. 1004112 - Broadband External LTE / Cellular antenna Frequency 690–960 1710–2220 2500–2700 Peak Gain 1.18 dBi 4.5 dBi 4.0 dBi Wireless WAN (LTE) Specifications Specifications 110-SE and 110-LTE-WiFi-SE Modem Quectel EG25-G Geography Global © 1999-2021 Citrix Systems, Inc. All rights reserved.
- Page 70 Channel width: 20 5180 MHz, 5200 MHz, 5.0 dBi 5220 MHz, 5240 MHz, 5745 MHz, 5765 MHz, 5785 MHz, 5805 MHz, 5825 MHz Channel width: 80 5210 MHz, 5775 MHz 5.0 dBi © 1999-2021 Citrix Systems, Inc. All rights reserved.
-
Page 71: Citrix Sd-Wan 210 Standard Edition Appliances
Note • You can configure Citrix SD-WAN 210-SE and Citrix SD-WAN 210-SE LTE as an MCN only in the SD-WAN Orchestrator managed networks. • You can configure the Citrix SD-WAN 210-SE appliance using the new user interface. For... - Page 72 Power ON the appliance and then insert the SIM card. Bypass LEDs Normal Mode: Green Bypass Mode: Orange Ethernet Fiber Ports Active/Link: Green Speed: 1000: Orange Power LEDs Power on: Green Power off: off © 1999-2021 Citrix Systems, Inc. All rights reserved.
- Page 73 Virtual WAN. 1/4 and 1/5 SFP and Ethernet Used as a (combination ports) combination of SFP and Ethernet one each on the top and bottom. USB ports © 1999-2021 Citrix Systems, Inc. All rights reserved.
- Page 74 12 V, and current: 3.33 A. Note From Citrix SD-WAN 11.2.2 release onwards, Huawei Dongle E8372 is supported in SD-WAN 210 appliances. Citrix SD-WAN 210-SE LTE The 210 SE LTE appliance is a 1U appliance. This appliance has 2-core processor with 4 GB memory and 64 GB of storage.
- Page 75 Speed: 1000 Orange Speed 100: Green Speed 10: off Bypass LEDs Normal Mode: Green Bypass Mode: Orange Ethernet Fiber Ports Active/Link: Green Speed: 1000: Orange** System and Data LEDs Sys: Power on: Green © 1999-2021 Citrix Systems, Inc. All rights reserved.
- Page 76 Figure 4. 210 SE (LTE) back panel with antenna The following components are visible on the back panel of the 210 SE LTE appliance: Interface Port Labels Type Description 1/1 and 1/2 Bypass/FTW FTW ports Traffic Traffic port © 1999-2021 Citrix Systems, Inc. All rights reserved.
- Page 77 Power supply DC Power supply Single power adapter. Power rating: 40 W, voltage: 12 V, and current: 3.33 A. Antenna connectors Male connectors Connectors for antenna © 1999-2021 Citrix Systems, Inc. All rights reserved.
- Page 78 Installing the LTE antennas To use the Citrix SD-WAN 210 SE LTE appliance as an LTE modem, install the antennas to the appliance. The antennas are included in the appliance package. The 210 SE LTE appliance has two SMA coax male connectors at the front and rear of the appliances.
- Page 79 Configure LTE functionality on 210 SE LTE appliance. Citrix SD-WAN 210 platform support for MiRiC-E1T1 FE/GBE SFP The following two types of MiRiC SFPs are supported on the 210 appliance for SFP ports 1/5 and 1/6. 1. MiRiC-E1T1 FE SFPs.
- Page 80 Enabling management access on 1/5 automatically disables management access on 1/6, and conversely. • To disable access to the management: – Log in appliance CLI via ssh admin@(IP address) – Run: sfp_access © 1999-2021 Citrix Systems, Inc. All rights reserved.
-
Page 81: Summary Of Hardware Specifications
Regulatory Model Number NS-SDW-210, NS-SDW-210-LTE-R1, NS-SDW-210-LTE-R2 Processors Intel C3338 Memory 4 GB DDR4 PC4-2400 SODIMM Number of Power Adapters AC Power Supply (adapter) Voltage, Frequency 115–230 V 50–60 Hz 1.5A and Current © 1999-2021 Citrix Systems, Inc. All rights reserved. - Page 82 RX Receiving Sensitivity (dBm) for Sierra Wireless™ EM7455, Sierra Wireless™ EM7430 AirPrime EM7455 AirPrime EM7430 LTE Bands (SD-WAN-210-LTE-R1) LTE Bands (SD-WAN-210-LTE-R2) Band 1 -97.5 Band 1 -97.5 Band 2 -97.0 Band 3 -97.1 © 1999-2021 Citrix Systems, Inc. All rights reserved.
- Page 83 Band 1, 2, 3, 4, 5, 8, 12, +23 dBm +/- 1 dB Band 1, 3, 5, 8, 18, 19, +23 dBm +/- 1 dB 13, 20, 25, 26 21, 28, 29 © 1999-2021 Citrix Systems, Inc. All rights reserved.
- Page 84 TG.30.8113 Product Name Apex Hinged TG.30 Ultra-Wideband 4G LTE antenna Frequency Range 698 MHz to 960 MHz, 1575.42 MHz, 1710 MHz to 2700 MHz (typical 70%+ Efficiency and 3 dBi+ Peak Gain) © 1999-2021 Citrix Systems, Inc. All rights reserved.
-
Page 85: Citrix Sd-Wan 400 And 410 Standard Edition Appliances
Citrix SD-WAN 400 and 410 Standard Edition Appliances June 19, 2020 The Citrix SD-WAN 400 SE and 410 SE are 1U appliances for use in small branch offices. The SD-WAN 410 SE Series is the next generation of SD-WAN Standard Edition appliances with Virtual WAN functionality. -
Page 86: Citrix Sd-Wan 400 Se
Remote UID is on. Use this function to identify the server from a remote location. • NIC1 and NIC2—Indicate network activity on the LAN1 and WAN1 ports. • HDD—Indicates the status of the hard disk drive. © 1999-2021 Citrix Systems, Inc. All rights reserved. -
Page 87: Citrix Sd-Wan 410 Se
The SD-WAN 410 SE platform has a dual-core processor and 8 GB of memory. This platform has a bandwidth of up to 150 Mbps. The following figure shows the front panel of an SD-WAN 410 SE appliance. © 1999-2021 Citrix Systems, Inc. All rights reserved. - Page 88 The terms FTW and bypass are inter-exchangeable. The bypass port is the FTW port. The above figure shows the back panel of an SD-WAN 410 SE appliance. The following components are visible on the back panel of an SD-WAN 410 SE appliance: © 1999-2021 Citrix Systems, Inc. All rights reserved.
-
Page 89: Summary Of Hardware Specifications
Summary of Hardware Specifications May 23, 2019 The following table summarizes the specifications of the SD-WAN 400 SE and 410 SE hardware plat- forms. Citrix SD-WAN 400 and 410 platforms specification summary Hardware specifications Feature SD-WAN 400 SE SD-WAN 410 SE... - Page 90 100–240 VAC, 50–60 Hz Operating Temperature 32–104°F (0–40°C) 32–104°F (0–40°C) Operating altitude 0–4921 ft (0-1500M) 0–4921 ft (0-1500M) Storage temperature 14–140°F (-10–60°C) 14–140°F (-10–60°C) Allowed Relative Humidity 8%–90% Operating: 20% to 80% (noncondensing) © 1999-2021 Citrix Systems, Inc. All rights reserved.
-
Page 91: Citrix Sd-Wan 4000, 4100, And 5100 Standard Edition Appliances
Citrix SD-WAN 4000, 4100, and 5100 Standard Edition Appliances June 19, 2020 Citrix SD-WAN Standard Edition 4000, 4100, 5100 appliances are high-performance appliances for busy datacenters. These platform editions are designed for Virtual WAN links with speeds more than 1 Gbps, especially for busy datacenters that communicate with many branch and regional sites. -
Page 92: Citrix Sd-Wan 4000 Se
The following figures shows the front panel of the SD-WAN 4000 SE appliance. Figure 1.SD-WAN 4000 SE, front panel The Citrix SD-WAN 4000 SE appliances have the following ports: • 10/100Base-T copper Ethernet Port (RJ45), also called LOM port. You can use this port to re- motely monitor and manage the appliance independently of the appliance’s software. -
Page 93: Citrix Sd-Wan 4100 Se
July 7, 2020 Citrix SD-WAN 4100 is a 2U appliances. Each model has two 6-core processors for a total of 12 physical cores (24 cores with hyper-threading), and 96 GB (GB) of memory. The SD-WAN 4100 SE has a virtual WAN bandwidth of 4 Gbps and 6 Gbps. - Page 94 • Disable alarm button. Press this button to stop the power alarm from sounding when you have plugged the appliance into only one power outlet or when one power supply is malfunctioning and you want to continue operating the appliance until it is repaired. © 1999-2021 Citrix Systems, Inc. All rights reserved.
-
Page 95: Citrix Sd-Wan 5100 Se
Press this button to mute the power alarm from sounding when you have plugged the ap- pliance into only one power outlet or when one power supply is malfunctioning and you want to continue operating the appliance until it is repaired. • Dual redundant, hot-swappable power supplies. © 1999-2021 Citrix Systems, Inc. All rights reserved. -
Page 96: Summary Of Hardware Specifications
10.0 or later. Note: Citrix SD-WAN 5100-SE is a bare metal platform. You can login directly to the appliance console using admin/password and then into shell prompt. Configure Management IP address using serial Console 1. - Page 97 28” (72 cm) 28” (72 cm) Operating 32–104 F (0–40 C) 32–104 F (0–40 C) 32–104 F (0–40 C) temperature Humidity 20% - 80% 20% - 80% 20% - 80% (non-condensing) Safety certifications © 1999-2021 Citrix Systems, Inc. All rights reserved.
-
Page 98: Citrix Sd-Wan 1000, 2000, And 2100 Standard Edition Appliances
The SD-WAN Standard Edition 1000, 2000, and 2100 appliances combine virtualized instances of the SD-WAN appliance. The SD-WAN Standard Edition 1000, 2000, and 2100 appliances are based on the Citrix branch architec- ture, which supports multiple virtual machines. All branch appliances contain an SD-WAN Standard Edition instance and management service instance. -
Page 99: Citrix Sd-Wan 1000 Se
• HDD – Indicates the status of the hard disk drive. • Power – Indicates that the power supply units are receiving power and operating normally. The following figure shows the back panel of an SD-WAN 1000-SE appliance. © 1999-2021 Citrix Systems, Inc. All rights reserved. - Page 100 Citrix SD-WAN Platforms Figure 2. Citrix SD-WAN 1000-SE appliance, back panel The following components are visible on the back panel of an SD-WAN 1000-SE appliance: • Cooling fan. • Single power supply, rated at 200 watts, 110–240 volts. • Accelerated pairs of Ethernet ports (apA and apB).
- Page 101 Advanced Tab > Select b) Boot Feature > Enter 5. When in the Boot Feature screen, change the value of the parameter Restore on AC Power Loss; from Last State > Power ON. © 1999-2021 Citrix Systems, Inc. All rights reserved.
- Page 102 Allow the system to restart. This takes approximately five minutes. 7. After the appliance is powered on, login to the appliance management instance (SVM). The de- fault IP address for the appliance is: 192.168.100.1, user name is: admin/password. © 1999-2021 Citrix Systems, Inc. All rights reserved.
-
Page 103: Citrix Sd-Wan 2000 Se
SD-WAN appliance, waiting for 10 seconds and then plugging it back in again. The appliance power ups automatically from all shut-down scenarios. Citrix SD-WAN 2000 SE May 23, 2019 © 1999-2021 Citrix Systems, Inc. All rights reserved. - Page 104 Citrix SD-WAN Platforms The Citrix SD-WAN 2000-SE platform is a 1U appliance with one quad-core processor and 24 gigabytes (GB) of memory. The following figure shows the front panel of the SD-WAN 2000-SE appliance. Figure 1. Citrix SD-WAN 2000-SE appliance, front panel SD-WAN 2000-SE appliance has the following ports: •...
-
Page 105: Citrix Sd-Wan 2100 Se
Citrix SD-WAN 2100 SE June 25, 2020 The Citrix SD-WAN 2100-SE platform is a 1U appliance with 8 core processor and 32 GB (GB) of memory. The following figure shows the front panel of the SD-WAN 2100-SE appliance. Figure 1. Citrix SD-WAN 2100-SE appliance, front panel SD-WAN 2100-SE appliance has the following ports: •... - Page 106 • A copper Ethernet (RJ45) management port, labeled 0/2. This management port cannot be used for system administration functions. This port is reserved for future use. Figure 2. Citrix SD-WAN 2100-SE appliance, back panel The following components are visible on the back panel of the SD-WAN 2100-SE appliance: •...
-
Page 107: Summary Of Hardware Specifications
3. Ensure that the software release version installed on the appliance is SD-WAN release version 10.0. Follow the steps provided here; upgrade new appliance. 4. Install the Enterprise Edition platform license. For license information, see the Citrix SD-WAN product downloads. 5. Upgrade the network using single step upgrade to software release version 10.0 or later. - Page 108 (Max.) Operating 10–35 0–40 0–40 Temperature (degree Celsius) Non-operating -40 to +70 -40 to +70 -10C to +60C Temperature (degree Celsius) Allowed Relative 8% – 90% 5%–95% 20%-80% Humidity non-condensing non-condensing non-condensing © 1999-2021 Citrix Systems, Inc. All rights reserved.
-
Page 109: 6100 Standard Edition And Premium Edition Appliance
The following Citrix SD-WAN software versions are supported on the 6100 appliance editions: • Citrix SD-WAN 6100 SE – Citrix SD-WAN 10.2.3 and above. • Citrix SD-WAN 6100 PE - Shipped with Citrix SD-WAN 10.2.7 image, upgrade the software to Citrix SD-WAN 11.2.1 and above to enable PE functionality. - Page 110 10/5, 10/6, 10/7, 10/8 10G SFP+ The following components are visible on the back panel of the Citrix SD-WAN 6100 SE/PE appliance: For Citrix SD-WAN 6100 SE [SSD Configuration] • Drive bay 3 - 2.5” Boot drive SSD with 480 GB capacity •...
- Page 111 1. Restart the appliance through the SD-WAN web management interface. 2. Ensure that the software release version installed on the appliance is Citrix SD-WAN 11.2.1 or above. If the appliance is running a version lower than 11.2.1, upgrade the software to 11.2.1 and perform a local change management.
- Page 112 EIA 310-D for 19 (inch) racks Rack Depth 28 inches (71.1 cm) Operating temperature 0–45°C (32–113°F) Humidity (non-condensing) 5% - 95% Safety certifications IEC 60950-1, second Edition CSA 60950-1, second Edition UL 60950-1, second Edition AS/NZS 60950-1 © 1999-2021 Citrix Systems, Inc. All rights reserved.
-
Page 113: Citrix Sd-Wan 1100 Standard Edition And Premium Edition
Citrix SD-WAN 1100 Standard Edition and Premium Edition January 21, 2021 The Citrix SD-WAN 1100 standard and premium edition appliance is a desktop form factor appliance. Each model has 8-core processor with 24 GB memory and 480 GB of storage (SSD drive). - Page 114 • Two como ports (1/5 and 1/6). One can use RJ45 or SFP port at a time. • 480 GB solid-state drive, which is used to store the Citrix SD-WAN software and the user data. • Power switch, which turns off power to the appliance, as if you were to unplug the power supply.
- Page 115 Citrix SD-WAN Platforms • SFP transceiver and cable (s) Citrix SD-WAN 1100 SE and PE back panel: Citrix SD-WAN 1100 SE and PE back panel labeled: For information about installing the rails, rack mounting the hardware, and connecting the cables, Installing the Hardware.
- Page 116 RJ45: 1000 only, SFP: 100 (certain SFPs)/1000 1/7-1/8 100/1000 Citrix SD-WAN 1100 platform support for MiRiC-E1T1 FE/GBE SFP The following two types of MiRiC SFPs are supported on the 1100 appliance for SFP ports 1/5 and 1/6. 1. MiRiC-E1T1 FE SFPs.
- Page 117 • Default password: 1234 • To configure Interface Type (E1 or T1), navigate to Configuration > Physical Ports and choose E1 or T1 from the drop down menu, and click Save button. © 1999-2021 Citrix Systems, Inc. All rights reserved.
-
Page 118: Factory Reset
Factory Reset November 4, 2019 Factory Reset via button pushes You can restore factory default settings on Citrix SD-WAN 210, 410 and 1100 appliances by performing a reset via button pushes. To perform factory reset on Citrix SD-WAN 410 appliance: 1. -
Page 119: Premium (Enterprise) Edition
CLI or the web management interface. Factory Reset via Internal USB You can restore factory default settings on Citrix SD-WAN 210, 410, 1100, 2100, 4100, 5100, and 6100 appliances by performing a reset via the internal USB. These appliances have an internal USB drive that stores the factory default settings. -
Page 120: Citrix Sd-Wan 1000, 2000, And 2100 Premium (Enterprise) Edition Appliances
WAN optimization and Virtual WAN functionality installed on the appliance. It offers a com- bination of Virtual WAN and WAN Optimization capabilities. The SD-WAN 1000 PE, 2000 PE, and 2100 appliances are based on the Citrix branch architecture, which supports multiple virtual machines. All branch appliances contain an SD-WAN instance, a manage- ment service instance, and a Xenserver hypervisor. -
Page 121: Sd-Wan 2000 Pe (Ee) Appliance
To use PE functionality, you need SD-WAN release 10.0 on the 2100 PE appliances and install PE licenses. SD-WAN 2000 PE (EE) Appliance May 23, 2019 The Citrix SD-WAN 2000 PE (EE) platform is a 1U appliance with 1 quad-core processor and 24 gigabytes (GB) of memory. © 1999-2021 Citrix Systems, Inc. All rights reserved. - Page 122 Citrix SD-WAN Platforms The following figure shows the front panel of the SD-WAN 2000 PE (EE) appliance. Figure 1. Citrix SD-WAN 2000 PE (EE) appliance, front panel SD-WAN 2000 PE (EE) appliance has the following ports: • An RS232 serial console port.
-
Page 123: Citrix Sd-Wan 1000 Pe (Ee) Appliance
The following figure shows the front panel of an SD-WAN 1000 PE (EE) appliance. Figure 1. Citrix SD-WAN 1000 PE (EE), front panel • The front panel of the SD-WAN 1000 PE (EE) appliance has a power button and five LEDs. - Page 124 • Power – Indicates that the power supply units are receiving power and operating normally. The following figure shows the back panel of an SD-WAN 1000 EE appliance. Figure 2. Citrix SD-WAN 1000 PE (EE) appliance, back panel The following components are visible on the back panel of an SD-WAN 1000 PE (EE) appliance: •...
- Page 125 • Advanced Tab > Select • Boot Feature > Enter 5. When in the Boot Feature screen, change the value of the parameter Restore on AC Power Loss; from Last State > Power ON. © 1999-2021 Citrix Systems, Inc. All rights reserved.
- Page 126 Allow the system to restart. This takes approximately five minutes. 7. After the appliance is powered on, login to the appliance management instance (SVM). The de- fault IP address for the appliance is: 192.168.100.1, user name is: admin/password. © 1999-2021 Citrix Systems, Inc. All rights reserved.
-
Page 127: Summary Of Hardware Specifications
SD-WAN appliance, waiting for 10 seconds, and then plugging it back in again. The appliance power ups automatically from all shutdown scenarios. Summary of Hardware Specifications June 19, 2020 © 1999-2021 Citrix Systems, Inc. All rights reserved. - Page 128 Rack Units Width EIA 310-D, 19” EIA 310-D, 19” EIA 310-D, 19” Depth 10” 25.4 cm 25.4” (64.5 cm) 28” (71.1 cm) Operating 10–35 C 0–40 C 32–104 F (0–40 C) temperature © 1999-2021 Citrix Systems, Inc. All rights reserved.
-
Page 129: Ethernet Port Names
Specify IP addresses for various Ethernet ports of the appliance when configuring the appliance. The Ethernet ports are labeled differently on the front panel of SD-WAN 1000 PE and 2000 PE appliances in the SD-WAN instance, as shown in the following table: © 1999-2021 Citrix Systems, Inc. All rights reserved. -
Page 130: Installing The Appliance
An SD-WAN 1000 PE (EE) or 2000 PE (EE) appliance requires one rack unit. Both are rack-mount devices that can be installed into two-post relay racks or four-post EIA-310 server racks. Verify that the rack is compatible with your appliance. © 1999-2021 Citrix Systems, Inc. All rights reserved. -
Page 131: Rack Mount The Appliance
Ethernet cables connect your appliance to the network. The type of cable you need depends on the type of port used to connect to the network. Use a category 5e or category 6 Ethernet cable with a © 1999-2021 Citrix Systems, Inc. All rights reserved. - Page 132 An SD-WAN appliance has one power supply. A separate ground cable is not required, because the three-prong plug provides grounding. Provide power to the appliance by installing the power cord. Connect the other end of the power cable to a standard 110V/220V power outlet. © 1999-2021 Citrix Systems, Inc. All rights reserved.
-
Page 133: Switch On The Appliance
After checking the connections, you are ready to deploy the SD-WAN 1000 and 2000 appliances on the network. The appliance shipped from Citrix has default IP addresses configured on it. To deploy the appliance on the network, you must configure the appropriate IP addresses on the appliance to accelerate the network traffic. -
Page 134: Prerequisites
Preferably, print the worksheet before you start the configuration process. • You should already have an SD-WAN license key from Citrix, sent in an email. If you are using remote licensing, you need the IP address of the licensing server. - Page 135 4. On the login page, use the following default credentials to log on to the appliance. 5. Start the configuration wizard by clicking Get Started. 6. On the Platform Configuration page, enter the respective values from your worksheet, as shown in the following example: © 1999-2021 Citrix Systems, Inc. All rights reserved.
- Page 136 16. In System Services section, update the values if necessary. 17. In the Licensing section, select the appropriate license type. You can either select a local license or a remote license server to apply a license to the appliance. © 1999-2021 Citrix Systems, Inc. All rights reserved.
- Page 137 IP address of the licensing server in the Licensing Server Address field. 18. In the WAN Link Definition section, specify receive and send speeds for the WAN link in the re- spective fields. Citrix recommends values 10% lower than the WAN bandwidth, to avoid network congestion.
-
Page 138: Assigning A Management Ip Address Through The Serial Console
WCCP Mode. Assigning a Management IP Address through the Serial Console May 23, 2019 If you do not want to change the settings of your computer, you can perform initial configuration by © 1999-2021 Citrix Systems, Inc. All rights reserved. - Page 139 14. Access the SD-WAN appliance by entering the new management service IP address of the appli- ance, such as , in a web browser of a com- https://<Management_Service_IP_Address> puter on the management network. © 1999-2021 Citrix Systems, Inc. All rights reserved.
-
Page 140: Setting Up The Sd-Wan Appliance
Citrix SD-WAN 5100 Premium (Enterprise) Edition Appliance June 19, 2020 Citrix SD-WAN Premium (Enterprise)Edition 5100 appliances are high-performance appliances for busy datacenters. This appliance is designed to operate Virtual WAN links with speeds more than 1 Gbps for busy data- centers that communicate with many branch and regional sites. - Page 141 1. Insert the required SSD in the standard edition appliance. For instructions about how to insert SSD, see Solid State Drive (Field Replaceable Unit). a) 5100 SE appliance requires 960 GB more SSD. Insert the SSD into the third, fourth, and fifth drive bays. © 1999-2021 Citrix Systems, Inc. All rights reserved.
-
Page 142: Summary Of Hardware Specifications
3. Ensure that the software release version installed on the appliance is SD-WAN release version 10.0. Follow the steps provided here; upgrade new appliance. 4. Install the Premium (Enterprise) Edition platform license. For license information, see the Citrix SD-WAN product downloads site. 5. Upgrade the network using single step upgrade to software release version 10.0 or later. -
Page 143: 6100 Standard Edition And Premium Edition Appliance
The following Citrix SD-WAN software versions are supported on the 6100 appliance editions: • Citrix SD-WAN 6100 SE – Citrix SD-WAN 10.2.3 and above. • Citrix SD-WAN 6100 PE - Shipped with Citrix SD-WAN 10.2.7 image, upgrade the software to Citrix SD-WAN 11.2.1 and above to enable PE functionality. - Page 144 10/5, 10/6, 10/7, 10/8 10G SFP+ The following components are visible on the back panel of the Citrix SD-WAN 6100 SE/PE appliance: For Citrix SD-WAN 6100 SE [SSD Configuration] • Drive bay 3 - 2.5” Boot drive SSD with 480 GB capacity •...
- Page 145 1. Restart the appliance through the SD-WAN web management interface. 2. Ensure that the software release version installed on the appliance is Citrix SD-WAN 11.2.1 or above. If the appliance is running a version lower than 11.2.1, upgrade the software to 11.2.1 and perform a local change management.
- Page 146 EIA 310-D for 19 (inch) racks Rack Depth 28 inches (71.1 cm) Operating temperature 0–45°C (32–113°F) Humidity (non-condensing) 5% - 95% Safety certifications IEC 60950-1, second Edition CSA 60950-1, second Edition UL 60950-1, second Edition AS/NZS 60950-1 © 1999-2021 Citrix Systems, Inc. All rights reserved.
-
Page 147: Citrix Sd-Wan 1100 Standard Edition And Premium Edition
Citrix SD-WAN 1100 Standard Edition and Premium Edition January 21, 2021 The Citrix SD-WAN 1100 standard and premium edition appliance is a desktop form factor appliance. Each model has 8-core processor with 24 GB memory and 480 GB of storage (SSD drive). - Page 148 • Two como ports (1/5 and 1/6). One can use RJ45 or SFP port at a time. • 480 GB solid-state drive, which is used to store the Citrix SD-WAN software and the user data. • Power switch, which turns off power to the appliance, as if you were to unplug the power supply.
- Page 149 Citrix SD-WAN Platforms • SFP transceiver and cable (s) Citrix SD-WAN 1100 SE and PE back panel: Citrix SD-WAN 1100 SE and PE back panel labeled: For information about installing the rails, rack mounting the hardware, and connecting the cables, Installing the Hardware.
- Page 150 RJ45: 1000 only, SFP: 100 (certain SFPs)/1000 1/7-1/8 100/1000 Citrix SD-WAN 1100 platform support for MiRiC-E1T1 FE/GBE SFP The following two types of MiRiC SFPs are supported on the 1100 appliance for SFP ports 1/5 and 1/6. 1. MiRiC-E1T1 FE SFPs.
- Page 151 • Default password: 1234 • To configure Interface Type (E1 or T1), navigate to Configuration > Physical Ports and choose E1 or T1 from the drop down menu, and click Save button. © 1999-2021 Citrix Systems, Inc. All rights reserved.
-
Page 152: Factory Reset
Factory Reset November 4, 2019 Factory Reset via button pushes You can restore factory default settings on Citrix SD-WAN 210, 410 and 1100 appliances by performing a reset via button pushes. To perform factory reset on Citrix SD-WAN 410 appliance: 1. -
Page 153: Vpx Models
CLI or the web management interface. Factory Reset via Internal USB You can restore factory default settings on Citrix SD-WAN 210, 410, 1100, 2100, 4100, 5100, and 6100 appliances by performing a reset via the internal USB. These appliances have an internal USB drive that stores the factory default settings. -
Page 154: Citrix Sd-Wan Vpx Standard Edition
Citrix SD-WAN VPX Standard Edition June 19, 2020 Citrix SD-WAN Standard Edition is a virtual Citrix SD-WAN appliance that can be hosted on Citrix XenServer, VMware ESX or ESXi, Microsoft Hyper-V, and Amazon AWS-virtualization platforms. An SD-WAN VPX appliance supports most of the features of a physical Standard Edition or WANOP appliances. -
Page 155: Prerequisites
Installation. Prerequisites January 21, 2021 This section outlines the hardware and software requirements for Citrix SD-WAN Virtual Appliance (SD-WAN VPX-SE), and defines the platform dependencies. NOTE • From 10.2.6 and 11.0.3 release onwards, it is mandatory to change the default admin user account password while provisioning any SD-WAN appliance or deploying a new SD-WAN SE VPX. - Page 156 Remote licenses are supported for SD-WAN VPX-VW. For additional information on licensing and downloading SD-WAN software, see the sections, Licensing Acquiring the SD-WAN Software Packages. To download the SD-WAN VPX-SE installation files, go to the following URL: http://www.citrix.com/downloads.html © 1999-2021 Citrix Systems, Inc. All rights reserved.
-
Page 157: Checklist
39.1 GB). • If you are not using DHCP, note the IP Address you intend to assign as the static Management IP Address for the SD-WAN VPX-SE. (By default, SD-WAN VPX-SE uses DHCP). © 1999-2021 Citrix Systems, Inc. All rights reserved. -
Page 158: Citrix Sd-Wan Vpx-Se Versus Vpx-Wanop
SD-WAN network, as compared to a SD-WAN VPX for WAN Optimization. The primary differences when installing and configuring a SD-WAN VPX-SE virtual appliance from SD- WAN WANOP VPX, are as follows: • Download the following installation files from the Citrix SD-WAN downloads site (http://www. citrix.com/downloads.html). - Page 159 - <gateway>* is the Gateway IP Address of the SD-WAN VPX-SE Virtual Appliance will use to com- municate with external networks. 4. Restart the SD-WAN VPX-SE Virtual Appliance VM. Note See also the section, Setting the Management IP Addresses for the Appliances. © 1999-2021 Citrix Systems, Inc. All rights reserved.
-
Page 160: Overview Of Vpx Installation And Deployment
VPX are very similar. For instructions on installing a SD-WAN WANOP VPX on XenServer, see the chapter entitled, “CloudBridge VPX,” in the document entitled, Citrix CloudBridge 7.4 Prod- Documentation, available on the Citrix Documentation Portal (http://docs.citrix.com/). See also, Differences Between a SD-WAN VPX-SE and WANOP VPX Installation. -
Page 161: Vpx Standard Edition On Esxi
SD-WAN VPX-SE Virtual Machine. Note Please refer to your VMware vSphere Client documentation for additional information. SD-WAN can be deployed in vShpere Client version 5.5 or later. © 1999-2021 Citrix Systems, Inc. All rights reserved. - Page 162 4. After the installation completes, start the vSphere Client program. The VMware vSphere Client login page displays, prompting you for the ESXi server login credentials. © 1999-2021 Citrix Systems, Inc. All rights reserved.
- Page 163 • User name: Enter the server Administrator account name. The default is root. • Password: Enter the password associated with this Administrator account. 6. Click Login. This displays the vSphere Client main page. © 1999-2021 Citrix Systems, Inc. All rights reserved.
-
Page 164: Deploy Sd-Wan Vpx
• version_number is the SD-WAN VPX release version number. • .ova is the file name suffix indicating that this is an OVF template file. Note For additional information, see Downloading the Software Packages. © 1999-2021 Citrix Systems, Inc. All rights reserved. - Page 165 3. Select the CB VPX-VW OVF template (.ova file) you want to install. Browse to the location of the .ova file you downloaded earlier to the local PC, and select it. 4. Click Next. This imports the selected .ova file and displays the OVF Template Details page. © 1999-2021 Citrix Systems, Inc. All rights reserved.
- Page 166 Citrix SD-WAN Platforms 5. This page displays some basic information regarding the OVF template you imported. 6. Click Next. This proceeds to the End User License Agreement page. © 1999-2021 Citrix Systems, Inc. All rights reserved.
- Page 167 Citrix SD-WAN Platforms 7. Click Accept, and then click Next. This proceeds to the Name and Location page. © 1999-2021 Citrix Systems, Inc. All rights reserved.
- Page 168 Inventory folder, and can be up to 80 characters in length. 9. Click Next. This displays the Disk Format page. The SD-WAN VPX-VW Virtual Machine requires 39.1 GB of disk space. © 1999-2021 Citrix Systems, Inc. All rights reserved.
- Page 169 Citrix SD-WAN Platforms 10. Accept the default settings, and click Next. This proceeds to the Network Mapping page. © 1999-2021 Citrix Systems, Inc. All rights reserved.
- Page 170 Citrix SD-WAN Platforms 11. Accept the default (VM Network) and click Next. This proceeds to the Ready to Complete page. © 1999-2021 Citrix Systems, Inc. All rights reserved.
- Page 171 Citrix SD-WAN Platforms 12. Click Finish to create the VM. Note Decompressing the disk image onto the server could take several minutes. This displays the Deploying Citrix SD-WAN VPX status dialog box. © 1999-2021 Citrix Systems, Inc. All rights reserved.
-
Page 172: Configure Management Ip
If you are not using DHCP or SLAAC, you must configure a static Management IP Address for the SD- WAN VPX Virtual Appliance VM manually. To configure, use the console of the Virtual Machine you created, in the vSphere Client. © 1999-2021 Citrix Systems, Inc. All rights reserved. - Page 173 3. Select the Console tab in the Inventory page tab bar. The Console tab is located in Inventory page tab bar at the top of the main page area. Selecting this tab displays and enables access to the CLI console for the VM. © 1999-2021 Citrix Systems, Inc. All rights reserved.
- Page 174 Citrix SD-WAN Platforms As the new VM starts up, a series of status messages display in the console. © 1999-2021 Citrix Systems, Inc. All rights reserved.
- Page 175 5. Log into the VM console. The default login credentials for the new SD-WAN VPX-SE VM are as follows: • Login: admin • Password: password This displays the console Welcome screen. 6. Enter the following command line at the console prompt: • To configure an IPv4 address: management_ip © 1999-2021 Citrix Systems, Inc. All rights reserved.
- Page 176 – <subnet mask> is the subnet mask used to define the network in which the CB VPX-VW Virtual Appliance resides. – <gateway> is the Gateway IP Address the SD-WAN VPX-SE Virtual Appliance uses to communicate with external networks. This stages but does not apply the interface settings. © 1999-2021 Citrix Systems, Inc. All rights reserved.
- Page 177 – SLAAC: Enables SLAAC for automatically assigning an IPv6 address to each device on the network. SLAAC enables an IPv6 client to generate its own addresses. – DHCP: Enables DHCP for assigning IP addresses automatically. Select stateful or stateless based on your need. © 1999-2021 Citrix Systems, Inc. All rights reserved.
- Page 178 – Static: Enter the IP address is manually. 8. Apply the staged settings for the VM interface. Do the following: a) Enter the following command at the set_management_ip prompt (for IPv4) or © 1999-2021 Citrix Systems, Inc. All rights reserved.
- Page 179 In the Basic Tasks section, click Shut down the virtual machine (red box icon). You are prompted to confirm that you want to shut down the guest operating system for the VM. © 1999-2021 Citrix Systems, Inc. All rights reserved.
- Page 180 12. Restart the Virtual Machine. Click Power on the virtual machine (green right-arrow) to restart the VM. You can view the progress of the start-up process in the Console tab page for the VM. © 1999-2021 Citrix Systems, Inc. All rights reserved.
- Page 181 Displaying the DHCP assigned Management IP address for the VPX This section provides instructions for displaying and recording the DHCP-assigned Management IP Address for the new SD-WAN VPX-SE Virtual Appliance VM. © 1999-2021 Citrix Systems, Inc. All rights reserved.
- Page 182 3. Select the Console tab in the Inventory page tab bar. The Console tab is located in Inventory page tab bar at the top of the main page area. Selecting this tab displays and enables access to the CLI console for the VM. © 1999-2021 Citrix Systems, Inc. All rights reserved.
- Page 183 To release console control of your cursor, press the Ctrl and Alt keys simultaneously. 5. Press Enter to display the console login prompt. Press Enter once or twice to display the console login prompt. © 1999-2021 Citrix Systems, Inc. All rights reserved.
-
Page 184: Connecting To The Sd-Wan Vpx And Testing The Deployment
Connecting to the SD-WAN VPX and Testing the Deployment June 25, 2020 The next step is to connect to the new SD-WAN VPX-SE Virtual Appliance, to confirm that the deploy- ment was successful. To test the deployment, do the following: © 1999-2021 Citrix Systems, Inc. All rights reserved. - Page 185 Alert icon (goldenrod delta) and alert message indicating that the Virtual WAN Service is disabled, and the license has not been installed. For now, you can ignore this alert. The alert will be resolved © 1999-2021 Citrix Systems, Inc. All rights reserved.
-
Page 186: Sd-Wan Vpx Usage Scenarios
VPX has all the functionality of a SD-WAN/SD-WAN appliance, and in addition has advantages provided by virtualization. Group mode and high-availability modes are not supported. Figure 1.VPX use case #1: Branch-office accelerator © 1999-2021 Citrix Systems, Inc. All rights reserved. - Page 187 Installing VPX VMs on every server in the data center creates a solution that scales perfectly as you add server capacity, while minimizing the number of servers by adding acceleration to the servers © 1999-2021 Citrix Systems, Inc. All rights reserved.
- Page 188 Once you have more than a few accelerated servers, the aggregate acceleration provided by multipleVPX VMs exceeds anything that can be provided with a single appliance. VPX accelerates all types of network applications, including XenApp, XenDesktop, Citrix Merchandis- ing Server, network file systems, databases, web servers, and more.
- Page 189 WCCP and virtual inline modes are suitable for one-arm deployments, which use only one port. The Amazon AWS version of VPX uses only a single port, and is thus always deployed in a one-armed mode. Figure 6. VPX use case #6: WCCP or virtual inline deployment © 1999-2021 Citrix Systems, Inc. All rights reserved.
-
Page 190: System Requirements And Provisioning
SD-WAN VPX features VPX supports Citrix Command Center release 4.0 or later. SD-WAN also supports SD-WAN/SD-WAN VPX Express licenses, which support a maximum accelerated sending rate of 512 kbps, 10 accelerated connections, and 5 SD-WAN/SD-WAN Plug-ins. - Page 191 4 GB 4 GB 250 GB 45 mbps 15,000 production config. (With 45mbps license) 8 GB 8 GB 500 GB 45 mbps 25,000 production config. Other configurations (not for production networks) © 1999-2021 Citrix Systems, Inc. All rights reserved.
- Page 192 The following figure shows a VPX VM in a one-arm deployment for traffic that ends on another virtual machine on the same server. Only one physical port is required in this case, but both virtual ports are used. © 1999-2021 Citrix Systems, Inc. All rights reserved.
- Page 193 Virtual NICs Except for Amazon AWS, two virtual network interfaces are required. They are bridged and used for both acceleration and the browser based user interface. These interfaces must be attached to different © 1999-2021 Citrix Systems, Inc. All rights reserved.
-
Page 194: Installing Sd-Wan Virtual Appliances On Xenserver
Installing SD-WAN Virtual Appliances on XenServer June 19, 2020 To install NetScaler SD-WAN virtual appliances on Citrix XenServer, you must first install XenServer on a machine with adequate system resources. To perform the SD-WAN VPX installation, you use Cit- rix XenCenter, which must be installed on a remote machine that can connect to the XenServer host through the network. - Page 195 Do not attach both virtual adapters to the same network. Doing so creates forwarding loops, which can cause network outages. Also, do not attach the two physical Ethernet ports associated with SD-WAN VPX to the same Ethernet switch. © 1999-2021 Citrix Systems, Inc. All rights reserved.
- Page 196 8. Complete the configuration. NOTE • From 10.2.6 and 11.0.3 release onwards, it is mandatory to change the default admin user account password while provisioning any SD-WAN appliance or deploying a new SD-WAN © 1999-2021 Citrix Systems, Inc. All rights reserved.
-
Page 197: Xenserver 6.5 Upgrade For Sd-Wan Standard Edition Appliances
Single-Step Upgrade work flow to upgrade SD-WAN software. 2. Perform steps a or b as outlined in step 1 before upgrading to Citrix XenServer 6.5. 3. Navigate to Update Software in the SD-WAN GUI. 4. Upload Citrix XenServer6.5 bundle which has been download from download server to Update Operating System Software by selecting the downloaded file location. -
Page 198: Installing Sd-Wan Virtual Appliances On Vmware Esx
• Install VMware ESX version 5.5 or ESXi 6.0, or later, on hardware that meets the minimum re- quirements. • Install the VMware vSphere client on a management workstation that meets the minimum sys- tem requirements. © 1999-2021 Citrix Systems, Inc. All rights reserved. - Page 199 See also your VMware vSphere Client documentation for additional information. 1. Open a browser and navigate to the ESXi server that hosts your vSphere Client and SD-WAN VPX- SE virtual machine (VM) instance. The VMware ESXi Welcome page displays. © 1999-2021 Citrix Systems, Inc. All rights reserved.
- Page 200 4. After the installation completes, start the vSphere Client program. The VMware vSphere Client login screen displays, prompting you for the ESXi server login credentials. © 1999-2021 Citrix Systems, Inc. All rights reserved.
- Page 201 • User name: Type the server administrator account name. The default is root. • Password: Type the password associated with this administrator account. 6. Choose Login. This appears the vSphere Client main page. © 1999-2021 Citrix Systems, Inc. All rights reserved.
- Page 202 Source page. 3. Choose the SD-WAN VPX-SE OVF template (.ova file) you want to install. Browse to the location of the .ova file you downloaded earlier to the local PC, and choose it. © 1999-2021 Citrix Systems, Inc. All rights reserved.
- Page 203 • When you are using DHCP: By default, all SD-WAN -VW Virtual Appliances use DHCP to acquire the Management IP Address. To use DHCP, the DHCP server must be present and available in the Virtual WAN. For more information see, Configuring the management © 1999-2021 Citrix Systems, Inc. All rights reserved.
- Page 204 SE Virtual Appliance resides. • is the Gateway IP Address the SD-WAN VPX-SE Virtual Appliance uses to com- <gateway> municate with external networks. This stage but does not apply the interface settings. © 1999-2021 Citrix Systems, Inc. All rights reserved.
- Page 205 • A system maintenance account - CBVWSSH, exists for development and debugging and has no external login permissions. The account can only be accessed through a regular admin- istrative user’s CLI session. © 1999-2021 Citrix Systems, Inc. All rights reserved.
- Page 206 To install SD-WAN VPX-SE in the hypervisor on HyperV 2012 R2 and 2016: 1. Install HyperV Manager. For more information, see documentation at Microsoft.com. 2. Unzip the SD-WAN distribution that you downloaded from My Citrix. 3. Start Hyper-V Manager. There are two methods to create the virtual machine.
- Page 207 – Allocate the RAM space by adjusting the memory to one of the supported sizes. – Click OK. 13. Optionally, define the management port. – Right-click the virtual machine, and then click Settings. © 1999-2021 Citrix Systems, Inc. All rights reserved.
- Page 208 172.16.0.213 18. In the HyperV Manager window, go to Virtual Switch Manager, and configure interfaces in the following order; management, LAN, and WAN. 19. Download the hyperv.tgz file and untar it. © 1999-2021 Citrix Systems, Inc. All rights reserved.
- Page 209 2. Copy the hard disk image and paste it in a freshly created folder outside of the Hyper-V setup file. 3. Open the Hyper-V Manager > select the Hyper-V ID > right click and select New > Virtual Machine. 4. The Virtual Machine Wizard opens, Click Next. © 1999-2021 Citrix Systems, Inc. All rights reserved.
- Page 210 Citrix SD-WAN Platforms 5. Provide the name and you can also specify a location for the virtual machine. Select the check box to provide a different location to store the virtual machine. Click Next. © 1999-2021 Citrix Systems, Inc. All rights reserved.
- Page 211 Citrix SD-WAN Platforms 6. Select the generation for the virtual machine and click Next. © 1999-2021 Citrix Systems, Inc. All rights reserved.
- Page 212 7. Specify the amount of memory to allocate to the virtual machine and click Next. 8. Select a connection from the drop-down list and click Next. The connection being selected here is for Management port. © 1999-2021 Citrix Systems, Inc. All rights reserved.
- Page 213 9. To connect VHD, select the Use an existing virtual hard disk radio button, browse, and select the VHD file from the extracted zip file and click Next. The virtual hard disk can be found in below location: ** > ctx-sdw-se-vpx > Virtual Hard Disks** © 1999-2021 Citrix Systems, Inc. All rights reserved.
- Page 214 Citrix SD-WAN Platforms 10. Verify the details on the Summary page and click Finish to complete the creation of the virtual machine. © 1999-2021 Citrix Systems, Inc. All rights reserved.
- Page 215 Incorrect configuration creates packet loops, which can bring down the network. 7. Increase Number of Virtual CPU cores. • In the Settings window navigation pane, select Processor. • Increase Number of virtual processors to at least 4. © 1999-2021 Citrix Systems, Inc. All rights reserved.
- Page 216 • Allocate the RAM space by adjusting the memory to one of the supported sizes. • Click OK. 10. Right click and select start. Once the state is changed to Running, your virtual machine is now ready to use. © 1999-2021 Citrix Systems, Inc. All rights reserved.
- Page 217 Citrix SD-WAN Platforms Adding interfaces Enabling Mac spoofing on the interfaces (LAN and WAN) After the VM is up, assign free IP address. The VM can be accessed after assigning the IP address. © 1999-2021 Citrix Systems, Inc. All rights reserved.
-
Page 218: Installing Sd-Wan Appliances On The Microsoft Hyper-V Platform
CPU, network interfaces, and hard-disk size and format. After you install an SD-WAN VPX instance, you can configure its network adapters, add virtual NICs, assign the SD-WAN IP address, subnet mask, and gateway, and complete the basic configuration of the virtual appliance. © 1999-2021 Citrix Systems, Inc. All rights reserved. - Page 219 Microsoft at any time). • Download the VPX setup files. If you do not have a My Citrix account, access the home page at http://www.mycitrix.com, click the New Users link, and follow the instructions to create a new My Citrix account.
- Page 220 SD-WAN SE VPX. This change is enforced using both CLI and UI. – A system maintenance account - CBVWSSH, exists for development and debugging and has no external login permissions. The account can only be accessed through a regular administrative user’s CLI session. © 1999-2021 Citrix Systems, Inc. All rights reserved.
- Page 221 2. Type your user name and password. 3. Click Downloads. 4. In Search Downloads by Product, select Citrix SD-WAN. 5. Under Virtual Appliances, select and download the required SD-WAN Hyper-V distribution. 6. Copy the compressed file to your server and extract it.
- Page 222 Citrix SD-WAN Platforms 6. Select the generation for the virtual machine and click Next. © 1999-2021 Citrix Systems, Inc. All rights reserved.
- Page 223 Citrix SD-WAN Platforms 7. Specify the amount of memory to allocate to the virtual machine and click Next. © 1999-2021 Citrix Systems, Inc. All rights reserved.
- Page 224 Citrix SD-WAN Platforms 8. Select a connection from the drop-down list and click Next. The connection being selected here is for Management port. © 1999-2021 Citrix Systems, Inc. All rights reserved.
- Page 225 9. To connect VHD, select the Use an existing virtual hard disk radio button, browse, and select the VHD file from the extracted zip file and click Next. The virtual hard disk can be found in below location: ** > ctx-sdw-se-vpx > Virtual Hard Disks** © 1999-2021 Citrix Systems, Inc. All rights reserved.
- Page 226 Citrix SD-WAN Platforms 10. Verify the details on the Summary page and click Finish to complete the creation of the virtual machine. © 1999-2021 Citrix Systems, Inc. All rights reserved.
- Page 227 WAN interface for apA2. Important: Do not configure the same Network for both the network adapters. Incorrect configuration creates packet loops, which can bring down the network. 7. Increase Number of Virtual CPU cores. • In the Settings window navigation pane, select Processor. © 1999-2021 Citrix Systems, Inc. All rights reserved.
-
Page 228: Installing Sd-Wan Vpx On Microsoft Server 2008 R2
10. Right click and select start. Once the state is changed to Running, your virtual machine is now ready to use. Installing SD-WAN VPX on Microsoft Server 2008 R2 June 19, 2020 © 1999-2021 Citrix Systems, Inc. All rights reserved. - Page 229 To install SD-WAN VPX on Microsoft Server 2008 R2 by using Hyper-V Manager 1. Unzip the SD-WAN distribution that you downloaded from My Citrix. 2. Start Hyper-V Manager. 3. In the navigation pane, under Hyper-V Manager, select the server on which you want to install SD-WAN VPX.
-
Page 230: Installing Sd-Wan Vpx On The Microsoft Server 2012
The software upgrade mechanism built into physical SD-WAN appliances is also supported by SD-WAN VPX. Alternatively, you can install a new virtual machine running the desired release. Installing SD-WAN VPX on the Microsoft Server 2012 May 23, 2019 © 1999-2021 Citrix Systems, Inc. All rights reserved. - Page 231 To install SD-WAN VPX on Microsoft Server 2012 by using Hyper-V Manager 1. Unzip the SD-WAN distribution that you downloaded from My Citrix. 2. Start Hyper-V Manager. 3. In the navigation pane, under Hyper-V Manager, select the server on which you want to install SD-WAN VPX.
-
Page 232: Installing Sd-Wan Se Virtual Appliances (Vpx) In Linux-Kvm Platform
WAN/SD-WAN VPX. Alternatively, you can install a new virtual machine running the desired release. Installing SD-WAN SE Virtual Appliances (VPX) in Linux-KVM Platform June 19, 2020 1. To set up SDWAN VPX-SE for the Linux-KVM platform: © 1999-2021 Citrix Systems, Inc. All rights reserved. - Page 233 2. Once the VMM opens, you must see QEMU/KVM which indicates that the VMM is not connected to the QEMU Virtualization. NIC ordering for SD-WAN VPX-SE provisioning must be in the following order; Management, LAN, and WAN. 3. Select New Virtual Machine. © 1999-2021 Citrix Systems, Inc. All rights reserved.
- Page 234 6. Name the VM as needed and select Customize configuration before Install. As by default one NIC gets selected to the Virtual Machine, you can see the Network selection option. In this © 1999-2021 Citrix Systems, Inc. All rights reserved.
- Page 235 7. After clicking Finish, ensure you select customize configuration before install for further configuration. For the NIC that is assigned, in this example “enp4s0f0: MacVTap” select the Device model as “virtio.” The model that is supported for communication. © 1999-2021 Citrix Systems, Inc. All rights reserved.
- Page 236 Lower NIC and hence it cannot be shared across VMs). For LAN and WAN interfaces use “Pass- through” Mode and Device Model must be “virtio.” 9. Select Begin Installation for the installation process to start and you can see the console of the © 1999-2021 Citrix Systems, Inc. All rights reserved.
- Page 237 WANLink-1 for Primary VM, the same interface must be used for secondary appliance, so that if primary appliance becomes inactive, the secondary appliance can respond to the ARP requests for shared MAC. © 1999-2021 Citrix Systems, Inc. All rights reserved.
- Page 238 These steps must be followed only when both Primary and Secondary high availability node is present on the same KVM Hypervisor/Host. In case, if high availability nodes are present on dif- ferent Hypervisors then MACVTAP: Passthrough source mode can be used. © 1999-2021 Citrix Systems, Inc. All rights reserved.
- Page 239 • A system maintenance account - CBVWSSH, exists for development and debugging and has no external login permissions. The account can only be accessed through a regular admin- istrative user’s CLI session. © 1999-2021 Citrix Systems, Inc. All rights reserved.
-
Page 240: Install Citrix Sd-Wan Se Vpx On Google Cloud Platform
2. Create a Citrix SD-WAN SE instance and associate the interfaces with the VPCs. 3. Create firewall rules on WAN subnet VPC to enable ingress on UDP port 4980. It is used by Citrix SD-WAN instance to create the virtual path. - Page 241 Citrix SD-WAN Platforms 5. Access the Citrix SD-WAN SE VPX using the management IP address. Create VPC networks Create VPC networks that will be associated with the management subnet, LAN subnet, and WAN sub- net. While creating an image a default interface is available, this can be used as the management interface.
- Page 242 Citrix SD-WAN Platforms 3. Similarly create a WAN VPC network. © 1999-2021 Citrix Systems, Inc. All rights reserved.
- Page 243 Citrix SD-WAN Platforms Note All three VPC networks must be in the same region. 4. Create WAN link public IP. © 1999-2021 Citrix Systems, Inc. All rights reserved.
- Page 244 Citrix SD-WAN Platforms 5. Associate the WAN Public IP to WAN subnet after creating the instance. © 1999-2021 Citrix Systems, Inc. All rights reserved.
- Page 245 Citrix SD-WAN Platforms Create the Citrix SD-WAN SE VPX instance 1. In GCP Marketplace search for Citrix SD-WAN Standard Edition, open it, and click LAUNCH ON COMPUTE ENGINE. © 1999-2021 Citrix Systems, Inc. All rights reserved.
- Page 246 Citrix SD-WAN Platforms © 1999-2021 Citrix Systems, Inc. All rights reserved.
- Page 247 Citrix SD-WAN Platforms 2. The required vCPU’s and memory are selected by default. Select the GCP Region. Note The GCP region must be same as the region of the VPC networks. © 1999-2021 Citrix Systems, Inc. All rights reserved.
- Page 248 Existing network3 select the LAN and WAN subnets respectively. Ensure that useExNet is selected for all the three networks and click Deploy. Note If you are creating a new management subnet, allow port 443 in its firewall rules. © 1999-2021 Citrix Systems, Inc. All rights reserved.
- Page 249 Citrix SD-WAN Platforms 4. After the SD-WAN SE VPX instance is deployed. Use the default user name and password pro- vided by GCP to log in into the SD-WAN SE VPX. © 1999-2021 Citrix Systems, Inc. All rights reserved.
- Page 250 1. Navigate to VPC Network > VPC Networks > WAN subnet VPC. In the Firewall rules tab, click Add firewall rule. 2. Allow ingress for all instances on UDP port 4980. This port is used by the SD-WAN instance to create an overlay network. © 1999-2021 Citrix Systems, Inc. All rights reserved.
- Page 251 Citrix SD-WAN Platforms © 1999-2021 Citrix Systems, Inc. All rights reserved.
- Page 252 2. Enter the Destination IP range, the LAN network of the other end. In the Next Hop field, select Specify IP address and in the Next hop IP address specify the SD-WAN LAN interface IP. © 1999-2021 Citrix Systems, Inc. All rights reserved.
- Page 253 Use the management interface IP address to access the GUI of the SD-WAN SE VPX instance. Use the default user name and password provided by GCP to log into the SD-WAN SE VPX. © 1999-2021 Citrix Systems, Inc. All rights reserved.
-
Page 254: Citrix Sd-Wan On Oracle Cloud Infrastructure (Technical Preview)
Citrix SD-WAN on Oracle Cloud Infrastructure (Technical preview) January 24, 2020 NOTE Citrix SD-WAN is now available for Oracle cloud as a technical preview build from 11.0.2 Onwards You can use SD-WAN instance in Oracle cloud to connect it with the on-premise SD-WAN instance and thus access your resources inside Oracle cloud. - Page 255 Essentially, this is a LAN environment. • Create virtual cloud network plus related resources – this option allows access to Inter- net by default and you need create ACL’s to allow/block traffic © 1999-2021 Citrix Systems, Inc. All rights reserved.
- Page 256 3. In the next step create a subnet where your SD-WAN appliance will be hosted. Again, if you’re using an existing virtual network which has a subnet available, you can use that as well. © 1999-2021 Citrix Systems, Inc. All rights reserved.
- Page 257 A public IP is mandatory since the SD-WAN appliance would must form virtual paths with an SD-WAN branch appliance or an MCN. 5. SD-WAN Image Availability: Using OCI Object Storage, upload SD-WAN image into the dedi- © 1999-2021 Citrix Systems, Inc. All rights reserved.
- Page 258 Citrix SD-WAN Platforms cated Object Storage Bucket. You find the SD-WAN image on downloads.citrix.com under the release version 11.0.2. You need to use the KVM image, that is, 11.0.2.29_kvm.qcow2.gz. Once you find that, create an Object storage bucket by navigating to Object storage > Object storage and assign a name to it.
- Page 259 8. Click import image to import the image to object storage and wait until the image is uploaded. Once uploaded, assign a name to the image. This’ll now form the base of SD-WAN images, you can use the same image for creating multiple SD-WAN instances. © 1999-2021 Citrix Systems, Inc. All rights reserved.
- Page 260 Citrix SD-WAN Platforms © 1999-2021 Citrix Systems, Inc. All rights reserved.
- Page 261 Change VM shape to a proper size and number of VNICs (in this example, we used VM.Standard2.4): You can use other VM’s as well as the VM has at least three VNIC’s. © 1999-2021 Citrix Systems, Inc. All rights reserved.
- Page 262 Citrix SD-WAN Platforms 11. After picking the VM size, pick the virtual network within which you’d want to provision the in- stance. In this case the virtual cloud network is called dconoci. © 1999-2021 Citrix Systems, Inc. All rights reserved.
- Page 263 Citrix SD-WAN Platforms Once you create an instance, you can log into SD-WAN administration GUI by management pub- lic IP address: © 1999-2021 Citrix Systems, Inc. All rights reserved.
- Page 264 13. Navigate back to the OCI portal, on your VM instance, create VNICs as the SD-WAN instance needs at least 3 network adapters/NIC’s to function. Create two more NIC’s and attach them to the VM. © 1999-2021 Citrix Systems, Inc. All rights reserved.
- Page 265 Citrix SD-WAN Platforms © 1999-2021 Citrix Systems, Inc. All rights reserved.
- Page 266 Citrix SD-WAN Platforms © 1999-2021 Citrix Systems, Inc. All rights reserved.
- Page 267 Citrix SD-WAN Platforms 14. Once all additional VNICs are created, you can view them from OCI portal: © 1999-2021 Citrix Systems, Inc. All rights reserved.
- Page 268 Citrix SD-WAN Platforms 15. When you log in SD-WAN administrative GUI, after rebooting the VM, you will see all additional VNICs shown in Network Adapters: © 1999-2021 Citrix Systems, Inc. All rights reserved.
- Page 269 • A system maintenance account - CBVWSSH, exists for development and debugging and has no external login permissions. The account can only be accessed through a regular admin- istrative user’s CLI session. © 1999-2021 Citrix Systems, Inc. All rights reserved.
-
Page 270: Installing Sd-Wan Vpx Standard Edition Ami On Aws
Installing SD-WAN VPX Standard Edition AMI on AWS December 4, 2020 The Citrix SD-WAN SE appliances bond multiple network paths in the single virtual path. The virtual paths are monitored so that critical application paths are always routed through optimal paths. This solution enables customers to deploy applications in the cloud and utilize multiple service provider networks for seamless delivery of applications to the end-users. - Page 271 • Network Interfaces: minimum of 2 (one management, one for LAN/WAN) • BYOL – bring-your-own-license and subscription From 11.3 release onwards, Citrix SD-WAN has introduced support for the M5 and C5 instances. The newer AWS regions such as Hong Kong and Paris only support M5 and C5 instances.
- Page 272 • Connectivity between Data Center, Branch, and Cloud applying different transport modes uti- lizing multiple WAN paths simultaneously. • Automatic Route Learning with OSPF and BGP. • Single IPsec tunnel across multiple paths where security renegotiation is not required upon any link failure occurrences. © 1999-2021 Citrix Systems, Inc. All rights reserved.
- Page 273 • Define Network ACLs (Access Control List) - for controlling the inflow/outflow of the traffic from/to the subnet for security purposes • Define Security Group - for controlling the inflow/outflow of the traffic from/to each instance of the network device © 1999-2021 Citrix Systems, Inc. All rights reserved.
- Page 274 – SSH from all IP addresses / subnets from where management IP will be accessed. – All traffic from your AWS VPCs (private IPs) – All traffic from the WAN side public IPs of Citrix SD-WAN peer appliances hosted on prem or in cloud.
- Page 275 Citrix SD-WAN Platforms 2. Select your VPCs, then click the Create VPC button. 3. Add Name tag, CIDR block according to your network diagram and Tenancy = default, and click Yes, Create. © 1999-2021 Citrix Systems, Inc. All rights reserved.
- Page 276 2. Give the IGW a Name tag, and click Yes, Create. 3. Select the newly created IGW and click Attach to VPC. 4. Select the previously created VPC and click Yes, Attach. © 1999-2021 Citrix Systems, Inc. All rights reserved.
- Page 277 • VPC: <the VPC previously created> • Availability Zone: <set at discretion> • CIDR block: subnet specific to the defined name (Mgmt, LAN, or WAN) that is a smaller subset of the CIDR previously defined © 1999-2021 Citrix Systems, Inc. All rights reserved.
- Page 278 Mgmt, LAN, and WAN subnets. 2. Enter the detail for the Mgmt subnet • Name tag: name to identify different subnets (Mgmt, LAN, or WAN) • VPC: The previously created VPC © 1999-2021 Citrix Systems, Inc. All rights reserved.
- Page 279 5. With the newly created route table still highlighted, select Routes > Edit. 6. Click Add another route button (only required for the Mgmt, and WAN subnets), then Save. • Destination: 0.0.0.0/0 • Target: The Internet Gateway (igw-xxxxxxx previously defined) © 1999-2021 Citrix Systems, Inc. All rights reserved.
- Page 280 5. With the newly created route table still highlighted, select Routes > Edit. 6. Click Add another route button (only required for the Mgmt, and WAN subnets), then Save. • Destination: 0.0.0.0/0 • Target: <The Internet Gateway> (igw-xxxxxxx previously defined) © 1999-2021 Citrix Systems, Inc. All rights reserved.
- Page 281 To route LAN side traffic through SD-WAN, associate the target destination as the SD-WAN LAN interface id in the SD-WAN LAN route table. The target for any destination can be set to interface id only after creating the instance and attaching network interfaces to that instance. © 1999-2021 Citrix Systems, Inc. All rights reserved.
- Page 282 2. Select the EC2 dashboard tool bar, select Instances > Launch Instance. 3. Use the AWS Marketplace tab to search for the SD-WAN Amazon Machine Image (AMI) or use the My AMIs tab to locate an owned or shared SD-WAN AMI, locate Citrix NetScaler SD-WAN Standard Edition and then click Select.
- Page 283 • Number of Instances: 1 • Network: select VPC previously created> • Subnet: select Mgmt Subnet previously defined • Auto-assigning Public IP: enabled • Network interfaces > Primary IP: enter predefined Mgmt IP © 1999-2021 Citrix Systems, Inc. All rights reserved.
- Page 284 SD-WAN Mgmt interface. If eth0 is not associated with the SD-WAN Mgmt interface, connectivity is lost following a reboot.1. 8. Enter the following information for the Root Storage: • Volume Type: General Purpose (SSD) GP2 9. Then select Next: Tag Instance © 1999-2021 Citrix Systems, Inc. All rights reserved.
- Page 285 Click the Add Rule button to add two more: • All ICMP with Source: Custom 0.0.0.0/0 • Custom UDP Rule with Port Range: 4980 and Source: custom <known IP addresses from partner SD-WAN> 13. Select Review and Launch. © 1999-2021 Citrix Systems, Inc. All rights reserved.
- Page 286 15. In the Key Pair pop-up, either select an existing key pair or create a new key pair, then select Launch Instance. Important If a new key pair is created, be sure to download and store it in a safe location. 16. Citrix SD-WAN SE AMI must now be launched successfully. © 1999-2021 Citrix Systems, Inc. All rights reserved.
- Page 287 • Private IP: <the private IP for the interface previously defined during preparation> • Security Group: <the appropriate security group for the interface> 20. Repeat and click Create Network Interface to create the WAN interface. © 1999-2021 Citrix Systems, Inc. All rights reserved.
- Page 288 21. Edit the Name tag for each new interface and give a useful name. 22. Highlight the Mgmt Interface and select Actions > Change Source/Dest. Check to disable Source/Dest. Check, then select Save. 23. Repeat for LAN and WAN interfaces. © 1999-2021 Citrix Systems, Inc. All rights reserved.
- Page 289 WAN Link IP in the SD-WAN configuration for this site node. This can be accomplished by defining Secondary Private IPs for the WAN Interface as needed. 25. From the EC2 Dashboard tool bar, select Instances. © 1999-2021 Citrix Systems, Inc. All rights reserved.
- Page 290 29. Click Allocate to allocate a new IP address, then Close after the New address request succeeded. 30. Highlight the new EIP and select Action > Associate address to associate the EIP with the Mgmt. © 1999-2021 Citrix Systems, Inc. All rights reserved.
- Page 291 2. Enter the Elastic IP (EIP) associated with the Mgmt. Interface. You can create a security excep- tion, if the security certificate is not recognized. 3. Log in to the SD-WAN SE AMI using the following credentials: • User name: admin • Password: <aws-instance-id> (example; i-00ab111abc2222abcd) © 1999-2021 Citrix Systems, Inc. All rights reserved.
- Page 292 • From License Configuration: Upload License for this Appliance, select Choose File, browse and open the SD-WAN SE AWS license, then click Upload and Install • After successful upload, License Status will indicate State: Licensed © 1999-2021 Citrix Systems, Inc. All rights reserved.
- Page 293 + Configuration) is installed on the AMI. Add SD-WAN SE AMI to your SD-WAN environment To add SD-WAN AMI to your SD-WAN environment: 1. Navigate to your SD-WAN Center or Master Control Node for your SD-WAN environment. © 1999-2021 Citrix Systems, Inc. All rights reserved.
- Page 294 SD-WAN AMI instead of via direct connection to the Mgmt. interface. Private IP addresses must be defined on the EC2 WAN Network Interface for every WAN Link IP in the Configuration Editor. This can be accomplished by defining one or more Sec- © 1999-2021 Citrix Systems, Inc. All rights reserved.
- Page 295 6. From the Change Management page, download the package generated specifically for the new AWS node using the active link. 7. Navigate back to the SD-WAN SE AMI’s management interface using the assigned EIP for the © 1999-2021 Citrix Systems, Inc. All rights reserved.
- Page 296 Flows and enable the service using the Enable button. 12. Upon successful connectivity on the WAN interface, the SD-WAN reports Good Path State on the Monitoring > Statistics > Paths page. © 1999-2021 Citrix Systems, Inc. All rights reserved.
- Page 297 VIP/Private IP (which was NAT’d by the IWG). Note This can typically occur when an IP address is created outside of the CIDR block assigned to the VPC. © 1999-2021 Citrix Systems, Inc. All rights reserved.
-
Page 298: Deploy Citrix Sd-Wan Standard Edition Instance On Azure - Release Version 10.2 And Above
Azure eliminating the need to backhaul cloud bound traffic through a data center. Some of the benefits of using Citrix SD-WAN in Azure are: • Create direct connections from every location to Azure. - Page 299 SD-WAN SE in Azure. Topology - SD-WAN in Azure Citrix SD-WAN Standard Edition can only be deployed in Gateway deployment mode in Azure. A Public IP address (Static/Dynamic) is assigned to the WAN facing interface of SD-WAN and one public IP is assigned to the management interface to access the management interface in Azure.
- Page 300 Citrix SD-WAN Platforms To deploy Citrix SD-WAN standard edition in Microsoft Azure 1. In a web browser, type https://portal.azure.com/. Log into Microsoft Azure account. Search for Citrix SD-WAN Standard Edition. 2. In the search results window, choose the following solution. Click create after going through the description and making sure the solution chosen is correct.
- Page 301 • You can move a resource from one resource group to another resource group • A resource group can contain resources that reside in different regions. • A resource group can be used to scope access control for administrative actions. © 1999-2021 Citrix Systems, Inc. All rights reserved.
- Page 302 4. Provide a name for the Virtual Machine. Choose a user name and strong password. The pass- word must consist of an upper case letter, special character and must be more than nine charac- © 1999-2021 Citrix Systems, Inc. All rights reserved.
- Page 303 • Instance type F8 standard for max uni-directional throughput of 1 Gbps with 64 max virtual paths/branches. • Instance type F16 standard for max uni-directional throughput of 1 Gbps with 128 max vir- tual paths/branches. © 1999-2021 Citrix Systems, Inc. All rights reserved.
- Page 304 Citrix SD-WAN Platforms 6. From Citrix SD-WAN 11.0.3 release, by default 120 GB of OS Disk Size is allocated. If necessary, you can modify the disk size to a value between 40 GB to 999 GB. 7. Create a new Virtual Network (VNET) or use an existing VNET. It is the most critical step for de- ployment as this step chooses the subnets to be assigned to the interfaces of the SD-WAN VPX ©...
- Page 305 In the following image, you are assigning the subnets to each of the interfaces. Associated network NIC 0 (default) Management subnet NIC 1 LAN subnet NIC 2 WAN subnet 9. Click Review+Create and ensure the validation is passed. © 1999-2021 Citrix Systems, Inc. All rights reserved.
- Page 306 The deployment starts and you can view the status in the notifications section. 10. You can get more details of your deployment by going to the resource group in which you are creating the deployment. © 1999-2021 Citrix Systems, Inc. All rights reserved.
- Page 307 11. After provisioning, a public IP address for the management interface is auto created. Use the Public IP address to access the SD-WAN GUI. 12. To get admin access to the instance, use admin as the user name and the password created in the first step. © 1999-2021 Citrix Systems, Inc. All rights reserved.
- Page 308 To configure internet breakout for Azure MCN: 1. In the MCN appliance configure DHCP IP on the WAN interface with Public IP configured for the WAN link. 2. Configure Internet service on the MCN. © 1999-2021 Citrix Systems, Inc. All rights reserved.
- Page 309 MCN. Limitations - Microsoft Azure VMs • After a VM is created and booted in Azure, the interfaces cannot be added or deleted. The VM profile (RAM/HD/CPUs) can be changed. © 1999-2021 Citrix Systems, Inc. All rights reserved.
-
Page 310: Citrix Sd-Wan Standard Edition Virtual Appliance (Vpx) High Availability Support For Aws
AWS. 10. For the cloud platform setup, the shared base MAC address configuration is ignored and has no significance. Deploy Citrix SD-WAN standard edition VPX in high availability mode using cloud template For more information,refer to the EBS best practices... - Page 311 – SSH from all IP addresses / subnets from where management IP will be accessed. – All traffic from your AWS VPCs (private IPs) – All traffic from the WAN side public IPs of Citrix SD-WAN peer appliances hosted on prem or in cloud.
- Page 312 Citrix SD-WAN Platforms 2. Click Continue to Configuration. 3. Specify Fulfillment Option as CloudFormation Template and High Availability Mode Deploy- ment from the drop-down list. Select Region and click Continue to Launch. © 1999-2021 Citrix Systems, Inc. All rights reserved.
- Page 313 4. Choose action as Launch CloudFormation in the launch software window and click Launch. 5. In the Create Stack window, the predefined S3 template URL appears during the CloudFor- mation. Click Next. © 1999-2021 Citrix Systems, Inc. All rights reserved.
- Page 314 • Remote HTTPS CIDR IP: Provide the IP address range that can HTTPS to the EC2 instance (port 443). • Key Pair: Provide a name of an existing EC2 KeyPair to enable SSH access to the instances. © 1999-2021 Citrix Systems, Inc. All rights reserved.
- Page 315 9. Configure other Parameters such as Instant Type and Tenancy Type and click Next. NOTE If any validations fail, AWS notifies you and would not let you proceed until the errors are © 1999-2021 Citrix Systems, Inc. All rights reserved.
- Page 316 14. Monitor the events of all the resources created by the Cloud Formation template. If there is any failure, detailed descriptions of events are generated by AWS which helps in debugging the issue. The Events appear as follows: © 1999-2021 Citrix Systems, Inc. All rights reserved.
- Page 317 Perform the following procedure to attach the secondary LAN IPs to the active instance: Note Once the HA solution is deployed, we have to assign secondary floating IP only to the primary instance. 1. Navigate to Services > EC2 > Instances. © 1999-2021 Citrix Systems, Inc. All rights reserved.
- Page 318 Citrix SD-WAN Platforms 2. Navigate to Services > EC2 > Network interfaces and select the LAN/WAN Elastic Network In- terfaces (ENI) of the primary instance. 3. Assign new secondary IP. © 1999-2021 Citrix Systems, Inc. All rights reserved.
- Page 319 Citrix SD-WAN Platforms 4. Click Yes, Update. © 1999-2021 Citrix Systems, Inc. All rights reserved.
- Page 320 2. Select the elastic IP created, and click Action > Associate address and associate the public to the secondary private WAN IP which we just created. 3. Verify final interfaces and IPs are expected as below: • Primary Instance: © 1999-2021 Citrix Systems, Inc. All rights reserved.
- Page 321 And for the high availability virtual IP interface, specify a dummy IP in the high availability network. • Enable high availability and specify the high availability interface IPs of the active and sec- ondary instance. © 1999-2021 Citrix Systems, Inc. All rights reserved.
- Page 322 For example, it can take up to or more than 20 secs to move two traffic ENIs. AWS do not have SLAs on API response and you cannot have one for high availability fail-over time. © 1999-2021 Citrix Systems, Inc. All rights reserved.
- Page 323 4. Ensure all ENIs associated are detached. 5. Attach ENIs to the current Primary instance. 6. Ensure All ENIs are attached. 7. Trigger upper layers to detect that new ENIs are in place. © 1999-2021 Citrix Systems, Inc. All rights reserved.
- Page 324 SD-WAN high availability appliances. • When failover occurs, you see SD-WAN appliance transitioning from stand-by to active modes and/or conversely without any configuration loss. © 1999-2021 Citrix Systems, Inc. All rights reserved.
-
Page 325: Deploy Citrix Sd-Wan On Aws Outposts
AWS services and tools. With the addition of AWS Outposts to the AWS offering, Citrix SD-WAN customers now can use Citrix SD-WAN’s hybrid-cloud solution to easily connect AWS Outposts instances to their existing WAN infras- tructure. - Page 326 Prerequisites 1. Log into the Outposts AWS Account. 2. Have access to the Citrix SD-WAN AMI from the market place of AWS Outposts. NOte All the snapshots of AWS Outpost console provided in the configuration guide are done with the new console launched by AWS and may not be looking exactly the same, if a legacy UI is selected.
- Page 327 5. The status should be associated. 6. Once the VPC is created, the VPC list should show up the new VPC created with the CIDR details in the Your VPCs section of VPC AWS outposts service. © 1999-2021 Citrix Systems, Inc. All rights reserved.
- Page 328 • The Internet gateway is just a resource creation and has nothing special to be configured. If needed, ensure to configure the name tag and the relevant resource tags to search for the re- source among the IGW’s in the list in future. © 1999-2021 Citrix Systems, Inc. All rights reserved.
- Page 329 • Once the attach to VPC is clicked, select the VPC we created in step 1 which is for the SD-WAN. • Click the Available VPC’s drop-down list and select the SD-WAN VPC created. • Click Attach Internet Gateway. Associate the VPC to the Internet Gateway © 1999-2021 Citrix Systems, Inc. All rights reserved.
- Page 330 Citrix SD-WAN Platforms Creation of LAN, WAN and MGMT Subnets for Citrix SD-WAN VPXL appliance The SD-WAN standalone appliance hosts 3 Interfaces in general. 1. Management Interface 2. LAN Interface 3. WAN Interface The order of association of the interfaces also are important and the first interface that is associated is the management, followed by LAN and then the WAN subnet.
- Page 331 2. Select any availability zone of your choice. 3. Provide the LAN interface a subnet prefix from the VPC CIDR. 4. For this configuration guide, the LAN interface will be configured with 192.168.100.0/24. 5. Click Create. © 1999-2021 Citrix Systems, Inc. All rights reserved.
- Page 332 Internet Gateway configured. Management subnet route table • Click Route tables under VPC. • Click create route table. • Select the VPC created for SD-WAN in step 1. • Click Create. © 1999-2021 Citrix Systems, Inc. All rights reserved.
- Page 333 • Click the Actions drop-down list. • Select Edit Subnet associations. • Associate the Management Subnet to the route table which hosts the IP 192.168.102.0/24. 3. Edit Subnet Associations for management Route Table. © 1999-2021 Citrix Systems, Inc. All rights reserved.
- Page 334 Define route tables for the WAN subnet 1. Create the Route table for WAN Interface • Click Route tables under VPC. • Click create route table. • Select the VPC created for SD-WAN in step 1. © 1999-2021 Citrix Systems, Inc. All rights reserved.
- Page 335 • Select the WAN route table from the list. • Click the Actions drop-down list. • Select Edit Subnet associations. • Associate the WAN Subnet to the route table which hosts the IP 192.168.101.0/24. © 1999-2021 Citrix Systems, Inc. All rights reserved.
- Page 336 1. Create the Route table for LAN Interface • Click Route tables under VPC. • Click create route table. • Select the VPC created for SD-WAN in step 1. • Click create. © 1999-2021 Citrix Systems, Inc. All rights reserved.
- Page 337 • Select the WAN route table from the list. • Click the Actions drop-down list. • Select Edit Subnet associations. • Associate the LAN Subnet to the route table which hosts the IP 192.168.100.0/24. © 1999-2021 Citrix Systems, Inc. All rights reserved.
- Page 338 1. Choose the Private AMI by uploading the shared AMI into outposts (If not published in Market- place yet). 2. Select the right type of instance (VPXL – M5.2xlarge). • Configure the Instance Details like the VPC network, Subnet. © 1999-2021 Citrix Systems, Inc. All rights reserved.
- Page 339 • Provide a custom Private IP as well for the management interface in the bottom of the instance details page. 3. Select default Storage. 4. Add relevant tags for instance search/indexing later. © 1999-2021 Citrix Systems, Inc. All rights reserved.
- Page 340 Citrix SD-WAN Platforms 5. Define the relevant Security Group for the instance. 6. Summary of the Network Security Group of the Citrix SD-WAN Outpost Instance. 7. Download the Keypair for the instance launch via SSH for later use. © 1999-2021 Citrix Systems, Inc. All rights reserved.
- Page 341 Citrix SD-WAN Platforms 8. Initiate the LAUNCH of the instance. 9. Verify the Instance status and its health check in the EX2 Dashboard post launch. © 1999-2021 Citrix Systems, Inc. All rights reserved.
- Page 342 Citrix SD-WAN Platforms Creation of LAN/WAN Network Interfaces and Association LAN Network Interface 1. Create the LAN Network Interface. 2. Associate the Subnet related to LAN Interface. © 1999-2021 Citrix Systems, Inc. All rights reserved.
- Page 343 3. Associate a custom LAN Private IP 192.168.100.5 and associate the NSG (Network Security Group). WAN Network Interface 1. Create the WAN Network Interface. 2. Associate the WAN Subnet to the network interface. © 1999-2021 Citrix Systems, Inc. All rights reserved.
- Page 344 Disabling the Source/Dest. Check attribute enables the interface to handle network traffic that is not destined for the EC2 instance. As the NetScaler SD-WAN AMI acts as a go-between for network traffic, the Source/Dest. Check attribute must be disabled for proper operation. © 1999-2021 Citrix Systems, Inc. All rights reserved.
- Page 345 Citrix SD-WAN Platforms Management Interface disable SRC/DEST check LAN Interface disable SRC/DEST check © 1999-2021 Citrix Systems, Inc. All rights reserved.
- Page 346 Citrix SD-WAN Platforms WAN Interface disable SRC/DEST check Attach the LAN/WAN Network Interfaces to Outpost Citrix SD-WAN LAN Interface Association 1. Attach the LAN Network Interface to the SD-WAN. WAN Interface Association 1. Attach the WAN Network Interface to the SD-WAN.
- Page 347 This aligns with the mapping of the provisioned AMI and ensures that interfaces are not reas- signed incorrectly in the event of AMI reboot. Create and Associate ELASTIC IPs to MGMT and WAN Interfaces of Outpost Citrix SD-WAN Management IP Elastic IP 1.
- Page 348 IP associated with the management subnet which is “192.168.102.11”. • Select Network Interface • Select the Management network interface • Assign a private IP Address “192.168.102.11” • Associate © 1999-2021 Citrix Systems, Inc. All rights reserved.
- Page 349 The WAN Elastic IP is needed for enabling the overlay communication between different sites to the Outpost based Citrix SD-WAN appliance and have the IP connectivity to the external world. This would be the Public IP of the WAN Link that we will provide for an MCN or a Branch. This IP is essentially to be known by all the remote appliances/peers to help have an overlay control/data channel establishment.
- Page 350 • Select the WAN network interface • Assign a private IP Address “192.168.101.5” Outpost VPXL SD-WAN VM as an MCN Access/Configure the Outpost Citrix SD-WAN as an MCN 1. Access MGMT Interface IP. Note down the elastic IP of the Management interface and type in https://<elastic_ip_mgmt_interfac...
- Page 351 Citrix SD-WAN Platforms User name is admin and password is the INSTANCE ID (Highlighted below) 3. Make the role of the Outpost Citrix SD-WAN VM as an MCN (Master Control Node) 4. Add a new site for the MCN (Outpost SD-WAN).
- Page 352 Citrix SD-WAN Platforms 6. Configure the Outpost VM (MCN) Virtual IP Addresses (VIPs) for LAN and WAN. 7. Configure the Outpost VM (MCN) WAN Link. • DOWNLOAD/UPLOAD capacity definitions on the WAN link. © 1999-2021 Citrix Systems, Inc. All rights reserved.
- Page 353 Citrix SD-WAN Platforms • Configure the Access Interface and the Gateway IP of the WAN Link. Citrix SD-WAN 210 as a HOME USER BRANCH SD-WAN Configure the 210 Citrix SD-WAN as a BRANCH 1. Add a 210 site as a Branch in Client mode.
- Page 354 3. Configure the 210 HOME OFFICE Branch Virtual IP Addresses (VIPs) for LAN and WAN. 4. Configure the 210 HOME OFFICE Branch WAN Link. • DOWNLOAD/UPLOAD capacity definitions on the WAN link. © 1999-2021 Citrix Systems, Inc. All rights reserved.
- Page 355 Citrix SD-WAN Platforms • Configure the Access Interface and the Gateway IP of the WAN Link. © 1999-2021 Citrix Systems, Inc. All rights reserved.
- Page 356 Citrix SD-WAN Platforms Perform Change Management and Stage the configuration to the appliances Activate the Configuration © 1999-2021 Citrix Systems, Inc. All rights reserved.
- Page 357 Citrix SD-WAN Platforms Verify the Virtual PATH creation On the Outpost MCN VM On the 210 HOME Branch Validate Traffic over Virtual PATH between Outpost VM and 210 Branch. © 1999-2021 Citrix Systems, Inc. All rights reserved.
- Page 358 Initiate PING from the end laptop to 192.168.100.5 (LAN side VIP of the SD-WAN) Verify Flows that the LAN to WAN and WAN to LAN direction entries are seen in both the MCN (Outpost VM) and the 210 Branch © 1999-2021 Citrix Systems, Inc. All rights reserved.
- Page 359 • Also check the path will display the current best path that is taking the ICMP traffic through the Virtual Path (Which is WL1 on the 210 to the only existing link at the MCN side) Note Check the current path in the “Path” Column in the below snapshot. © 1999-2021 Citrix Systems, Inc. All rights reserved.
- Page 360 • Source IP – 192.168.100.5 • Proto/IPP – ICMP • Verify that the service used is Virtual Path and the service name is that if between the MCN (Out- post VM) to the Branch 210 © 1999-2021 Citrix Systems, Inc. All rights reserved.
- Page 361 • Destination Service – Virtual Path (Because we are pinging to the IP of the SD-WAN and is in- tended to the device and is carried via Virtual Path) • State - Established For information on support policies see support and services © 1999-2021 Citrix Systems, Inc. All rights reserved.
-
Page 362: Deploy Sd-Wan Standard Edition Instances In High Availability Mode In Azure - Release Version 10.2 And Above
Azure - Release Version 10.2 and above February 10, 2021 The Citrix SD-WAN Azure solution deploys Citrix SD-WAN in Edge Gateway Mode as a single instance, or a cluster pair for High Availability (HA). In an HA deployment, an Azure Load Balancer (ALB) controls the failover between the WAN interfaces of the Citrix SD-WAN appliances. - Page 363 How to deploy Citrix SD-WAN To create Citrix SD-WAN Standard Edition (SE) instance: 1. Search for Citrix SD-WAN in the Azure Marketplace and select Citrix SD-WAN Standard Edition 10.2.X. 2. Click Create button to create the Citrix SD-WAN SE 10.2.X Instance.
- Page 364 Citrix SD-WAN Platforms 3. Configure Basic settings page and provide the Resource group name with the appropriate Lo- cation. © 1999-2021 Citrix Systems, Inc. All rights reserved.
- Page 365 To create an instance either a new resource group must be created or the resource group must be empty to be reused. 4. Name the Virtual Machine, select Enabled for HA Deployment Mode, and create a Username and Password. © 1999-2021 Citrix Systems, Inc. All rights reserved.
- Page 366 Use admin as a user name for the provisioned instance with the same password that was given during provisioning to get the admin access. In the previously mentioned screen- shot, the provisioned user has the guest privilege. 5. Select the Virtual Machine size based on the requirement. © 1999-2021 Citrix Systems, Inc. All rights reserved.
- Page 367 Citrix SD-WAN Platforms 6. From Citrix SD-WAN 11.0.3 release, by default 120 GB of OS Disk Size is allocated. If necessary, you can modify the disk size to a value between 40 GB to 999 GB. 7. Use an existing VNet in the location specified or create a new.
- Page 368 Citrix SD-WAN Platforms 8. Once the Vnet is created, confirm the auto-populated subnets for Management, LAN, WAN, and AUX, then click OK. © 1999-2021 Citrix Systems, Inc. All rights reserved.
- Page 369 Citrix SD-WAN Platforms 9. Validate the configuration before the Instance creation. © 1999-2021 Citrix Systems, Inc. All rights reserved.
- Page 370 Citrix SD-WAN Platforms 10. Click Create. © 1999-2021 Citrix Systems, Inc. All rights reserved.
- Page 371 Citrix SD-WAN Platforms How to configure Citrix SD-WAN HA in Azure 1. Determine the IP addresses assigned to the SD-WAN interfaces. Navigate to Virtual Machines > SDWSEA (or as appropriate)> Networking, and examine the IP of each Azure Network Interface.
- Page 372 • The SDWSEA Interface 2 WAN VIP is 10.100.0.4. • The SDWSEA Interface 3 HA Tracking IP (not VIP) is 10.100.253.4: • Repeat the procedure for the secondary Citrix SD-WAN appliance. 2. Determine the SD-WAN ALB Public IP. Navigate to Load Balancers > sdwanha-external. Select the correct ALB based on the Resource Group created during the deployment.
- Page 373 SDWSWEA and SDWSEASec appliances are the MCN appliances. Note You can configure Citrix SD-WAN HA in Azure through SD-WAN Orchestrator as well. 4. The SDWANSEA and SDWANSEASec Interface Group Configuration is provided as follows. By- pass mode is set to fail-to-block since only one Ethernet/physical interface is used per virtual interface.
- Page 374 Interface three. Use an available IP address in the appropriate subnet (the subnet assigned to the AUX interface) and not the IP assigned to the Citrix SD-WAN appliances. Note only one VIP in each subnet is the Identity IP.
- Page 375 6. The SDWANSEA WAN Link Settings are provided as follows. Note to configure External load balancer Public IP Address as part of WAN link Public IP Address setting. The SD-WAN license determines the bandwidth settings. © 1999-2021 Citrix Systems, Inc. All rights reserved.
- Page 376 Azure Internal Load-balancer IP. And associate the LAN subnet to the route table created. If at all you must route all the traffic through SD-WAN, create a default route whose next-hop is pointing to Internal Load balancer IP. © 1999-2021 Citrix Systems, Inc. All rights reserved.
-
Page 377: Deploy A Citrix Sd-Wan Vpx Instance On A Citrix Adc Sdx Appliance
For more information, see Citrix SD-WAN. From release 12.1 49.xx, you can deploy a Citrix SD-WAN VPX instance on Citrix ADC SDX 14XXX and SDX 115XX appliances. For more information, see the following documents: • Citrix ADC SDX 14020, SDX 14030, SDX 14040, SDX 14060, SDX 14080, and SDX 14100 •... - Page 378 • Citrix ADC SDX platform license Citrix SD-WAN VPX requirements The Citrix SD-WAN VPX on SDX platform can act both as a site and MCN. The MCN can handle 1 Gb/s bidirectional throughput and 64 sites. Supported throughput for MCN and site •...
- Page 379 Data center topology You can deploy a Citrix SD-WAN VPX appliance on a Citrix ADC SDX in policy-based route (PBR) mode or in inline mode. See scenario 1 and 2 for topologies for these two supported modes. For more infor-...
- Page 380 Citrix SD-WAN Platforms Follow these steps to provision the Citrix SD-WAN VPX appliance. 1. Log on to the Citrix ADC SDX appliance. 2. Navigate to Configuration > SD-WAN > Instances. 3. Select Software Images > Upload and upload the SD-WAN XVA file.
-
Page 381: Standard Edition In Aws For Cloud Watch Support
• Configuration • Configuring the virtual path service between the MCN and client sites Related information For more information about getting started with a Citrix SD-WAN appliance, see Citrix SD-WAN. For more about Citrix ADC SDX appliance, see Citrix ADC SDX. -
Page 382: Citrix Sd-Wan Vpx Wanop
Citrix SD-WAN VPX WANOP June 19, 2020 Citrix SD-WAN WANOP VPX is a virtual Citrix SD-WAN appliance that can be hosted on Citrix XenServer, VMware ESX or ESXi, Microsoft Hyper-V, and Amazon AWS-virtualization platforms. An SD-WAN WANOP VPX appliance supports most of the features of a physical SD-WAN WANOP appliances. -
Page 383: Installing Sd-Wan Wanop Edition Ami On Amazon Aws
• 10 Mbps • 20 Mbps • 45 Mbps • “Bring your own license,” which uses a standard Citrix license to determine the licensed band- width. Besides the hardwired licensing, the major difference between SD-WAN WANOP-VPX for Amazon AWS is that it supports only a single port for both management and acceleration. This means that the appliance cannot be used in inline mode. - Page 384 3. Use your Amazon AWS account credentials to sign in. This takes you to the Amazon Web Services page. 4. Click EC2 in the Compute & Networking section, then click Launch Instance. © 1999-2021 Citrix Systems, Inc. All rights reserved.
- Page 385 6. In the Request Instance Wizard dialog box, click AWS Marketplace tab. 7. In the Search text field, type SD-WAN to search for the SD-WAN AMI, and click Search. On the search result page, select one of the Citrix SD-WAN offerings On the Citrix SD-WAN page, click Continue.
- Page 386 Citrix SD-WAN Platforms 9. On the Request Instance Wizard page, type 1 in the Number of Instances text box, and from the Instance Type drop-down list, select Large (m1.large, 7.5GIB). © 1999-2021 Citrix Systems, Inc. All rights reserved.
- Page 387 12. On the Request Instances Wizard page, enter a name for the EC2 instance in the Value text box, and then click Continue. On the Request Instances Wizard page, select one of the three Kay Pair options and then click Continue. © 1999-2021 Citrix Systems, Inc. All rights reserved.
- Page 388 13. Verify the EC2 instance configuration details, and then click Launch to launch the EC2 instance. 14. Click Close to close the Launch Instance Wizard dialog box. The new EC2 instance is launched successfully. © 1999-2021 Citrix Systems, Inc. All rights reserved.
-
Page 389: Disabling The Source/Destination Check Feature
3. Right-click the new EC2 instance and then select Change Source/Dest Check from the popup menu. 4. In the Change Source / Dest. Check dialog box, click Yes, Disable to disable the feature. Configuring SNMP Monitoring for the SD-WAN WANOP Edition AMI on May 23, 2019 © 1999-2021 Citrix Systems, Inc. All rights reserved. -
Page 390: Limitations And Usage Guidelines For The Sd-Wan Wanop Edition Ami Instances On Aws
• Management Station IP (set to the NSIP of the SD-WAN VPX on AWS) 5. Click Add. Limitations and Usage Guidelines for the SD-WAN WANOP Edition AMI Instances on AWS May 23, 2019 © 1999-2021 Citrix Systems, Inc. All rights reserved. -
Page 391: Deploy Sd-Wan Wanop Vpx On Microsoft Azure
Citrix SD-WAN WANOP as a standalone VPX in Azure Cloud. However, you can deploy Citrix SD-WAN WANOP VPX along with Citrix ADC VPX in Azure cloud infras- tructure. The Citrix ADC VPX uses cloud connector to create an IPsec tunnel, while the SD-WAN WANOP VPX accelerates the connections, providing LAN-like performance for applications. - Page 392 Citrix SD-WAN WANOP VPX. The Citrix SD-WAN WANOP VPX processes the packets, optimizes it, and sends it back to Citrix ADC VPX. The Citrix ADC VPX sends the packet to the destination. On the return path, the Citrix ADC VPX forwards the packets to Citrix SD-WAN WANOP VPX for optimization.
- Page 393 1. In Microsoft Azure, navigate to Home > Marketplace > Networking, search for Citrix SD-WAN WANOP and install it. 2. On the Citrix SD-WAN WAN OP page, from the drop-down list select Resource Manager and click Create. The Create Citrix SD-WAN WAN Optimization page appears.
- Page 394 Citrix SD-WAN Platforms 5. In the Citrix SD-WAN WANOP settings section, configure the setting for the Citrix SD-WAN WANOP VPX as per your requirements. Click OK. © 1999-2021 Citrix Systems, Inc. All rights reserved.
- Page 395 Citrix SD-WAN Platforms 6. The configuration that you provided in previous steps is validated and applied. If you have con- figured correctly, the validation passed message appears. Click OK. © 1999-2021 Citrix Systems, Inc. All rights reserved.
-
Page 396: Citrix Sd-Wan Vpxl
Citrix SD-WAN VPXL August 11, 2020 Citrix SD-WAN VPXL-SE is an enhanced version of the SD-WAN VPX-SE platform. Depending on the RAM/CPU/Disk configuration, the VPX platform can be operated either as VPX-SE or VPXL-SE. It is avail- able on all VPX-SE platforms including Azure and AWS. - Page 397 Citrix SD-WAN Platforms The Citrix SD-WAN VPXL-SE platform can handle up to 256 virtual paths when provisioned as an MC- N/RCN. Following are the configuration requirements for the VPXL-SE platform. • 16 GB memory and 16 CPU cores. • 250 GB of HDD.
- Page 398 Similarly, the steps to configure and deploy VPXL-SE in AWS is similar to the steps for deploying VPX-SE appliance in AWS with the only difference of selecting disk size of 40 GB and instance of m4.4x large. © 1999-2021 Citrix Systems, Inc. All rights reserved.
-
Page 399: Common Hardware Components
LCD display and LED status indicators The LCD display on the front of every appliance displays messages about the current operating status of the appliance. These messages communicate whether your appliance has started properly and © 1999-2021 Citrix Systems, Inc. All rights reserved. - Page 400 Port Type LED Location LED Function LED Color LED Indicates Ethernet (RJ45) Left Speed No connection, or a traffic rate of 10 megabits per second (Mbps). Green Traffic rate of 100 Mbps. © 1999-2021 Citrix Systems, Inc. All rights reserved.
- Page 401 On each power supply, a bicolor LED indicator shows the condition of the power supply. The LEDs of the AC power supplies for each appliance are different from the LEDs of the other appliances. Table 2. LED Power Supply Indicators © 1999-2021 Citrix Systems, Inc. All rights reserved.
- Page 402 10/100/1000Base-T copper Ethernet ports, 1-gigabit copper and fiber 1G SFP ports, 10- gigabit fiber SFP+, and 10G Base-T, ports. All Citrix SD-WAN appliances have a combination of some or all of these ports. For details on the type and number of ports available on your appliance, see the section describing that platform.
- Page 403 • You cannot insert a fiber 1G transceiver into a 10G slot. • You cannot insert a 10G transceiver into a 1G slot. The following tables list the maximum distance specifications for Citrix SD-WAN pluggable media (1G SFP and 10G SFP+ transceivers).
- Page 404 Typical Reach (m): 550m Fiber type: 50/125um MMF, 400MHz-km Typical Reach (m): 550m Fiber type: 62.5/125um MMF, 200MHz-km (OM1) Typical Reach (m): 300m Fiber type: 62.5/125um MMF, 160MHz-km Typical Reach (m): 300m © 1999-2021 Citrix Systems, Inc. All rights reserved.
- Page 405 • SD-WAN 1100 SE and PE Long reach fiber 1G SFP distance specifications Description: 1G SFP Ethernet long range (10 km) - Single Transmitter wavelength (nm): 1310 nm (nominal) Fiber type: 9/125um SMF © 1999-2021 Citrix Systems, Inc. All rights reserved.
- Page 406 Transmitter wavelength (nm): 1310nm (nominal) Fiber type: 9/125um SMF Typical reach (m): 10km Citrix direct attached (DAC) copper TwinAx 10G SFP+ passive cables Description: 1m DAC SFP+ cable for up to 1m distance Description: 3m DAC SFP+ cable for up to 3m distance Description: 5m DAC SFP+ cable for up to 5m distance ©...
-
Page 407: Field Replaceable Units
Citrix SD-WAN field replaceable units (FRU) are components that can be quickly and easily removed from the appliance and replaced by the user or a technician at the user’s site. The FRUs for a Citrix SD- WAN appliance include DC or AC power supplies, solid-state or hard-disk drives, and a direct attach cable (DAC). - Page 408 Note: Citrix SD-WAN appliances emit a high-pitched alert if one power supply fails or if you con- nect only one power cable to an appliance in which two power supplies are installed. To silence the alarm, press the small red button on the back panel of the appliance.
- Page 409 Important: When you insert the drive, make sure that the Citrix product label is at the top if the drive is inserted horizontally or at the right if the drive is inserted vertically.
- Page 410 A hard disk drive (HDD) stores logs and other data files. Files stored on the HDD include the newnslog files, dmesg and messages files, and any core/crash files. The HDD comes in various capacities, de- pending on the Citrix SD-WAN platform. Hard drives are used for storing files required at runtime. An HDD is mounted as /var.
-
Page 411: Ports
Note Some Citrix SD-WAN appliances do not require SFP transceivers. Ports are used to connect the appliance to external devices. The Citrix SD-WAN appliances support RS232 serial ports, 10/100/1000Base-T copper Ethernet ports, fiber 1G SFP ports, and 10-gigabit fiber SFP+ ports. All SD-WAN appliances have a combination of some or all of these ports. For details on the type and number of ports available on your appliance, see the section describing that platform. -
Page 412: Power Supply
Power Supply January 28, 2020 Citrix SD-WAN appliances are configured with a single power supply. For an SD-WAN 3000 WANOP appliance, you can order a second power supply. Citrix SD-WAN 4000, 5000 WANOP/SE, 4100, and 5100 SE appliances are configured with dual power supplies but can operate with only one power supply. - Page 413 Replace an AC power supply with another AC power supply. All power supplies must be of the same type (AC or DC). Note: You can replace one power supply without shutting down the appliance, provided the other power supply is working. © 1999-2021 Citrix Systems, Inc. All rights reserved.
- Page 414 Citrix SD-WAN Platforms To install or replace an AC power supply on a Citrix SD-WAN 4000/5000 appliance 1. Align the semicircular handle perpendicular to the power supply. Loosen the thumbscrew and press the lever toward the handle and pull out the existing power supply, as shown in the fol- lowing figure.
- Page 415 2. Carefully remove the new power supply from its box. 3. On the back of the appliance, align the power supply with the power supply slot. © 1999-2021 Citrix Systems, Inc. All rights reserved.
-
Page 416: Solid-State Drive
Replace solid-state drive The SD-WAN 4000/5000 software is stored on the solid-state drive (SSD). For Citrix SD-WAN 410 appliance, the on-board SATA disk controller must support at least two devices. Support for SATAv3 (6 Gbps) is available. To replace a solid-state drive 1. -
Page 417: Hard Disk Drive
Important: When you insert the drive, make sure that the Citrix product label is at the top if the drive is inserted horizontally or at the right if the drive is inserted vertically. -
Page 418: Install And Remove 1G Sfp Transceivers
To seat the drive, close the handle flush with the rear of the appliance so that the hard drive locks securely into the slot. Important: When you insert the drive, make sure that the Citrix product label is at the top. Figure 2. Inserting the Replacement Hard Disk Drive 5. - Page 419 6. If you are using a fiber 1G SFP transceiver, do not remove the dust caps attached to the transceiver and the cable until you are ready to insert the cable. Note The illustration in the following figures might not represent your actual appliance. © 1999-2021 Citrix Systems, Inc. All rights reserved.
-
Page 420: Install And Remove 10G Sfp+ Transceivers
Important SD-WAN 4100/5100 appliances do not support 10G SFP+ transceivers provided by vendors other than Citrix Systems. Attempting to install third-party 10G SFP+ transceivers on your SD-WAN 4100/5100 appliance voids the warranty. To install a 10G SFP+ transceiver 1. -
Page 421: Regulatory Compliance
5. Put the 10G SFP+ transceiver into its original box or another appropriate container. Regulatory compliance November 17, 2020 Supplier’s declaration of conformity The FCC Compliance Statements listed on this page apply to all Citrix SD-WAN hardware models. Responsible Party – U.S. Contact Information: Citrix Systems, Inc. -
Page 422: Taiwan Bsmi Rohs Statement
Citrix SD-WAN 110-WiFi-SE Compliance • EU Declaration of Conformity Taiwan BSMI RoHS statement May 23, 2019 The following tables are a declaration of the presence condition of restricted substances in Citrix SD- WAN hardware appliances. © 1999-2021 Citrix Systems, Inc. All rights reserved. - Page 423 Citrix SD-WAN Platforms © 1999-2021 Citrix Systems, Inc. All rights reserved.
- Page 424 © 2021 Citrix Systems, Inc. All rights reserved. Citrix, the Citrix logo, and other marks appearing herein are property of Citrix Systems, Inc. and/or one or more of its subsidiaries, and may be registered with the U.S. Patent and Trademark Office and in other countries.
Need help?
Do you have a question about the SD-WAN Series and is the answer not in the manual?
Questions and answers