
Related Manuals for HID VertX EVO V1000


Summary of Contents for HID VertX EVO V1000
- Page 1 15370 Barranca Parkway Irvine, CA 92618 ™ VertX EVO V1000 Installation Guide © 2003 - 2011 HID Global Corporation. All rights reserved. July 2011 Document Number: 71000-901 Rev A.1...
-
Page 2: Table Of Contents
Battery Replacement ..........................13 Network Defaults Jumper........................13 Firewall............................14 Contact Information..........................14 Regulatory ..............................15 Configuration Checklist - Static ......................16 VertX Installation Worksheet ........................A1 July 2011 Page 2 of 19 © 2003 - 2011 HID Global Corporation. All rights reserved. -
Page 3: Introduction
TCP/IP network with the capability of a variety of applications. For example, the VertX EVO Access Controllers are a cost-effective method for two-way communication using Ethernet between a computer and a V1000. In addition, the VertX EVO V1000 communicates through a RS-232 serial port and multi-drop RS-485 ports. -
Page 4: Overview
VertX EVO V1000 Installation Guide Overview The following outlines what is required to install VertX EVO controllers. July 2011 Page 4 of 19 © 2003 - 2011 HID Global Corporation. All rights reserved. -
Page 5: Step 1 Connect
CAUTION: Stacking the VertX EVO devices without the cover risks the danger of breaking the LEDS unless spacers are used for separation. July 2011 Page 5 of 19 © 2003 - 2011 HID Global Corporation. All rights reserved. -
Page 6: Wiring Vertx Evo
VertX EVO V1000 Installation Guide Wiring VertX EVO Warning: VertX EVO V1000 is a NON-PoE device. DO NOT connect J1 (Ethernet port) to a PoE capable port. This applies to both direct PoE Power Sourcing Equipment (Endspan PSE) and PoE injector (Midspan PSE) equipment. Not all PSE's correctly detect Non-PoE-capable devices, and such PSE's may not function as expected when connected to Non-PoE equipment. - Page 7 Go to support.hidglobal.com, see Solution 891 - How do I wire a High In-Rush Current locking device to VertX/Edge/Edge Solo?. July 2011 Page 7 of 19 © 2003 - 2011 HID Global Corporation. All rights reserved.
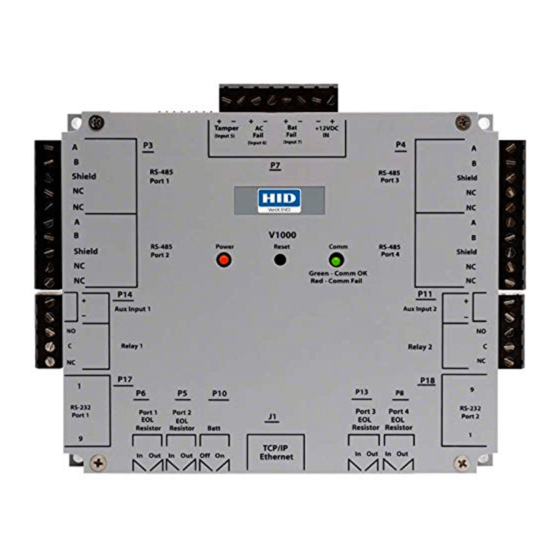
- Page 8 V1000 P14 Pins 1/2 P11 Pins 4/3 P7 Pins 8/7 - Tamper P7 Pins 6/5 - AC Fail P7 Pins 4/3 - Batt Fail July 2011 Page 8 of 19 © 2003 - 2011 HID Global Corporation. All rights reserved.
-
Page 9: Step 2 Contact
Blink OFF. When verification of the controller is complete, click Blink Click Configure Unit to open the Basic Configuration page of that controller Go to Step 3 Configure, page 10 July 2011 Page 9 of 19 © 2003 - 2011 HID Global Corporation. All rights reserved. -
Page 10: Virtual Port
If using a DHCP TCP/IP network, this information is configured automatically. 3.1.3 Host Communication Setup Enter the Host Name, and the Here I Am Interval collected on the Configuration Checklist, page 15. July 2011 Page 10 of 19 © 2003 - 2011 HID Global Corporation. All rights reserved. -
Page 11: Confirmation
Now that the controller is connected, contacted and configured, communicate with the controller using the host. Basic setup is now complete! Additional trouble-shooting tools are available on the System Status Supplemental Configuration (page 12) screens. July 2011 Page 11 of 19 © 2003 - 2011 HID Global Corporation. All rights reserved. -
Page 12: Appendices
Initially, all of the interface panels are selected by default to be updated Note: Depending on the VertX controller and system, it may take several minutes to complete a download. July 2011 Page 12 of 19 © 2003 - 2011 HID Global Corporation. All rights reserved. -
Page 13: Battery Replacement
CAUTION: During the controller rebooting process, all network configuration information is overwritten and returned to the original defaults. Configure the controller for your installation parameters. See 3.1 VertX Communications, page 10. Replace the V1000 cover. July 2011 Page 13 of 19 © 2003 - 2011 HID Global Corporation. All rights reserved. -
Page 14: Firewall
+44 1440 714 840 Asia-Pacific HID Asia Pacific Ltd. (Hong Kong) support: support.hidglobal.com sales: www.hidglobal.com/main/sales telephone: (852) 3160 9800 fax number: (852) 3160 4809 July 2011 Page 14 of 19 © 2003 - 2011 HID Global Corporation. All rights reserved. -
Page 15: Regulatory
CE Mark – Europe (EU) C-Tick – Australia and New Zealand VCCI – Japan NCC--Taiwan SRRC--China IDA--Singapore KCC--Korea UL Recognized Component (UL294 and UL1076) July 2011 Page 15 of 19 © 2003 - 2011 HID Global Corporation. All rights reserved. -
Page 16: Configuration Checklist - Static
Telnet Enabled Virtual Port Enabled Host Addressing (IP Address or Host Name) Here I Am Interval (sec) TCP/IP Connection Port TCP/IP Listen Port Login Password July 2011 Page 16 of 19 © 2003 - 2011 HID Global Corporation. All rights reserved. - Page 17 VertX EVO V1000 Installation Guide Intentional Blank July 2011 Page 17 of 19 © 2003 - 2011 HID Global Corporation. All rights reserved.
-
Page 18: Vertx Installation Worksheet
Relay 2: Relay 3: Relay 4: Relay 5: Relay 6: Relay 7: Relay 8: Relay 9: Relay 10: Relay 11: Relay 12: Input 1: Input 2: July 2011 Page A1 © 2003 - 2011 HID Global Corporation. All rights reserved. - Page 19 Relay 2: Relay 3: Relay 4: Relay 5: Relay 6: Relay 7: Relay 8: Relay 9: Relay 10: Relay 11: Relay 12: Input 1: Input 2: July 2011 Page A2 © 2003 - 2011 HID Global Corporation. All rights reserved.
Need help?
Do you have a question about the VertX EVO V1000 and is the answer not in the manual?
Questions and answers