
Related Manuals for ujk technology OTORO TTX2

Summary of Contents for ujk technology OTORO TTX2
- Page 1 Basch Kit Code 103570 Makita/Dewalt Kits Code 103571 Original Instructions AT&M: 14/07/2020 BOOK REF: 103572 Planing Mode Planing Width Mode BOOK VERSION: 02 Moulding Mode Router Lift Mechanism OTORO Palm Router Table...
- Page 2 UJK Technology OTORO Palm Router Table has been licensed by OTORO The adjustable part works by using a ‘folding wedge’ suited to the needs of any craftsperson wishing to DESIGN INC., Japan, based on patented design of OTORO Multipurpose...
-
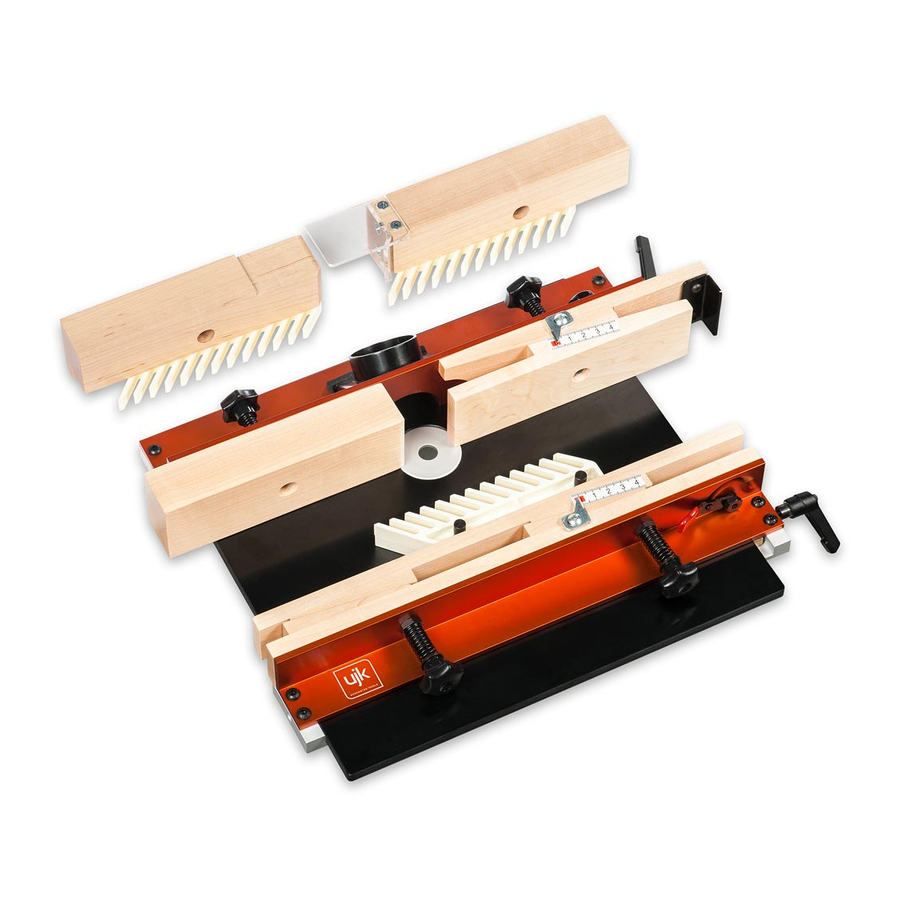
Page 3: Parts Breakdown
Parts Breakdown Model Number OTORO TTX2 Front Planing Width Fence 1 No Angled fence casting with operating lever to set the thickness. 2 No Two part wooden fence with machined slots and depth scale and pointer. 2 No Threaded clamping knobs with two washers and springs. -
Page 4: Specification
UJK Technology OTORO Palm Router Table Kits Specification Bosch Kit Code 103570 Makita/DeWALT Kit Code 103571 Product Name UJK Technology OTORO Palm Router Table Model TTX2 Product Dimensions Width 410 x Depth 300mm x Height 240mm Table Size Width 315mm x Depth 300mm x Thickness 8mm... - Page 5 Assembly Router Table Planing Width Featherboard Fence Clamping Handle Fine-feed adjusting knob Continues Over..
- Page 6 Assembly Front/Rear Fence Rear Featherboard Fence Brass clamping block...
- Page 7 Router Assembly/Setup Bosch 1/4" GKF 600 Router Select the appropriate table insert Loosen the caphead bolts Make sure the table is secure Fine feed lock Lock Un-lock Table insert Fine-feed adjuster Raise Un-lock Secure the router in place Continues Over..
- Page 8 Router Assembly/Setup Makita 1/4" Router Trimmer DeWALT 1/4" D26204K Router Sleeve lip Remove the fine-feed control Makita sleeve Secure the router in place Please note you will not be able to use the ‘Fine-feed function control’ as the ‘DeWALT’ router control head is too bulky. Please remove and place safely aside.
-
Page 9: Parts Illustration & Description
Parts Illustration & Description Rear planing fence assembly Out-feed clamping knob Table insert Dust extraction outlet Planing scale and pointer In-feed clamping knob Planing assembly clamping handle Out-feed fence Router table In-feed fence Featherboard Adjustable planing fence Planing width operating lever Front planing width fence assembly Planing width clamping knobs Brass clamping block... - Page 10 Parts Illustration & Description Planing width scale/pointer Rear planing featherboard fence Planing width operating lever Out-feed fence clamping knob 48.5mm Dust extraction outlet In-feed fence clamping knob Planing scale/pointer Planing width stop Adjustable fence clamping knob Planing assembly clamping handle...
- Page 11 Parts Illustration & Description Table inserts Router housing Adjusting gib strip grub screws Height assembly clamping handle Table clamping foot Fine-feed locking wheel Router height operating lever Fine-feed control knob Bristol locking handle...
- Page 12 Router Table Modes Planing Mode 1. Using a known straight edge set the fence flush with the cutter, see figs 1-2. 2. The in-feed fence works on a router of 10-1 so when the scale reads 5mm this will make a 0.5mm cut, see figs 3-4.
- Page 13 Router Table Modes Planing Width Mode 1. Setup the router table as shown in figure 1. 2. With the timber in position, adjust the front planing fence so the timber is in contact with the router cutter’s body, see fig 2. (NOTE: Not the TCT blade) This will create a 1mm cut.
- Page 14 Router Table Modes Moulding Mode 1. Set the cutter’s height using the operating lever, see fig 1-2. 2. Set both fences so they are in line with the bearing of the cutter, see fig 3. 3. Before making your first cut, make sure the material is firmly against the in-feed fence, (more right to left), see fig 4.
- Page 15 Router Table Modes Planing Width Tips If you want to Plane thin strips of of timber, follow the steps as shown using double sided tape, see figs 1 to 7. Double sided tape Timber...
-
Page 16: Exploded Diagram/Parts List
Exploded Diagram/Parts List... - Page 17 Exploded Diagram/Parts List PARTS DESCRIPTION SIZE 24081008 Adaptor-small 24081102 Stroke controller 24081007 Adaptor-large 50304010 Wave washer WW-10 50105028 Phillips pan screw M6x1.0Px30L 24081046 Adaptor-medium 50301102 Flat washer 8]2x16xlt 24081009 Clamp body 24081018 Guide rod 50206002 Hex nut M8x1.25P 50201013 Hex nut M6H.0P 24081020 Spring...
- Page 18 Notes...
- Page 19 Notes...
- Page 20 The UJK brand was launched by Axminster in 2012 with the intention of encompassing a range of carefully selected products that Axminster held in particular high esteem. Many of these products are designed by and manufactured by Axminster. The range includesrouting, measuring and wood jointing products and has proven to be extremely popular.
Need help?
Do you have a question about the OTORO TTX2 and is the answer not in the manual?
Questions and answers