Table of Contents
Advertisement
Advertisement
Table of Contents

Related Manuals for Samsung SAMSUNG_BL103


Summary of Contents for Samsung SAMSUNG_BL103
-
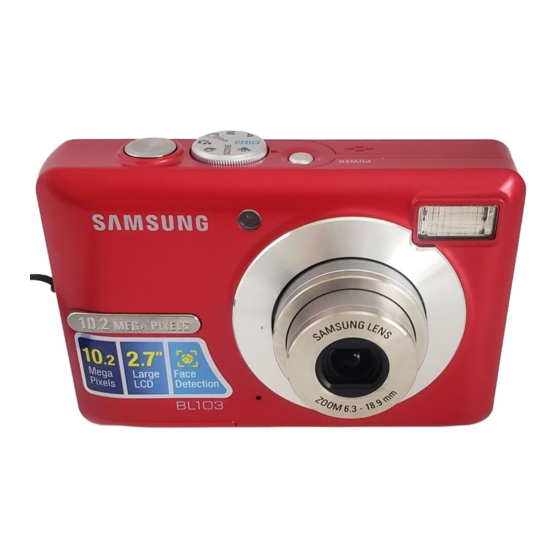
Page 2: Getting To Know Your Camera
A/S centre. Please check that the camera is operating properly prior to when you intend to use it (e.g. for a trip or an important event) to avoid disappointment. Samsung takes no responsibility for any loss or damage that may result from camera malfunction. - Page 3 Battery and camera may become hot during prolonged use and it may result in camera malfunction. Should this be the case, allow the camera to sit idle for a few minutes to allow it time to cool. Do not leave this camera in places subject to extremely high temperatures, such as a sealed vehicle, direct sunlight or other places of extremes in temperature.
- Page 4 Otherwise the battery may leak corrosive electrolyte and permanently damage the camera’s components. Do not fi re the fl ash while it is in contact with hands or objects. Do not touch the fl ash after using it continuously. It may cause burns.
-
Page 5: Table Of Contents
Contents Pausing while recording a movie clip (Successive Recording) Things to Watch Out for When Taking Pictures Using the camera buttons to set the camera POWER button SHUTTER button ZOOM W/T button Face Detection(FD) button Function Description / Info / Up button... - Page 6 Contents Setting up the Date / Time / Date type Start up image Display Bright Quick view Display SAVE Settings Formatting a memory Initialisation File name Imprinting the recording date Auto power off Selecting Video out type Auto Focus lamp...
- Page 7 Before contacting a service centre Specifi cations Software Notes SOFTWARE System Requirements About the software Setting up the application software Starting PC mode Removing the removable disk Samsung Master Setting up the USB Driver for MAC Using the USB Driver for MAC...
-
Page 8: System Chart
System chart Please check that you have the correct contents before using this product. The contents can vary depending on the sales region. To buy the optional equipment, contact your nearest Samsung dealer or Samsung service centre. Included items AA Alkaline... - Page 9 Identifi cation of features Front & Top Mode dial Shutter button Self-timer lamp / AF sensor Microphone Power button Speaker Flash Lens/ Lens cover USB / AV connection terminal...
- Page 10 Identifi cation of features Back LCD monitor Camera status lamp Face Detection(FD) button Fn / Delete button 5 function button Play mode / Printer button Zoom T button (Digital zoom) Zoom W button (Thumbnail) E (Effects) button Strap eyelet...
- Page 11 Identifi cation of features Bottom Memory card slot Battery chamber cover Memory card cover Tripod socket To open the battery chamber cover, slide it in the direction shown above. 5 Function button Battery chamber Function Description / Information / Up button...
- Page 12 Identifi cation of features Self-timer lamp Icon Status Description - For the fi rst 7 seconds, the lamp blinks at 1 second intervals. Blinking - For the fi nal 3 seconds, the lamp blinks quickly at 0.25-second intervals. For the 2 seconds, the lamp blinks quickly at Blinking 0.25-second intervals.
-
Page 13: Connecting To A Power Source
Important information about battery usage. When camera is not in use, turn off the power. Please remove the battery if the camera will not be used for long periods. Batteries can lose power over time and are prone to leaking if kept inside the camera. -
Page 14: Inserting The Memory Card
When using the camera and the battery in a place that is excessively cold or hot, the battery status on the LCD may be different from the actual battery status. Inserting the memory card Insert the memory card as shown. -
Page 15: Instructions On How To Use The Memory Card
Instructions on how to use the memory card Be sure to format the memory card (see p.48) if you are using a newly purchased memory card for the fi rst time, if it contains data that the camera cannot recognise, or if it contains images captured with a different camera. - Page 16 fi les from being deleted or formatted. By sliding the switch to the bottom of the SD/SDHC memory card, the data will be protected. By sliding the switch to the top of the SD/SDHC memory card, the data protection will be cancelled.
- Page 17 LCD monitor indicator The LCD monitor displays information about the shooting functions and selections. [Image & Full Status] Description Recording mode Optical / Digital Zoom bar / Digital Zoom rate Voice Memo / Without Sound Number of available shots remaining...
-
Page 18: Starting The Recording Mode
LCD monitor. 7. Press the shutter button to capture an image. If the auto focus frame turns to red when you press the shutter button down half way, it means that the camera cannot focus on the subject. Should this be the case, the camera is unable to capture an image clearly. - Page 19 High Shutter speeds can capture a moving object in a still image as if the object is not moving. Low Shutter speeds can capture a moving object with an ‘active’ effect. How to use the DIS mode ( Digital Image Stabilisation (DIS) mode.
- Page 20 Function that can be used when focusing is diffi cult Functions that can be used when the image is blurred Function that can be used when fi lming in the dark Function that can be used when adjusting the picture brightness...
- Page 21 3. Press the shutter button to capture an image. The scene modes are listed below. [Nightscene] ) : Use this for shooting still images at night or in other dark conditions. [Children] ) : To take a picture of fast moving objects, for example, children.
-
Page 22: Pausing While Recording A Movie Clip
Starting the recording mode How to use the Movie clip mode ( A movie clip can be recorded for as long as the available recording time of the memory capacity allows. 1. Select the Movie clip mode by rotating the Mode dial. ( The Movie clip mode icon and available recording time will display on the LCD monitor.). -
Page 23: Things To Watch Out For When Taking Pictures
Things to Watch Out for When Taking Pictures Pressing the shutter button down half way. Lightly press the shutter button to confi rm focus and fl ash battery charge. Press the shutter button all way down to take the picture. -
Page 24: Using The Camera Buttons To Set The Camera
Using the camera buttons to set the camera The recording mode function can be set up by using the camera buttons. POWER button Used for turning the camera’s power on / off. If there is no operation during the specifi ed time, the camera's power will be turned off automatically to save battery life. - Page 25 DIS modes, movie mode and Face Detection. W button Take care not to touch the lens to avoid taking an unclear image and possibly causing camera malfunction. If the image is dim, turn the camera power off and on again to modify the lens [WIDE zoom] position.
-
Page 26: Face Detection(Fd) Button
Face Detection(FD) button Face Detection(FD) This mode detects the face position of the subject automatically and then sets the focus and exposure. Select this mode for quick and easy face picture. Selectable modes: Auto, Program, Manual, DIS, Photo Help Guide, Portrait, Children, Beach &... -
Page 27: Function Description / Info / Up Button
Self Portrait icon appears ( Pressing the FD button 2. For self-fi lming, set the camera lens towards the face of the object. It automatically detects the face of the object, and emits a guiding sound. 3. Start fi lming by pressing the shutter button. -
Page 28: Macro / Down Button
While the menu is showing, press the DOWN button to move from the main menu to a sub menu, or to move down the sub menu. When the menu is not showing, you can use the MACRO ( ) / DOWN button to take macro pictures. -
Page 29: Focus Lock
SCENE Mode Auto macro Macro Focus lock To focus on a subject not positioned in the centre of the picture, use the focus lock function. : Infi nity focus range) Normal Using the Focus Lock 1. Ensure the subject is in the centre of the autofocus frame. -
Page 30: Flash / Left Button
Flash range Normal Macro WIDE TELE WIDE AUTO 0.8 ~ 3.0 0.8 ~ 2.5 0.4 ~ 0.8 0.5 ~ 0.8 0.4 ~ 3.0 0.5 ~ 2.5 [Selecting the Auto fl ash] (Unit: m) Auto macro TELE WIDE TELE If you press the shutter button after selecting the fl ash, the fi rst fl... - Page 31 The intensity of the fl ash Fill in fl ash will be automatically controlled to suit the prevailing conditions. The fl ash operates with a slow shutter speed to obtain a balanced correct exposure. In poor lighting conditions the camera shake Slow synchro warning indicator ( LCD monitor.
-
Page 32: Self-Timer / Right Button
Self-timer ( ) / Right button When the menu is displayed on the LCD monitor, pressing the Right button makes the cursor shift to the right tab. When the menu is not displayed on the LCD monitor, the RIGHT button operates as the Self-timer ( ) button. -
Page 33: Menu / Ok Button
Starting the Stopping the detection OK button - When the menu is displayed on the LCD monitor, this button is used for shifting the cursor to the sub menu or for confi rming data. The detection range of Motion Timer RECORDING... -
Page 34: E (Effect) Button
It is possible to add special effects to your images by using this button. - Still image mode : You can select the colour and image adjust menu. In the Auto, Portrait mode, you can select the [COLOR] menu only. -
Page 35: E (Effect) Button : Sharpness
1. Select ( ) by pressing the Up/Down button and a bar for selecting the sharpness will be displayed. 2. Change the Sharpness by pressing the Left/Right button. 3. Press the Shutter button to take an image. -
Page 36: Fn Button
*1: This menu is only available in the Children scene mode. ( How to use the Fn menu : Selectable) 1. Press the Fn button in an available mode. 2. Select a desired menu by pressing the Up / Down button. And Page p.36 p.36 p.37... -
Page 37: Size
QUALITY Fine [ STILL IMAGE mode ] This fi le format complies with the DCF (Design rule for Camera File system). JPEG (Joint Photographic Experts Group) : JPEG is the image compression standard developed by the Joint Photographic Experts Group. This type of compression is most commonly used for compressing photos and graphics because it can compress the fi... -
Page 38: Metering
If less than 3 pictures are available in the memory, the AEB shooting is not available. It is best to use a tripod for the AEB shooting as the time to save each image fi le is longer and blurring caused by camera shake may occur. -
Page 39: Iso
Fn button You can select the ISO sensitivity when taking pictures. The speed or specifi c light-sensitivity of a camera is rated by ISO numbers. [Auto] : The camera's sensitivity is automatically changed by variables such as lighting value or subject brightness. -
Page 40: White Balance
Exposure compensation This camera automatically adjusts the exposure according to the ambient lighting conditions. You can also select the exposure value by using the Fn button. Compensating Exposure 1. Press the Fn button, and then use the UP and DOWN buttons to select the exposure compensation icon ( 2. -
Page 41: Using The Lcd Monitor To Adjust The Camera Settings
Using the LCD monitor to adjust the camera settings You can use the menu on the LCD monitor to set up recording functions. The items indicated by are default settings. Mode Menu Sub menu Center AF Multi AF Foucs Area... -
Page 42: Auto Focus Type
Auto Focus type You can select your preferred Focus Area according to the shooting conditions. [Center AF] : The rectangular area in the center of the LCD monitor will be focused [Multi AF] : This camera selects all of available AF point from the 9 AF points. -
Page 43: Voice Recording
Move 2. Press the Pause button ( to resume the recording. 3. If you wish to stop recording, press the shutter button again. A distance of 40cm between you and the camera (microphone) is the best distance to record sound. -
Page 44: Recording The Movie Clip Without Voice
Select [On] of [Voice Mute] menu in the Movie clip mode. ( ) icon will appear on the LCD monitor. Press the Shutter button and a movie will record for as long as the memory capacity allows without voice. SCENE mode Use the menu to easily confi... -
Page 45: Sound Menu
Sound menu In this mode, you can set up sound settings. You can use the setup menu in all camera modes, except Voice Recording mode. The items indicated by are default settings. Mode Menu Sub Menu Volume Medium High Sound 1... -
Page 46: Beep Sound
Sound ( Beep Sound If you set sound to ON, a beep will sound when buttons are pressed, letting you know the camera operation status. - [Beep Sound] sub menu : [Off], [Sound 1, 2, 3] AF sound If you set AF sound to on, AF sound will be activated when the Shutter button is pressed down half way so that you can be aware of the camera operation status. - Page 47 Menus are subject to change without prior notice. Display ( Language Sub menu Page There is a choice of language that can be displayed on the LCD Alaska monitor. Even if the battery is removed and inserted again, the language setting will be preserved. p.47...
-
Page 48: Setting Up The Date / Time / Date Type
Athens, Helsinki, Rome, Paris, Berlin DST : Daylight Saving Time Start up image You can select the image that is fi rst displayed on the LCD monitor whenever the camera is turned on. - Sub menus : [Off], [LOGO], [User Image]... -
Page 49: Quick View
Be sure to run [Format] on the following types of memory card. - A new memory card, or an unformatted memory card - A memory card that has a fi le this camera can't recognise or one that has been taken from another camera. -
Page 50: Initialisation
Imprint Power Off Video Out Back - The fi rst stored folder name is 100SSCAM, and the fi rst fi le name is SDC10001. - File names are assigned sequentially from SDC10001 SDC10002 - The folder number is assigned sequentially from 100 to 999 as follows: 100SSCAM - Maximum numbers of fi... -
Page 51: Imprinting The Recording Date
fi le. [Date&Time] : The DATE & TIME will be imprinted on the image fi le. The Date & Time are imprinted at the bottom right side of the still image. The imprint function is applied only to still images. -
Page 52: Selecting Video Out Type
- When using a TV as an external monitor, you will need to select the external or AV channel of the TV. - There will be a digital noise on the external monitor, but it is not a malfunction. SETTINGS... -
Page 53: Auto Focus Lamp
[On] : The AF lamp will light up in low light conditions. Selecting a battery type If a battery type is selected, the camera will be optimized according to the selected battery type. [Battery Type] sub Menu : Alkaline / Ni-MH... -
Page 54: Playing Back A Still Image
If the memory card is inserted in the camera, all the camera functions apply only to the memory card. If the memory card is not inserted in the camera, all the camera functions apply only to the internal memory. Playing back a still image 1. -
Page 55: Movie Clip Capture Function
2. Press the play & pause button ( to play back a recorded voice file. - To pause a recorded voice file, while - To resume playback of the voice file, press the play & pause button Play Capture - To rewind the voice file while it is playing, press the Left button. -
Page 56: Lcd Monitor Indicator
Protect Voice Memo Using the camera buttons to set the camera In Play mode, you can use the buttons on the camera to conveniently set up the Play mode functions. Thumbnail ( You can view multiple pictures, enlarge a selected picture, and crop and save a selected area of an image. -
Page 57: Thumbnail / Enlargement Button
OK button. - [No] : The trimming menu will disappear. - [Yes] : The trimmed image will be saved as a new file name, and appear on the LCD monitor. If there is not enough memory space to save the trimmed image, the image can’t be trimmed. -
Page 58: Info / Up Button
- If the menu is displayed Press the DOWN button to move from the main menu to a sub menu, or to move down the sub menu cursor. - If a still image with a voice memo, a voice file, or a movie clip is playing ·In Stop mode ·During playback : Temporarily stops playback. -
Page 59: Left / Right / Menu / Ok Button
RIGHT button to select the next image. - MENU button : When you press the MENU button, the play mode menu will be displayed on the LCD monitor. Pressing it again will return the LCD to the initial display. - Page 60 - The resized image will have a new file name. The [Start Image] image is stored not on the memory card but on the internal memory. - If a new user image is saved, one of the two user images will be Move Exit deleted in order.
- Page 61 E ( Effect ) button : Colour It is possible to add colour effects to your images by using this button. 1. Press the play mode button and press the E button.
- Page 62 PLAY mode functions can be changed by using the LCD monitor. In the PLAY mode, pressing the MENU button displays the menu on the LCD monitor. The menus you can set up in Play mode are Custom Color as follows. To capture an image after setting up the play menu, press the PLAY mode button or shutter button.
-
Page 63: Setting Up The Play Back Function Using The Lcd Monitor
Setting up the play back function using the LCD monitor This menu is available while the camera is connected to a PictBridge supporting printer (direct connection to the camera, sold separately) with a USB cable. Menu Tab Main Menu Sub Menu... -
Page 64: Starting The Multi Slide Show
Start the Multi Slide Show The Multi Slide Show can start only in the [Show Start] menu. 1. Use the Up / Down buttons to select the [Show Start] menu and press the Right button. 2. Select a desired sub menu by pressing the Up / Down button. -
Page 65: Confi Gure Multi Slide Show Effects
Images are displayed at set interval. [Classic] : You can add noise to the image to give a classic feel. [Memories] : Scratches are added to give an old movie effect. [Rhythmic] : Images are displayed with a special effect. -
Page 66: Setting Background Music
Back Back [Voice memo menu] - Press the shutter button to take a picture. The images are saved on the memory. After saving the image, the voice will record for 10 seconds. - To stop the recording, press the shutter button. -
Page 67: Deleting Images
Important shots should be stored on a computer before deletion takes place. The startup image is stored in the camera's internal memory (i.e., not on the memory card) and it will not be deleted even if you delete all files on the memory card. Protecting images This is used to protect specific shots from being accidentally erased (Lock). -
Page 68: Dpof
This function is not available for Movie clips and Voice recording files. When the wide angle image is printed as a wide angle print, 8% of the left and right side of the image may not be printed. Check that your printer can support the wide angle image when you print the image. - Page 69 3. Select a desired sub menu by pressing the UP / DOWN button. If [No] is selected : Cancel the index print setting. If [Yes] is selected : The image will be printed in index format. 4. Press the OK button to confirm the setting. Print size You can specify the print size when printing images stored on the memory card.
-
Page 70: Copy To Card
Back the file name. - When the [Reset] of the [File] setup menu is set : The copied file names start from after the last stored file name. - When the [Series] of the [File] setup menu is set : The copied file names start from after the last captured file name. -
Page 71: Pictbridge
PictBridge You can use the USB cable to connect this camera to a printer that supports PictBridge (sold separately) and print the stored images directly. Movie clips and voice files cannot be printed. Setting up the camera for connection to the printer 1. -
Page 72: Pictbridge : Picture Selection
3. Use the Up / Down buttons to select a desired sub menu and press the OK button. - Select [One Pic] or [All Pics]. A screen where you can set the number of copies to print will appear as shown below. -
Page 73: Pictbridge : Reset
- Areas exposed to severe changes in temperature and humidity. Type - Areas exposed to dust and dirt. Quality Date - Areas exposed to direct sunlight or the inside of a vehicle in hot File Name weather. Reset Back - Environments where there is high magnetism or excessive vibration. - Page 74 Important notes Extremes in temperature may cause problems. - If the camera is transferred from a cold to a warm and humid environment, condensation can form on the delicate electronic circuitry. If this occurs, turn the camera off and wait for at least 1 hour until all moisture is dispersed.
-
Page 75: Warning Indicator
Warning indicator There are several warnings that may appear on the LCD display. [ Card Error!] Memory card error Turn off the camera power and turn it on again Insert the memory card again Insert and format the memory card (p.48) -
Page 76: Before Contacting A Service Centre
Insert fresh batteries. The Camera is turned off automatically Turn on the camera power again. Operation has ceased in a low temperature outside of the camera usage temperature range. Make the camera and battery warm by placing them in your pocket, etc. - Page 77 The camera buttons do not operate Camera malfunction Remove/re-insert battery and switch the camera on A card error has occurred while the memory card is in the camera. Incorrect memory card format Re-format the memory card The images don't play back...
-
Page 78: Specifications
·Play mode : 1.0X ~ 11.4X (depends on image size) LCD Monitor - 2.7" color TFT LCD (230,000 dots) Focusing - Type : TTL auto focus (Multi AF, Center AF, Face Detection AF) - Range Normal Macro Wide 10cm ~ 80cm... - Page 79 2432 2056 2304 Super Fine About 219 About 241 About 282 About 290 About 366 About 1089 About 1907 Fine Normal About 507 About 550 About 619 About 660 About 825 About 2204 About 2419 These figures are measured under Samsung standard conditions and may vary depending on shooting conditions and camera settings.
- Page 80 - Approx. 120g (without batteries and card) Operating Temperature - 0 ~ 40°C Operating Humidity - 5 ~ 85% Software - Samsung Master, Adobe Reader Specifications are subject to change without prior notice. All trademarks are the property of their respective owners.
-
Page 81: Specifi Cations
We cannot, however, be held responsible in any way for damage caused by inappropriate use. -Using a Hand-made PC or a PC and OS that has not been guaranteed by the manufacturer is not covered by the Samsung warranty. -
Page 82: About The Software
CD-ROM drive, the following window should automatically run. Samsung Master : This is the all-in-one multi media software solution. You can download, view, edit and save your digital images and movie clips with this software. This software is only compatible with Windows. -
Page 83: Setting Up The Application Software
Setting up the application software To use this camera with a PC, install the application software first. After this has been done, the stored images in the camera can be moved to the PC and can be edited by an image editing program. - Page 84 Setting up the application software 3. After restarting the computer, connect the PC to the camera with the USB cable. 4. Turn the camera power on. The [Found New Hardware Wizard] will open and the computer will recognise the camera.
-
Page 85: Starting Pc Mode
Internet Explorer. Starting PC mode If you connect the USB cable to a USB port on your PC and then turn on the power, the camera will automatically switch to "computer connection mode". In this mode, you can download stored images to your PC through the USB cable. -
Page 86: Removing The Removable Disk
Downloading stored images You can download the still images stored on the camera to your PC's hard disk and print them or use a photo editing software to edit them. 1. Connect the camera to your PC with the USB cable. -
Page 87: Samsung Master
Opening images directly from the removable disk may be subject to unexpected disconnection. When you upload a file that is not taken by this camera to the Removable Disk, the [File Error!] message will be displayed on the LCD monitor in the PLAY mode, and nothing is displayed in... -
Page 88: Removing The Removable Disk
(The illustrations may differ from those shown depending on the Windows O/S.) 1. Check whether the camera and PC are transferring a file. If the camera status lamp blinks, please wait until the lamp has finished blinking and is constantly on. 2. Double-click the [Unplug or Eject Hardware] icon on the task bar. -
Page 89: Samsung Master
Samsung Master You can download, view, edit and save your images and movies with this software. This software is only compatible with Windows. To start the program, click [Start Programs Samsung Master]. Downloading images 1. Connect the camera to your PC. - Page 90 Media type selection menu : You can select image viewer, image edit and movie edit functions in this menu. Preview window : You can preview an image or a movie clip and check the multi media information. Zoom bar : You can change preview size.
- Page 91 Samsung Master Movie edit : You can get the still image, movie clip, narration, music files together in a movie clip. - Movie clip edit functions are listed below. Edit menu : You can select the following menus. [Add Media] : You can add other media elements to a movie.
-
Page 92: Setting Up The Usb Driver For Mac
Setting up the USB Driver for MAC 1. A USB Driver for MAC is not included with the software CD as MAC OS supports the camera driver. 2. Check the MAC OS version during start-up. This camera is com- patible with MAC OS 10.3. - Page 93 Case 4 When using the USB hub. There may be a problem in connecting the camera to the PC through the USB hub if the PC and the hub are not compatible. Wherever possible, connect the camera to the PC directly.
- Page 94 Legacy USB Support) If you can’t change the menu by yourself, contact to the PC manufacturer or BIOS manufacturer. If the movie clip can’t be deleted, or the removable disk can’t be extracted or an error message displays during the file transfer.
-
Page 95: Fcc Notice
If this equipment does cause harmful interference to radio or television reception, which can be determined by turning the equipment off and on, the user is encouraged to try to correct the interference by one or more of the following measures: - Reorient or relocate the receiving antenna. - Page 96 MEMO...
- Page 97 MEMO...