Table of Contents
Advertisement
Quick Links
Advertisement
Table of Contents

Related Manuals for digicon CATRAX Plus


Summary of Contents for digicon CATRAX Plus
- Page 1 Product Manual plus...
- Page 3 All rights reserved. No part of this publication may be reproduced, transmitted, transcribed, stored in a retrieval system, translated into any language or computer language in any electronic, magnetic, optical, chemical, manual way, or otherwise, without the express written permission from Digicon S.A. Code: 069.31.252 Version: 08...
-
Page 4: Table Of Contents
5.1 Unboxing ...................... 5.2 Floor drilling ....................5.3 Colum fixation ....................5.4 Assembling arms and covers ................5.5 Access to Catrax Plus after assembling .............. 5.5.1 Rear cover ....................5.5.2 Frontal cover....................5.5.3 Column cover ....................6. Optional items .................... -
Page 5: Important Instructions
You can see, below, the symbols that will appear in this manual, signaling important moments. It is essential to pay attention to them. TIP: Indicates something Digicon considers important. CAUTION: Indicates a moment of extreme caution when handling the equipment/product. -
Page 6: Orientations
Keep this manual for future consultations. Ÿ Digicon reserves its right to alter its products at any moment to adapt them to more Ÿ recent technical advancements. Digicon maintains its right to alter the information contained in this manual without Ÿ... -
Page 7: Features Of Catrax Plus
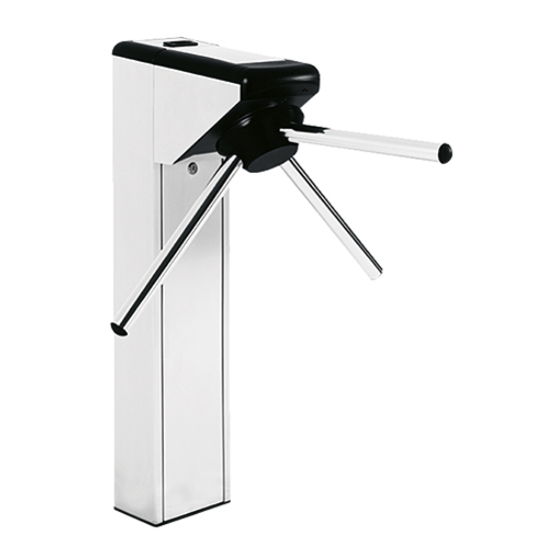
4. Features of Catrax Plus CATRAX Plus, an access controller in the model mini turnstile (column type), presents three bidirectional, equidistant arms at 120 degrees with brushed stainless steel (AISI 304) finishing. The column can present external finishing in brushed stainless steel (AISI 304) or 1020 carbon steel with electrostatic painting in black epoxy powder. -
Page 8: Catrax Plus Operation
If this signal is recognized, the equipment will allow the turning of the arm of CATRAX Plus. After half of the turning is complete (60 degrees), a 400 milliseconds returning signal will be sent, informing the passage direction. After the signal, the arm cannot be returned to the previous position. -
Page 9: Installing/Assembling Catrax Plus
As the items inside the package can vary (depending on the client's requests), it is important to perform a cautious visual inspection before installing and assembling the turnstile. A checklist that works as a guide during inspection accompanies all Digicon packages. -
Page 10: Floor Drilling
3. If the place chosen is adequate for the installation of the access controller (indoors). 4. If there will be enough space (minimum 5 cm) between the rear of the CATRAX Plus column and the wall. This space is important in order to provide access to the upper panel and plug's locks for the cables passage. -
Page 11: Assembling Arms And Covers
TIP: - As an optional item, Digicon can provide a steel template for the fixation of CATRAX Plus, containing the exact demarcations of the necessary holes. -TIP: We recommend the bolts by the brand Tecnart, model AF38110, 3/8x4''. -
Page 12: Rear Cover
plus plus Then, assemble the upper panel’s rear cover. The image below shows the parts corresponding to each phase. Frontal cover Frontal plastic cover set Fiat washer M3, lock washer M3 and hex nut M3 Frontal stainless steel sheet Rear cover Rear stainless steel cover Colector box’s socket kit... - Page 13 5.5 Access to CATRAX Plus after assembly After CATRAX Plus is installed and assembled, access to the interior of the equipment can be done with the key that accompanies the equipment, in three ways: 5.5.1 Rear cover 1º Open the lock with the smaller key (clockwise) 2º...
-
Page 14: Column Cover
plus 5.5.3 Column cover 1º Open the lock with the smaller key (clockwise) 2º Pull the cover forward 3º The cover will be loose As shown below:... -
Page 15: Optional Items
6. Optional Items CATRAX Plus is compatible with most access control technologies in the market today; however, Digicon offers a range of optional items that allow enhancing and matching the equipment's performance to the client's needs. See the description of each of these items: 6.1 Collecting box kit... -
Page 16: Pictogram Kit
(not included in card after 1.5 seconds the kit) To the access control board Inputs Outputs Digicon control board Turnstile Box sensor Electromagnets sensors INFORMATION: - The box for cards is part of the kit and is positioned under the collecting kit. -
Page 17: Power Supply
INPUT: 100 A 240 Vca Ground wire OUTPUT: Neutral Phase 5% / 3A TIP: The power supply can be mounted to the board's support that accompanies CATRAX Plus... - Page 18 plus Signal Name/Description C N 1 G ro u n d w ire In p u t s e n s o r 1 In p u t s e n s o r 2 E x te rn a l s u p p ly o f 5 V ( b a tte ry e lim in a to r) G ro u n d w ire In p u t fo r c le a ra n c e k e y o f fro n ta l k e y G ro u n d w ire...
-
Page 19: Control Board
CATRAX Plus's control board was designed to meet most technologies of access control terminals in the market. The controller have mechanical features and layout perfectly suited for the CATRAX Plus's needs and it is one of the best options for the equipment's operation. - Page 20 LED 1 anode Sensor 2 signal LED 2 anode INFORMATION: -The cables of the optical sensors (CN6) and the electromagnets (CN5) are provided alongside CATRAX Plus. -The cable of the box sensor (CN4) is provided alongside the collecting box kit (optional)
-
Page 21: 1Inputs
plus 6.4.1 Inputs The input signals or passage clearance (HAB1 and HAB2) can be originated by a relay contact, pushbutton contact, tension from 5 to 24 Vca/cc, from 110 to 220 Vca/cc. To enable passage through relay contact or pushbutton, make the connection as shown below: NO or NC contact Enabling passage through tension pulse is shown in the image below. -
Page 22: Connection Scheme
Inputs Output Relay Inputs Output Access control board Digicon control board 6.4.1.2 Pictogram The pictogram's outputs are activated by NPN transistors (maximum 500 mA) at the moment of activation, the GND is sent through a corresponding output. 6.4.1.3 Pictogram connections... -
Page 23: Outputs
. The shadowed area indicates the factory plus configuration of Digicon's board. The control board also has inputs for optical controllers (Cn6), which monitor the CATRAX Plus's turning (there is no mechanical wear) and two opto-isolated inputs for liberating CATRAX Plus if necessary. -
Page 24: Electromagnets
6.4.3.3 Sound alarm The sound alarm output is activated by a NPN transistor (maximum 500 mA) every time that CATRAX Plus -receives a clearance signal (two short rings) -is not cleared and is forced during 1 second (1-second rings) -is stuck mid-turn for over 2 seconds (1-second rings) -
Page 25: Anti-Panic System
The control board and monitoring that integrates the device is presented below. The anti-panic system requires a power of 12Vcc 2A. Optionally, Digicon also provides a switched-mode power supply (code 019.01.334). To avoid overheating of the solenoid, the control board has an automatic routine that reduces its voltage to 6Vcc two seconds after the turnstile is tuned on. -
Page 26: Power Connection
plus 6.5.1 Power connection To disassemble the arm, it is necessary to cause a short-circuit between the GND and LIB inputs, as shown below: 6.5.2 Assembling the arms The arms are provided disassembled. To assemble them, follow the instructions provided below: The wrench used for assembling must be an Allen n.8 and the screw must be tightened to the maximum to ensure good fixation. -
Page 27: Maintenance Test
· set the arm on the horizontal position; · turn the turnstile off; · check if the arm drops (if the arm does not drop, contact the dealer or Digicon); · turn the turnstile on; · raise the arm until it reaches its normal position (the arm must stay in horizontal position without external support;... -
Page 28: Maintenance
plus 7. Maintenance 7.1 Preventive and corrective routine maintenance Sphere base – Periodicity: every 700,000 cycles The wear of the spheres' track must be checked Corrective actions: 1. In case of excessive wear (chipping, perforations, fillings or grooves where the sphere turns) replace the part. - Page 29 plus Corrective actions: 1. if you spot an incorrect resistance, a short-circuit or open electromagnet, replace it. 2. if the electromagnet is not working, check the board or the voltage 3. if the electromagnet is moving, fasten the base screws. Electromagnets adjustments (if necessary) 1.
-
Page 30: Defects And Possible Causes
7.2 Defects and possible causes Defect Posible cause Action · CATRAX Plus will not · The power supply cable is not connected · Check the cables and the tun on properly fuse (fuse: 3 A) · The fuse of the power supply is blown ·... -
Page 31: Technical Characteristics
plus 8. Technical characteristics 8.1 Dimensions (18,897") (15,534") (6,299") INFORMATION: The measures presented in this manual are in millimeters and inches. -
Page 32: Other Information
1541 (60,669") (11,417") 1039 (40,905") 199(7,834") 8.2 Outher information Catrax Plus: Gross weight Approxim. 40 kg (including package). Distance between 120 degrees arms Electromagnets’ 12 Vcc and 12 A power Sensors’ power 5 Vcc and 0.5 A Power supply... -
Page 33: Cleaning
plus 9. Cleaning 9.1 Maintenance and conservation of stainless steel: Do not use chemicals, bleaches or cleaning products for household use; Routine cleaning: The best products to conserve stainless steel are water, soap, mild and neutral detergents and ammonia-based removers diluted in lukewater and applied with a soft cloth or a nylon sponge. - Page 34 plus Intense Dirt / Strong Stains: Make an application of warm or hot detergent, or a solution of an ammonia-based remover (household removers) and water. If this is not enough to soften burned foods or charred deposits, use more aggressive products, such as caustic soda removers used in household cleaning.
-
Page 35: Warranty And Technical Assistance
10. Warranty and Technical Assistance Digicon is responsible for the project, skilled labor, and quality of the materials used in the manufacturing of our products, ensuring that the equipment and all parts are free of manufacturing defects or problems. Digicon commits itself to replace or repair, as we choose, any part or equipment presenting manufacturing defects without any costs to the buyer, in our factory in Gravataí... - Page 36 36 36...
- Page 37 Gravataí/RS CEP 94045-420 Vendas: (0xx51) 3489.8700 / 3489.8745 Assistência técnica: (0xx51) 3489.8903 E-mail: vendas.acesso@digicon.com.br Filial/ SP Desenvolvimento, Assistência Técnica e Vendas Rua São Paulo, 82 - Alphaville. Barueri/SP CEP 06465-130 Fone: (0xx11) 3738.3500 E-mail: vendas.acesso@digicon.com.br Home page: www.digicon.com.br 37 37...
Need help?
Do you have a question about the CATRAX Plus and is the answer not in the manual?
Questions and answers