
Related Manuals for Rioned FLEXMATIC+


Summary of Contents for Rioned FLEXMATIC+
- Page 1 USER’S MANUAL FLEXMATIC+ RIONED P.O. Box 5070 5004 EB Tilburg The Netherlands Telephone: +31 13 5479100 E-mail: info@rioned.com Internet: www.rioned.com...
- Page 2 RIONED has the right to change parts of the machine at any time without any prior or direct warning to the client. Similarly, the contents of this manual can also be changed without any prior warning.
- Page 3 Foreword This user’s manual is a manual for the professional user. This user’s manual has the purpose to control the machine in a safety manner and must be saved with the machine. The photos and drawings help you understand the text easier. First the user’s manual gives you an overview of the most important safety aspects.
- Page 4 08/13...
-
Page 5: Table Of Contents
TABLE OF CONTENTS INTRODUCTION ....................... 7 Use..........................7 SECURITY........................... 9 Instruction indications in this manual................9 Descriptions security measures ................... 9 Personnel protection outfit ..................9 Warnings........................9 Personnel qualification and education............... 10 Danger that can occur if the security regulations aren’t observed ......10 Working safely...................... - Page 6 Stuklijst........................41 APPENDIX......................... 42 10.1 EC declaration Of Conformity For Machinery ............42 10.2 Sales Managers......................43 10.3 Wiring diagram......................44 10.4 Dimensions ........................ 45 10.5 Geluidsmeetrapport ....................46 10.6 Safety instructions ..................... 47 INDEX ..........................50 08/13...
-
Page 7: Introduction
INTRODUCTION RIONED wishes to thank you for your purchase of the RIONED drain and sewer-clearing machine. We recommend that you read this manual thoroughly and see that the machine is handled and main- tained in the proper manner. If your machine should give trouble and need servicing, when you want to order parts, or if you have any questions, contact your RIONED dealer. - Page 8 08/13...
-
Page 9: Security
SECURITY Be responsible for other people when you are working with this machine. This manual contains instructions for fundamental conditions that must be followed by use and maintenance of this machine. That is why it is necessary that authorised and qualified personnel must read the user's manual and the user’s manual must always be available with the machine. -
Page 10: Personnel Qualification And Education
Before starting the machine again, you must follow the instructions correctly. 2.10 Making Changes to the machine are only permitted if Rioned has given written authorisation. The use of changes and fabri- original spare parts and accessories are for the safety necessary. Rioned is not responsible for inju- cate spare parts ries or damages if other spare parts are used. - Page 11 If the machine does not work or give troubles, it is forbidden to work further with the machine. Tel- ephone your dealer or the technical department of Rioned Telephone: +31 (0) 13-5479100 This manual contains all the necessary information concerning control and maintenance. If the de- vice is positioned correctly, properly controlled, and regularly maintained, a warranty will be given according to the general conditions of delivery.
- Page 12 08/13...
-
Page 13: Technical Specifications
Technical Specifications General Description (symbol) Unit Type : FlexMatic+ Dimensions see chapter 10.4 Dimensions page.: 45 Weight (dry) (m) : 11,9 kg Maximum spring length : 15 m : 8 mm - 10 mm Spring diameter : 20 - 75 mm Springs suitable for sewer diameter Place type plate:Plaats typeplaat: In and out speed spring... - Page 14 08/13...
-
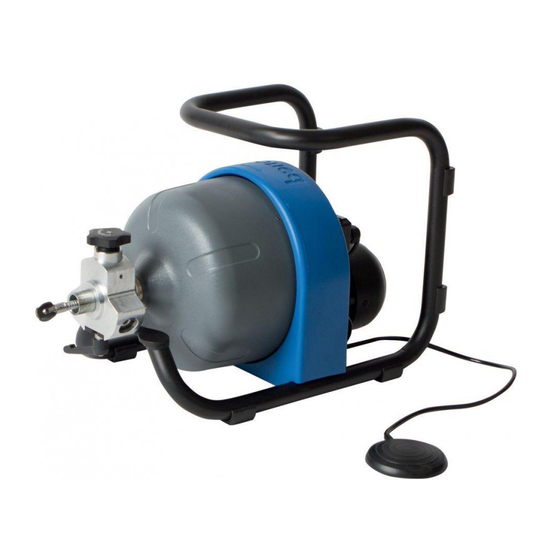
Page 15: Construction
Construction The spring-cleaning device contains the following main parts: Clamp Electric Motor Pressure knob Toolbox Feed unit Switch 1-0-2 Frame Handle Cover Drum 08/13... - Page 16 08/13...
-
Page 17: Control
Control If you control, maintain or inspect the machine, you must have the right qualifications for this job. If you do not have the necessarily knowledge, you may not use the machine. Further, you must convince yourself that you understand this manual thoroughly. - Page 18 Pressure knob: By turning the pressure knob, you can bring the feed unit in and out of order.Turn pressure knob clockwise: Feed unit activated. Spring ro- tates and gets transported. Turn pressure knob counter clockwise: Feed unit out of order. Spring rotates, no transportation.
- Page 19 Toolbox with accessories 08/13...
-
Page 20: Before Unblocking
5.3 Before unblock- Couple a spring with a diameter of 8 mm or 10 mm onto the standard spring. Loosen the pressure knob. Turn the switch to position 1. Move the handle to the drum. Fasten carefully the pressure knob. Now the spring gets fed into the spring drum. - Page 21 Turn the switch to position 0 if the beginning of the spring is in sight. Let the handle loose. The spring is now wind up in the spring drum. Couple the spring guidance tube onto the feed unit. Turn the switch to position 1. Move the handle of the feed unit away from the drum.
- Page 22 Fasten carefully the pressure knob. Now the spring is fed out of the spring drum. Turn the switch to position 0 if the beginning of the spring is come out of the spring guidance tube. Set the handle to the middle position. Loosen the pressure knob.
-
Page 23: Unblocking
5.4 Unblocking Put the spring machine as near as possible to the drain opening. Never use the spring without the spring guidance tube. When the spring guidance tube is not long enough, you can use the telescope-inlet- tube or another guide tube. Never let the machine run without supervision! Illustration 5.4.1 Wrong manner of work-... - Page 24 Turn the switch to position 1. Move the handle of the feed unit away from the drum. Fasten the pressure knob. Now the spring can be fed in. Depending of the position of the han- dle, the spring moves quicker or slower in or out of the spring drum.
- Page 25 When there is any resistance in the pipe, you must stop feeding in of the spring immedi- ately. Pull the handle upwards. Then move the spring several times back and forwards at the place of the blockage. By feeding the spring into the drum, move the handle completely upwards. Place the machine ±...
-
Page 26: Unclogging A Highly Placed Hole
5.5 Unclogging a Tip the machine over. highly placed hole 08/13... -
Page 27: Options
Options 6.1 Foot switch Using the optional foot switch allows you to switch the electric motor on and off. Your hands are now free for other work. 08/13... - Page 28 08/13...
-
Page 29: Maintenance
MAINTENANCE Warning! Always stop the motor and take the plug out of the wall socket before serving or repairing the machine. 7.1 General The machine is maintenance free, except the feed unit. Use only original spare parts (See 9 Exploded View Explosionszeichnung und Ersatzteilliste Dessin et Liste de Rechange). - Page 30 Rotate the handle a quarter turn loose. Move the feed unit from the frame. Hold the drum! Remove the circlip from the feed unit. Remove the tilting disc. 08/13...
- Page 31 Loosen the lower tilting disc bolt and handle. Remove the circlip from the feed unit. Remove the plates with the bearing from the feed unit. For the other pressure piece, repeat point 1 to again. Loosen the upper tilting disc bolt. 08/13...
- Page 32 Remove the upper pressure knob. Clean everything thoroughly. Check the pressure bearings. Replace pressure bearings: Remove the axle from the pressure piece. Remove the rings and the pres- sure bearing. Place the new rings and the new pressure bearings in the pressure piece.
-
Page 33: Lubrication
7.3 Lubrication Bearing Scrwe thread Springguidancetube in the drum Pressure rolles (3x) Bearing 7.4 Extensive peri- Have the machine checked and maintained from time to time by the technical service of your dealer. odical maintenance In this way, long life and quality will be guaranteed. 08/13... -
Page 34: Maintenance Schedule
7.5 Maintenance Description Interval schedule Cleaning the feed unit : Every time before using the machine and by strong pollution. Checking pressure rollers : Once a month. Change by wastage. Cleaning the body of the machine : Weekly or by strong pollution. Lubrication moving parts : Every 50 hours or at least ones every 6 months. -
Page 35: Accessories
ACCESSORIES 8.1 Supplies Inlet guide tube: To guide the spring on difficult places. Spring drum empty. Repair and quick couplings: To connect springs or to repair broken springs. Anti-oxidation-spray. Mounting tools: To mount and dismantle spring couplings and auxiliaries. 08/13... -
Page 36: Auxiliaries That Can Be Coupled
8.2 Auxiliaries that Retrieving hook: can be coupled: To remove obstacles from pipes. For example: cloth, rags, napkins, sheets, etc. 4-blade drill and 6-blade drill: To mill pipes that are clogged with frying fat. Cutting knife: To mill big pipes. The knife diameter can be chosen for the right kind of sewer. Chain head: To clean steel and iron pipes. - Page 37 Root cutter: To saw tree roots. Funnel drill: For long bended pipes. Pointed head: For pipes cocked with lime or uric stones. 08/13...
- Page 38 08/13...
-
Page 39: Explosionszeichnung Und Ersatzteilliste
Exploded View Explosionszeichnung und Ersatzteilliste Dessin et Liste de Rechange 08/13 39/41... -
Page 40: Exploded View
Blad Prod. no.: 10260001000 Tel.: 013-5479100 Fax: 013-5479104 Maten in mm Tek.no.: Deze tekening is eigendom van Rior B.V. / Rioned en mag zonder haar toestemming niet vermenigvuldigd, 10261001000 noch aan derden ter inzage gegeven worden. WWW.RIONED.COM File: C:\VaultWorkspace\Inventor\10\10261001000.iam 08/13... -
Page 41: Stuklijst
9.2 Stuklijst QTY ARTIKELNR.: OMSCHRIJVING QTY ARTIKELNR.: OMSCHRIJVING QTY ARTIKELNR.: OMSCHRIJVING 13261000301 Drum FlexMatic+ complete 13261000150 Cover Flexmatic+ 10.9.2 31151251215 schotelveer DIN 2093 25 x 12,2 x 1,5 13261000304 Drum Flexmatic+ 13261000200 Transporteur compleet 10.9.3 13271000032 ONDERLEGRING MESSING 13261000302 Back ring drum Flexmatic+ 10.1 13261000201 Huis transporteur 10.9.4... -
Page 42: Appendix
APPENDIX 10.1 EC declara- (Directive 2006/42/EC, Annex II, sub A) tion Of Conformity For Machinery RIOR B.V. / RIONED Centaurusweg 45, Tilburg, The Netherlands, Herewith declares that: Spring cleaning machine FlexMatic+, • is in compliance with the Machinery Directive (2006/42/EC);... -
Page 43: Sales Managers
Managers D.Maas Area Sales Manager Centaurusweg 45 5015 TC Tilburg Tel.: +31 13-547 91 00 Fax: +31 13-547 91 04 REPAIR THE NETHERLANDS Rioned Centaurusweg 45 5015 TC Tilburg Tel.: +31 13-547 91 00 Fax: +31 13-547 91 04 08/13... -
Page 44: Wiring Diagram
10.3 Wiring diagram 08/13... -
Page 45: Dimensions
10.4 Dimensions 08/13... -
Page 46: Geluidsmeetrapport
10.5 Geluidsmeet- rapport 08/13... -
Page 47: Safety Instructions
Warning: When using electric tools, basic safety precautions should always be 10.6 Safety instructions followed to reduce the risk of fire, electric shock, and personal injury, including the following. Read all these instructions before attempting to operate this product and safe these instructions. - Page 48 Check damaged parts. Before further use of the tool, a guard or other part that is damaged should be carefully checked to determine that it would operate properly and perform its intended function. Check for alignment of moving parts, binding of moving parts, breakage of parts, mount- ing, and any other conditions that may affect its operation.
- Page 49 08/13...
-
Page 50: Index
Numerics gloves ......... 9 4-blade drill ...... 36 responsible ......9 6-blade drill ...... 36 retrieving hook ....36 rioned ......10 injuries ......10 insulation ......9 iron pipes ......36 accessories ....... 10 adhesives ......9 sales managers ....43 asbestos ...... - Page 51 08/13...
Need help?
Do you have a question about the FLEXMATIC+ and is the answer not in the manual?
Questions and answers