Table of Contents
Advertisement
Available languages
Available languages
Quick Links
Advertisement
Chapters
Table of Contents

Related Manuals for Haier WS120GA


Summary of Contents for Haier WS120GA
- Page 1 Wine Cellar WS120GA WS190GA...
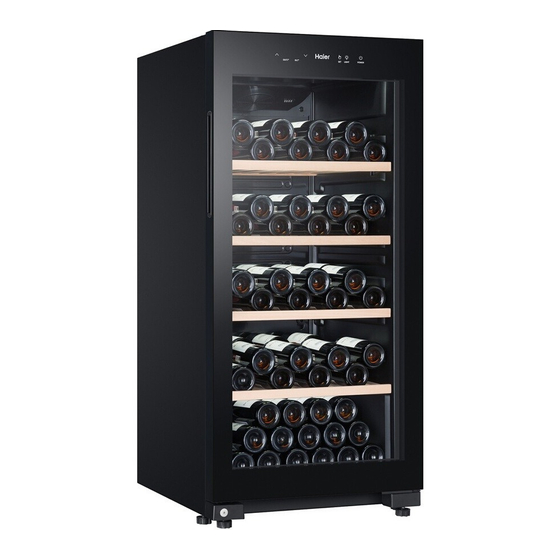
- Page 2 Names of Wine Cellar Components Master control panel Top wine shelf Glass door Wine shelves Adjustable foot screw WS120GA WS190GA (117bottle capacity) (189bottle capacity)
-
Page 3: Table Of Contents
Table Of Contents Heading 1 Page IMPORTANT SAFEGUARDS ............. 4 Installing Your Wine Cellar.............. 5 Unpacking Your Wine Cellar ..................... 5 Leveling Your Wine Cellar ....................5 Proper Air Circulation......................5 Electrical Requirement ...................... 6 Install Limitations....................... 6 Use of Extension Cord....................... 6 Initial Setup ......................... -
Page 4: Important Safeguards
Heading 1 IMPORTANT SAFEGUARDS This appliance is intended to be used exclusively for the storage of wine. When using this appliance, always exercise basic safety precautions, including the following: 1. Read all of the instructions before using this appliance. 2. Use this appliance only for its intended purpose as described in this use and care guide. -
Page 5: Installing Your Wine Cellar
Installing Your Wine Cellar Heading 1 Unpacking Your Wine Cellar 1. Remove all packaging material. This includes the foam base and all adhesive tape holding the wine cellar accessories inside and outside. 2. Inspect and remove any remains of packing, tape or printed materials before powering on the wine cellar. -
Page 6: Electrical Requirement
Heading 1 Electrical Requirement • Make sure there is a suitable power Outlet (220-240V, 15 amps outlet) with proper grounding to power the wine cellar. • An independent and exclusive standard outlet with reliable grounding shall be used for the wine cellar by matching its 3-pin plug including the grounding pin,which shall never be removed or disconnected with the grounding wire in any circumstances. -
Page 7: Introduction To Primary Functions Of The Appliance
Heading 1 Introduction to Primary Functions of the Appliance Control Panel Temperature Temperature Adjustment Adjustment Light Power (up) (down) POWER OUT.T° IN.T° LIGHT The temperature range of display panel is 5~20°C(41~68°F). The default setting temperature is 12°C(54°F). You can set the temperature according to your wine storage requirements. Temperature Adjustments To set the temperature hold the button for about 3 seconds. -
Page 8: Door Opening Alarm
Heading 1 Door opening alarm In case the door is kept open for over 1 min, buzzer will be beeping to give an alarm till the door is closed or any key on display panel can be operated and then the buzzer will stop beeping. -
Page 9: Precautions For Use Of Wine Cellar
Heading 1 Precautions for Use of Wine Cellar Do not place too much wine in the cellar so Before placing the bottles inside the wine as not to exceed the bearing capacity of the wine shelves. Do not place more than four shelves are completely stable. -
Page 10: Shelving
Heading 1 Shelving • The shelves are designed for appearance and easy cleaning. Larger bottles or Magnums can be more easily accommodated at the cross shelves at the bottom of the cellar. • There are some shelves for easy storage and removal of your wine. Normal Operating Sounds You May Hear •... -
Page 11: Proper Wine Cellar Care And Cleaning
Heading 1 Proper Wine Cellar Care and Cleaning Cleaning and Maintenance Warning: To avoid electric shock always unplug your wine cellar before cleaning. Ignoring this warning may result in death or injury. Caution: Before using cleaning products, always read and follow manufacturer's instructions and warnings to avoid personal injury or product damage. -
Page 12: Troubleshooting
Heading 1 TroubleShooting Wine Cellar Does Not Operate: • Check if wine cellar is plugged in. • Check if there is power in the AC outlet, by checking the circuit breaker. Wine appears too warm: • Frequent door openings. • Allow time for recently added wine to reach desired temperature. •... -
Page 13: Technical Data
Technical Data•Packing List Technical Data Available Rated Electric Shock Rated Input Power Model Climate Tape Capacity Frequency Resistance Voltage (V) (Hz) Type WS120GA SN-ST 220-240 WS190GA SN-ST 220-240 Noise Temperature Overall Dimension Supply Cord Refrigerant Weight (Acoustic Range Connection (Depth × Width ×Height) - Page 14 Intestazione 1 Nomi dei componenti della cantina Pannello di controllo principale Ripiano superiore per i vini Sportello in vetro Ripiani per vino Vite del piede Filtro ai carboni attivi regolabile WS120GA WS190GA (capacità: (capacità: 117 bottiglie) 189 bottiglie)
- Page 15 Intestazione 1 Sommario Pagina MISURE DI SICUREZZA IMPORTANTI ........... 16 Installazione della cantina............17 Disimballaggio della cantina per vini ................17 Messa in piano della cantina per vini ................17 Circolazione adeguata dell'aria..................17 Requisiti elettrici ......................18 Limitazioni per l'installazione..................18 Utilizzo di cavi di prolunga....................
-
Page 16: Intestazione
Intestazione 1 MISURE DI SICUREZZA IMPORTANTI Questo apparecchio è concepito per essere utilizzato esclusivamente per la conservazione del vino. Durante l'utilizzo dell'apparecchio, seguire sempre le precauzioni di sicurezza basilari, tra cui: 1. Leggere tutte le istruzioni prima di utilizzare l'apparecchio. 2. -
Page 17: Installazione Della Cantina
Intestazione 1 Installazione della cantina Disimballaggio della cantina per vini 1. Rimuovere tutto il materiale di imballaggio, inclusa la base in schiuma e il nastro adesivo che 2. Ispezionare e rimuovere eventuali rimanenze dell'imballaggio o di nastro e qualsiasi materiale stampato prima dell'accensione della cantina. -
Page 18: Requisiti Elettrici
Intestazione 1 Requisiti elettrici • V, 15 amp) con messa a terra corretta, per l'alimentazione della cantina. • Evitare l'utilizzo di adattatori tripolari o l'adattamento a una presa bipolare eliminando il polo della messa a terra. Si tratta di un'operazione pericolosa poiché elimina la messa a terra necessaria per la cantina, con conseguente pericolo di scosse elettriche. -
Page 19: Introduzione Alle Funzioni Fondamentali Dell'apparecchio
Heading 1 Introduzione alle funzioni primarie dell’apparecchiatura Pannello di controllo... Temperatura Temperatura Luce Regolazione Regolazione IMPOSTA POTENZA forno ( giù POWER OUT.T° IN.T° LIGHT La gamma di temperatura del pannello del display è 5~20°C(41~68°F). La temperatura di impostazione predefinita è di 12°C(54°F). Sarà... -
Page 20: Allarme Apertura Porta
Heading 1 Allarme apertura porta Qualora la porta venga tenuta aperta per più di 1 minuto, il cicalino continuerà a emettere dei bip come allarme fino a che non verrà chiusa la porta o qualsiasi tasto sul pannello display non potrà essere usato e poi il cicalino smetterà di fare bip. Memoria di spegnimento temperatura In caso di black-out la cantinetta salva in modo automatico la temperatura impostata. -
Page 21: Precauzioni Per L'uso Della Cantina
Intestazione 1 Precauzioni per l'uso della cantina Non depositare nella cantina quantità di vino Prima di posizionare le bottiglie nella cantina, troppo elevate, in modo da non superare la capacità di portata dei ripiani. Non collocare stabili. quattro posizionare più di quattro livelli di bottiglie su ogni alcuna bottiglia per evitare che lo sportello di ripiano;... -
Page 22: Ripiani
Intestazione 1 Ripiani • I ripiani sono progettati per una presentazione ottimale e una facile pulizia. Le bottiglie più grandi o Magnum possono essere sistemate più facilmente sui ripiani orizzontali in basso. • Alcuni ripiani consentono di sistemare e rimuovere le bottiglie più facilmente. Rumori durante il funzionamento •... -
Page 23: Pulizia E Manutenzione Corrette Della Cantina Per Vini
Intestazione 1 Pulizia e manutenzione corrette della cantina per vini Pulizia e manutenzione Attenzione: per evitare scosse elettriche, scollegare sempre il cavo di alimentazione della cantina prima delle operazioni di pulizia. Il mancato rispetto di tale avvertenza può causare lesioni gravi o morte. Attenzione: prima di utilizzare prodotti per la pulizia, leggere e attenersi sempre alle persone o danni al prodotto. -
Page 24: Risoluzione Dei Problemi
Intestazione 1 Risoluzione dei problemi La cantina non funziona: • • Vino troppo caldo: • Aperture frequenti dello sportello. • • Controllare che le guarnizioni siano perfettamente aderenti. • Pulire la bobina del condensatore. • Regolare la temperatura su un valore più basso. Vino troppo freddo: •... -
Page 25: Dati Tecnici
T di resistenza Capacità Tensione Frequenza Tipo di Alimentazione Modello alle scosse disponibile nominale nominale clima elettriche (Hz) WS120GA SN-ST 220-240 WS190GA SN-ST 220-240 Modalità di Livello di Dimensioni generali Intervallo di Refrigerante collegamento Peso rumore (livello di (Profondità ×... - Page 26 Heading 1 Nombres de componentes de la bodega Panel de control principal Estante superior para el vino Puerta de cristal Bandejas de vino Filtro de carbón activado atornillado ajustable WS120GA WS190GA (Capacidad para (Capacidad para 117 botellas) 189 botellas)
- Page 27 Índice de contenido Heading 1 Página ADVERTENCIAS DE SEGURIDAD........... 28 Instalación de la bodega............... 29 Desembalaje de la bodega ....................29 Nivelación de la bodega ....................29 Ventilación......................... 29 Requisitos eléctricos ...................... 30 Limitaciones de la instalación..................30 Uso de la regleta de extensión ..................30 ......................
-
Page 28: Advertencias De Seguridad
Heading 1 ADVERTENCIAS DE SEGURIDAD El uso previsto de este electrodoméstico es el almacenamiento de vino. Asegúrese de tomar las debidas precauciones de seguridad antes de utilizar el aparato: 1. Lea estas instrucciones con detenimiento antes de utilizar la bodega por primera vez. -
Page 29: Instalación De La Bodega
Instalación de la bodega Heading 1 Desembalaje de la bodega 1. Retire todo el material de embalaje. Retire la base de espuma y la cinta adhesiva que sujeta los accesorios interiores y exteriores de la bodega. 2. Revise y elimine cualquier resto de embalaje, cinta o materiales impresos antes de conectar la bodega. -
Page 30: Requisitos Eléctricos
Heading 1 Requisitos eléctricos • Compruebe que dispone de una toma de corriente (220 - 240 V, enchufe de 15 A) y una toma de tierra adecuadas antes de encender la bodega. • Evite utilizar ladrones de tres enchufes o cortar la tercera toma de tierra para adaptar una toma de dos enchufes. -
Page 31: Introducción A Las Funciones Principales Del Aparato
Introducción a las funciones primarias del aparato Panel de control Temperatura Temperatura Ajuste Ajuste POTENCIA CONJUNTO (abajo) (arriba) LIGHT POWER OUT.T° IN.T° El rango de temperatura del panel es 5~20 °C(41~68 °F). La temperatura de ajuste predeterminada es 12 °C(54 °F). Usted puede fijar la temperatura según sus requisitos del almacenaje del vino. -
Page 32: Alarma De Puerta Abierta
Heading 1 Alarma de puerta abierta En caso de que la puerta se mantenga abierta durante más de 1 minuto, el zumbador emitirá un pitido para dar una alarma hasta que la puerta se cierre o cualquier tecla en el panel de visualización se puede operar y luego el zumbador dejará de sonar. Memoria de apagado de la temperatura En caso de corte de energía, la cava guardará... -
Page 33: Precauciones De Uso De La Bodega
Heading 1 Precauciones de uso de la bodega No coloque demasiado vino en la bodega para Antes de colocar las botellas dentro de no sobrepasar la capacidad de carga de los estantes. No coloque más de cuatro capas de vino completamente estables. -
Page 34: Estantes
Heading 1 Estantes • Los estantes han sido diseñados para mejorar el aspecto físico del aparato y facilitar su limpieza. Las botellas más grandes o de tamaño Magnum se adaptan con más facilidad a los estantes de rejilla situados en la parte posterior de la bodega. •... -
Page 35: Cuidado Y Limpieza De La Bodega
Heading 1 Cuidado y limpieza de la bodega Limpieza y mantenimiento Advertencia: Desconecte la bodega antes de limpiarla para reducir el riesgo de descarga eléctrica. No prestar atención a estas precauciones podría causar lesiones graves o la muerte. Precaución: Lea las instrucciones y advertencias del fabricante antes de utilizar productos de limpieza para evitar daños personales o en el producto. -
Page 36: Solución De Problemas
Heading 1 Solución de problemas La bodega no funciona: • Compruebe si el aparato se encuentra enchufado. • Examine el disyuntor para comprobar si hay suministro en la toma de corriente. La temperatura del vino es demasiado alta: • Reduzca la frecuencia de apertura de las puertas. •... -
Page 37: Datos Técnicos•Lista Del Paquete
Capacidad Tipo de Voltaje Frecuencia Potencia de Modelo a descargas disponible clima nominal (V) nominal (Hz) entrada (W) eléctricas WS120GA SN-ST 220-240 WS190GA SN-ST 220-240 Ruido (nivel Dimensiones totales de potencia Intervalo de Refrigerante Modo de conexión Peso (profundidad ×... - Page 38 Überschrift 1 Bauteilbezeichnungen des Weinkühlschranks Hauptbedienfeld Oberstes Weinfach Glastür Weinregale Verstellbare WS120GA WS190GA (Fassungsvermögen: (Fassungsvermögen: 117 Flaschen) 189 Flaschen)
- Page 39 Überschrift 1 Inhaltsverzeichnis Seite WICHTIGE SICHERHEITSHINWEISE ..........40 Weinkühlschrank installieren............41 Weinkühlschrank auspacken................... 41 Weinkühlschrank ausrichten ................... 41 Ausreichende Luftzirkulation................... 41 Elektrische Anforderungen ....................42 Installationsbeschränkungen ..................42 Verlängerungskabel......................42 Erste Verwendung......................42 Einführung in die Grundfunktionen des Geräts ......43 1.Temperaturregelung ......................
-
Page 40: Wichtige Sicherheitshinweise
Überschrift 1 WICHTIGE SICHERHEITSHINWEISE Dieses Gerät ist ausschließlich für die Lagerung von Wein vorgesehen. Bitte beachten Sie bei der Verwendung dieses Geräts stets die grundsätzlichen Sicherheitshinweise: Lesen Sie alle Anweisungen vor der Verwendung des Geräts durch. Verwenden Sie dieses Gerät nur für seinen vorgesehenen Zweck und Dieser Weinkühlschrank muss vor der Verwendung ordnungsgemäß... -
Page 41: Weinkühlschrank Installieren
Überschrift 1 Weinkühlschrank installieren Weinkühlschrank auspacken 1. Entfernen Sie das gesamte Verpackungsmaterial. Dazu gehören das Styroporteil und das Klebeband, mit dem die Zubehörteile des Weinkühlschranks innen und außen befestigt sind. 2. Stellen Sie vor dem Einstecken des Weinkühlschranks sicher, dass alle Verpackungsteile, Klebebänder und Drucketiketten entfernt wurden. -
Page 42: Elektrische Anforderungen
Überschrift 1 Elektrische Anforderungen • Sorgen Sie dafür, dass eine geeignete Steckdose (220-240 V, 15 A) mit ordnungsgemäßer Erdung für den Weinkühlschrank zur Verfügung steht. • Eine unabhängige und exklusive Standardausführung mit zuverlässiger Erdung ist für den Weinkeller durch Abstimmung seines 3-poligen Steckers mit em Erdungsstift zu verwenden, der unter keinen Umständen mit dem Erdungsdraht abgezogen oder abgetrennt werden darf. -
Page 43: Einführung In Die Grundfunktionen Des Geräts
Heading 1 Einführung in die wichtigsten Funktionen des Geräts Bedienfeld Temperatur Temperatur Anpassung Anpassung NETZ- (runter) Lampe (rauf) EINSTELLEN SCHALTER POWER OUT.T° IN.T° LIGHT Der Temperaturbereich des Anzeigefelds liegt zwischen 5~20°C(41~68°F). Die Standardeinstellung der Temperatur beträgt 12°C(54°F). Sie können die Temperatur entsprechend Ihren Anforderungen für die Weinlagerung einstellen. -
Page 44: Warnton Bei Offener Tür
Heading 1 Warnton bei offener Tür Steht die Tür länger als 1 min lang offen, ertönt ein Alarmton bis die Tür geschlossen wird oder bis eine beliebige Taste auf dem Anzeigefeld betätigt wird. Speichern der Temperatur bei Stromausfall Im Falle eines Stromausfalls speichert der Weinkühler automatisch die eingestellte Temperatur. -
Page 45: Warnhinweise Zur Verwendung Des Weinkühlschranks
Überschrift 1 Warnhinweise zur Verwendung des Weinkühlschranks Prüfen Sie, ob die Weinfächer fest den Kühlschrank, um das Tragvermögen der sitzen, bevor Sie die Flaschen in den Weinfächer nicht zu überschreiten. Legen Sie Weinkühlschrank legen. pro Fach nicht mehr als vier Lagen Flaschen Prüfen Sie außerdem, ob Flaschen aus den Fächern hervorragen, um zu verhindern, darf vier Lagen auf jedem Fach nicht... -
Page 46: Ablagefächer
Überschrift 1 Ablagefächer • Die Ablagefächer sind für eine ansprechende Präsentation der Flaschen und einfache Querablagen im unteren Bereich des Weinkühlschranks aufbewahren. • Einige Ablagefächer wurden speziell für die einfache Lagerung und Entnahme Ihrer Regulär auftretende Betriebsgeräusche • Wasserfließender Schall oder leichte Vibrationen sind das Ergebnis des Kältemittels, das durch die Kühlschlagen zirkuliert. - Page 47 Überschrift 1 Reinigung und Wartung Warnung: Um Stromschläge zu vermeiden, sollten Sie vor der Reinigung stets den Netzstecker ziehen. Die Missachtung dieser Warnung kann zu Verletzungen oder zum Tod führen. Achtung: Lesen und beachten Sie vor der Verwendung von Reinigungsprodukten stets die Anweisungen und Warnhinweise des Herstellers, um Verletzungen oder Produktschäden zu vermeiden.
-
Page 48: Fehlerbehebung
Überschrift 1 Fehlerbehebung Der Weinkühlschrank funktioniert nicht: • Überprüfen Sie, ob Sie der Netzstecker des Weinkühlschranks eingesteckt ist. • Überprüfen Sie, ob die Steckdose Strom führt, indem Sie den Schutzschalter kontrollieren. Der Wein ist zu warm: • • Geben Sie kürzlich hinzugefügtem Wein ausreichend Zeit, auf die gewünschte Temperatur abzukühlen. •... -
Page 49: Technische Daten
Technische Daten•Packliste Technische Daten Stromschlag- Fassungsver- Nennspan- Nennfre- Eingangs- Modell Klimatyp Widerstandstyp mögen (l) nung (V) quenz (Hz) leistung (W) WS120GA SN-ST 220-240 WS190GA SN-ST 220-240 Gesamtabmessungen turbereich (R600a) Netzkabel- Gewicht Geräuschpegel (Tiefe × Weite × Höhe) (°C) Anschlussart (kg) - Page 50 Nom des éléments de la cave à vin Panneau central de commande Clayette à bouteilles supérieure Porte en verre Clayettes à vin Vis réglable Filtre à charbon actif du pied WS120GA WS190GA (capacité de (capacité de 189 bouteilles) 117 bouteilles)
- Page 51 Table des matières En-tête 1 Page MESURES DE SÉCURITÉ IMPORTANTES ........52 Installation de votre cave à vin............. 53 Déballage de votre cave à vin ..................53 Mise à niveau de votre cave à vin................... 53 Circulation de l'air ......................53 Exigences électriques .....................
-
Page 52: Mesures De Sécurité Importantes
En-tête 1 MESURES DE SÉCURITÉ IMPORTANTES Cet appareil est exclusivement destiné au stockage de bouteilles de vin. Lorsque vous utilisez cet appareil, prenez toujours les mesures de précaution de base suivantes : 1. Lisez l'ensemble des instructions avant d'utiliser cet appareil. 2. -
Page 53: Installation De Votre Cave À Vin
Installation de votre cave à vin En-tête 1 Déballage de votre cave à vin 1. Retirez tous les éléments d'emballage, y compris la base en mousse et les rubans adhésifs qui maintiennent les accessoires de la cave à vin en place à l'intérieur et à l'extérieur de l'appareil. 2. -
Page 54: Exigences Électriques
En-tête 1 Exigences électriques • Assurez-vous de disposer d'une prise de courant adéquate (220-240 V, 15 A) reliée à la terre pour brancher la cave à vin. • Evitez d'utiliser des adaptateurs à trois broches ou de couper la broche de mise à la terre n'assure pas la mise à... -
Page 55: Présentation Des Fonctions Principales De L'appareil
Présentation des fonctions principales de l’appareil Panneau de commande Température Température Réglage Réglage DÉFINIR Éclairage ALIMENTATION (haut) (bas) LIGHT POWER OUT.T° IN.T° La plage de température du panneau d’affichage est comprise entre 5 et 20° C(41 et 68° F). La température par défaut est de 12° C (54° F). Vous pouvez régler la température en fonction de vos exigences en matière de stockage du vin. -
Page 56: Alarme D'ouverture De La Porte
Heading 1 Alarme d’ouverture de la porte Si la porte reste ouverte pendant plus de 1 min, une alarme se déclenche et ne s’arrête que lorsque vous refermez la porte ou appuyez sur une touche du panneau d’affichage. Fonction de mémorisation de température en cas de coupure En cas de panne de courant, le cellier enregistre automatiquement la température réglée. -
Page 57: Précautions Liées À L'utilisation De La Cave À Vin
En-tête 1 Précautions liées à l'utilisation de la cave à vin Ne placez pas trop de bouteilles de vin dans la Avant de placer les bouteilles dans la cave cave pour ne pas dépasser la capacité d'accueil des clayettes à bouteilles. Ne placez pas plus sont complètement stables. -
Page 58: Clayettes
En-tête 1 Clayettes • Les clayettes sont conçues pour offrir une esthétique agréable et faciliter le nettoyage. Les bouteilles de grande taille ou les Magnums peuvent être plus facilement stockées sur les clayettes transversales situées dans la partie basse de la cave à vin. •... -
Page 59: Entretien Et Nettoyage De La Cave À Vin
En-tête 1 Entretien et nettoyage de la cave à vin Nettoyage et entretien Attention : Pour éviter tout risque d'électrocution, débranchez toujours votre cave à vin avant de la nettoyer. Le non-respect de cette consigne peut provoquer des blessures graves ou mortelles. Attention : Avant d'utiliser des produits nettoyants, lisez et respectez les instructions et les mises en garde du fabricant pour éviter tout dommage corporel ou matériel. -
Page 60: Dépannage
En-tête 1 Dépannage La cave à vin ne fonctionne pas : • • Le vin ne semble pas assez frais : • Les portes sont ouvertes trop fréquemment. • Les bouteilles de vin rangées récemment dans l'appareil ont besoin d'un certain temps pour atteindre la température souhaitée. -
Page 61: Informations Techniques•Contenu De L'emballage
Informations techniques Choc électrique Capacité Tension Fréquence Puissance Type de climat Type de disponible nominale nominale Modèle d'entrée (W) résistance (Hz) WS120GA SN-ST 220-240 WS190GA SN-ST 220-240 Mode de Encombrement Bruit (niveau Plage de Réfrigérant branchement (profondeur × de puissance température... - Page 62 Koptekst 1 Onderdelen van de wijnkast Hoofdbedieningspaneel Bovenste wijnschap Glazen deur Wijnrekken Verstelbare Filter met actieve koolstof pootschroef WS120GA WS190GA (ruimte voor (ruimte voor...
- Page 63 Inhoudsopgave Koptekst 1 Pagina BELANGRIJKE VOORZORGSMAATREGELEN........ 64 Uw wijnkast installeren ..............65 De wijnkast uitpakken...................... 65 De wijnkast waterpas zetten ................... 65 Juiste luchtcirculatie ....................... 65 Elektriciteitsbenodigdheden ..................66 Installatiebeperkingen..................... 66 Gebruik van verlengsnoer....................66 Eerste gebruik ........................66 Inleiding tot de hoofdfuncties van de wijnkast ......67 1.Temperatuur aanpassingen ..................
-
Page 64: Belangrijke Voorzorgsmaatregelen
Koptekst 1 BELANGRIJKE VOORZORGSMAATREGELEN Dit apparaat is exclusief bedoeld voor het opslaan van wijn. Houd altijd de standaard voorzorgsmaatregelen in acht bij het gebruik van dit apparaat, zoals: 1. Lees alle instructies voor het gebruik van dit apparaat. 2. Gebruik dit apparaat alleen waarvoor het is bedoeld, zoals beschreven in deze handleiding. -
Page 65: Uw Wijnkast Installeren
Uw wijnkast installeren Koptekst 1 De wijnkast uitpakken 1. Verwijder al het verpakkingsmateriaal. Ook de schuimbasis en het plakband waarmee de accessoires aan de binnen- en buitenkant van de wijnkast zijn bevestigd. 2. Controleer op resterende verpakking, plakband of bedrukte materialen voordat u de wijnkast inschakelt. -
Page 66: Elektriciteitsbenodigdheden
Koptekst 1 Elektriciteitsbenodigdheden • Zorg dat er een geschikt stopcontact is (220-240 V, 15 Amp) dat correct geaard is om de wijnkast van stroom te voorzien. • Vermijd het gebruik van een stekker met drie pinnen of het bewerken van de aarding van de stekker zodat deze in het stopcontact past. -
Page 67: Inleiding Tot De Hoofdfuncties Van De Wijnkast
Inleiding in de voornaamste functies van het apparaat Bedieningspaneel Temperatuur Temperatuur Aanpassing Aanpassing Licht INSTELLING STROOM (omhoog) (omlaag) POWER OUT.T° IN.T° LIGHT Het temperatuurbereik van het scherm is 5~20°C (41 ~ 68°F). De standaard temperatuurinstelling is 12°C(54°F ) . U kunt de temperatuur instellen in overeenstemming met uw wijn opslagvereisten. Temperatuur aanpassingen Houd de knop 3 seconden ingedrukt om de temperatuur in te stellen. -
Page 68: Deur Opening Alarm
Heading 1 Deur opening alarm Als de deur langer dan 1 minuut wordt open gehouden, weerklinkt een geluidssignaal tot de deur gesloten wordt of men kan een toets indrukken op het bedieningspaneel om het geluidssignaal te stoppen. Temperatuur uitschakeling geheugen In het geval van een stroompanne slaat de kelder automatisch de ingestelde temperatuur op. -
Page 69: Voorzorgsmaatregelen Voor Gebruik Van Wijnkast
Koptekst 1 Voorzorgsmaatregelen voor gebruik van wijnkast Plaats niet te veel wijn in de wijnkast, zodat het draagvermogen van de wijnschappen niet plaatst, of de wijnschappen volledig stabiel zijn. wordt overschreden. Plaats niet meer dan vier schappen steekt, om te voorkomen dat lagen per schap. -
Page 70: Schappen
Koptekst 1 Schappen • gemakkelijk op de horizontale schappen onderin de kast. • weer uit het apparaat worden gehaald. Operationele geluiden die u zou kunnen horen • Kokend water, klokkende geluiden of lichte trillingen als gevolg van de circulerende koelvloeistof. •... -
Page 71: Onderhoud En Reiniging Van De Wijnkast
Koptekst 1 Onderhoud en reiniging van de wijnkast Reinging en onderhoud Waarschuwing: verwijder voordat u de wijnkast gaat schoonmaken, altijd eerst de stekker van de wijnkast uit het stopcontact om elektrische schokken te vermijden. Het negeren van deze waarschuwing kan letsel of overlijden tot gevolg hebben. Let op: lees voordat u schoonmaakproducten gebruikt altijd eerst de instructies en waarschuwingen van de fabrikant om letsel en schade te voorkomen. -
Page 72: Problemen Oplossen
Koptekst 1 Problemen oplossen Wijnkast werkt niet • Controleer of de wijnkast is aangesloten. • Controleer of er stroom staat op het AC-stopcontact door de zekering te controleren. Wijn is te warm: • Deur gaat te vaak open. • Geef nieuwe wijn in de wijnkast de tijd om de gewenste temperatuur te bereiken. •... -
Page 73: Technische Gegevens•Paklijst
Koptekst 1 Technische gegevens•Paklijst Technische gegevens Type resistentie Beschikbare Nominale Nominale Model Klimaattype tegen elektrische capaciteit spanning frequentie vermogen schokken (Hz) WS120GA SN-ST 220-240 WS190GA SN-ST 220-240 Geluid Tempera- Koelmiddel Totale afmeting Netsnoeraan- Gewicht (akoestische tuurbereik (R600a) (diepte × breedte ×... - Page 74 Nadpis 1 Názvy součástí vinotéky Hlavní ovládací panel Horní police na víno Skleněné dveře Vino police Nastavitelný šroub nožky WS120GA WS190GA (kapacita 117 lahví) (kapacita 189 lahví)
- Page 75 Nadpis 1 Obsah Strana DŮLEŽITÉ BEZPEČNOSTNÍ POKYNY..........76 Instalace vinotéky................. 77 Rozbalení vinotéky......................77 Vyrovnání vinotéky ......................77 Správná cirkulace vzduchu..................... 77 Požadavky na elektrickou síť ..................78 Požadavky na umístění....................78 Použití prodlužovacího kabelu ..................78 Počáteční nastavení......................78 Úvod do základních funkcí...
-
Page 76: Nadpis 1
Nadpis 1 DŮLEŽITÉ BEZPEČNOSTNÍ POKYNY Toto zařízení je určeno výhradně ke skladování vína. Při používání tohoto zařízení vždy dodržujte základní bezpečnostní opatření včetně těch následujících: 1. Než začnete toto zařízení používat, přečtěte si všechny pokyny. 2. Zařízení používejte pouze k zamýšlenému účelu, tak jak je popsán v tomto návodu k užívání... -
Page 77: Instalace Vinotéky
Instalace vinotéky Nadpis 1 Rozbalení vinotéky 1. Odstraňte všechen obalový materiál. Ten zahrnuje i pěnový podstavec a veškerou lepicí pásku, jíž jsou uvnitř i zvenčí připevněny doplňky vinotéky. 2. Před zapnutím vinotéku důkladně prohlédněte a odstraňte všechny zbytky obalů, pásky nebo tištěných materiálů. -
Page 78: Požadavky Na Elektrickou Síť
Nadpis 1 Požadavky na elektrickou síť • Pro napájení vinotéky zajistěte vhodnou zásuvku (220–240 V, 15 A) s řádným uzemněním. • Nepoužívejte adaptéry pro zástrčky se třemi kolíky, ani neuřezávejte třetí kolík uzemnění, aby bylo zástrčku možné použít do zásuvky určené pro dvoukolíkovou zástrčku. Tento nebezpečný... -
Page 79: Úvod Do Základních Funkcí Zařízení
Úvod do primárních funkcí spotřebiče Ovládací panel Teplota Teplota Nastavení Nastavení Světlo NAPÁJENÍ NASTAVENÍ (nahoře) (dolů) POWER OUT.T° IN.T° LIGHT Teplotní rozsah zobrazovacího panelu je 5~20°C(41~68°F). Teplota nastavená od výroby je 12°C(54°F). Můžete nastavit teplotu dle Vašich požadavků na uchovávání vína. Nastavení... -
Page 80: Alarm Při Otevřených Dveřích
Heading 1 Alarm při otevřených dveřích V případě, že jsou dveře otevřené déle než 1 minutu, bude bzučák pípat jako alarm, dokud se dveře nezavřou nebo se na panelu displeje nestiskne libovolné tlačítko, následně bzučák přestane pípat. Paměť Teploty vypnutí proudu V případě... -
Page 81: Bezpečnostní Opatření Pro Používání Vinotéky
Nadpis 1 Bezpečnostní opatření pro používání vinotéky Neumisťuje do vinotéky příliš velké množství Před umístěním lahví do vinotéky se ujistěte, vína, abyste nepřekročili maximální zátěž polic zda jsou police na víno zcela stabilní. na víno. Na jednu polici neumisťujte více než Dále se také... -
Page 82: Ukládání Do Polic
Nadpis 1 Ukládání do polic • Police byly navrženy s důrazem na vzhled a jednoduché čištění. Rozměrnější láhve nebo velké láhve o objemu 1,5 l lze snáze uložit na příčné police ve spodní části vinotéky. • Jsou tu také police pro snadné ukládání a vyjímání vašich vín. Běžné... -
Page 83: Řádná Údržba A Čištění Vinotéky
Nadpis 1 Řádná údržba a čištění vinotéky Čištění a údržba Varování: Před čištěním vinotéku vždy nejprve odpojte od sítě, abyste předešli riziku elektrického šoku. Neuposlechnutí tohoto varování může způsobit smrt nebo úraz. Upozornění: Před použitím čisticích přípravků si vždy přečtěte instrukce a upozornění výrobce a řiďte se jimi, abyste předešli osobnímu úrazu nebo poškození... -
Page 84: Odstraňování Závad
Nadpis 1 Odstraňování závad Vinotéka nefunguje: • Zkontrolujte, zda je vinotéka zapojená do zásuvky. • Kontrolou elektrického jističe ověřte, zda je zásuvka střídavého proudu pod napětím. Víno je příliš teplé: • Časté otevírání dveří. • Jestliže jste víno do vinotéky uložili teprve nedávno, dopřejte mu čas, aby mohlo dosáhnout požadované... -
Page 85: Technické Údaje•Seznam Součástí V Balení
Technické údaje•Seznam součástí v balení Technické údaje Dostupná Jmenovitý Jmenovité Typ odolnosti vůči Model kapacita kmitočet Příkon (W) Typklimatu napětí (V) elektrickému šoku (Hz) WS120GA SN-ST 220-240 WS190GA SN-ST 220-240 Rozsah Chladivo Typ připojení Hluk (úroveň Celkové rozměry Hmotnost teploty (R600a) napájecího... - Page 86 Heading 1 Nazwa elementów chłodziarki Główny panel sterowania Górna półka na wino Drzwiczki szklane Wino police Regulowana śruba WS120GA WS190GA (pojemność (pojemność 189 butelek) 117 butelek)
- Page 87 Heading 1 Spis treści Strona INFORMACJE DOTYCZĄCE BEZPIECZEŃSTWA......88 Instalacja chłodziarki..............89 Rozpakowywanie chłodziarki do wina ................89 Poziomowanie chłodziarki ....................89 Właściwy obieg powietrza ....................89 Wymagania elektryczne ....................90 Ograniczenia instalacyjne....................90 Używanie przedłużacza....................90 ................90 Wprowadzenie do głównych funkcji urządzenia ......91 1.Regulacja temperatury....................
-
Page 88: Heading
Heading 1 INFORMACJE DOTYCZĄCE BEZPIECZEŃSTWA Niniejsze urządzenie jest przeznaczone wyłącznie do przechowywania wina. Zawsze stosuj podstawowe zasady bezpieczeństwa podczas korzystania z niniejszego urządzenia, takie jak: 1. Przed rozpoczęciem użytkowania chłodziarki, zapoznaj się dokładnie z jej instrukcją obsługi. 2. Używaj chłodziarki tylko i wyłączne zgodnie z jej przeznaczeniem, opisanym w niniejszej instrukcji. -
Page 89: Instalacja Chłodziarki
Heading 1 Instalacja chłodziarki Rozpakowywanie chłodziarki do wina 1. Usuń wszystkie elementy opakowania. Dotyczy to podłoża piankowego oraz taśmy samoprzylepnej, trzymającej elementy wyposażenia dodatkowego chłodziarki, w środku i na zewnątrz. 2. Przed podłączeniem chłodziarki do prądu upewnij się, że wszelkie pozostałości opakowania, taśma klejąca lub wydrukowane materiały zostały usunięte. -
Page 90: Wymagania Elektryczne
Heading 1 Wymagania elektryczne • Upewnij się, że gniazdko elektryczne do podłączenia chłodziarki ma odpowiednie parametry (220-240 V, 15 A) i jest prawidłowo uziemione. • Unikaj stosowania trójbolcowych wtyków przejściowych. Nie usuwaj bolca uziemiającego, aby umożliwić podłączenie wtyczki do gniazdka bez uziemienia. Takie rozwiązanie stanowi zagrożenie, ponieważ... -
Page 91: Wprowadzenie Do Głównych Funkcji Urządzenia
Wprowadzenie do podstawowych funkcji urządzenia Panel kontrolny Temperatura Temperatura Regulacja Regulacja USTAW ZASILANIE Podświetlenie (w górę) (w dół) OUT.T° IN.T° LIGHT POWER Zakres temperatury panelu wyświetlacza wynosi 5 ~ 20°C (41 ~ 68°F). Domyślne ustawienie temperatury to 12°C (54°F). Można ustawić temperaturę przechowywania wina w zależności od potrzeb. Regulacja temperatury Aby ustawić... -
Page 92: Alarm Otwartych Drzwi
Heading 1 Alarm otwartych drzwi W przypadku, gdy drzwi pozostaną otwarte na dłużej niż 1 minutę, zacznie rozbrzmiewać sygnał dźwiękowy, który wyłączy się po zamknięciu drzwi lub po naciśnięciu dowolnego przycisku na panelu wyświetlacza. Pamięć temperatury przy wyłączeniu W przypadku przerwy w zasilaniu, piwniczka automatycznie zapamięta ustawioną temperaturę. -
Page 93: Środki Ostrożności Podczas Używania Chłodziarki
Heading 1 Środki ostrożności podczas używania chłodziarki Nie należy umieszczać w chłodziarce zbyt dużo Przed umieszczeniem butelek wewnątrz wina, aby nie przekroczyć nośności półek. Nie chłodziarki należy się upewnić, że półki są należy umieszczać więcej niż cztery warstw całkowicie stabilne. butelek na każdej półce. -
Page 94: Półki
Heading 1 Półki • Półki zostały zaprojektowane, aby zapewnić łatwe czyszczenie i atrakcyjny wygląd. Większe butelki lub butelki typu Magnum (1,5 l) możesz łatwo ułożyć na półkach poprzecznych w dolnej części chłodziarki. • Chłodziarka posiada również półki do ułatwionego przechowywania i wyciągania wina. Odgłosy prawidłowej pracy, jakie mogą... -
Page 95: Właściwe Czyszczenie I Konserwacja Chłodziarki
Heading 1 Właściwe czyszczenie i konserwacja chłodziarki Czyszczenie i konserwacja Ostrzeżenie: Aby uniknąć porażenia prądem zawsze odłącz chłodziarkę od gniazdka przed przystąpieniem do jej czyszczenia. Zignorowanie tej zasady może spowodować obrażenia lub śmierć. Uwaga: Przed zastosowaniem środków czyszczących koniecznie zapoznaj się z zaleceniami i ostrzeżeniami producenta, aby uniknąć... -
Page 96: Rozwiązywanie Problemów
Heading 1 Rozwiązywanie problemów Chłodziarka nie działa: • Sprawdź, czy chłodziarka jest podłączona. • Sprawdź, czy w gniazdku elektrycznym prądu zmiennego jest zasilanie, sprawdzając mechanizmy zabezpieczające. Wina mają zbyt wysoką temperaturę: • Częste otwieranie drzwiczek. • Aby uzyskać pożądaną temperaturę pozostaw niedawno umieszczone butelki w chłodziarce na dłuższy czas. -
Page 97: Dane Techniczne•Lista Opakowania
Heading 1 Dane techniczne•Lista opakowania Dane techniczne Porażenie Dostępna Napięcie Częstotliwość Model Typ klimatu prądem Typ pojemność znamionowe znamionowa wejściowa oporu (Hz) WS120GA SN-ST 220-240 WS190GA SN-ST 220-240 Tryb Halas Ogólne wymiary Zakres Chłodziwo połączenia (poziom mocy (głębokość × temperatury (R600a) - Page 98 0070512622A Version: 2020Version B Private No.: 0070512622A Manufacturer Code: V14513...