Table of Contents
Advertisement
Advertisement
Table of Contents

Related Manuals for FP PostBase Mini


Summary of Contents for FP PostBase Mini
- Page 1 Franking machine Operator Manual Reference Guide...
-
Page 2: About This Manual
This Operator Manual contains all relevant information on handling the PostBase Mini. Functions that are described here but are not available for each PostBase Mini (among other things because of postal requirements in the individual coun- tries) are identified as (not available in all countries). -
Page 3: Table Of Contents
Contents About this Manual _____________________________________________2 1 Safety tips ____________________________________________________6 2 A short description of the PostBase Mini __________________________8 3 Installation and commissioning _________________________________11 Step 1: Unpacking and checking the contents of the package ___________11 Step 2: Assembling PostBase Mini _______________________________12... - Page 4 Change Postal Code (ZIP) / Re-authorisation (not in all countries) ____ 64 11.14 12 Maintenance and care _________________________________________ 65 12.1 Cleaning the PostBase Mini ______________________________ 65 12.2 Checking the ink level ___________________________________ 66 12.3 Changing the ink cartridge _______________________________ 66 12.4...
- Page 5 Contents 13 Tips for troubleshooting _______________________________________79 13.1 Error messages ________________________________________79 13.2 Problems and remedies __________________________________79 14 Withdrawal and disposal of the PostBase Mini _____________________85 Appendix Technical Data ________________________________________________87 Declaration of conformity ________________________________________89 License ______________________________________________________90 Security Declaration for data usage ________________________________92...
-
Page 6: Safety Tips
• Only use one of the power supply units specified in the appendix “Technical Data”. Make sure that the power supply unit is not damaged. • Make sure the socket for connecting the PostBase Mini is close by and easily accessible at all times. - Page 7 General safety tips • Install the PostBase Mini according to the instructions. • When you move the PostBase Mini from a cold environment (i.e. below 10 °C / 50 °F): Unpack the PostBase Mini and wait at least two hours before connecting the PostBase Mini.
-
Page 8: Short Description Of The Postbase Mini
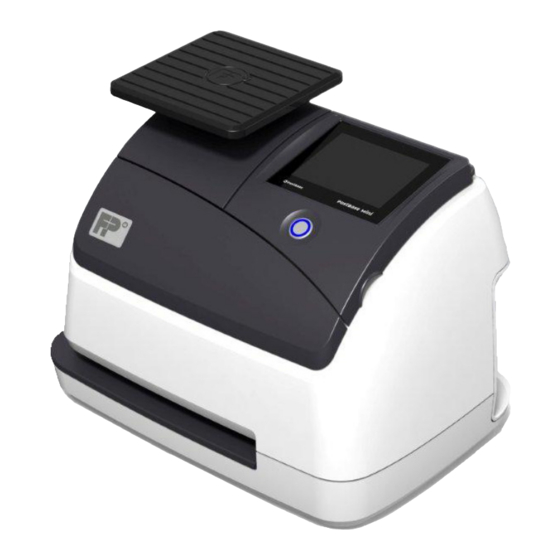
PostBase Mini A short description of the PostBase Mini Scale with Display / touch screen weighing platform Stylus for touch screen operation: pull out to the right Operating panel ink cartridge below it Button ON / OFF Letter slot Serial number plate... - Page 9 Download postage You conveniently download the postage for franking online from the data centre into your franking machine. If desired, PostBase Mini can also, by itself, make sure there is always sufficient postage available and prompt you automatically to download postage.
- Page 10 The determined weight directly affects the product settings. Account function – PostBase Mini allows for registra- tion and billing of postage costs to accounts. Access control – PostBase Mini can be protected against unauthorised use via a PIN (Personal Identifica- tion Number).
-
Page 11: Installation And Commissioning
Step 1: Unpacking and checking the contents of the package Warning! Do not start operating PostBase Mini if parts are damaged or missing. Please contact the Customer Support. Caution! Carry out the steps exactly in the given order. Also, consult the installation instructions (fold-out). -
Page 12: Step 2: Assembling Postbase Mini
Caution! When you move PostBase Mini from a cold environment (i.e. below 10 °C / 50 °F): Unpack the PostBase Mini and wait at least 2 hours before connecting PostBase Mini. PostBase Mini requires this period to adapt to the ambient conditions. -
Page 13: Step 3: Removing The Transport Fixture
Installation and commissioning Step 3: Removing the transport fixture To protect the print system, the ink cartridge holder is secured with tape (transport fixture). Remove the transport fixture: • Lift up the operating panel as far as it goes. It snaps in this position. •... -
Page 14: Step 4: Connecting Postbase Mini
Connect PostBase Mini only to a grounded single-phase power socket. Make sure your office power supply conforms to the power requirements indicated on the power supply unit’s serial number plate. Make sure the socket for connecting PostBase Mini is close by and easily accessible at all times. Optional •... -
Page 15: Step 5: Turning The Postbase Mini On
Step 5: Turning the PostBase Mini on • Press the button on the operating panel. The display lighting and button illumination switch on. PostBase Mini performs a self test and then starts the installation procedure. Step 6: Installing PostBase Mini PostBase Mini will guide you step by step through the installation procedure. - Page 16 PostBase Mini comes with pre-set connec- tion settings that should work in most cases. • Press the button to use these settings. PostBase Mini tests the connection to the FP Infrastructure. If no connection can be established, the wiz- ard for entering connection parameters is opened.
- Page 17 Installation and commissioning PostBase Mini then asks you to insert the ink cartridge. • Lift up the operating panel as far as it goes. You can feel it engage. • Remove the ink cartridge from the packing. Do not remove the protection strip (nozzle protection) yet.
- Page 18 While doing so, you will have to overcome a slight spring pres- sure. The illustration on the left shows the correct position of the latch. • Lower the operating panel back into position. PostBase Mini calibrates the cartridge …...
- Page 19 As soon as the sensor (in the back right hand corner of the letter slot) detects the envelope, the PostBase Mini grips the envelope tightly and prints the test print. Test print (example) • On the test print, determine the numbers where –...
- Page 20 PostBase Mini Adjust cartridge: horizontal line • Type the number where the horizontal par- tial lines are as exactly next to each other as possible. In the example, this is number ‘4’. (If necessary: Press CE to clear the dis- played number.)
- Page 21 Installation and commissioning • Contact to the data centre / load postage. To be able to frank with your PostBase Mini, the PostBase Mini must have the corre- sponding postage credit available. For this, a connection to the data centre is necessary.
-
Page 22: The Basics Of Operation
PostBase Mini The basics of operation In this chapter, you will learn about the basic functions of the PostBase Mini and how to handle the touch screen. Turning the PostBase Mini on / off Turning on • Press the button on the operating panel. -
Page 23: Standby
The PostBase Mini franking machine will go to standby automatically if it is not used for some time. The display is dark and the button is illumi- nated in standby. The touch function is inactive. You can ‘wake up’ PostBase Mini by briefly pressing the button. -
Page 24: Screen Elements And Operation Philosophy
4.3.1 The touch screen The touch screen is active when the display is lit. To operate the PostBase Mini, simply touch the screen elements with your finger. General operation philosophy You briefly touch the desired screen element (in the example: the postage button) with your finger. - Page 25 The basics of operation Buttons You distinguish buttons from the screen background by a frame. They can have vari- ous states, depending on the function: Button can be pressed / is active. Button is selected. Button is being pressed. Button cannot be pressed / is deactivated. Standard buttons The term ‘standard button’...
-
Page 26: The Home Screen
Operation philosophy A function can be edited or selected by simply touching its button. Depending on the respective function, the PostBase Mini opens a list, an adjustment menu or a menu offering further options. In the chapters to follow, you will be introduced to each of the menu and window types and their operation. -
Page 27: The Product Calculation Menu
The basics of operation 4.3.3 The Product calculation menu In the Product calculation menu, you set the product for franking. Calling up the Product calculation menu You open the Product calculation menu by pressing the button showing the postage value. The left area of the display shows the availa- Postage Weight... - Page 28 You select the mailing data for a product by pressing the button with the desired setting. PostBase Mini applies your selection and shows the next available mailing data to the left in the display. PostBase Mini guides you through the postage calculation process step by step. Press the button to accept the current setting and to return to the Home screen.
-
Page 29: The Menu
The basics of operation 4.3.4 The Menu Use the M button to open the Menu. From this Menu, you can access the basic settings, administration, and service functions. Menu (example) Use the arrow buttons to scroll to the next page and back in the Menu. More functions 4.3.5 Lists... -
Page 30: Adjustment Menus
PostBase Mini 4.3.6 Adjustment menus A separate menu each opens for editing and selecting settings. There are different types of adjustment menus, for example lists where you select a setting or menus with a keypad for entering figures or letters. -
Page 31: Pop-Up Windows
(pop-up window). The pop-up prompts you for an action. Messages and the ‘PC Mode’ (using the PC control software for PostBase Mini) also appear as a pop-up. Some pop-up messages feature auto-confir- mation, i.e. they automatically close after some time. -
Page 32: Procedures (Wizards)
PostBase Mini 4.3.8 Procedures (wizards) For more complex settings, e.g. when setting up connection data, PostBase Mini guides you through all necessary actions step by step. Different window types are used, depending on requirements. Press the button to accept the current settings and to go to the next step. -
Page 33: Setting The Franking Imprint
Setting the franking imprint Setting the franking imprint Set advertising imprint Set postal product / postage Date Product details Open list with further Shortcuts Open the Menu: shortcuts (set postal product) – setting date – changing account This chapter describes the required settings for franking and the additional possible advertising imprint: –... -
Page 34: Product / Postage
PostBase Mini Product / postage PostBase Mini sets the postage, i.e. the price for the postal product using the chosen mailing data (destination, type, mail piece dimensions and additional services if appli- cable), in conjunction with the displayed weight. Use the shortcuts to fast and easily set up a product. -
Page 35: Setting Mailing Data
In the Home screen: • Press the postage button. PostBase Mini opens the Product calculation menu. PostBase Mini prompts you for all required details regarding the mail piece. • Select the respective desired setting by pressing the button. The postage appears as soon as all neces- sary mailing data have been selected. -
Page 36: Setting The Weight - Weighing The Mail Piece
• Please heed the maximum weight of 2 kg (5 lb). • Place large mail pieces on the scale so that these are not touching the housing of the PostBase Mini. This prevents you getting false weighing results. • The scale only determines a new weight if it was emptied before. -
Page 37: Setting The Weight Manually (Not In All Countries)
Setting the weight manually (not in all countries) 5.1.4 For certain products, the PostBase Mini offers the possibility to enter the weight man- ually. This feature is necessary for mail pieces that exceed the scale’s weighing range (>2 kg / >5 lb). -
Page 38: Advertising Imprint
PostBase Mini Advertising imprint With the franking imprint, PostBase Mini can print an advertising imprint of your choice on your mail piece. Advertising imprints may be: – Graphical advertisements – Text messages / SMS texts (optional, not in all countries). -
Page 39: Date (Not Changeable In All Countries)
The date for the franking imprint is set automatically to the current date by the built- in clock. You can forward the date for the franking imprint. The PostBase Mini rejects invalid input, e.g. a franking date too far in the future or backward dating. -
Page 40: Franking
PostBase Mini Franking In this chapter, you can read how to frank your mail pieces with the PostBase Mini. You will learn how to set the account to register the postage used and how to insert letters correctly. Also, the counter function available for franking is described. -
Page 41: Selecting / Changing An Account
Franking Selecting / changing an account When the account function is active, PostBase Mini books all frankings to the cur- rently set account. The currently set account is displayed in the Home screen. Changing the account • Open the M •... -
Page 42: Positioning And Franking A Letter
PostBase Mini Positioning and franking a letter You can use the PostBase Mini to frank postcards and letters up to a thickness of 6 mm (0.23"). For thicker mail pieces, frank the empty envelope or use the special franking labels of at least 140 mm (5.5") length. You can order suitable labels for the PostBase Mini from Francotyp-Postalia. -
Page 43: Displaying And Resetting The Piece Counter
Apart from the counter for franking imprints in the register and the account counters, the PostBase Mini features a piece counter for franking imprints you can use as you like. The piece counter counts all franking imprints. You can reset this piece counter to zero or use it as a daily or job counter. -
Page 44: Using Postbase Mini In 'Pc Mode' (Optional)
PostBase Mini Using PostBase Mini in ‘PC Mode’ (optional) When PostBase Mini is connected to a PC via the optional FP software (e.g. Navigator, RemoteOne), a corresponding pop-up is shown (similar the example shown left). Access to the imprint settings and menu functions is blocked on the PostBase Mini while in ‘PC Mode’. -
Page 45: Displaying And Printing Registers
Displaying and printing registers Displaying and printing registers PostBase Mini saves important parameters and information on used postage in registers. You can view and print the register states. • Open the M • Select R EGISTERS PostBase Mini displays the current register states. - Page 46 ECEIPT screen, press the button. • Place a label or a folded sheet (folded edge first) in the letter slot. PostBase Mini prints the register report. For further information on ‘Positioning and printing’ refer to chapter 6.3 on page 42.
-
Page 47: Download Postage (Subject To Country-Specific Regulations / Not Available In All Countries)
If users are enabled, postage download might not be available. In that case, please contact the administrator. Loading postage • Make sure PostBase Mini is ready to con- nect to the data centre (network cable is connected, correct connectivity settings). -
Page 48: Special Functions
PostBase Mini Special functions Print advert only With the special function ‘Advert Only’, you can print advertising imprints (graphical adverts and text messages) that are stored in your PostBase Mini. • Open the M • Select S PECIAL FUNCTIONS • Select A... -
Page 49: Print Numbers
6.3 on page 42. The ‘Advert Only’ special function has its own counter. PostBase Mini shows the number of imprints on the right side of the display. When quitting this function, the counter is reset to ‘0’. - Page 50 When the desired start number is displayed: • Press the button for the desired direction of counting (Ascending or Descending). Ascending Descending PostBase Mini applies start number and Number to be printed direction of counting. You can start printing Counter numbers.
-
Page 51: Account Administration
Account administration Account administration The account function of the PostBase Mini offers you the possibility of registering and evaluating frankings separately according to accounts, i.e. according to the sending persons or departments of a company. If user management is enabled via the optional PC control software, the account administration features are only available to the administrator. -
Page 52: Display Account Information
Display account information • Open the M • Select M ANAGE CCOUNTS • Select S PostBase Mini displays the list of accounts containing the respective number and value of franked letters. 10.3 Set one account to zero • Open the M •... -
Page 53: Advanced Settings & System Information
You can view a list of all major system parameters (e.g. software version, rate table). • Open the M • Select S YSTEM PostBase Mini displays the system informa- tion. 11.2 Display brightness You can adapt the display brightness to fine-tune the gray scales and increase the legibility of the displayed texts. -
Page 54: Sound Signals
PostBase Mini 11.3 Sound signals PostBase Mini confirms certain actions with a beep. A series of sound signals indi- cates an error. You can restrict the scope of audible signals to warnings or turn off the audible signals altogether. • Open the M •... -
Page 55: User Interface Language
11.5 Standby time The PostBase Mini franking machine will go to standby automatically if it is not used for some time. The standby time is the time between your last operation and the time PostBase Mini automatically goes to standby. -
Page 56: Product After Standby (Not In All Countries)
– the product that was last used. • Open the M • Select P AFTER TANDBY PostBase Mini opens the adjustment menu for this function. The current setting is shown on a green background. • Select the desired setting. • Save the setting shown with Product after Standby –... -
Page 57: Auto Off
Advanced settings & system information 11.7 Auto Off The PostBase Mini franking machine switches off automatically if it is not used for some time. The Auto Off time is the time between your last operation and the time PostBase Mini automatically switches off. -
Page 58: Connection To Data Centre
11.9 Connection to data centre The PostBase Mini franking machine needs a connection to the data centre (Franco- typ-Postalia Infrastructure) in order that it can download funds and data. The connec- tion configuration is part of the installation procedure during commissioning. You should verify and, if necessary, correct the settings if changes were made to your sys- tem environment. - Page 59 ISABLED port DHCP. During manual configuration, you will need to enter the following parameters: – Static IP address for your PostBase Mini – Subnet mask – Default gateway – IP address of the DNS server. Please contact your network administrator for details.
- Page 60 In case your network only supports explicitly authorised devices, your network adminis- trator will require the MAC address of your PostBase Mini. You can find it in the Connec- tivity Settings menu. Reference Information for Network Administrators The PostBase Mini requires an Ethernet...
-
Page 61: View Contact Information
With the optional PC control software, you can set up a user-specific access control for the PostBase Mini. Please refer to the manual of the PC software. The menu function ‘Manage PIN’ is then only accessible with the administrator PIN. -
Page 62: Auto Postage Download (Not In All Countries)
11.12 The ‘Auto Postage Download’ feature facilitates keeping track of the remaining post- age. When enabled, PostBase Mini will warn you once the remaining postage reaches the preset threshold and will give you the opportunity to load postage. Enable ‘Auto Postage Download’ feature •... - Page 63 Advanced settings & system information Performing Auto Postage Download When the remaining postage reaches the threshold, PostBase Mini opens an appro- priate screen with the following options: • Use to load the displayed amount directly. • Use to change the displayed amount, then load postage.
-
Page 64: Remote Services
Change Postal Code (ZIP) / Re-authorisation (not in all countries) You must inform Francotyp-Postalia of the new location of your PostBase Mini if you wish to operate the PostBase Mini at another location (e.g. after a relocation). • Open the M •... -
Page 65: Maintenance And Care
Maintenance and care Maintenance and care Have your PostBase Mini cleaned and serviced regularly by an authorised service staff. This guarantees long-term, trouble-free operation. Ask about our low-cost care and maintenance agreement. You can do the following work yourself: – Cleaning housing exterior –... -
Page 66: Checking The Ink Level
12.3 Changing the ink cartridge The PostBase Mini franking machine monitors the ink level and issues a message when the ink cartridge must be replaced. We recommend that you always have a new FP ink cartridge in stock. - Page 67 Maintenance and care Changing the ink cartridge The PostBase Mini will prompt you to replace the cartridge when it is depleted. • Acknowledge the message. • Open the M • Select P RINT YSTEM • Select C HANGE ARTRIDGE The PostBase Mini moves the ink cartridge to the exchange position.
- Page 68 • Pull the ink cartridge upward out of the car- tridge holder. Inserting the new ink cartridge The full functioning of the PostBase Mini franking machine at the time of delivery can only be guaranteed when using original Francotyp-Postalia ink cartridges.
- Page 69 Maintenance and care • Remove the protection strip (nozzle pro- tection) from the ink cartridge. • Hold the ink cartridge so the contacts are facing to the front of the franking machine. • Insert the ink cartridge into the cartridge holder.
- Page 70 Please be patient until this process is complete. Aligning The PostBase Mini continues by aligning the ink cartridge and prompts you to perform a test print. For details on how to align the car- tridge, please read chapter 12.4.
-
Page 71: Aligning The Ink Cartridge
LIGNMENT • Insert an empty envelope or a folded sheet (folded edge first) into the letter slot. The PostBase Mini prints a test print. • On the test print, determine the numbers where – the horizontal lines are as exactly next to each other as possible and –... - Page 72 PostBase Mini Horizontal line • Type the number where the horizontal par- tial lines are as exactly next to each other as possible. In the example, this is number ‘4’. (If necessary: Press CE to clear the dis- played number.) •...
-
Page 73: Cleaning The Print System
Maintenance and care 12.5 Cleaning the print system 12.5.1 Starting automatic print system cleaning You should start automatic print system cleaning only if the print quality is not good enough (e.g. blank spots in the imprint after longer periods out of use). Cleaning •... -
Page 74: 12.5.2 Cleaning Ink Cartridge By Hand
YSTEM • Select C HANGE ARTRIDGE The PostBase Mini moves the ink cartridge to the exchange position. • Lift up the operating panel as far as it goes. You can feel it engage. • Unlock the ink cartridge and remove it (see... - Page 75 The minerals contained in tap water could, however, leave residues in the print head. For best cleaning results, use FP contact cleaner and cleaning cloths contained in the ‘clean & renew’ cleaning kit offered by Fran- cotyp-Postalia.
-
Page 76: Move The Motor Of The Print System To Reference Position
• Touch the red circle with the stylus. • Follow the further instructions on the display: Touch each of the displayed cali- bration circles with the stylus. The PostBase Mini will continue its start rou- tine. The touch screen is now calibrated. -
Page 77: Replacing The Battery
12.8 Replacing the battery The PostBase Mini monitors the charging state of the battery. An appropriate mes- sage appears in the display when it is time to replace the battery. Caution! The used battery has a special rated voltage of 3.6 V. There is a risk of severely damaging the machine when inserting the wrong battery. - Page 78 Symbols in the battery compartment depict the correct polarity. • Close the battery compartment. • Turn the PostBase Mini back to the upright position. • Reconnect the PostBase Mini (see page 14). • Dispose of the old battery as prescribed.
-
Page 79: Tips For Troubleshooting
Possible cause and remedy … during installation Blank display Check whether the power supply unit and the power cable are connected correctly and the PostBase Mini is turned on. Delivery is incomplete / Do not start operating the PostBase Mini. damaged... - Page 80 An error message with troubleshooting information procedure appears. If necessary: • Turn off the PostBase Mini (see chapter 4.1). Wait one minute. • Turn the PostBase Mini on again. The installation procedure restarts. Make sure the connectivity settings are correct (see chapter 11.9).
- Page 81 Please contact the administrator. Credit of the current user is too low. Have the administrator assign new credit. PostBase Mini does Sensor does not recognise the letter. not print Place a letter at the right hand edge of the letter slot and push in as far as it goes.
- Page 82 The weight is too low or the scale is overloaded. Use scale for mail pieces of the permitted weight range only. Either PostBase Mini does not recognise the scale, or the scale is defective. Call the Customer Support. … with postage loading Desired amount cannot Impermissible amount.
- Page 83 Remove and re-insert the ink cartridge. Wrong ink cartridge inserted. Observe the specifications (see page 88). Contacts of the print system are dirty. Use the ‘clean and renew’ FP cleaning kit to clean the contacts. Ink cartridge is defective. Call the Customer Support.
- Page 84 If you cannot solve the problem: Clean ink cartridge by hand (see chapter 12.5.2). Touch screen fails to react Turn off the PostBase Mini. Calibrate touch screen (see chapter 12.7). when touched User PIN is not accepted Did you select the correct user? Cancel the ‘Enter PIN’...
-
Page 85: Withdrawal And Disposal Of The Postbase Mini
Withdrawal and disposal of the PostBase Mini To ultimately decommission the PostBase Mini franking machine, you must correctly unsubscribe all postal services. PostBase Mini will guide you through all required decommissioning steps in a dialogue. We are pleased to assist if required. Please contact the Customer Support. - Page 86 PostBase Mini...
-
Page 87: Appendix Technical Data
Appendix – Technical Data Appendix Technical Data Dimensions – Length 310 mm (12.2") – Width / Depth 205 mm (8.1") – Height 230 mm (9.1") Weight 3.0 kg (6.6 lbs) Power supply 24 VDC / 0.7 A (using an external power supply unit) Protection class III Power connection External Power Supply Unit:... - Page 88 PostBase Mini Ink cartridge Ink cartridge FP ink cartridge for PostBase Mini (ink colour depending on country) Operating and storage +15 °C to +35 °C (59 °F to 95 °F) conditions Only use in closed rooms Do not expose to direct sunlight Rel.
-
Page 89: Declaration Of Conformity
Appendix – Technical Data Declaration of conformity... -
Page 90: License
PostBase Mini License This is a copy of the current LICENSE file inside the CVS repository. LICENSE ISSUES ============== The OpenSSL toolkit stays under a dual license, i.e. both the conditions of the OpenSSL License and the original SSLeay license apply to the toolkit. - Page 91 Appendix – License * This product includes cryptographic software written by Eric Young * (eay@cryptsoft.com). This product includes software written by Tim * Hudson (tjh@cryptsoft.com). Original SSLeay License ----------------------- /* Copyright (C) 1995-1998 Eric Young (eay@cryptsoft.com) * All rights reserved. * This package is an SSL implementation written * by Eric Young (eay@cryptsoft.com).
-
Page 92: Security Declaration For Data Usage
Security Declaration for data usage Product Description: PostBase Mini franking machine The PostBase Mini franking machine is connected to the user’s local network through an Ethernet interface to share data with the Francotyp-Postalia Data Centre using both the local network and a suitable available internet connection provided by the user. -
Page 93: Graphical Symbols And Product Safety Labels
Graphical symbols and product safety labels The following graphical symbols and product safety labels may be used on the PostBase Mini franking machine, depending on the respective version. You will find the product safety labels on the serial number plate of the product. - Page 94 PostBase Mini Connection for specified external power supply unit (see page 87). Symbol for direct voltage. Symbol for alternating voltage. USB ports for connection to a personal computer (PC) and to external USB devices. Interface for connection to a local computer network (LAN).
-
Page 95: User Interface Symbols (Overview)
Display information Call up the print function Menu functions Open the menu (access basic settings, special features, administration functions) Postage download / Synchronise data between PostBase Mini and the data centre (subject to country-specific regulations) Display register report (with print function) - Page 96 PostBase Mini Set franking date (forward dating) (not in all countries) Print system Display filling level of the ink cartridge Clean print system Align cartridge Replace cartridge Calibrate cartridge Move the motor of the print system to reference position Switch account function on / off,...
- Page 97 Appendix – User interface symbols (overview) Display / clear down piece counter Adjust display brightness Brighter Default Darker Display system information (postal serial number, software version, rate table version, …) Change language Display / edit connectivity settings (network connection) Withdraw machine (not in all countries) Set sound signals Adjust standby times Configure ‘Auto Off’...
- Page 98 General error Printing plate error Account error Print system error Scale error Security device error Communication error with FP infrastructure Postage calculation error Communication error with the PC (only when using the optional PC control software) Postage warning, threshold is reached...
-
Page 99: Index
Appendix – Index Index Battery compartment 8, 77 Button (ON / OFF) 8 Access control 10, 61 Buttons 25 disable 62 symbols (overview) 95 enable 61 Account 26, 41 change 33, 41 current account 26 Calibrate display in the Home screen 26 ink cartridge 65 display information 52 touch screen 76... - Page 100 Item counter. See Piece counter Ethernet cable 11, 60 Keypad 30 Filling level ink cartridge 66 Firewall 60 Forward dating 39 Label 42 FP Infrastructure 58, 64 minimum size 88 suitable labels 42 FPI. See FP Infrastructure Francotyp-Postalia Infrastructure 58 types 88...
- Page 101 Appendix – Index LAN 14 LAN port 8 ON / OFF 8 Language 55 Operating conditions 87 change 55 Operation philosophy set 15 Home screen 26 Letter in general 24 frank 42 product calculation menu 27 insert 42 position 42 Letter slot 8 License 90 Patents (USA) 92...
- Page 102 PostBase Mini PostBase Mini 11 Product calculation menu 27 assembling 12 calling up 27 button 8 cancelling 28 controlling via PC 44 exit 28 disconnecting from mains 23 operation philosophy 27 install 11 overview 27 overview 8 quitting 28 short description 8...
- Page 103 Appendix – Index Shortcut 34 Text message 26, 38 available shortcuts 34 enter / change 38 edit / save 34 print separately 48 further shortcuts 26, 33 set 38 select 26, 33 Touch functionality 24 selected shortcut 26, 34 Touch screen 8, 24 set postal product 33 adjust brightness 53 shortcut 1 after standby 56...
- Page 104 PostBase Mini...
- Page 105 For your notes...
- Page 106 For your notes...
-
Page 107: Customer Support / Warranty
Customer Support / Warranty Customer Support Every PostBase Mini is thoroughly checked before leaving the factory. Should any faults occur with your PostBase Mini in spite of our extensive quality con- trol, please contact Francotyp-Postalia help line. fp-francotyp.com Warranty For warranty information, refer to the country- specific addendum to the PostBase Mini Operator Manual (if available in your country).
Need help?
Do you have a question about the PostBase Mini and is the answer not in the manual?
Questions and answers