Table of Contents
Advertisement
Quick Links
PHONES
(044) 338-0-130
(050) 332-0-130
(063) 577-0-130
(067) 353-0-130
CAR RECEIVERS — Receivers • Media receivers and stations • Native receivers • CD/DVD changers • FM-modulators/USB adapters • Flash memory • Facia plates and adapters • Antennas • Accessories |
CAR AUDIO — Car audio speakers • Amplifiers • Subwoofers • Processors • Crossovers • Headphones • Accessories | TRIP COMPUTERS — Universal computers • Model computers • Accessories |
GPS NAVIGATORS — Portable GPS • Built-in GPS • GPS modules • GPS trackers • Antennas for GPS navigators • Accessories | VIDEO — DVR • TV sets and monitors • Car TV tuners • Cameras • Videomodules
• Transcoders • Car TV antennas • Accessories | SECURITY SYSTEMS — Car alarms • Bike alarms • Mechanical blockers • Immobilizers • Sensors • Accessories | OPTIC AND LIGHT — Xenon • Bixenon • Lamps
• LED • Stroboscopes • Optic and Headlights • Washers • Light, rain sensors • Accessories | PARKTRONICS AND MIRRORS — Rear parktronics • Front parktronics • Combined parktronics • Rear-view mirrors
• Accessories | HEATING AND COOLING — Seat heaters • Mirrors heaters • Screen-wipers heaters • Engine heaters • Auto-refrigerators • Air conditioning units • Accessories | TUNING — Vibro-isolation
• Noise-isolation • Tint films • Accessories | ACCESSORIES — Radar-detectors • Handsfree, Bluetooth • Windowlifters • Compressors • Beeps, loudspeakers • Measuring instruments • Cleaners • Carsits
• Miscellaneous | MOUNTING — Installation kits • Upholstery • Grilles • Tubes • Cable and wire • Tools • Miscellaneous | POWER — Batteries • Converters • Start-charging equipment • Capacitors
• Accessories | MARINE AUDIO AND ELECTRONICS — Marine receivers • Marine audio speakers • Marine subwoofers • Marine amplifiers • Accessories | CAR CARE PRODUCTS — Additives • Washer fluid •
Care accessories • Car polish • Flavors • Adhesives and sealants | LIQUID AND OIL — Motor oil • Transmission oil • Brake fluid • Antifreeze • Technical lubricant
In store "130" you can find and buy almost all necessary goods for your auto in
Kyiv and other cities, delivery by ground and postal services. Our experienced
consultants will provide you with exhaustive information and help you to chose
the very particular thing. We are waiting for you at the address
http://130.com.ua
Internet store of
autogoods
SKYPE
km-130
Advertisement
Table of Contents

Related Manuals for Kenwood DMX100BT


Summary of Contents for Kenwood DMX100BT
- Page 1 Internet store of PHONES (044) 338-0-130 autogoods (050) 332-0-130 (063) 577-0-130 SKYPE (067) 353-0-130 km-130 CAR RECEIVERS — Receivers • Media receivers and stations • Native receivers • CD/DVD changers • FM-modulators/USB adapters • Flash memory • Facia plates and adapters • Antennas • Accessories | CAR AUDIO —...
- Page 2 DMX100BT MONITOR WITH RECEIVER INSTRUCTION MANUAL • Updated information (the latest Instruction Manual, etc.) is available from <http://www.kenwood.com/cs/ce/>. © 2016 JVC KENWOOD Corporation B5A-1692-00 (E/R) Autogoods “130”...
-
Page 3: Table Of Contents
Preparation ........................8 Playback operations ....................8 • When you purchase optional accessories, check Radio ................... 10 with your KENWOOD dealer to make sure that they Radio Basic Operation..................10 work with your model and in your area. Presetting stations ....................10 •... -
Page 4: Getting Started
Getting Started Clock settings Turn the ignition key of your car to ACC. The unit is turned on. Ñ Synchronizing the clock time with FM RDS Press the <MENU> button. Activate [RDS Clock Sync]. See “Tuner Setup” Touch [SETUP]. (P.11). Ñ... -
Page 5: Basics
Basics Basics Functions of the Buttons on the Front Common operations Panel Ñ Turning on the power Press the <AUD> button. Ñ Turning off the power Press and hold the <AUD> button. 5 6 7 Ñ Adjusting the volume 1 s (Reset) Press the <S>... -
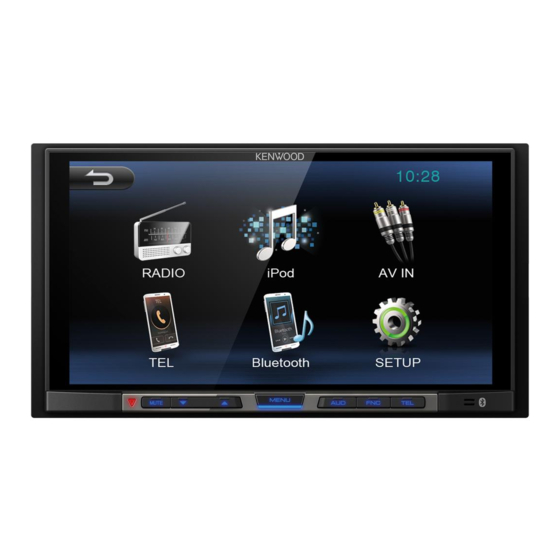
Page 6: Top Menu Screen Descriptions
Basics TOP MENU screen descriptions Source control screen descriptions You can perform source playback operations on the Press the <MENU> button. source control screen. TOP MENU screen appears. 1 Displays the TOP MENU screen. 2 [EQ] Displays the Equalizer screen. (P.15) [BASS] Sets the amount of bass boost among “OFF”... -
Page 7: Usb
Preparation Playback operations Ñ Connecting a USB device Ñ Control the music you are listening to on the source control screen. Remove the cap of the USB terminal. Connect the USB device with the USB cable. The unit reads the device and playback starts. Ñ... - Page 8 Ñ Function menu 3 [Zoom] : Select the zoom ratio. “Off”, “x2”, “x3”, “x4”, “1/2”, “1/3”, “1/4” Touch [FNC]. [R] [S] [T] [U] : Scrolls the screen. Function screen appears. 4 Select the screen mode. 16:9 ratio, 4:3 ratio Set each item as follows. Ñ...
-
Page 9: Ipod/Iphone
iPod/iPhone iPod/iPhone Preparation Playback operations Ñ Connecting iPod/iPhone Ñ Control the music you are listening to on the source control screen. • For Lightning connector models: Use USB Audio cable for iPod/iPhone—KCA-iP103 (optional accessory). • For details about connecting iPod/iPhone, see page 21 . - Page 10 iPod/iPhone Ñ Selecting a content in a list Ñ Function menu Touch [ Touch [FNC]. Function screen appears. Touch the desired category. Set each item as follows. The list is sorted by selected category. Repeat * Touch desired item. Selects Repeat playback mode. Off: Repeat off One: Functions the same as Repeat One.
-
Page 11: Radio
Radio Radio Radio Basic Operation FM RDS features (Europe sales area only) Press the <MENU> button. Ñ Search by program type Touch [Radio]. Ñ Source control screen Touch [FNC]. Function screen appears. Touch [PTY List]. Select a program type from the list. 1 Displays the information of the current station: PS name, Frequency, PTY Genre, Preset number 2 Recalls the memorized station. -
Page 12: Tuner Setup
External Components Radio Tuner Setup Using external audio/video players Ñ Function menu Ñ Starting playback Touch [FNC]. Connect an external component to the AV-IN input terminal. (P.20) Function screen appears. Set each item as follows. Press the <MENU> button. Touch [AV-IN]. Turn on the connected component and start playing the source. -
Page 13: Bluetooth Smartphone
Bluetooth device currently connected and then register the new device. Turn on the Bluetooth function on your smartphone/cell-phone. Search the unit (“DMX100BT”) from your smartphone/cell-phone. Confirm the request on the device Pairing and connection are established. “Connect OK” appears. -
Page 14: Make A Phone Call
Bluetooth smartphone Call using the phonebook Make a phone call 1) Touch [ Press the <MENU> button. 2) Select the name from the list. Touch [TEL]. See the table below for each operation method. 3) Select the number from the list. Call by entering a phone number 1) Touch [ 2) Enter a phone number with number keys. -
Page 15: Playing Bluetooth Audio Device
Bluetooth smartphone Ñ Selecting a track in a list Playing Bluetooth Audio Device Touch [ Press the <MENU> button. Touch [6] to moves to the upper hierarchy. Touch [Bluetooth]. Touch the desired folder. Ñ Source control screen When you touch a folder its contents are displayed. 1 The jacket of the currently playing file is displayed. -
Page 16: Controlling Audio
Controlling Audio Controlling General Audio Equalizer Control Press the <MENU> button. Press the <MENU> button. Touch [SETUP]. Touch [SETUP]. Touch [Audio]. Touch [EQ]. Touch [Speaker]. Set each item as follows. Set each item as follows. 1 To recall the preset equalizer curve. 2 You can select frequency bar and adjust its level by [C] [D] Adjust the left and right volume balance. -
Page 17: Remote Control
Remote control This unit can be operated using the remote control. For Latin America sales area, the remote control is supplied with the unit. For Europe sales area, the remote control KNA- RCDV331 (optional accessory) can be used. Turn its operation mode switch to “DVD”... -
Page 18: Installation
Installation Installation Before Installation to which they correspond. The unit may be damaged or fail to work if you share the ¤ wires or ground Before installation of this unit, please note the them to any metal part in the car. following precautions. -
Page 19: Installing The Unit
Installation Ñ Installation procedure Ñ Trim plate 1) To prevent a short circuit, remove the key from 1) Attach accessory 1 to the unit. the ignition and disconnect the ¤ terminal of the battery. 2) Make the proper input and output wire connections for each unit. - Page 20 Installation Ñ Removing the trim plate Ñ Removing the unit 1) Use the extraction key (accessory 3) to lever out the 1) Remove the trim plate by referring to step 1 in four tabs (two on the upper part, two on the lower “Removing the trim plate”.
- Page 21 • Make sure that the pin assignment of the connector matches with the KENWOOD unit. • Take extra notice of the power wire. • In case battery wire and ignition wire are not corresponding then change them accordingly.
- Page 22 Installation Ñ Connecting an iPod/iPhone Latin America sales area only iPod/iPhone Lightning connector KCA-iP103 (0.8m) 1 3 5 7 2 4 6 8 1 3 5 7 2 4 6 8 Accessory 5 USB terminal (0.8 m) Accessory 6 5V = 1A Speaker impedance: 4-8 Ω...
-
Page 23: About This Unit
About this Unit About this Unit More information Troubleshooting What appears to be trouble is not always serious. Ñ Playable Audio files Check the following points before calling a service Audio Bit rate Sampling frequency center. format • For operations with the external components, refer also to the instructions supplied with the adapters MP3 (.mp3) 16 –... -
Page 24: Copyrights
• Turn on the video component if it is not on. the Bluetooth SIG, Inc. and any use of such marks • Connect the video component correctly. by JVC KENWOOD Corporation is under license. Other trademarks and trade names are those of their Ñ Bluetooth respective owners. -
Page 25: Specifications
About this Unit Ñ Bluetooth section Specifications Technology Ñ Monitor section : Bluetooth Ver.3.0 Frequency Picture Size : 2.402 – 2.480 GHz : 6.75 inches (diagonal) wide : 151.8 mm (W) × 79.7 mm (H) Output Power : +4dBm (MAX), 0dBm (AVE), Power Class2 Display System : Transparent TN LCD panel Maximum Communication range... - Page 26 About this Unit Ñ Information on Disposal of Old Electrical Ñ AM tuner section and Electronic Equipment and Batteries Frequency Range (step) (applicable for EU countries that have MW: 531 – 1611 kHz (9 kHz) (Europe sales area) adopted separate waste collection MW: 530 –...