Table of Contents
Advertisement
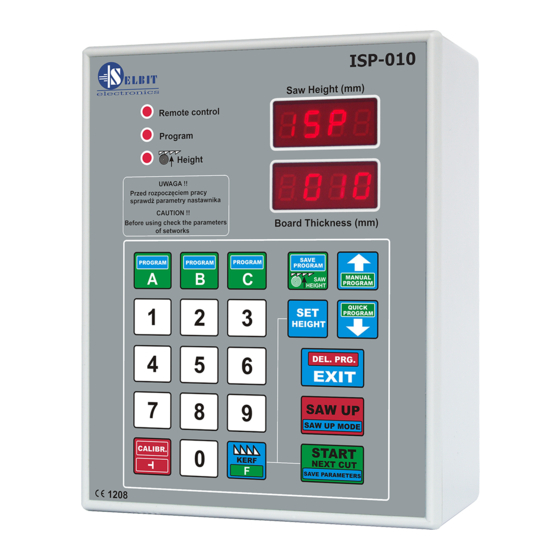
Automatic thickness controller for sawing frame machines
Automatic thickness controller for sawing frame machines
Automatic thickness controller for sawing frame machines
Automatic thickness controller ISP-010 is designed to be mounted on the sawing frame
Automatic thickness controller ISP
machine.
Before assembly and start please read this handbook manual carefully, instructions
Before assembly and start please read this handbook manual carefully, instructions
Before assembly and start please read this handbook manual carefully, instructions
provided help you in correct mounting and operating of our product.
provided help you in correct mounting and operating of our product.
MANUAL HANDBOOK
MANUAL HANDBOOK
ISP - 010
010 is designed to be mounted on the sawing frame
Advertisement
Table of Contents

Related Manuals for Selbit ISP - 010


Summary of Contents for Selbit ISP - 010
- Page 1 Automatic thickness controller for sawing frame machines Automatic thickness controller for sawing frame machines Automatic thickness controller for sawing frame machines ISP - 010 Automatic thickness controller ISP Automatic thickness controller ISP-010 is designed to be mounted on the sawing frame 010 is designed to be mounted on the sawing frame machine.
- Page 2 If on the main panel is no place to mount controller, it is possible to add it as separate device (fig. 2). Figure 1. Controller mounting on the main board. Figure 2. Mounted controller as separate device. In case of controller mounting as a www.selbit.pl - 2 -...
- Page 3 Anti-disturbance choke CPZ (WX1P 224M 440V) added in the controller kit is designed to protect from any other electromagnetic disturbance made by other electrical devices mounted on the frame machine saw. Its correct mounting is decisive for correct controller operating. www.selbit.pl - 3 -...
- Page 4 Example of the encoder mounting is shown at the photo 4a below. Photo 4a. Example of the necoder mounting. Fig. 4 Encoder mounting ex ample. www.selbit.pl - 4 -...
- Page 5 SCALE SLIDE is faced on the magnetic tape side. The sensor and the tape should be mounted in a such way that during feeding sensor “is above” the tape in all range. Please notice the stability of the tape and the sensor during normal operating. www.selbit.pl - 5 -...
- Page 6 To create such a way of connection please use contactors cause disconnecting of the other). To create such a way of connection please use ancillary contactors and connect them according to the diagram below. ancillary contactors and connect them according to the diagram below. www.selbit.pl - 6 -...
- Page 7 Fig. 7 Contactors steering cables diagram connections There is a possibility to connect contactors steering cables direct to the contactors thus to meet original connection configurations but instructions given above provide simpler solution. www.selbit.pl - 7 -...
- Page 8 MSK-320 with controller’s junction marked as (+) plus black cable of MSK-320 with controller’s junction marked as (-) minus red cable of MSK-320 with controller’s junction marked as IN-1 orange cable of MSK-320 with controller’s junction marked as IN-2 www.selbit.pl - 8 -...
- Page 9 8 should be displayed. Now press “Start/Next Cut” button and the controller should move the head saw a little bit down. If this movement is up, please check the connections with up and down feeding and it is required exchange junctions DWN with www.selbit.pl - 9 -...
- Page 10 1. If the value is not correct, please type in required one and save it to the controller’s memory pressing “Start/Next Cut” button. Text “Save” should be shown. www.selbit.pl - 10 -...
- Page 11 After checking and eventually changing the value of the saw trace to save it to the controller’s memory pressing “Start/Next Cut” button. Text “Save” should be shown. 3 – Auto-calibration (controller’s checking in with technical parameters of the sawing frame machine where its mounted) www.selbit.pl - 11 -...
- Page 12 Press and hold “Set Height” button for 3 seconds and on the upper display dashes will be displayed. Next please type in the read actual saw height value using numeric keyboard. Please type the value briskly because with longer pause controller end this operation. If there www.selbit.pl - 12 -...
- Page 13 Saw for about 12 mm. “HI” says that controller operate in “Saw Up” mode and it feed up the head saw for about 12 mm plus last cut value. To change modes, please use arrow buttons. Please save mode with “Start/Next Cut” button. www.selbit.pl - 13 -...
- Page 14 (A, B or C) type in the value and eventually press next button to store next cutting value After desired values save them using “Start/Next Cut button”. “Save” confirm operation. www.selbit.pl - 14 -...
- Page 15 Every cutting operation when the “Saw UP” button is pressed, the head saw is being raised up on the initial level. To erased this level please press shortly “Saw Height” button. www.selbit.pl - 15 -...
- Page 16 Next please press “Start/Next Cut” and controller sets up the saw on the first cut level and now the cutting process is starts in manual mode. www.selbit.pl - 16 -...
- Page 17 - 17 -...
- Page 18 (if it is required to use the settled backward saw height as it is in case manual program). If the tip dimension is not being used, please save the program without providing it. www.selbit.pl - 18 -...
- Page 19 - 19 -...
- Page 20 “Save Program” button. If all of the 60 position are not used, the controller automatically overwrite them with last provided position. Overwriting causes eventually fitting to bigger diameter of the log than predicted by the operator. www.selbit.pl - 20 -...
- Page 21 In this case position of the head saw is make without under dimension movement and its stopped while moving from top to the bottom. In some cases it can cause increase of the accuracy of the last dimension positioning if its value is smaller or equal 30 mm. www.selbit.pl - 21 -...
- Page 22 Clr to disable the automatic downward approach motion; select Set to activate the automatic approach motion). 3. Confirm your selection by briefly pressing the STARTkey; the message Save on the display confirms that the selection has been saved. The adjuster saves the selection after disconnecting the power supply. www.selbit.pl - 22 -...
- Page 23 (settingClrresults in turning off the upward movement, and setting Set results in turning on the upward movement). 3 –The choice is confirmed by a short pressing START button, and Save button confirms the selected choice. The controller keeps the selected adjustment once the power is off. CHAPTER 11 www.selbit.pl - 23 -...
- Page 24 (ch. 3 p.1) check and eventually correct saw trace value (ch. 3 p.2) make auto-calibration (ch. 3 p. 3) 5 During automatic movements controller turns the feeding down and displays: www.selbit.pl - 24 -...
- Page 25 MSK-320 encoder type check its mounting and distance from the magnetic tape check controlling connections DWN and UP with all electronic connections. 6 During auto-calibration controller stops and displays Action: check as it is above. www.selbit.pl - 25 -...
Need help?
Do you have a question about the ISP - 010 and is the answer not in the manual?
Questions and answers