Table of Contents
Advertisement
Advertisement
Table of Contents

Summary of Contents for TMI Products 49-85
- Page 1 TESTING MACHINES, INC. The Finest Test Equipment for all Industries 49-85/86/87 MICROMETERS PLEASE READ BEFORE OPERATING UNIT 49-85/86/87 Rev.E digital-micrometer-ld3581-49-86-m44.pdf 1 digital-micrometer-ld3581-49-86-m44.pdf 1 15-6-2020 14:37:32 15-6-2020 14:37:32...
- Page 2 Supplying the requested information on the repair policy page enables our Technical Support Staff to service your needs faster. Please contact us at (302) 613-5600 if additional information is required. Sincerely, Testing Machines, Inc. 49-85/86/87 Rev.E digital-micrometer-ld3581-49-86-m44.pdf 2 digital-micrometer-ld3581-49-86-m44.pdf 2 15-6-2020 14:37:58...
- Page 3 15. Adjust only those controls that are covered by the operating instructions. Improper adjustments of other controls may result in damage to the instrument and will often require extensive work by a technician to restore the unit to normal operation. 49-85/86/87 Rev.E digital-micrometer-ld3581-49-86-m44.pdf 3 digital-micrometer-ld3581-49-86-m44.pdf 3...
- Page 4 This may only be done by a trained service engineer! 17. Instrument Labels: The following labels can be found on the instrument. Earth (Ground) Electrical Shock Warning Consult the Operator’s Manual 49-85/86/87 Rev.E digital-micrometer-ld3581-49-86-m44.pdf 4 digital-micrometer-ld3581-49-86-m44.pdf 4 15-6-2020 14:37:59 15-6-2020 14:37:59...
-
Page 5: Table Of Contents
CALIBRATION GAUGE ..........................7 FEATURES ..............................7 NAME AND FUNCTION OF PARTS ....................... 8 SETUP ................................12 OPERATION ...............................12 INTRODUCTION ............................16 PARALLELISM CHECK/ADJUSTMENT ....................16 STATISTICS ………………………………………………………………………………………..……. 15 SERIAL DATA OUTPUT …………………………………….……………………...…………………. 15 MAINTENANCE ............................18 49-85/86/87 Rev.E digital-micrometer-ld3581-49-86-m44.pdf 5 digital-micrometer-ld3581-49-86-m44.pdf 5 15-6-2020 14:37:59 15-6-2020 14:37:59... -
Page 6: Introduction
22 lb. (10kg) Power Requirements: 90-264VAC, 50/60 Hz Ranges of Measurement: For Models 49-85 and 49-86: Imperial Units; 0-0.050 in. x 0.0000254 in. resolution SI Units; 0-1.270mm x 0.0005mm resolution For Models 49-87: Imperial Units; 0-0.50 in. x 0.0000254 in. resolution SI Units;... -
Page 7: List Of Equipment
Available Accessories: For Models 49-85 and 49-86: TMI # 35-12-02 Gauge Blocks for accurate calibration (.010 in./.254mm, .020 in./.508mm, .030 in./.762mm, .040 in./1.016mm and .050 in./1.270mm in thickness) For Models 49-87: TMI # 35-12-03 Gauge Blocks for accurate calibration (0.010 in./.254mm, .100 in./2.54mm, .200 in./5.08mm, .300 in./7.62mm, .400 in./10.16mm and .500 in./12.70mm in thickness) -
Page 8: Name And Function Of Parts
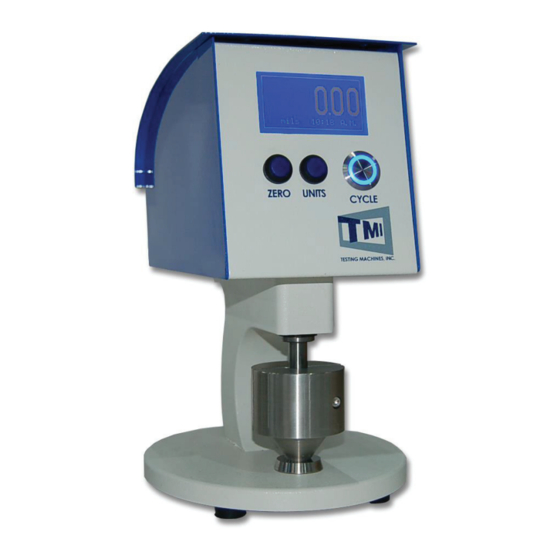
(In Menus this button will move the highlighted area between different options.) Units Button: This button is located on the middle of the front panel. In the 49-85 instrument, this button will cycle the units through μm, mils, millimeters, and inches. (In Menus this button will cycle through available options for the highlighted setting or accept the selected command depending on the menu.) In the 49-86 and 49-87 instruments, the UNITS button is used to access... - Page 9 14. Base Plate: The solid plate that the machine stands on. 15. Rubber Foot: To make sure the machine stands flat and secure on the ground; the machine has four rubber spacing feet. TMI # 240-001 49-85/86/87 Rev.E digital-micrometer-ld3581-49-86-m44.pdf 9 digital-micrometer-ld3581-49-86-m44.pdf 9...
- Page 10 Figure 1. 49-85/86/87 Rev.E digital-micrometer-ld3581-49-86-m44.pdf 10 digital-micrometer-ld3581-49-86-m44.pdf 10 15-6-2020 14:37:59 15-6-2020 14:37:59...
- Page 11 Figure 2. 49-85/86/87 Rev.E digital-micrometer-ld3581-49-86-m44.pdf 11 digital-micrometer-ld3581-49-86-m44.pdf 11 15-6-2020 14:37:59 15-6-2020 14:37:59...
-
Page 12: Setup
Also visually inspect the anvil surfaces for any debris, it might be necessary to use a small amount of rubbing alcohol to clean them. 49-85/86/87 Rev.E digital-micrometer-ld3581-49-86-m44.pdf 12 digital-micrometer-ld3581-49-86-m44.pdf 12... - Page 13 Pressing this will tell the machine to zero itself the next time that it comes to rest on the lower platen or other static object. If you wish, you can perform a quick check of your micrometer. This is done with the TMI Gauge Blocks: For Model 49-85 and 49-86: TMI # 35-12-02 For Model 49-87: TMI # 35-12-03 Slip one of the gauge blocks between the pressure foot and the anvil.
- Page 14 GraphMaster. LED Pulse: This will toggle the Cycle Button’s LED functions between constantly on and pulsing when a test is being conducted. This has no effect on the machine’s function. 49-85/86/87 Rev.E digital-micrometer-ld3581-49-86-m44.pdf 14 digital-micrometer-ld3581-49-86-m44.pdf 14...
-
Page 15: Statistics
After each cessation of downward motion, like the spindle coming to rest on a sample, the machine will output a serial data string in the following format. TM V00.01.02 49-87-00-000112345-67 00000000053+000004.370 "TM V00.01.02 " - A software version number 49-85/86/87 Rev.E digital-micrometer-ld3581-49-86-m44.pdf 15 digital-micrometer-ld3581-49-86-m44.pdf 15... -
Page 16: Introduction
(See Section 3 – Specifications.) These gauge blocks are checked against standards that are traceable to the NIST. The part number for the TMI gauge blocks is as follows: For Model 49-85 and 49-86: TMI # 35-12-02 For Model 49-87: TMI # 35-12-03 Turn the micrometer on. - Page 17 Figure 1 49-85/86/87 Rev.E digital-micrometer-ld3581-49-86-m44.pdf 17 digital-micrometer-ld3581-49-86-m44.pdf 17 15-6-2020 14:38:00 15-6-2020 14:38:00...
-
Page 18: Maintenance
For Model 49-85 and 49-86:* The readings must be within 0.00004 in. of each other for the anvil and the pressure foot to be considered parallel and no adjustment needs to be done. For Model 49-87:* The readings must be within 0.0002 in. of each other for the anvil and the pressure foot to be considered parallel and no adjustment needs to be done. - Page 19 All materials delivered, services provided, and work performed by TMI are subject to the Terms and Conditions listed on the linked document. To view and/or download the complete Terms and Conditions of Sale document in PDF format, please visit: http://www.testingmachines.com/terms-and-conditions-of-sale 49-85/86/87 Rev.E digital-micrometer-ld3581-49-86-m44.pdf 19 digital-micrometer-ld3581-49-86-m44.pdf 19 15-6-2020 14:38:00...
- Page 20 digital-micrometer-ld3581-49-86-m44.pdf 20 digital-micrometer-ld3581-49-86-m44.pdf 20 15-6-2020 14:38:00 15-6-2020 14:38:00...
Need help?
Do you have a question about the 49-85 and is the answer not in the manual?
Questions and answers