
Related Manuals for EBA 721-06LT Guillotine


Summary of Contents for EBA 721-06LT Guillotine
- Page 1 EBA 721-06LT Guillotine Instruction Manual Provided By http://www.MyBinding.com http://www.MyBindingBlog.com...
- Page 2 EBA 721-05 LT GB Operating Instructions...
- Page 3 EBA 721-05 Children must not operate the machine! Never leave the blade unattended. Do not extract or transport the blade without protection! Danger! Risk of injury! Do not reach beneath the blade! Paper clips or hard material will damage the cutting blade!
-
Page 4: Table Of Contents
Table of contents 1. General ............4 1.1 Safety Precautions ....4 1.2 Application ........... 4 Installation ........... 5 2.1 Preparing for installation ......5 2.2 Power supply ..........6 Operation ............ 7 Checklist ............7 3.1 Operating elements ........8 3.2 Start-up ............ -
Page 5: General
EBA 721-05 1. General This instruction manual will help you to learn the safe and comfortable operation of this machine. Please read these operating instructions before putting the machine into operation and observe the safety regulations. 1.1 Safety Precautions Danger! Non-compliance with the instructions may endanger persons. -
Page 6: Installation
2. Installation - Transport the machine on the pallet to its destination using a pallet truck. - 6 strong people are required to lift the machine from the pallet. - The machine must be installed on a sturdy, dry and level floor. Danger! - The machine must not be located outside. -
Page 7: Power Supply
EBA 721-05 2.2 Power supply The name plate (23) is located at the rear of the machine. - Data stated on the name plate - Voltage "V", - Frequency "Hz", - Power consumption "A" must correspond to the values of the power supply unit. -
Page 8: Operation
3. Operation Danger! It is forbidden to operate the machine if the operating and safety instructions have not been understood. Danger! Please check the safety devices are functioning and complete before use and after replacing the blade. Checklist - Machine panels: All panels have to be mounted - Cutting activation: The release for cutting is allowed only if the... -
Page 9: Operating Elements
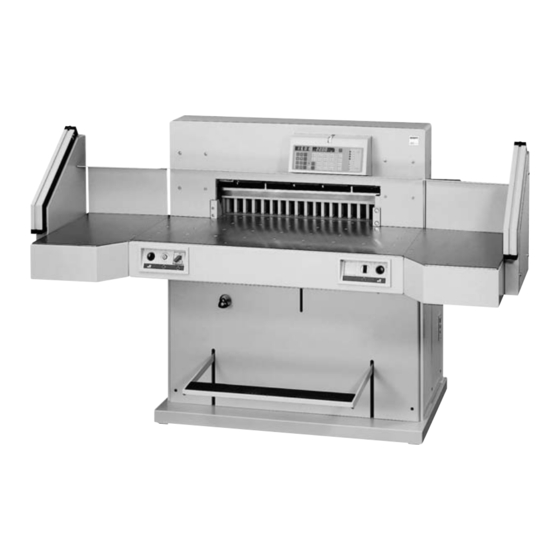
EBA 721-05 3.1 Operating elements (1) Safety two-handed control system (2) Backgauge control (3) Backgauge (4) Key switch (5) Main switch (6) Paper knock-up block (7) Clamp pressure adjustment (8) Foot pedal (9) Airtable switch (10) Program number (11) Program step (12) LED "M"... -
Page 10: Calculating
Calculating: 2 0 - 2 © Backgauge advances to e.g. the calculated measurement of 18. Cut according to markings - Adjust the backgauge (16) to the back. - Insert paper and move by means of the paper knock-up block to the backgauge. - Turn the hand-wheel (17) to the front until the marking on the paper to be cut is below the cutting line indicator. -
Page 11: Multiple Cuts Function Start
EBA 721-05 Multiple cuts function start - Enter the cut size on the display. button © advances to the - Press measurement. - Push the paper to the backgauge. - Release the cut. button © "A" appears on the middle - Press display. -
Page 12: False Clamp Plate
3.4 False clamp plate A cover plate (39) can be fitted to prevent pressure marks on sensitive material. The LED (22) light is on when the cover plate is fitted. To dismount: - Remove the clamp plate (39) by pulling it down - Store the clamp plate in the provided holder (45) ©... -
Page 13: Programming
EBA 721-05 3.5 Programming This control system enables you to store 40 programs with 36 programmable steps. One step represents one measurement or max. 9 multiple cuts. Program Step Memory (multiple cut) Memory (multiple cut with automatic control after the cut) -
Page 14: Changing Select Program
Changing select program © “PR“ appears on the display. - Press - Enter desired program number - Press - Enter step number - Or enter the next program step with button Insert a step The program step is entered first. - Choose a step number with button - Press button - Enter measurement. -
Page 15: Working With Programs
EBA 721-05 Working with programs - Press - Enter program number © proceeds to position. - Press - Insert the paper and push it with the paper knock- up block (6) to the backgauge. - Release the cut © after every cut the backgauge advances to the next position. -
Page 16: Maintenance
4. Maintenance Danger! - Maintenance work may only be performed by trained staff. - Before replacing the blade or cutting stick switch off the main switch. - Disconnect from the mains before starting any service work or before removing the cover. Safety check The safety regulations are according to the regulations of the country where the cutting... -
Page 17: Turning Or Replacing The Cutting Stick
EBA 721-05 4.2 Turning or replacing the cutting stick - Turn the blade depth adjustment (27) to the top until it stops (spanner in tool set). - Remove spanner. Danger! Risk of injury! - Take out the cutting stick (26) with a small screwdriver. -
Page 18: Blade Replacement
4.3 Blade replacement A reduction in the cutting quality indicates that the blade must be sharpened or a blade change is necessary. Danger! Risk of injury! - The blade is extremely sharp. Do not remove or transport the blade without protection. -
Page 19: Mounting The Blade
EBA 721-05 Mounting the blade - Turn or replace the cutting stick © see „Turning or replacing the cutting stick“. - Push the replacement blade with the blade chan- ging tool (31) mounted into the blade carrier (30) to the top and screw into place with the grips. -
Page 20: Maintenance Every 7 Days
4.4 Maintenance every 7 days - Advance the backgauge as far as possible to the front. - Lubricate the grease nipple (32). Type of grease - Non-resinous oil or grease. 4.5 Maintenance every 6 months - Turn main switch off. - Disconnect from the mains. -
Page 21: Malfunctions
EBA 721-05 5. Malfunctions Danger! Disconnect from the mains before starting any service work or before removing the cover. Afterwards attach the covers. Malfunction: Display illumination off. Cause: Power supply. Remedy: - Machine is plugged in? - Main switch is on? - Page 22 Change the blade or adjust as necessary. Malfunction: No clamp pressure Cause: Hydraulic oil needs refilling Remedy: Contact your dealer. If you have further questions please contact your dealer or directly on the internet www.eba.de © "service" service@krug-priester.com "Service" Subject to alteration wihout notice...
-
Page 23: Technical Data
EBA 721-05 6. Technical data Height of blade > 82 mm. Sound level DIN 45635-27: max. 70 dB(A) Minimum space requirement w x d: without side tables 130 cm x 151 cm with side tables 210 cm x 160 cm... -
Page 24: Ec-Declaration Of Conformity
EG-KONFORMITÄTSERKLÄRUNG EC-declaration of conformity Déclaration de conformité CE Declaración CE de conformidad Dichiarazione CE di conformità EG-verklaring van overeenstemming Declaraçao CE de conformidade EF-overensstemmelseserklæring - Hiermit erklären wir, daß die Bauart von - Herewith we declare that - Par la présente, nous déclarons que - Por la presente, declaramos que la - Si dichiara che il modello della - Hiermede verklaren wij, dat de in de handel gebrachte machine... - Page 25 EBA 721-05 EBA Krug & Priester 72336 Balingen Germany www.eba.de...
Need help?
Do you have a question about the 721-06LT Guillotine and is the answer not in the manual?
Questions and answers