
Related Manuals for Brinno TLC 2000


Summary of Contents for Brinno TLC 2000
- Page 1 Time Lapse Camera TLC 2000 TLC 2020 User Manual Copyright © 2019 Brinno All Rights Reserved...
- Page 2 Register your camera online to earn an extra 6 months warranty! Register Online and get www.brinno.com/support/registration Register your camera for a free 6 month warranty extension and receive direct notifi cation of fi rmware updates.
-
Page 3: Table Of Contents
CONTENTS Before You Start What's in the Box Camera Parts Initial Operation Install batteries Battery type Install microSD card USB-C Cable Power On/Off Check your camera fi rmware Power saving mode LED indicator Set date & time Start recording... - Page 4 CONTENTS Stop recording Menu change (option) Quick menu mode operation Display icons (quick menu mode) 1. Scene settings Scene 2. Menu settings Menu (quick menu mode) 3. Schedule settings Schedule mode Full menu mode operation Display icons (full menu mode) 1.
- Page 5 CONTENTS Start/Stop recording-Stop Motion Start/Stop recording-Still 2. Menu settings Menu (full menu mode) 3. Interval settings Specifications Battery Setting Downloading and installing the latest firmware Support Tutorial Video Time Lapse Calculator Manual in multi-languages...
-
Page 6: Before You Start
Before You Start... -
Page 7: What's In The Box
WHAT'S IN THE BOX (TLC2000) Time Lapse Camera TLC 2000 TLC 2020 User Manual USB-C Cable User Manual TLC2000 Screwdriver 2 AA Batteries microSD Lens Cover microSD Card... - Page 8 WHAT'S IN THE BOX (TLC2020) Time Lapse Camera TLC 2000 TLC 2020 User Manual USB-C Cable User Manual TLC2020 Screwdriver 4 AA Batteries Battery Cover Adapter microSD *To be used with the ATH2000 Construction Power Housing Lens Cover microSD Card...
-
Page 9: Camera Parts
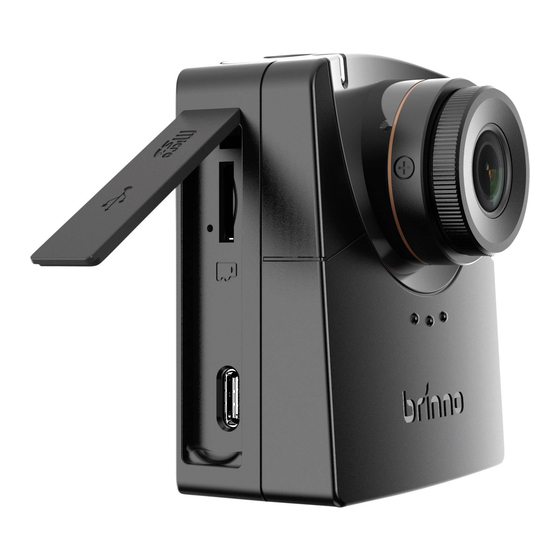
CAMERA PARTS TLC2000 TLC2020 1. Power Button 6. Camera Reset Button 2. Shutter/ 7. USB-C Socket Back to Preview Button Only can be used as an external power supplier & data transfer, CANNOT be used to charge batteries. 3. LED Status Indicator 8. - Page 10 CAMERA PARTS 10. LCD Screen 13. OK Button 11. Circuit Indicator 14. Next Button 12. Previous Button 15. Tripod Mount (size: ¼”)
-
Page 11: Initial Operation
Initial Operation... -
Page 12: Install Batteries
INSTALL BATTERIES (TLC2020) OPEN - Press the center of battery door to release the latch inside, and open battery door CLOSE - Along the track on the camera and push the center of the bottom side of battery door to close. OPEN CLOSE... -
Page 13: Battery Type
BATTERY TYPE Battery type: Please select the correct battery type in the menu settings to optimize battery life. For information on how to change battery type in settings please go to page 52. Alkaline Default setting. The batteries that come with your camera will be Alkaline. NiMH Most rechargeable batteries are NiMH type. -
Page 14: Install Microsd Card
INSTALL microSD CARD Open the memory card door and insert microSD card. Supports up to 128GB microSD card. For 64 or 128 GB microSD card, follow instruction on the LCD screen to format the card before using it the first time. TLC 2020... -
Page 15: Usb-C Cable
USB-C Socket The USB-C Socket can only be used as an external power supplier and data transfer point. External Power Supplier Plug your camera into an external power outlet using the USB-C Cable. If you are using an external power supply, we recommend you still install fully charged batteries as a back-up. -
Page 16: Power On/Off
POWER ON Open the memory card door and insert microSD card. Power On 3 secs 1. Power on: hold “Power Button” for 3 secs. 2. Power off: hold “Power Button” for 3 secs. -
Page 17: Check Your Camera Firmware
You can find and download the latest firmware version on the Firmware Download Site : www.brinno.com/support/download#TLC2000series If your Time Lapse Camera is not the latest firmware, refer to the page 53 to learn details about downloading and installing the latest firmware. -
Page 18: Power Saving Mode
POWER SAVING MODE When the camera is turned on but not recording: Sleep Mode The camera goes into sleep mode to save power after 25 seconds without activity. The LED indicator turns solid Green. Press “ ” button to wake up the camera. Power off The camera shuts down after 60 seconds without activity. -
Page 19: Led Indicator
LED indicator Green The LED flashes Green every 10 seconds while recording. (Time Lapse mode) Out of batteries/No SD card/SD card error. Orange While firmware is updating, LED indicator will flash Orange. For more information on checking your camera firmware refer to page 18, downloading and installing the latest firmware detail refer to page 53. -
Page 20: Set Date & Time
SET DATE & TIME The date & time menu appears when the camera is first turned on. DATE & TIME YYYY / MM / DD 09 : 41 : 05 1. Set the numeric value using “ ”. 2. Press “ ”... -
Page 21: Start Recording
START RECORDING 1. Press “SHUTTER” button to start recording. 2. The LCD screen displays “REC” icon along with beep sound. The LCD screen then turns off to save power. Beep TWLT SCENE MENU SCHEDULE Info... -
Page 22: Stop Recording
STOP RECORDING Press “SHUTTER” button to wake up LCD screen. The camera stops recording and starts post-editing video immediately. LCD screen displays “PROCESSING” icon accompanied by beep sound to confirm the completion of video post-editing. The camera returns to PREVIEW SCREEN after the video is completed. -
Page 23: Menu Change (Option)
MENU CHANGE (option) Quick Menu is the default on the TLC2000/ TLC2020. If you would like more detailed settings through the Full Menu you will need to change it in settings. On the PREVIEW SCREEN press “ ” button and then the “... -
Page 24: Quick Menu Mode Operation
Quick menu mode operation... -
Page 25: Display Icons (Quick Menu Mode)
DISPLAY ICONS (Quick menu mode) 1. Scene DAY: Daytime TWLT TWLT: Twilight NITE: Night 2. HDR 3. Schedule 4. Battery indicator SCENE MENU SCHEDULE 5. Scene setting Info 6. Menu/Info 7. Schedule setting... -
Page 26: Scene Settings
1. SCENE SETTINGS 1-1. At PREVIEW SCREEN, press “ ” button to go to SCENE SETTINGS screen. 1-2. Press “ ” and “ ” to select desired SCENE MODE and press “ ” button to confirm and return to PREVIEW SCREEN. -
Page 27: Scene
1. SCENE Capture scene Initial Description Interval: 1 min EXPO mode: Twilight HDR: On FPS: 20 Short Outdoor Video length per hour: 3 seconds Construction Scene for : Short outdoor construction project Interval: 5 min EXPO mode: Twilight HDR: On FPS: 20 Long Outdoor Video length per hour: 0.6 seconds... - Page 28 1. SCENE Capture scene Initial Description Interval: 20 sec EXPO mode: Twilight Indoor HDR: On FPS: 20 Event Video length per hour: 9 seconds Scene for : Indoor event Interval: 30 sec EXPO mode: Night Construction HDR: On FPS: 20 Site Security Video length per hour: 6 seconds Scene for : Surveillance...
-
Page 29: Menu Settings
2. MENU SETTINGS 2-1. At PREVIEW SCREEN, press “ ” button to go to MENU SETTINGS screen. 2-2. At MENU SETTINGS, press “ ” or “ ” button to switch to menu options. 2-3. Press “ ” button to enter the setting. SKIP BUTTON: Press “SHUTTER”... -
Page 30: Menu (Quick Menu Mode)
2. MENU (QUICK MENU MODE) Option Level I Level II INFO Display current camera status Quick menu MENU Full menu Auto/tungsten fluorescent WHITE BALANCE (1)/fluorescent (2)/cloudy/ shadow/daylight CONTRAST IMAGE SETTING SATURATION SHARPNESS Restore image defaults OK/Cancel Return Return to Main Menu... - Page 31 2. MENU (QUICK MENU MODE) Option Level I Level II LED indicator Yes/No DATE & TIME Set camera date & time TIME STAMP Yes/No BAT TYPE Alkaline/NiMh/Lithium RESOLUTION 720P/1080P MORE FOCUS Zoom in/Zoom out/Ok to Exit PLAYBACK FPS 1/5/10/20/30/Custom System Info. Camera firmware version FORMAT SD CARD Yes/No...
-
Page 32: Schedule Settings
3. SCHEDULE SETTING 3-1. At PREVIEW SCREEN, press “ ” button to go to SCHED- ULE SETTINGS screen. 3-2. Select desired Continuous or Daily mode and press “ ” button to confirm and go to SCHEDULE STATUS SCREEN. Press“ ” to go to step 3-3. - Page 33 3. SCHEDULE SETTING 3-3. At SCHEDULE START/STOP SCREEN, set your required filming schedule. Press “ ” to save and go to the SCHEDULE DAYS SCREEN. 3-4. Select desired recording days of week, select SAVE option to complete the setting and go back to PREVIEW SCREEN.
-
Page 34: Schedule Mode
3. SCHEDULE MODE Continuous Camera will auto COMBINE several daily files into a SINGLE AVI FILE. SCHEDULE TLC0 00 01 Continous Daily Daily Every daily recording produces a single DAILY AVI FILE. T LC00001 SCHEDULE T LC00002 Continous T LC00003 Daily T LC00004 Schedule setting is only for Time Lapse mode. -
Page 35: Full Menu Mode Operation
Full menu mode operation... -
Page 36: Display Icons (Full Menu Mode)
DISPLAY ICONS (Full menu mode) 1. Scene DAY: Daytime TWLT TWLT: Twilight NITE: Night 2. HDR 3. Schedule 4. Battery indicator SCENE MENU INTERVAL 5. Scene setting Info 6. Menu/Info 7. Schedule setting... -
Page 37: Capture Mode Settings
1. CAPTURE MODE SETTINGS 1-1. At PREVIEW SCREEN, press “ ” button to go to CAP- TURE MODE SCREEN. 1-2. Press “ ” and “ ” to select desired CAPTURE MODE and press “ ” button to confirm and return to PREVIEW SCREEN. -
Page 38: Capture Modes
1. CAPTURE MODES Capture mode Description Camera captures series of photos at a time interval of Time Lapse your choice, and auto combines them into a ready-to- view time lapse video. Camera records a short video clip at a selected capture Step Video interval, and auto combines those clips to a ready-to-view step video. -
Page 39: Start/Stop Recording-Time Lapse & Step Video
1. START STOP RECORDING (CAPTURE MODE - TIME LAPSE & STEP VIDEO) Start 1-3. Press “SHUTTER” button to start recording. 1-4. The LCD screen displays “REC” icon along with beep sound. 1-5. The LCD screen then turns off to save power. Beep TWLT TWLT... - Page 40 1. START STOP RECORDING (CAPTURE MODE - TIME LAPSE & STEP VIDEO) Stop 1-6. Press“SHUTTER” button to wake up LCD screen. The camera stops recording and starts post-editing video immediately. 1-7. LCD screen displays “PROCESSING” icon accompanied by beep sound to confirm the completion of video postediting. 1-8.
-
Page 41: Start/Stop Recording-Stop Motion
1. START STOP RECORDING (CAPTURE MODE - STOP MOTION ) Start 1-9. Press “SHUTTER “ button. LCD screen shows “Initializing Stop Motion “ followed by a beep to start recording. 1-10. Press “SHUTTER” button to capture single frame. * * * * 1-11. - Page 42 1. START STOP RECORDING (CAPTURE MODE - STOP MOTION ) Stop 1-13. Hold “SHUTTER“button for 3 seconds to stop recording. LCD screen displays “Closing Stop Motion“ followed by a beep to confirm the completion of video post-editing. 1-14. The camera returns to PREVIOUS SCREEN. 1-13 1-14 Closing...
-
Page 43: Start/Stop Recording-Still
1. START STOP RECORDING (CAPTURE MODE - STILL) 1-15. At STILL mode, press “SHUTTER“ along with beeps to capture one photo each time. 1-15 Beep TWLT SCENE MENU INTERVAL Info To view recorded footage, SD card must be removed or camera must be plugged into a computer using the USB-C cable. -
Page 44: Menu Settings
2. MENU SETTINGS 2-1. At PREVIEW SCREEN, press “ ” button to go to MENU SETTINGS screen. 2-2. At MENU SETTINGS, press “ ” or “ ” button to switch to menu options. 2-3. Press “ ” button to enter the setting. * SKIP BUTTON: Press “SHUTTER”... -
Page 45: Menu (Full Menu Mode)
2. MENU (FULL MENU MODE) Option Level I Level II INFO Display current camera status Quick menu MENU Full menu Time Lapse CAPTURE Step Video MODE Still Stop Motion ASAP ~ CUSTOM INTERVAL (Interval options depends on selected exposured mode) EXPO MODE Daytime/Twilight/Night OFF/ON... - Page 46 2. MENU (FULL MENU MODE) Option Level I Level II SCHEDULE Camera will autocombine Continuous several daily AVI fi les into a single fi le. *Only for Time Lapse Every daily recording produc- Daily mode, information es a single AVI fi le. refer to page 33~35.
- Page 47 2. MENU (FULL MENU MODE) Option Level I Level II LED indicator Yes/No DATE & TIME Set camera date & time TIME STAMP Yes/No BAT TYPE Alkaline/NiMh/Lithium RESOLUTION 720P/1080P MORE FOCUS Zoom in/Zoom out/Ok to Exit PLAYBACK FPS 1/5/10/20/30/Custom System Info. Camera firmware version FORMAT SD CARD Yes/No...
-
Page 48: Interval Settings
3. INTERVAL SETTING 3-1. At PREVIEW SCREEN, press “ ” button to go to INTER- VAL SETTINGS. 3-2. Select desired Interval, press “ ” button to confirm and go to PREVIEW SCREEN. EXPO mode Interval options Daytime ASAP,1,2,3,5,10,20,30 SEC/1,2,3,5,10,20,30 MIN/Custom Twilight 3,5,10,20,30 SEC/1,2,3,5,10,20,30 MIN/Custom Night... - Page 49 3. INTERVAL SETTING (STEP VIDEO MODE) 3-3. At PREVIEW SCREEN, press “ ” button to go to INTER- VAL SETTINGS. 3-4. Select desired Burst length and press “ ” button to confirm and go to next setting. 3-5. Select desired Burst Interval and press “ ”...
-
Page 50: Specifications
SPECIFICATIONS Model TLC2000/TLC2020 Resolution 1080P Aperture F2.0 Field of View 118° Time Lapse; Step Video; Capture Mode Still; Stop Motion LCD Screen 2.0” TFT LCD microSD/microSDHC/microSDXC Storage (up to 128 GB, recommend a minimum of Class 10) AA Batteries Power Source DC IN 5V 1A (USB-C connector) Operating Temperature 32 °F ~ 113 °F (0 °C ~ 45 °C) -
Page 51: Battery Setting
BATTERY SETTINGS To optimize the battery life of your TLC2000/TLC2020, please set the battery type in your camera settings. Click the “ ” button and go through the setting screen using the “ ” button until MORE. Click the “ ”... -
Page 52: Downloading And Installing The Latest Firmware
Take out microSD card and insert it to PC (Windows). 100TLC2K Download fi rmware zip fi le from: TLC2K_C.RCF www. brinno.com/support/download#TLC2000series Right click zip fi le and click <extract all> to access fi rmware fi le. Open folder and ONLY copy the TLC2K_C.RCF fi le to microSD card in the 100TLC2K folder(F:DCIM/100TLC2K). - Page 53 DOWNLOADING & INSTALLING THE LATEST FIRMWARE Step 3. Start FW upgrade Insert the microSD card into the camera. DC IN 5V, 1A Connect the camera to external power using the USB-C cable. Camera will automatically turn on and upgrade fi rmware. The LED indicator will Connect the camera to external power fl...
-
Page 54: Support
Support... -
Page 55: Tutorial Video
TUTORIAL VIDEO Scan the QR code to watch the video tutorial. www.brinno.com/support/tutorial/TLC2000-tutorial... -
Page 56: Time Lapse Calculator
TIME LAPSE CALCULATOR Scan the QR code to calculate Time Lapse setting. www.brinno.com/support/time_setting_calculator... -
Page 57: Manual In Multi-Languages
STAY UP TO DATE The product features, specifications sheets and instructions may differ from actual products. Please refer to Brinno official site for the latest version of user manual. www.brinno.com/support/download... - Page 58 EN_A2 301-0153-01...
Need help?
Do you have a question about the TLC 2000 and is the answer not in the manual?
Questions and answers
This camara for charging point Available....?
The Brinno TLC2000 camera can be powered using an external power supply through the USB-C socket, but there is no mention of an internal rechargeable battery or charging capability.
This answer is automatically generated