Table of Contents
Advertisement
Quick Links
Advertisement
Table of Contents

Summary of Contents for CLS ARGOS GONIO 2
- Page 1 GONIO V 1.0 – 12/03/2020 – CLS-ENV-MU-20-0106...
-
Page 2: Table Of Contents
6.5. Receiving platforms ..................32 6.6. Favorite platforms ..................33 6.7. Template information for direct reception ............34 6.8. Viewing and Exporting data ................34 6.9. HyperTerminal mode and log file ..............36 7. Technical characteristics ..................39 V 1.0 – 12/03/2020 – CLS-ENV-MU-20-0106... -
Page 3: Highlights
1. Highlights The CLS Goniometer is a very highly sensitive direction finder that provides the direction as well as an indication of the signal power of an Argos transmitter for field recovery. It is fully compatible with : A2 : Argos-2 low data rate transmitters... -
Page 4: Product Overview
In addition, an USB key is also provided with the following documents and software : • ReadMe.txt • CLS-DT-MEMO-14-045 - Recommendations for using the RXG234 goniometer ENG.pdf • GONIO RXG 234 Installation and User Manual vvv.pdf (vvv : version number) •... -
Page 5: General View Of The Receiver
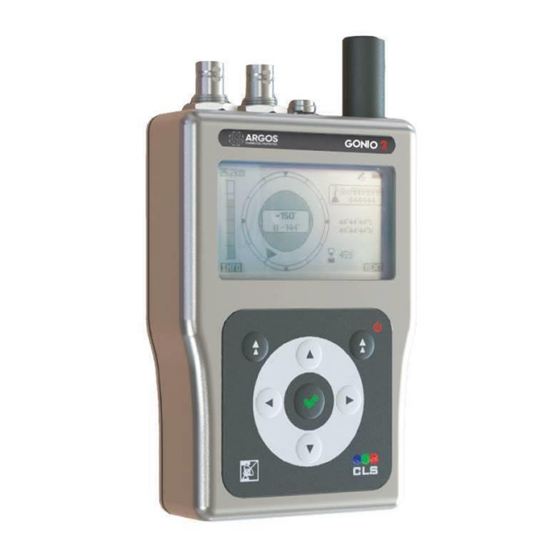
Display screen ON/OFF Indicator Navigation button ON/OFF - Navigation button Circular control Arrow buttons Validation button Front view (RXG-134 or RXG-234) Connector for USB Receiving antenna and charger cable connectors GPS antenna Top view V 1.0 – 12/03/2020 – CLS-ENV-MU-20-0106... -
Page 6: Turn On/Off And Main Screens
You can navigate through the items in a menu by pressing the Arrow buttons (left, right, up and down). To select an item in a menu, press the Validation button in the middle of the control pad. Details of the screens are given in chapter V 1.0 – 12/03/2020 – CLS-ENV-MU-20-0106... -
Page 7: Antenna Installation Procedures
3. Antenna installation procedures 3.1. Goniometer antenna Insert one of the two cables into the opening in the antenna mount. Then insert the second cable. Screw the mount into the antenna. V 1.0 – 12/03/2020 – CLS-ENV-MU-20-0106... - Page 8 You may also pass the cables through the hole on the side of the antenna mount. Connect both cables to the receiver. Note: The white pointer on the receiving antenna corresponds to the reference azimuth (0°) for the bearings received. V 1.0 – 12/03/2020 – CLS-ENV-MU-20-0106...
-
Page 9: Bnc Antenna
Important: keep the antenna vertical and avoid touching it with your hands to prevent interference when the GONIO is receiving. 3.2. BNC antenna Connect your BNC Argos antenna as shown in the figure below. Gonio RXG-234 with BNC antenna V 1.0 – 12/03/2020 – CLS-ENV-MU-20-0106... -
Page 10: Quick Start Guide
After the initialization process, the RECEPTION screen will appear. Note: When the GONIO is switched on for the first time, no information is displayed on the RECEPTION screen, in the FAVORITES PLATFORMS menu or in the RECEIVING PLATFORMS menu. V 1.0 – 12/03/2020 – CLS-ENV-MU-20-0106... -
Page 11: Setup The Configuration
FAVORITE PLATFORMS menu and the RECEIVING PLATFORMS menu. RECEPTION screen FAVORITE PLATFORMS menu RECEIVING PLATFORMS menu OPTIONS menu Enter the SETUP screens by selecting the SETUP option, using the Arrow buttons and the Validation button. V 1.0 – 12/03/2020 – CLS-ENV-MU-20-0106... - Page 12 Validate the setting by pressing the PREV button and save the parameters by pressing the Navigation button under the "YES" label. You will be taken back to the Screen 1 of the SETUP menu. V 1.0 – 12/03/2020 – CLS-ENV-MU-20-0106...
-
Page 13: Compass Feature
If too close from a magnetized surface or piece, you should use the “Compass Calibration” feature on the SETUP 1/2 Then follow the instructions. The procedure to calibrate the goniometer is intuitive and well described in the screens below. V 1.0 – 12/03/2020 – CLS-ENV-MU-20-0106... -
Page 14: Select Your Argos Platform As A Favorite
Note : If a beacon is transmitting two modulation , two lines will be displayed and they are considered as two different platforms. Once your Argos platform is selected you may access the FAVORITES PLATFORMS screen setup: V 1.0 – 12/03/2020 – CLS-ENV-MU-20-0106... -
Page 15: Choose Among The Favorite Platforms
Gonio will ask to switch band. 4.8. RECEPTION screen Platform information can be displayed on the RECEPTION screen in two different ways: Goniometer mode and direct reception mode (direction mode in screen 2 of SETUP menu). V 1.0 – 12/03/2020 – CLS-ENV-MU-20-0106... -
Page 16: The Argos Platform Recovery Can Start
In the case of a GPS decoded platform, the distance and direction to the platform from the Gonio are displayed directly on the screen. Do not forget that the direction is given relative to the North. V 1.0 – 12/03/2020 – CLS-ENV-MU-20-0106... -
Page 17: Details Of The Screens
(7) Direction from the azimuth reference: 37° instantaneous direction, Ø 37° averaged direction (8) Date Time of the last received message Press INFO (left navigation button) to display more details on the last received message. V 1.0 – 12/03/2020 – CLS-ENV-MU-20-0106... -
Page 18: Favorite Screen
Favorite Platforms management screen 1 Press the PREV navigation button to begin searching for the platform. The Edit screen of the FAVORITE PLATFORMS is obtained after selecting a platform in the RECEIVING platform screen. V 1.0 – 12/03/2020 – CLS-ENV-MU-20-0106... -
Page 19: Receiving Platforms Screen
Once all the desired changes have been made, press the validation button to return to the Favorites screen. 5.3. RECEIVING PLATFORMS screen Press the PREV navigation button from the OPTIONS screen to go to the RECEIVING PLATFORMS screen, which displays, in real time, all transmitters whose signals have been received. V 1.0 – 12/03/2020 – CLS-ENV-MU-20-0106... -
Page 20: Option Menu
USB menu: to activate the USB connection (only available when connected to a PC) FFT menu: to display the Argos band signals received (spectral analysis mode) Setup menu: to configure the Goniometer’s operating parameters V 1.0 – 12/03/2020 – CLS-ENV-MU-20-0106... -
Page 21: Setup Menu
64 favorites limit). This allow you to records all Argos transmissions on a Band. Distance: Select the unit of distance used (kilometer, nautical mile, mile) Direction Comp: Add an offset to the reference azimuth To be left at 0° Temp: Measured temperature Vbat: Battery voltage level V 1.0 – 12/03/2020 – CLS-ENV-MU-20-0106... - Page 22 Gonio antenna. o GPS (for decoded GNSS platforms only): will display differential direction between the Gonio position and the platform position, on the RECEPTION screen. The reference for this direction is North. V 1.0 – 12/03/2020 – CLS-ENV-MU-20-0106...
- Page 23 Argos Band: Select the Band where your platforms are transmitting o B1 [401.610-401.690] o B2 [401.530-401.610] o B3 [401.460-401.540] o B4 [401.390-401.470] o B5 [401.310-401.390] o B6 [401.110-401.190] o B7 [401.010-401.090] o B8 [399.970-400.050] o B9 [399.900-399.980] V 1.0 – 12/03/2020 – CLS-ENV-MU-20-0106...
-
Page 24: Gps Info Menu
Nb sat: Number of GPS satellites within view of the GONIO RXG GPS icon meanings: GPS Activated and Position OK GPS Activated but Unable to Position GPS not Activated (go to Setup ½ to activate) V 1.0 – 12/03/2020 – CLS-ENV-MU-20-0106... -
Page 25: Fft Menu
The FFT menu allows you to display a graph of the spectrum, once the frequency of the signal has been analyzed. Example of FFT display 5.4.4. USB menu Press on USB to connect to a PC. See chapter USB menu selection V 1.0 – 12/03/2020 – CLS-ENV-MU-20-0106... -
Page 26: Pc Connexion (Usb Communication Mode)
Goniometer is connected, in the (usually log_S/N.txt in User/Documents/RXG-234 Comm Software/ directory). $NPR and $NPRF format description accessible on upon request to CLS. F. Access the HyperTerminal mode: all the Argos platforms received by the Goniometer will be displayed in real time (as in the log file). - Page 27 Goniometer required drivers and recognize the USB connection as “XERIUS RS232”: When using the USB connection please insure that the PC will not go to sleep, otherwise when happening, the connection will be cut. V 1.0 – 12/03/2020 – CLS-ENV-MU-20-0106...
-
Page 28: Installation Of The Usb Communication Software
6.1. Installation of the USB Communication software 1. The USB communication software is on the USB key provided with the package. You can check on cls-telemetry website if you have the latest version 2. Launch the communication software by double clicking on RXG234 Communication Software.exe... -
Page 29: Usb Connection
Once in the USB mode, launch the RXG234 Comm Software on your PC. When you connect Goniometer for the first time to your computer, Windows will automatically install required drivers and recognize the USB connection as “XERIUS RS232”: V 1.0 – 12/03/2020 – CLS-ENV-MU-20-0106... -
Page 30: Updating The Goniometer Firmware
Once you click "Open", the PC will start uploading the firmware to the Goniometer. • The PC communication application will reboot and ask you if you want to load your saved data. Answer NO V 1.0 – 12/03/2020 – CLS-ENV-MU-20-0106... -
Page 31: Configuring The Goniometer
6.4. Configuring the Goniometer • To configure the Goniometer (equivalent to the Setup Menu of the equipment) click on "Edit Configuration". • You will have access to the two following configuration screens below. V 1.0 – 12/03/2020 – CLS-ENV-MU-20-0106... -
Page 32: Receiving Platforms
28 bit ID or not (note that all Argos ID are now 28bit) o click on Add to Favorites o the ID will move from this list to the Favorite Platforms list V 1.0 – 12/03/2020 – CLS-ENV-MU-20-0106... -
Page 33: Favorite Platforms
Selecting a platform ID will allow you to Edit Platform attribute o enter a label or the decimal ID for this platform (limited to 19 characters) o choose a GNSS predefined-format for direct reception mode (please ask CLS if you need to add a new decoding format) -
Page 34: Template Information For Direct Reception
Goniometer own GPS position. In order to have the format of your platform declared in the goniometer software please contact CLS. Note that the messages of your platform shall not be encrypted. - Page 35 To export the data to an Excel file click the "export" button. You will be able to choose a filename and a directory for the file to be saved. The columns in the Excel file will be the same as the columns shown above. V 1.0 – 12/03/2020 – CLS-ENV-MU-20-0106...
-
Page 36: Hyperterminal Mode And Log File
(background or received when the HyperTerminal is opened) o the Goniometer command $NPR for a non favorite platform and $NPRF for a favorite platform, followed by several parameters which are explained below V 1.0 – 12/03/2020 – CLS-ENV-MU-20-0106... - Page 37 Gonio direction (not implemented yet) • le, da: message length and data message (in hexadecimal) Below is a view when the HyperTerminal is opened. The recorded parameters are the same as in the log file. V 1.0 – 12/03/2020 – CLS-ENV-MU-20-0106...
- Page 38 V 1.0 – 12/03/2020 – CLS-ENV-MU-20-0106...
-
Page 39: Technical Characteristics
Waterproof rating IP 66 GONIO RXG 234 dimensions 135mm x 92.5mm x 34mm GONIO RXG 234 weight 565gr Dimension of AXG 134 antenna 400mm x 65mm AXG 134 Antenna Weight (without cable) 650gr V 1.0 – 12/03/2020 – CLS-ENV-MU-20-0106...
Need help?
Do you have a question about the ARGOS GONIO 2 and is the answer not in the manual?
Questions and answers