Advertisement
Quick Links
9
Troubleshooting continued
PROBLEM
POSSIBLE CAUSE
Your Door Chime has
Your Door Chime Receiver batteries
stopped sounding.
may be flat (3C batteries).
If the red indicator light on the
Bell Press Transmitter no longer
illuminates when pressed then your
transmitter battery is flat.
If you have checked
Check the distance between your Door
your batteries and your
Chime and Bell Press, they may be
Door Chime is still not
located too far away from each other.
operating.
Your Bell Press may be located too
close to a metal structure or too
close to the ground.
The volume control may be in off
position
Channel used on Bell Press
Transmitter and Door Chime Receiver
may be different
10
Maintenance
The HPM Wireless Door Chime is an example of superior design and craftsmanship. The following
suggestions will help you care for the Door Chime so you can enjoy it for years:
1. K eep the Door Chime dry. If the Door Chime gets wet, wipe it dry immediately. Liquids might
contain minerals that can corrode the electronic circuits.
2. U se and store the Door Chime only in normal temperature environments. Temperature extremes
can shorten the life of electronic devices, damage batteries, and distort or melt plastic parts.
3. H andle the Door Chime gently and carefully. Dropping it can damage the circuit boards and can
cause the door chime to work improperly.
4. K eep the Door Chime away from dust and dirt, which can cause premature wear of parts.
5. W ipe the Door Chime with a damp cloth occasionally to keep it looking new. Do not use harsh
chemicals, cleaning solvents, or strong detergents to clean the chime.
6. U se only fresh batteries of the recommended size and type. Always remove old or weak batteries.
They can leak chemicals that can destroy electronic circuits.
7. M odifying or tampering with the Door Chime's internal components can cause a malfunction and
might invalidate its warranty.
8. C are should be taken when replacing Receiver batteries. Open casing carefully so as not to
damage the internal wiring.
Warranty
HPM Legrand warrants this product for a period of 3 years
from the date of purchase.
These goods come with guarantees that cannot be
excluded under the Australian and New Zealand Consumer
Laws. You are entitled to a replacement or a refund
for a major failure and for compensation for any other
reasonably foreseeable loss or damage. You are also
entitled to have the goods repaired if the goods fail to be
of acceptable quality and the failure does not amount to a
major failure.
See the Warranty card enclosed with this product for
further details.
SUGGESTED SOLUTION
Replace the batteries in your Door
Chime Receiver (3C batteries).
Replace your Bell Press Transmitter
battery (A23 12V).
Relocate the Door Chime Receiver
closer to the Bell Press.
Relocate your Bell Press away from
the metal structure or further away
from the ground.
Move the volume control to either
low or high
Modify channel on either Bell Press
Transmitter or Door Chime Receiver.
Refer to Channel Selection – Section 5.
Customer Service
For all Customer Service and Technical Support
please call Monday to Friday during business hours.
HPM Legrand Australia
1300 369 777
www.hpm.com.au
HPM Legrand New Zealand
0800 476 009
www.hpm.co.nz
ABN: 31 000 102 661
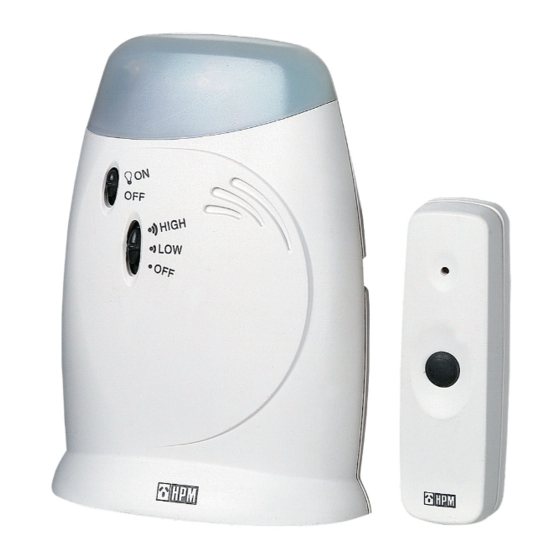
Deluxe Wireless Door Chime
Please read all instructions carefully before installation and use.
Specifications
Bell press supply voltage: 12V d.c
Transmission frequency:
Range:
Receiver battery voltage: 4.5V d.c
Sound level:
Battery requirement:
Door chime receiver:
Bell press transmitter:
Note: This door chime is not compatible with units from
D642 series or with D641/B, D641/BLR and D641/BLRCC.
Box contents
• Bell Press
• Door Chime receiver
• 1 x 12V battery
• Mounting screws and wall plugs
• Double-sided tape
1
Features
• Operating range up to 70m
• 2 melodies for selection
• Weather resistant bell press
• Flashing Light
• Volume control
with Flashing Light
Battery Operated
Cat. D641/BFL
Instruction Manual
433.92 MHz
Up to 70m
70dB
3 x 'C' batteries (not supplied)
1 x 12V A23 battery (supplied)
2
Typical Applications
• Visitor alert
• Panic button
• Pager
Advertisement

Related Manuals for HPM D641/BFL


Summary of Contents for HPM D641/BFL
- Page 1 POSSIBLE CAUSE SUGGESTED SOLUTION with Flashing Light Your Door Chime has Your Door Chime Receiver batteries Replace the batteries in your Door stopped sounding. may be flat (3C batteries). Chime Receiver (3C batteries). Battery Operated If the red indicator light on the Replace your Bell Press Transmitter Cat. D641/BFL Bell Press Transmitter no longer battery (A23 12V). Instruction Manual illuminates when pressed then your transmitter battery is flat. If you have checked Check the distance between your Door Relocate the Door Chime Receiver your batteries and your Chime and Bell Press, they may be closer to the Bell Press. Door Chime is still not located too far away from each other.
- Page 2 Step 1: Remove the security screw at the bottom of the Bell Press Unit. - (Fig. 2 L) Step 2: Remove the Bell Press (Fig. 2 G) from the Mounting Bracket (Fig. 2 J). Open the Battery Inside the Battery Compartment of the Bell Press Unit (Fig. 2 K) there is a row of 8 switches. The last Compartment cover on the back of the Bell Press. Insert 12V battery provided into the Battery 2 switches are for Tune Selection and represent the 2 tunes available - Ding Dong or Westminster. To Compartment (Fig.2 K) ensuring that the (+) end of the battery is at the (+) in the Battery change the tune, simply select the other Tune Selection Switch. Compartment. Replace Battery Compartment cover. Step 3: Ensure the channel selected is the same as the channel selected on the Chime Unit Volume Selection (refer Channel Selection section). Step 4: Select tune you wish to hear (refer Tune Selection section). The Volume Control (Fig. 1 D) enables you to adjust the volume of your HPM Door Chime (HIGH or LOW) Step 5: P ress the Bell Press Button (Fig.2 I) to ensure that the red indicator light (Fig. 2 H) illuminates, or turn it OFF completely. indicating that the battery is correctly installed, and to test satisfactory operation. The Bell Press is suitable for outdoor use, however for best performance and a longer life the Bell Press should not Flashing Light Selection be exposed to direct sunlight or rain. Step 6: S ecure the Mounting Bracket (Fig. 2 J) using the 2 x screws/ wall plugs or double sided tape The Flashing Light Control (Fig. 1 C) enables you to have a light (Fig. 1 B) flash when the Door Chime Unit provided. To ensure that the weatherproofing is maintained, mount the Bell Press in upright is activated . This can be in addition to or instead of the tune sounding. Simply position the Flashing Light position. The Bell Press (Fig. 2 G) can then be inserted into the Mounting Bracket (Fig. 2 J) and Control (Fig. 1 C) in either the ON or OFF position. Perfect for hearing impaired, families with children,...
Need help?
Do you have a question about the D641/BFL and is the answer not in the manual?
Questions and answers