Table of Contents
Advertisement
Quick Links
Thermostat NO contact with centre plate, time-controlled
Thermostat NO contact with centre plate, time-controlled
Order no.: 2044 xx
Operation and installation instructions
1 Safety instructions
Electrical equipment must only be installed and assembled by qualified electricians.
Always follow the relevant accident prevention regulations.
The device is compliant with the guidelines of the EN 60730 and works according to the
mode of operation 1C.
Failure to comply with these instructions may result in damage to the device, fire or other
hazards.
These operating instructions are an integral component of the product, and must be
retained by the end user.
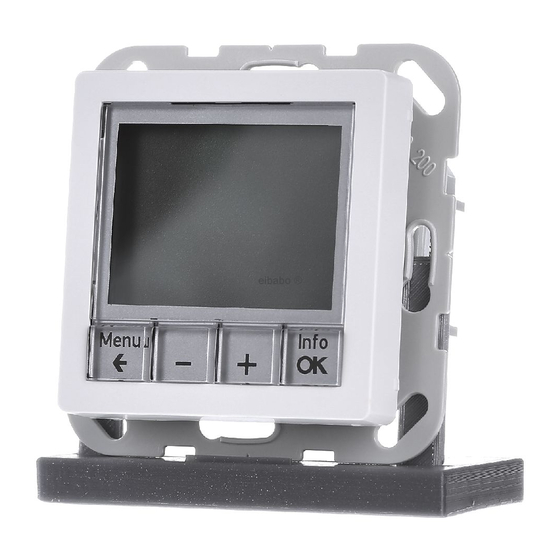
2 Design and layout of the device
(1) Display
(2) Operating keys
(3) Operating unit
(4) Plug-in contacts for insertion
(5) Frame (not included in delivery)
(6) Socket for plug-in contacts
(7) Insert
97-09920-000
Figure 1: Device overview
Page 1/15
(1)
(2)
(3)
(4)
(5)
(6)
(7)
10/2011
Advertisement
Table of Contents

Related Manuals for Berker 2044 Series


Summary of Contents for Berker 2044 Series
- Page 1 Thermostat NO contact with centre plate, time-controlled Thermostat NO contact with centre plate, time-controlled Order no.: 2044 xx Operation and installation instructions 1 Safety instructions Electrical equipment must only be installed and assembled by qualified electricians. Always follow the relevant accident prevention regulations. The device is compliant with the guidelines of the EN 60730 and works according to the mode of operation 1C.
-
Page 2: Operation
Thermostat NO contact with centre plate, time-controlled 3 Function The time-controlled thermostat allows the room temperature to be controlled in automatic mode depending on the time and weekday (program) so that the heating requirements can be adjusted according to individual lifestyles. The automatically controlled temperature can also be adjusted manually as required. - Page 3 Thermostat NO contact with centre plate, time-controlled Operating thermostat You can navigate through the menu using the four push-buttons below the display. In the menu the functions can be set and activated and settings can be adjusted. The operation can also be carried out when the operating unit is removed. If no push-button is actuated for longer than 3 minutes, the device returns automatically to the previous function and basic display.
- Page 4 Thermostat NO contact with centre plate, time-controlled Selecting and changing programs The control provides three preset time temperature programs Program 1 Mon – Fri Sat – Sun 6:00 h 8:00 h 10:00 h 12:00 h 14:00 h 16:00 h 18:00 h 20:00 h 22:00 h Figure 3: Time temperature diagram (day profile) for program 1...
- Page 5 Thermostat NO contact with centre plate, time-controlled Program 3 Mon – Fri Sat – Sun 6:00 h 8:00 h 10:00 h 12:00 h 14:00 h 16:00 h 18:00 h 20:00 h 22:00 h Figure 5: Time temperature diagram (day profile) for program 3 Program with four events and temperature setback to 18 °C during the day (absence).
- Page 6 Thermostat NO contact with centre plate, time-controlled Select the settings menu USER SETTING with push-button +/– (9/10) and press OK to confirm (see operating thermostat). G 1 - PROGRAM SELECT ONE is displayed. Keep pressing the +/– push-button repeatedly until G2 - EVENT SETTING is displayed. Press OK.
-
Page 7: User Setting
Thermostat NO contact with centre plate, time-controlled Time-independent control of the room temperature according to the value set here Activation: OK Set temperature: +/– in the basic display Display of function (16): MAN TIMER Specifying a room temperature for a set number of hours Set hours: +/–... - Page 8 Thermostat NO contact with centre plate, time-controlled When all values have been set, the display returns again to the basic display. The function is executed. User settings (Table 2) The behaviour of the controller is set in the settings menu User settings. The settings menu is accessed via the menu (see Select function).
- Page 9 Thermostat NO contact with centre plate, time-controlled Display of the approximate calculated energy consumption/operating ENERGY- hours for 2 DAYS – WEEK – 30 DAYS – YEAR. CONSUMTION TO The current day until the display time is taken into account. DATE Calculation: Duty cycle of the heating x COSTS/h Select time period for calculating the energy consumption: +/–...
- Page 10 Thermostat NO contact with centre plate, time-controlled The next adjustable value flashes in the display. Once all values have been adjusted, the display returns to the subordinate level. 5 Information for electricians Assembly and electrical connection DANGER! Touching live parts can result in an electric shock. An electric shock can lead to death.
- Page 11 Thermostat NO contact with centre plate, time-controlled (19) (20) Figure 7: Mounting Align insert (7) in the connector socket and fix it into position with fastening screws (20). Mount the insert in such a way that the plastic tongue (19) acts as insulation for the fastening screw.
-
Page 12: Control Mode
Thermostat NO contact with centre plate, time-controlled Setting the heating type When commissioning the controller, the heating type must be set. The device is in the basic display. Press Menu/ (8) push-button. A help text is shown at the bottom of the display. Keep pressing the +/–... - Page 13 Thermostat NO contact with centre plate, time-controlled Only when using as room thermostat with limiter. MIN/MAX Setting the minimum and maximum floor temperature for the limit: FLOORTEMP LOWER LIMIT OF FLOOR TEMPERATURE: The floor does not – become colder than the temperature set here. Factory settings: OFF (no limit) UPPER LIMIT OF FLOOR TEMPERATURE: The floor does not –...
-
Page 14: Reset All
Thermostat NO contact with centre plate, time-controlled Resetting all installer and user settings carried out in the settings menu RESET ALL to the factory settings Select YES (reset): +/–, press OK to confirm Table 3: Overview of the installer settings and their selection Displaying device errors Errors in the hardware configuration can be shown via the display. -
Page 15: Troubleshooting
Our products are under guarantee within the scope of the statutory provisions. If you have a warranty claim, please contact the point of sale or ship the device postage free with a description of the fault to the appropriate regional representative. Berker GmbH & Co. KG Klagebach 38 58579 Schalksmühle/Germany...
Need help?
Do you have a question about the 2044 Series and is the answer not in the manual?
Questions and answers