
Related Manuals for Meyer Sound LEOPARD


Summary of Contents for Meyer Sound LEOPARD
- Page 1 OPERATING INSTRUCTIONS LINE ARRAY LEOPARD ™ Compact Linear Line Array Loudspeaker Keep these important operating instructions. Check www.meyersound.com for updates.
- Page 2 The contents of this manual are furnished for informational purposes only, are subject to change without notice, and should not be con- strued as a commitment by Meyer Sound Laboratories Inc. Meyer Sound assumes no responsibility or liability for any errors or inaccura- cies that may appear in this manual.
-
Page 3: Important Safety Instructions
2. Keep these instructions. 12. Use only with the caster rails or rigging specified by 3. Heed all warnings. Meyer Sound, or sold with the apparatus. Handles are 4. Follow all instructions. for carrying only. 5. Do not use this apparatus near water. - Page 4 Wassereinwirkung oder übermäßig hoher Luft- feuchtigkeit ausgesetzt werden könnte, solange es sich nicht um ein Produkt handelt, dass mit der Meyer Sound English Weather Protection Option ausgestattet ist. • To reduce the risk of electric shock, disconnect the •...
- Page 5 LEOPARD OPERATING INSTRUCTIONS • Pour réduire les risques de surchauffe, évitez d’exposer Todas las demás reparaciones deben ser realizadas úni- directement l’enceinte aux rayons du soleil. Ne l’installez camente por personal de servicio capacitado de fábrica. pas à proximité de sources de chaleur, radiateur ou four par exemple.
- Page 6 IMPORTANT SAFETY INSTRUCTIONS...
-
Page 7: Table Of Contents
LEOPARD OPERATING INSTRUCTIONS CONTENTS Important Safety Instructions Symbols Used Chapter 1: Introduction How to Use This Manual LEOPARD Compact Linear Line Array Loudspeaker Native Mode Chapter 2: Power Requirements AC Power Distribution AC Connectors Wiring AC Power Cables LEOPARD Voltage Requirements... - Page 8 Appendix C: Specifications LEOPARD Dimensions LEOPARD with Rain Hood Dimensions viii...
-
Page 9: Chapter 1: Introduction
Updates and supplementary information are available at excellent performance right out of the box. www.meyersound.com. LEOPARD is portable and easy to configure. Its low weight Meyer Sound Technical Support is available at: and narrow profile make it well-suited for small- to medium- sized touring acts and fixed installations, where scalability •... -
Page 10: Native Mode
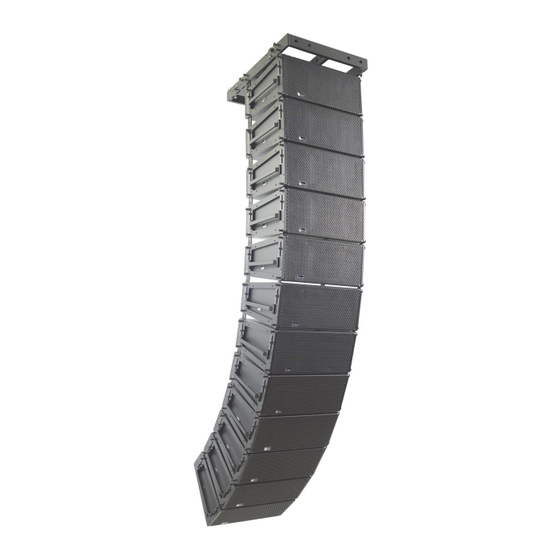
MTF-LYON/LEOPARD transition frame. Figure 3: MCF-LEOPARD Caster Frame with LEOPARD Stack Figure 2: MG-LEOPARD/900 Multipurpose Grid with Mixed Array In addition to working as a standalone system, LEOPARD can also be used as a supplemental fill loudspeaker in LEO-M and LYON systems. - Page 11 To use LEOPARD and 900-LFC loudspeakers in Native mode, send an identical, unmodified signal to each element in the array. The simplest way to accomplish this task is by looping the same, unprocessed source signal through all array elements.
- Page 12 CHAPTER 1: INTRODUCTION NOTE: For Native mode to work properly, the source signal must be correctly configured with the appropriate gain structure. CAUTION: Make sure that all cabling for looped loudspeakers is wired correctly (Pin 1 to Pin 1, Pin 2 to Pin 2, and so forth) to prevent the polarity from being reversed.
-
Page 13: Chapter 2: Power Requirements
This configuration is possible CAUTION: Make sure the voltage received by because LEOPARD tolerates elevated voltages from the LEOPARD remains within its 90–264 V ground line and does not require a neutral line. This system AC operating range. In addition, the ground line must delivers 208 V AC to each loudspeaker. -
Page 14: Ac Connectors
AC Input (Blue) The blue AC Input connector supplies power to LEOPARD. LEOPARD ships with a gray powerCON 20 cable mount The 3-conductor powerCON 20 is rated at 20 A and uses a connector, rated at 20 A, for assembling AC looping cables. -
Page 15: Wiring Ac Power Cables
LEOPARD OPERATING INSTRUCTIONS WIRING AC POWER CABLES LEOPARD VOLTAGE REQUIREMENTS LEOPARD ships with a gray powerCON 20 cable mount LEOPARD operates as intended when receiving AC voltage connector (Figure 11), rated at 20 A, for assembling AC within the following range: looping cables. -
Page 16: Intelligent Ac Power Supply
The minimum electrical service amperage required by a energize or disconnect the other end of the cable. loudspeaker system is the sum of the maximum long-term • LEOPARD requires a grounded outlet. Always use a continuous current for all loudspeakers. An additional grounded outlet and plug. - Page 17 • Do not operate the loudspeaker if the power cable is frayed or broken. • Keep all liquids away from LEOPARD loudspeakers to avoid hazards from electrical shock.
- Page 18 CHAPTER 2: POWER REQUIREMENTS...
-
Page 19: Chapter 3: Amplification And Audio
RMS signals. that prevent driver over-excursion and regulate voice coil temperatures. The LEOPARD user panel (Figure 13) includes Input and Loop output connectors for audio, Limit and Active LEDs, and RMS connectors and controls (see Chapter 5, “RMS Remote Monitoring System”). -
Page 20: Trupower Limiting
To calculate the load impedance for the looped HF and LF Limit LEDs loudspeakers, divide 10 kOhms (the input impedance for a The low- and high-frequency drivers for LEOPARD are single loudspeaker) by the number of looped loudspeakers. powered by separate amplifier channels, each with their For example, the load impedance for ten LEOPARDs is own limiter. -
Page 21: Amplifier Cooling System
When exposed to high ambient temperatures or when driven continuously at high output levels, a variable- speed fan circulates air internally to ensure that LEOPARD remains operational. CAUTION: To keep LEOPARD from overheat- ing, allow at least 6 inches behind the cabinet for proper ventilation. - Page 22 CHAPTER 3: AMPLIFICATION AND AUDIO...
-
Page 23: Chapter 4: Quickfly Rigging
LEOPARD RIGGING OPTIONS Table 4 summarizes the available rigging options for LEOPARD. For complete information about rigging hardware, including dimensions, weight, configuration, and load ratings, refer to the MG-LEOPARD/900 Assembly Guide (PN 05.243.080.01) available at www.meyersound.com. - Page 24 CHAPTER 4: QUICKFLY RIGGING Rigging Example, LEOPARD Array with Pull-Back MG-LEOPARD/900 Multipurpose Grid Oriented for maximum (12) LEOPARD array downtilt with four Primary array pick-up points and two coverage motors PBF-LEOPARD Pull-Back Frame Attached to bottom cabinet to provide pull-back for extreme...
- Page 25 LEOPARD OPERATING INSTRUCTIONS Rigging Example, Mixed Array with 900-LFCs and LEOPARDs MVP Motor Vee Plate Attached to front center of grid with two motors MG-LEOPARD/900 to adjust the horizontal Multipurpose Grid aim of the array Oriented for maximum array downtilt with three...
- Page 26 CHAPTER 4: QUICKFLY RIGGING Rigging Example, LYON Array with LEOPARD Downfill MVP Motor Vee Plate Attached to front center MTG-LYON Top Grid of grid with two motors Oriented for maximum to adjust the horizontal array downtilt with three aim of the array...
-
Page 27: Leopard Guidealinks
(black button) (PN 134.024). steering coverage away from structures like balconies. Figure 18: LEOPARD GuideALinks (Exposed) Attached at 0.5 Degrees Rear GuideALinks attach at splay angles of 0.5 to 10 degrees. The labels next to the rear GuideALinks indicate the splay... - Page 28 GuideALink configurations listed in loudspeakers and to predict coverage patterns for Table 5. arrays. Table 5: LEOPARD (Top Cabinet) GuideALink Configurations Rear Front Resulting Angle GuideALinks...
-
Page 29: Chapter 5: Rms Remote Monitoring System
WiFi. RMS MODULE NOTE: For the latest RMS system require- The LEOPARD RMS user panel includes an Identify button, Remote Mute switch, Wink/Activity LED, and two Network ments, visit the Meyer Sound website connectors (Figure 21). -
Page 30: Neuron Id For Rms Module
The loudspeaker can also be winked by RESETTING THE RMS MODULE clicking the Wink button on the loudspeaker Use the Identify button to reset the LEOPARD RMS module icon in Compass RMS. when powering on the loudspeaker. This action will cause the module to be removed from the RMS network. -
Page 31: Chapter 6: System Design And Integration Tools
LEOPARD OPERATING INSTRUCTIONS CHAPTER 6: SYSTEM DESIGN AND INTEGRATION TOOLS This chapter introduces MAPP, Meyer Sound’s patented MAPP client software lets you configure Meyer Sound system design tool, and SIM, a comprehensive system for loudspeaker systems and define the environment in which measurement and analysis. -
Page 32: Sim Measurement System
• Measuring variations in frequency response caused by the acoustical environment and the placement and interaction Source Independent Measurement Technique of loudspeakers to determine corrective equalization The SIM audio analyzer implements Meyer Sound’s source • Optimizing subwoofer integrations independent measurement technique. This dual-channel • Optimizing loudspeaker arrays method makes analysis of statistically unpredictable excitation signals possible. -
Page 33: Appendix A: Meyer Sound Weather Protection
APPENDIX A: MEYER SOUND WEATHER PROTECTION The Weather Protection option from Meyer Sound is air environments, the exterior grille can quickly show signs intended to increase the useful life of Meyer Sound of oxidation, causing unsightly discoloration. loudspeakers when they are installed outdoors and exposed Apart from selecting suitable weather protection, the to different and often harsh weather conditions. -
Page 34: Weather Protection Components
Always discuss the environmental conditions of your Meyer Standard Weather Protection Sound installation with your Sales Manager, and verify the Meyer Sound designs toward an IP rating of IPX4 (see “IP availability of Weather Protection for your selected Ratings” on page 35) for Standard Weather Protection, loudspeaker models. -
Page 35: Ip Ratings
LEOPARD OPERATING INSTRUCTIONS IP RATINGS IP stands for "Ingress Protection." The current format for expressing an IP rating is a 2-digit code. The first digit of an IP rating represents protection from solid objects. The second digit of an IP rating represents protection from water or moisture. - Page 36 APPENDIX A: MEYER SOUND WEATHER PROTECTION...
-
Page 37: Appendix B: Rain Hoods
Weather-protected LEOPARDs include a quick-clip removable rain hood for indoor/outdoor touring and sheltered outdoor installations. LEOPARD QUICK-CLIP RAIN HOOD The LEOPARD quick-clip removable rain hood (Figure 24) is easily attached and removed with its two winghead studs. To attach the LEOPARD quick-clip rain hood: 1. Connect any required cables to the LEOPARD loudspeaker. - Page 38 APPENDIX B: RAIN HOODS...
- Page 39 M-noise at the onset of limiting, 2-hour duration, and 50- degree C ambient temperature is <2 dB. M-noise is a full bandwidth (10 Hz–22.5 kHz) test signal developed by Meyer Sound to better measure the loudspeaker’s music performance. It has a constant instantaneous peak level in octave bands, a crest factor that increases with frequency, and a full band- width Peak to RMS ratio of 18 dB.
- Page 40 Endframes with captive GuideALinks secured with 0.3125 in x 0.63 in quick-release pins that allow 0.5- to 15.0-degree splay angles; detachable side and rear handles Load Ratings MG-LEOPARD/900 multipurpose grid flies 23 LEOPARDs at a 5:1 safety factor, or 20 LEOPARDs at a 7:1 safety factor, with some restrictions Dimensions 26.93 in (684 mm) W...
- Page 41 [624 mm] [499 mm] 5.60 in [142 mm] 11.11 in [282 mm] 10.08 in [256 mm] NOTE: For dimensions and weight for the MG-LEOPARD top grid and MCF-LEOPARD caster frame, refer to the MG-LEOPARD/900 Assembly Guide (PN 05.243.080.01) available at www.meyersound.com.
- Page 42 APPENDIX C: SPECIFICATIONS LEOPARD WITH RAIN HOOD DIMENSIONS 23.34 in [593 mm] 26.93 in 21.66 in [684 mm] [550 mm] 24.56 in 19.66 in [624 mm] [499 mm] 11.11 in [282 mm] 5.60 in [142 mm] 10.08 in [256 mm]...
- Page 43 LEOPARD OPERATING INSTRUCTIONS FEDERAL COMMUNICATIONS COMMISSION (FCC) STATEMENT This equipment has been tested and found to comply with the limits for a Class A digital device, pursuant to part 15 of the FCC Rules. These limits are designed to provide reasonable protection against harmful interference when the equipment is operated in a commercial environment.
- Page 44 APPENDIX C: SPECIFICATIONS...
- Page 46 Meyer Sound Laboratories Inc. © 2015, 2016, 2019 2832 San Pablo Avenue Meyer Sound. All rights reserved. Berkeley, CA 94702 LEOPARD Operating Instructions +1 510 486.1166 PN 05.243.005.01 B3 www.meyersound.com...
Need help?
Do you have a question about the LEOPARD and is the answer not in the manual?
Questions and answers