Advertisement
Quick Links
Advertisement

Related Manuals for Proactive PROTEKT 600 STAND


Summary of Contents for Proactive PROTEKT 600 STAND
- Page 1 PROTEKT 600 STAND ® SIT-TO-STAND PATIENT LIFT MODEL: 34600 OWNER’S MANUAL...
- Page 2 If the merchandise is received damaged or is missing components, contact the shipping company immediately and file a claim. For further assistance, contact your local dealer or Proactive Medical Products at the following:...
- Page 3 ARNING...
-
Page 4: Safety Precautions
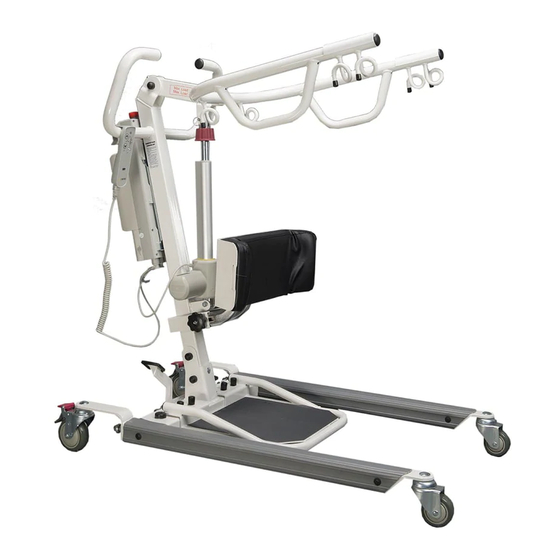
Proactive Medical slings are specially designed to be used in conjunction with Proactive lifts. Do not use slings manufactured by other companies on the lift. Proactive Medical is not responsible for any consequence resulting from the use of non-Proactive slings on this equipment. - Page 5 FEATURES C ART: ① Base ② Mast ③ Control Box ④ Pendant ⑤ Actuator ⑥ Lifting Boom ⑦ Kneepad Assembly ⑧ Footrest ⑨ Brake...
- Page 6 ASSEMBLY INSTRUCTIONS: Open the box and take lift out. 2. Unscrew nuts and bolts at top and bottom of the mast. Attach boom to mast and hand tight bolt and nut. Attach the L-shaped arms to back of the kneepad. For desired height of the kneepad, use proper holes on the L-shaped arms).
- Page 7 STEP 1: Attach the L-shaped arms to the mast. Make adjustment to the desired position. STEP 2: Use the bolt to fasten the L-shaped arms to the Mast.
- Page 8 1. Turn on the power by twisting the RED RESET BUTTON clockwise. 2. Press the UP or DOWN button on the hand control once. Check if the battery indicator lights are on. To proceed with lifting, make sure there is at least one green light.
- Page 9 Lift and Transfer From Bed Fit sling as described in “Fitting Stand Assist Sling”. Push lift towards patient. Open the base of the lift. Apply the brakes in both rear casters. Position patient’s feet on the foot platform and knees against the knee pad.
- Page 10 Lift and Transfer From Wheelchair sling as described in ting Assist ush lift towards patient. the base of the lift to go around the chair. Apply the brakes in both rear casters. patient’s feet on the foot platform and knees against the knee pad. 4.
-
Page 11: Charging The Battery
USER GUIDE CHARGING THE BATTERY The lift can be charged by plugging the charger directly into the control box w hile it is attached to the lift. The battery pack can be charged while seated in the optional wall/desk charging caddy. OPERATING INSTRUCTIONS —... - Page 12 Left button Right button Pressing the left Pressing the right button for more button for more than 0.5 seconds than 0.5 seconds will begin actuator will begin actuator extension. retraction. Raise / Lower Lift Long press to raise lift Long press to lower lift 3.
- Page 13 OPERATING INSTRUCTIONS — USING THE HAND PENDANT Raise / Lower Lift Long press to raise lift Long press to lower lift 1. Press the bu�on to lower the li�. bu�on to raise or the...
- Page 15 • The operator of the lift shall inspect the lift before each use. Check all bolts for tightness. Make sure the base can be easily widened, and that all lift parts are in place. Make sure that casters can be turned freely, and that caster brakes can be engaged.
-
Page 16: Troubleshooting
Notice “click” sound from control box when UP or DOWN button on hand control was pressed. WARNING: If you experience a problem with your lift and are unable to service it yourself, contact Proactive Medical or your Proactive authorized distributor. - Page 17 Toileting Sling postural control. Fitting The Toileting Sling Slide the sling down pa�ents back to lumbar posi�on. Draw shoulder straps under the arms and around the chest into the front. Draw Velcro waist belt around waist and press together to fasten. Draw each leg support under the thigh.
-
Page 18: Limited Warranty
LIMITED WARRANTY... - Page 19 This warranty shall not apply to any product which has been repaired or altered in any way so as, in our judgment, to affect its functionality and durability, nor to any product subject to abuse, misuse, negligence or accident, improper maintenance, improper installation, nor to any product used with other parts, components and/or accessories with quality and/or specifications not compatible with this product.
Need help?
Do you have a question about the PROTEKT 600 STAND and is the answer not in the manual?
Questions and answers