Wahoo Kickr Setup Instructions
Fixed gear adapter
Hide thumbs
Also See for Kickr:
- Quick start manual ,
- Quick start manual and instructions (60 pages) ,
- Quick start manual & instructions (6 pages)

Related Manuals for Wahoo Kickr


Summary of Contents for Wahoo Kickr
- Page 1 Wahoo Kickr Fixed Gear Adapter Compatable with Wahoo Kickr Generation 1 or 2 (2014/2016) trainers Set-up Instructions www.velobike.co.nz...
- Page 2 Contents Introduction What is included Tools You Will Need Fixed Gear Adapter Installation www.velobike.co.nz...
- Page 3 This adapter replaces the cassette and free-hub on your Wahoo Kickr generation 1 or 2 (2014/2016) with a fixed gear setup compatible with horizontal drop-out track bicycles. The bike is locked in place with a chain tug and a quick release skewer for maximum hold.
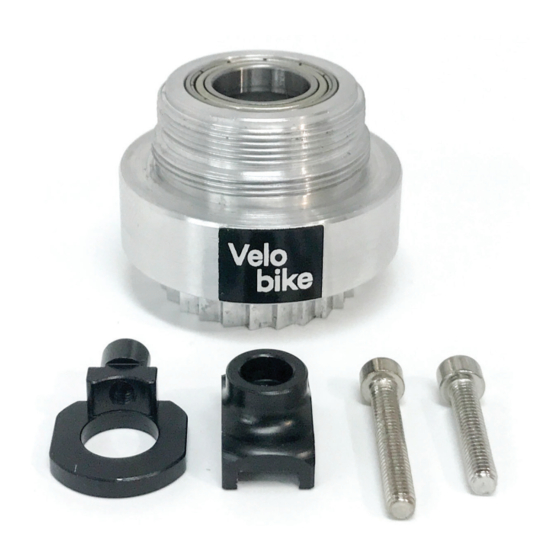
- Page 4 What is Included The following parts are included to convert your Wahoo Kickr generation 1 or 2 (2014/2016) trainer to fit a fixed gear track bike: 1. Wahoo Kickr Fixed Gear Adapter - 7075 Aluminum - Standard cog and lock ring threads - Sealed bearings 2.
- Page 5 Tools You Will Need • 17mm Spanner • 3mm Allen/Hex Key www.velobike.co.nz...
- Page 6 Fixed Gear Adapter Installation 1. Remove the axle skewer from the trainer. 2. Remove the axle nut with a 17mm spanner. Set this nut aside, we will use this again when installing the fixed gear adapter. 3. Slide off the cassette and free-hub body.
- Page 7 5. Gently slide on the adapter. Make sure the spline is fully engaged. Note: Tolerance variations in the Kickr’s spline may make the adapter feel too tight or too loose. Try a few positions until you find one that feels firm with the least amount of play.
- Page 8 7. Screw on a fixed gear cog and lock ring. 8. Place the bike on the trainer. Fit the chain tug onto the outside of the drive side dropout. Adjust the chin tension using a 3mm Allen key 9. Screw the 17mm Axle nut back onto the axle.
- Page 9 www.velobike.co.nz...
Need help?
Do you have a question about the Kickr and is the answer not in the manual?
Questions and answers