
Related Manuals for Water Tech Pool Blaster Pulse


Summary of Contents for Water Tech Pool Blaster Pulse
- Page 1 Pool Blaster Pulse Cordless, Rechargeable Pool & Spa Vacuum Water Tech Corp. “The Pool Invention People”...
-
Page 2: Power On/Off
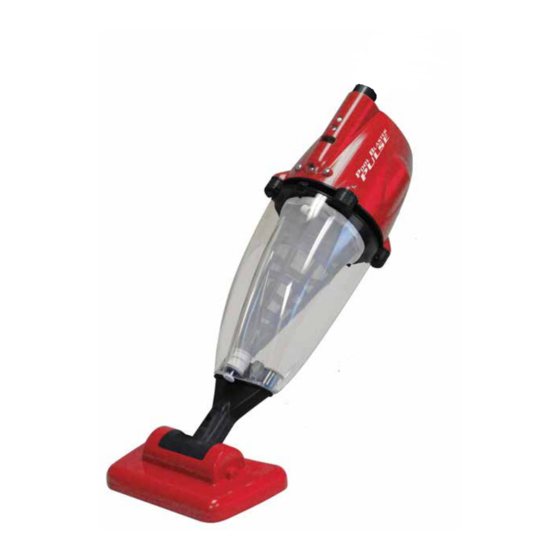
Handle Rear Body Back Cover (Not to be opened) Filter Cone Filter Sleeve Suction Nozzle Flap Vacuum Head Outlet Valve Filter Cone Base (Not to be disassembled) 10 Filter Sleeve Locking Tab 11 Charging contact plate 12 Handle locking hole 13 Power ON/OFF Button 14 Filter Sock... -
Page 3: Safety Warnings & Instructions
SAFETY WARNINGS & INSTRUCTIONS Read and follow all instructions in this manual and on the equipment. Failure to do so could result in severe or fatal injury. WARNING! This is not a TOY. Children should be supervised to ensure that they do not play with this cleaner and its accessories. - Page 4 Under no circumstances should you attempt to disassemble the cleaner and replace the impeller, motor and battery by yourself. External adaptor and Charging Base : For indoor use only. Never use the external adaptor and charging base for purpose other than battery charging for the pool vacuum supplied in the same pack.
-
Page 5: Getting Started
chemicals. Never leave the cleaner plugged for long term storage. Recharge the cleaner every three months. Above warnings and cautions are not intended to incorporate all possible instances for risks and / or severe injury. Pool / spa owners should always exercise intensive caution and common sense when utilizing the cleaner. -
Page 6: Charging The Battery
Wall Mounted 1. Use screws (not included) to fix the Charging Base to the wall at a height at least 16 inches (40cm) above a level surface. Fig.2 2. Align Hanging Slot of the cleaner to the upper hook of the Charging Base. Push the cleaner to Charging Base until two extended hooks are secured under the tabs on the Filter Cone base. -
Page 7: Set Up For Operation
3. When charging is completed, disconnect the external adaptor from power source and unplug the jack from the Charging Base. 4. If the Charging Base is mounted on the wall for charging, hold and lift the front body of cleaner to release it from the two extended hooks on Charging Base at first. -
Page 8: Operation
To release the telescopic pole, press down two side pins simultaneously and pull out the pole. Vacuum head assembly Insert the Vacuum Head adapter directly to the suction hole of the cleaner tightly by hand. Fig. 6 Brushes on the vacuum head can be replaced if needed by removing the bottom cover. It is recommended to keep both brushes and wheels on the vacuum head for most efficient cleaning and to prevent damage to your pool. - Page 9 DO NOT use this cleaner to pick up any toxic substance, flammable or combustible liquids such as gasoline, or operate in the presence of explosive or flammable fumes. CAUTION Use original accessories delivered with this product. DO NOT leave the cleaner in the water when not in use or when battery is low as water leakage may occur.
-
Page 10: Maintenance And Storage
3. Detach the Filter Sleeve from the cleaner. Clean out the debris from the sleeve. 4. Pull up the small loop on Filter Sock elastic to lift up the band and then pry along the band to release the sock from the tabs on the Filter Cone base. Fig. 8 5. -
Page 11: Battery Disposal
WARNING! Never attempt in any way to disassemble your cleaner. Under no circumstances should you attempt to disassemble the cleaner and replace the impeller, motor and battery by yourself or hire an unauthorized service provider to replace the battery. - Page 12 Never smoke or allow a spark or flame in the vicinity of the battery or the cleaner. Batteries can generate gases which could possibly ignite. Do Not expose to fire or intense heat as this may result in an explosion. CAUTION! If a battery leak develops, avoid contact with the leaking acid and place the damaged battery in a plastic bag.
- Page 13 4. Use Philips screw driver to unfasten 10 screws on the motor plate as pointed in diagram, and then remove the motor plate. 5. Remove battery pack from unit and lay next to plate with wires attached. 6. Use wrench socket to unfasten the nut, and then detach the battery wire terminal from the motor plate.
-
Page 14: Troubleshooting
Look wheel or adapter cavities for damage or excessive wear. Clean out the wheel and adapter cavity. Water Tech Corp. 10 Alvin Ct. East Brunswick, NJ 08816 - USA Tel: 1-800-298-8800 Fax:-1800-488-0700...
Need help?
Do you have a question about the Pool Blaster Pulse and is the answer not in the manual?
Questions and answers