Advertisement
Quick Links
Operating Instructions
Included Installation Instructions
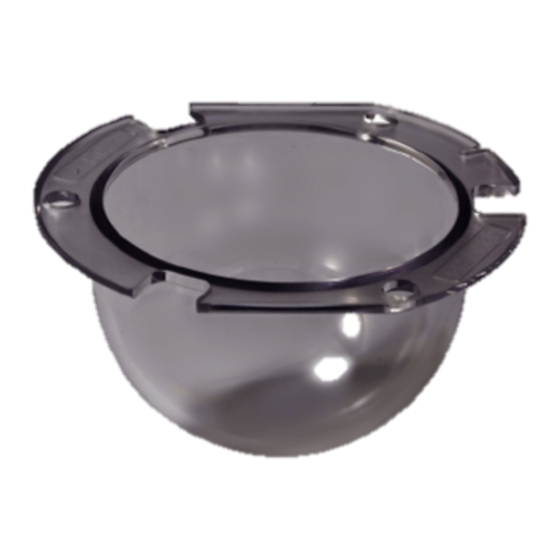
Dome Cover
WV-CR1S
Model No.
• Before attempting to connect or install this product, please read these instructions carefully and
save this manual for future use.
• The external appearance and other parts shown in this manual may differ from the actual product
within the scope that will not interfere with normal use due to improvement of the product.
For U.S. and Canada:
Panasonic i-PRO Sensing Solutions
Corporation of America
800 Gessner Rd, Suite 700 Houston, TX 77024
https://www.security.us.panasonic.com/
Panasonic Canada Inc.
5770 Ambler Drive, Mississauga, Ontario, L4W 2T3 Canada
1-877-495-0580
https://www.panasonic.com/ca/
© Panasonic i-PRO Sensing Solutions Co., Ltd. 2020
Preface
This smoke type dome cover is used to install the indoor use dome-type monitoring camera.
For the latest information about the supported cameras, refer to our support website
(https://security.panasonic.com/training_support/support/info/<Control No.:C0501>).
Specifications
Ambient operating temperature:
–10 °C to +50 °C {14 °F to 122 °F}
Approx. 61.0 g {0.13 lbs}
Mass:
Dimensions:
Diameter
Height
Diameter of the dome : 41.5 mm {1-5/8 inches}
Precautions
„ Refer installation work to the dealer.
„
Installation work requires technique and experience. Failure to observe this may cause fire, electric
shock, injury, or damage to the product.
Be sure to consult the dealer.
Standard Accessories
Operating instructions (this document) .......................................................................................1 pc.
For Europe and other countries:
Panasonic Corporation
http://www.panasonic.com
Panasonic i-PRO Sensing Solutions Co., Ltd.
Fukuoka, Japan
Authorised Representative in EU:
Panasonic Testing Centre
Panasonic Marketing Europe GmbH
Winsbergring 15, 22525 Hamburg, Germany
Cs0520-0
Printed in China
: 108 mm {4-1/4 inches}
: 59.5 mm {2-11/32 inches}
Installation
Read the following descriptions together with the Installation Guide of the camera.
Note:
• When a smoke type dome cover is used, the IR LED irradiation distance and the illuminance
level are lower than for a standard clear type dome cover.
Check the settings after attaching the enclosure.
Step1
Remove the enclosure from camera
Use the bit included with the camera to loosen
the 2 screws that secure the enclosure, and
then remove the enclosure from the camera
body.
Note:
• The enclosure is still connected to the
camera with the auxiliary wire at this stage.
Step2
Remove the auxiliary wire and dome cover
1
Remove the fixing screw* (1 pc., with
washer) that secures the auxiliary wire to the
enclosure.
Remove the 2 fixing screws* (2 pcs., without
2
washers) that secure the dome cover
anchor bracket to the enclosure.
Remove the dome cover anchor bracket
3
and the dome cover. (Do not peel off the
dust guard sponge.)
These 3 fixing screws, the dome cover
anchor Bracket will be used again in step3.
* Depending on the camera used, all 3 fixing
screws may be of the same type (without
washers). In this case, any of the screws can
be used.
Step3
Replace the dome cover
Remove the cover film from the outside of the
1
dome cover (WV-CR1S). Keep the removed
cover film for following step. (Take care not
to damage the outside or inside of the dome
cover.)
2
Attach the dome cover (WV-CR1S) to the
enclosure. When attaching, align the 3 holes of
the dome cover anchor bracket and 3 notches
of the dome cover with the 3 protrusions on the
enclosure.
Using the 2 fixing screws (without washers) that
3
were removed in step2, secure the dome cover
anchor bracket to the enclosure.
(Recommended tightening torque: 0.78 N·m
{0.58 lbf·ft})
4
Attach the cover film removed in
1
outside surface of the dome cover.
Step4
Attach the enclosure to the camera
1
Use the last fixing screw (with washer) to
secure the auxiliary wire from the camera
body to the enclosure.
(Recommended tightening torque: 0.78 N·m
{0.58 lbf·ft})
Position and secure the flat side of the
end of the auxiliary wire to the dome cover
anchor bracket with the screw. (Make sure
not to position the end of the auxiliary wire
above the protrusion.)
2
Secure the enclosure to the camera with the
2 enclosure fixing screws.
(The recommended tightening torque :
0.59 N·m {0.44 lbf·ft}
➔ Refer to the Installation Guide for more
information about installing the camera.
IMPORTANT:
• When the enclosure is attached, the camera's focus may go out of focus. Use the "Auto focus"
function in the setup menu to adjust the focus.
• Remove the cover film after installation is complete.
• If there are fingerprints or dirt on the dome cover, wipe it clean with a soft cloth.
Bit
Enclosure
Fixing screw (with washer)
Auxiliary wire
Dome cover
anchor bracket
Fixing screw
(without washer)
Dome cover
anchor bracket
Dome cover
to the
Protrusions on the enclosure (3 places)
Fixing screw
(with washer)
Auxiliary wire
Enclosure fixing
screw (2 places)
Dust guard sponge
Rotation stopper
Dome cover
anchor bracket
Advertisement

Related Manuals for Panasonic WV-CR1S


Summary of Contents for Panasonic WV-CR1S
- Page 1 Dome cover anchor bracket washers). In this case, any of the screws can Fixing screw (without washer) be used. Cs0520-0 © Panasonic i-PRO Sensing Solutions Co., Ltd. 2020 Printed in China Preface Step3 Replace the dome cover Dome cover anchor bracket Remove the cover film from the outside of the This smoke type dome cover is used to install the indoor use dome-type monitoring camera.
- Page 2 固定ねじが同じ種類 (ワッシャーなし) の場 合もあります。 ドームカバー 〒812-8531 福岡県福岡市博多区美野島四丁目1番62号 この場合、 固定ねじの使い分けは必要あり 固定金具 固定ねじ ません。 (ワッシャーなし) Panasonic i-PRO Sensing Solutions Co., Ltd. 2019 © Panasonic i-PRO Sensing Solutions Co., Ltd. 2020 商品概要 ドームカバーを交換する。 Step3 ドームカバー 固定金具 ドームカバー (WV-CR1S) の外側に付いている保 このスモークタイプドームカバーは、 屋内ドームタイプ監視カメラに取り付けて使用します。 護フィルムを取り外します。 取り付け可能なカメラの最新情報については、 サポートウェブサイト...