Jaga Micro Canal Installation Instructions Manual
Hide thumbs
Also See for Micro Canal:
- Manual (48 pages) ,
- Mounting instructions (8 pages) ,
- Manual (44 pages)
Table of Contents
Advertisement
Quick Links
Advertisement
Table of Contents

Subscribe to Our Youtube Channel
Related Manuals for Jaga Micro Canal


Summary of Contents for Jaga Micro Canal
- Page 1 Micro Canal INSTALLATION INSTRUCTIONS...
-
Page 2: Table Of Contents
9. INITIAL START ......................12 10. MAINTENANCE ......................13 11. WARRANTY .......................14 12. DISSASSEMBLY INSTRUCTIONS ................14 DECLARATION OF CONFORMITY JAGA N.V. - Verbindingslaan 16 - B 3590, declares under its sole responsibility that the CEO JAGA N.V. product to which this declaration relates: MICRO CANAL Jan Kriekels... -
Page 3: Used Symbols
- access to the unit has been restricted due to on-site conditions. - the initial start-up has been carried out before a general cleaning of both the fan and the coil. MICRO CANAL | MANUAL | 26 MAART 2020, 12:58... -
Page 4: Warnings And Safety
2. WARNINGS AND SAFETY Handling guidelines: The unit must be handled with care in order to avoid damage to the unit’s interior and exterior parts. The unit might have sharp edges; use gloves during installation/adjustment. All the operations listed below must be carried out in accordance with local health and safety regula- tions. -
Page 5: General Information
– it is advisable to run the unit at maximum speed and to check for abnormalities. Operational limits: An installation that does not meet the specified operational limits releases Jaga NV from all liability with respect to damage to objects or people. -
Page 6: Product Description
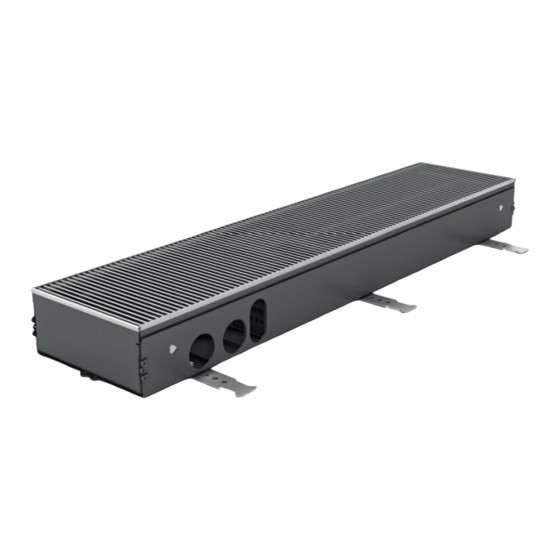
6. PRODUCT DESCRIPTION The Micro Canal is only 223⁄64 inch in height and 51⁄8 inch in width. It is fitted with small but powerful dynamic coils and quiet fans with EC-motors. Micro Canal combines minimalistic aesthetics and architectural freedom with an unprecedented heat output. Micro Canal can be integrated into any interior. -
Page 7: Technical Data
Max. 3 47⁄64 Min. 13⁄64 / Max. 25⁄32 7.4. OPTION: ADJUSTABLE RAISED FLOOR PEDESTALS 2 23⁄64 Max. 19⁄32 Min. 4 21⁄64 / Max. 14 49⁄64 Min. 1 31⁄32 / Max. 11 13⁄16 MICRO CANAL | MANUAL | 26 MAART 2020, 12:58... - Page 8 7.5. LEAVE SOME ROOM Min. 7 7⁄8 inch When installing the trench fancoil in front of a window, make sure to allow sufficient space for curtains. The curtain should never cover the grill of the trench fancoil unit. 7.6. MAX CABLE LENGTH - 24 VDC ELECTRICAL CONNECTION DISTANCE FROM POWER SUPPLY IN FT.
-
Page 9: Installation
Mark the drill holes. Drill the holes (drill dia.5⁄16inch) Secure the unit to the floor with mounting strips. and insert the plugs Make sure to use the correct type of plug for your floor type! MICRO CANAL | MANUAL | 26 MAART 2020, 12:58... - Page 10 223⁄64 inch Fill the cavities underneath the trench with a solid mass. Place both the supply and return hoses as well as the power cable. Make sure that there is at least 2 23⁄64 inch of both hose and cable inside the trench.
- Page 11 340C. If it is lower, remove the finishing touches. sensor and turn on/off the fans by means of a potential free thermostat. MICRO CANAL | MANUAL | 26 MAART 2020, 12:58...
-
Page 12: Initial Start
9. INITIAL START IMPORTANT! Start-up and Commissioning of the fancoil must be carried out by skilled staff, qualified to work on this type of product. DANGER! Before start-up, make sure the installation has been carried out in compliance with in this manual. Before start-up the fancoil unit, check if: 1. -
Page 13: Maintenance
– check the unit’s power consumption using a clip-on meter and compare the reading with the values shown in the documentation; – inspect the electrical contacts for corrosion and loose wires. MICRO CANAL | MANUAL | 26 MAART 2020, 12:58... -
Page 14: Warranty
– the fan coil has not been periodically cleaned, – the unit has been used in an improper or irresponsible manner, – repairs have been carried out by others than Jaga, – product modifications have been carried out by others, before or after the installation, – ... - Page 15 NOTE MICRO CANAL | MANUAL | 26 MAART 2020, 12:58...
- Page 16 Jaga Canada Climate Systems www.jaga-canada.com maart 26, 2020 12:58 p.m. - Jaga Inc.
Need help?
Do you have a question about the Micro Canal and is the answer not in the manual?
Questions and answers