BCN3D Sigma Series User Manual
Hide thumbs
Also See for Sigma Series:
- Quick start manual (2 pages) ,
- User manual (82 pages) ,
- Quick start manual (2 pages)
Table of Contents
Advertisement
Quick Links
Advertisement
Table of Contents

Related Manuals for BCN3D Sigma Series


Summary of Contents for BCN3D Sigma Series
- Page 1 Sigma Series User Manual User Manual...
-
Page 2: Table Of Contents
Contents Introduction Warranty Technical support List of consumables Product Warranty Period Conditions to exercise the warranty How to exercise the warranty? Warranty exclusions Limitations and liability exemptions Conformity Specifications Safety and compliance General information Hazards Proper area to install the printer Moving the machine Installation What is in the box? - Page 3 Regular Single Dual Mirror Duplication How to print the file Online printing From the BCN3D Cloud dashboard From BCN3D Cura via cloud Offline printing Via SD card Detach print from build plate Use a spatula Use water Reusage of the magigoo adhesives...
- Page 4 Select file from SD card While printing Utilities Filament Calibration Maintenance Printer setup Temperatures Information Maintenance General maintenance Hotend Extruder Printing surface Motion system Firmware upgrade Troubleshootin Error message Glossary Filaments BCN3D Technical Assistance Services Terms and Conditions Open Source User Manual...
-
Page 5: Introduction
Introduction Warranty BARCELONA THREE DIMENSIONAL PRINTERS, S.L. provides this Warranty to the consumers of the BCN3D brand products included in the sales package (“Product”). This Warranty will be valid only in the country in which the sale of the Products has been made. BARCELONA THREE DIMENSIONAL PRINTERS, S.L. -
Page 6: Conditions To Exercise The Warranty
Products for repair or replacement. 5 The serial number of the product to be returned will have to correspond to the one in the BCN3D Technologies records. How to exercise the warranty? 6 Unless specifically requested by BCN3D Technologies, nothing else should be sent apart from the Product. -
Page 7: Warranty Exclusions
6 Damage caused by abuse, misuse, accident or 7 If the user does not accept the reparation, BCN3D negligence when using the Product. Technologies will return the product by the agreed method of RMA. -
Page 8: Limitations And Liability Exemptions
Warranty Limitations and liability exemptions This Warranty is the sole and exclusive Warranty of BARCELONA THREE DIMENSIONAL PRINTERS, S.L. and the sole and exclusive responsibility of BARCELONA THREE DIMENSIONAL PRINTERS, S.L. for the defects present in its Products. Therefore, this Warranty replaces any other guarantee issued by BARCELONA THREE DIMENSIONAL PRINTERS, S.L., whether oral or written on any method. -
Page 9: Conformity
Conformity The BARCELONA THREE DIMENSIONAL PRINTERS, S.L. hereby declares that the BCN3D Sigma: Complies with the essential requirements and any other applicable or required provisions of the Directives: 2006/42/CEE Machinery Directive 2014/35/UE Low Voltage Directive 2014/30/UE Electromagnetic Compatibility Directive (EMC) -
Page 10: Specifications
Spanish, English, German, French, Italian, Japanese, Portuguese, Supported languages Chinese Supported files *.gcode Operating sound 49 dB Nozzle diameter Brass nozzle: 0,4mm (default) | 0,8mm Certifications CE / FCC Offline printing: SD card Connectivity Online printing: WiFi or Ethernet (through BCN3D Cloud) User Manual... - Page 11 80 ºC ELECTRIC PROPERTIES Input AC 84-240V, AC 3,6-1,3A, 50-60Hz Maximum power consumption 650W SOFTWARE File preparation software BCN3D Cura Operating Systems Windows, Mac, Linux Supported files STL, 3MF, OBJ, AMF Wireless connectivity BCN3D Cloud Supported browsers Google Chrome, Mozilla Firefox, Microsoft Edge, Safari, Opera...
-
Page 12: Safety And Compliance
Safety and compliance General information To avoid potential residual risks the user should read and understand the following safety measures (you are strongly advised to read this before using the machine). To highlight the areas where extra care should be taken, safety alert stickers have been affixed to the relevant parts of the machine to warn the user of potential hazards. - Page 13 Safety and compliance The printer is powered by mains voltage, which is hazardous when touched. This has been marked with a high-voltage symbol on the bottom cover. As with any other appliance, do not touch the terminals of the mains, the switch, or the power supply.
-
Page 14: Proper Area To Install The Printer
Proper area to install the printer In order to ensure easy access to the printer during normal operations and maintenance, install the machine in a place with enough space between walls and other equipment. The distance measured from the back of the printer to the wall has to be at least 200mm to allow easy access from the side of the printer. -
Page 15: Moving The Machine
Moving the machine To ensure safe movement of the machine, follow the steps described below: Switch off the printer • Disconnect the power supply cable from the rear of the machine. Also disconnect the ethernet cable and USB • Wifi dongle if it is connected. Ensure the glass printing surface is well fixed with the clamps. -
Page 16: Installation
Installation What is in the box? Printer box: BCN3D Sigma 3 plastic covers + with 0.4mm hotends Glass printing surface 2 PLA spools 10 Thumbscrews Upper box: 2 Spool holders Quick start guide and warranty SD card Ethernet cable USB cable... -
Page 17: Unboxing
Unboxing Unboxing Unboxing Watch our video to see how to correctly unbox. The printer is heavy and therefore this step needs to be performed by two people. Make sure that the table where the printer is being installed, is close enough. Retain packaging for warranty service. -
Page 18: Diagram
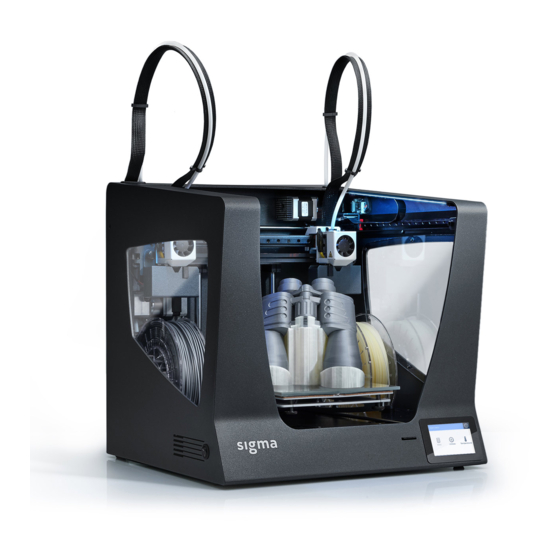
Diagram Hotend Extruder Bowden tube 10. Power plug Purge tank 11. USB port SD Card reader 12. Ethernet port Touchscreen 13. External spool holder Spool holder 14. External filament spool Filament spool 15. Filament Runout sensor (FRS) Glass printing surface 16. - Page 19 Diagram User Manual...
- Page 20 Diagram 20. Leveling thumbscrews 21. Clamps 22. Glass printing surface 23. Platform 24. Build plate 25. Hotend 26. Hotend fan 27. Layer fan 28. Coupling clip 29. Coupling collect User Manual...
-
Page 21: Set Up
In order to ensure the safe packaging and transport of the printer, some of the components are sent in separate packages. Before starting to print with the BCN3D Sigma Series printer, those parts need to be installed in order to complete the setup process. -
Page 22: Using The Printer
3. WiFi module 4. Power cable The BCN3D Sigma Series can be used online or offline. However connecting the printer to the network is needed in order to register it and to use the BCN3D Cloud functionality. Ethernet connection is more stable than Wifi, so having both options, we recommend connecting the printer using an Ethernet connection. -
Page 23: Getting Started
Continue. Network connectivity The BCN3D Sigma series printers come with the ability to connect to a network in order to monitorize, control and visualize the data generated by the usage. There are three available options, whether the printer is connected via ethernet (option A), via WiFi (option B) or if no network is available (option C). - Page 24 Welcome setup A. Ethernet connection In order to use this option, the ethernet cable must be connected as indicated in Ethernet cable connection. Connect the other end of the cable to a network source. If the cable is well connected and the LAN (Local Area Network) uses DHCP, then the next screen shows up, indicating that the printer has been connected successfully.
-
Page 25: Register
C. No network connection If none of the two options above are available, or you don’t want to use all the features available in the BCN3D You can connect and register the printer later via the display menu Utilities > Printer Setup > Register printer, following the steps indicated in the Register section. - Page 26 Welcome setup A. New User If you do not have an already active BCN3D Cloud account, fill your user information in the form that appears on the browser. After submitting the form an email will be sent in order to verify the sign up process. Once verified, both the accou- nt in BCN3D Cloud and your printer will be registered.
- Page 27 B. Existing user If you already have an account on BCN3D Cloud, please press the “Sign in” link in the form. Then insert your cre- dentials (email and password), and follow up with the form as shown in the image below.
-
Page 28: Setup Assistant
Spool installation Take the spools from the bottom tray and the 3D printed spool holders from the accessories box. Sigma Series printers have the possibility to install the spools inside the printer or in the back. Follow the instructions below... - Page 29 Setup Assistant Feeding filament to the system Once the spools are in place, press Next and follow the instructions on the screen: Choose the Left extruder and PLA material. After that, the printer will start heating up and adjusting the tempe- •...
- Page 30 Setup Assistant Push the filament gently through the tubes until it arrives at the extruder. Notice that the filament may get a • bit stuck in the Filament Run-out Sensor (FRS). The filament should be pushed through the FRS until it doesn’t move forward because it arrives at the extruder.
-
Page 31: Printer Calibration
Setup Assistant Printer calibration Before start printing, printer calibration must be performed to ensure a reliable first layer and adhesion of the print to the build surface, and to ensure a proper alignment of both printheads. NOTE: Remove the foams under the calibration screws, if you did not do it during printer setup. Printing surface calibration Printing surface calibration is a guided process performed by the printer to create a reliable first layer. -
Page 32: Z Offset Calibration
Setup Assistant In case some adjustments were made, the procedure suggests to perform the same probing again, in order to • fine tune the levelness of the printing surface. Tap the Redo button to repeat the operation. Normally a maximum of two operations is needed. However it is suggested to perform as many operations as •... - Page 33 Setup Assistant The process starts calibrating the Z offset of the left extruder. • The hotend heats up. After that, it is mandatory to clean the nozzle with a piece of paper or metal brush, so that • no rests of filament is on the tip of the nozzle. This is important because during calibration, a gauge has to be placed between the nozzle and the glass.
- Page 34 Setup Assistant HINT: Press the up-right button with the info icon to get more information about how the gauge should fit beneath the nozzle. At this time, the printer starts printing a short test print to validate the process. In this print, five lines will be •...
-
Page 35: Installing Shims
During the Printer Calibration process or before printing a job with Duplication or Mirror mode, the BCN3D Sigma may suggest you to install shims to correct the Z offset between nozzle tips. To correct this offset, there are diffe-... - Page 36 Setup Assistant Follow the instructions below or in our Knowledge Base. Skip installing shims: Although this option will correct the offset, the printed part from one extruder may • experiment different adhesion. Install shims to mechanically correct the Z offset: Printing a raft takes time and wastes material. For those users •...
- Page 37 Setup Assistant - Install as many shims as indicated on the screen. - Screw the bolts again. - Turn on the machine and follow the instructions on the screen. User Manual...
-
Page 38: Xy Offset Calibration
Setup Assistant XY Offset calibration After calibrating the Z offset, it is time to calibrate the offset between both print heads. This procedure is very im- portant while printing the same model with both extruders, either for dual color printing or for printing with support material. -
Page 39: Y Axis Calibration
Setup Assistant Find the best aligned couple of lines and select the number which corresponds to these lines on the screen. If • none are good, press Redo to repeat the test print. If there is no perfect alignment and a Redo operation was selected, another screen appears. In this case select •... - Page 40 Setup Assistant The printer now prints 10 lines from from to back along the X direction with both extruders, as in the image • below: Find the best aligned couple of lines and select the number which corresponds to these lines on the screen. If •...
-
Page 41: Operation
Operation Once the Setup Assistant wizard finishes, it is time to start operating the printer. Considering that the printer is connected to the network, registered, loaded with material in both extruders and correctly calibrated in the X, Y and Z directions, this chapter focuses on the preparation of the model to be printed, printing the file and collecting the print once it finishes. -
Page 42: Preparing A Print
BCN3D Cura for your Operative System and the BCN3D Cura manual. Once downloaded, follow the installation wizard. Add printer After the installation, when opening BCN3D Cura for the first time, you will be asked to select your BCN3D Sigma Series printer. Add an offline virtual printer Select the Sigma D25 profile. -
Page 43: Add A Printer That Is Linked To Your Account
Add a printer that is linked to your account • To add a printer into BCN3D Cura and take profit of all BCN3D Cloud functionalities, the printer must be registe- red and have an internet connection, as indicated in the sections Network connectivity and Register. -
Page 44: Regular
• Select the model, it will be highlighted with a blue outline. Use the adjustment tools to move, scale or rotate as needed. Visit Knowledge base to download BCN3D Cura manuals to get more information about adjustment tools. User Manual... - Page 45 Preparing a print • Click one part of the model and assign the extruder to print with. • Then select the material loaded in the selected Extruder. • Select Profile. User Manual...
-
Page 46: Dual
Preparing a print • Click Prepare to generate the printing file. Dual • Select Regular in the Print mode list option. • Click Open File. • Select the STL file to be printed. A Benchmark model can be found in the Sample parts folder. •... - Page 47 Preparing a print • Then select the material loaded in the Extruder 1. • Repeat the process with the other part, assign the Extruder 2 and select the material loaded. • Select the models by Shift+Left Click. Selected models will be highlighted with a blue outline. Right click on any of the selected models, and select Merge Models User Manual...
-
Page 48: Mirror
Preparing a print • Select Profile. • Click Prepare to generate the printing file. Mirror Print the model and its symmetrical part (along the X axis) at the same time. Using this printing mode, the printing capacity is doubled, but the available printing surface is reduced to less than half the original size. •... - Page 49 Preparing a print • Select the STL file to be printed. It can be found in the Sample parts folder. (Information) Note how the available printing volume is reduced and the loaded models automatically move to the left. These models can still be modified. A preview of the duplicated or mirrored parts is available at the right. •...
-
Page 50: Duplication
Preparing a print • Click Prepare to generate the printing file. Duplication Print the same model with both toolheads simultaneously and double the printing capacity. This mode is ideal for short runs of production. Bear in mind the available printing surface will be reduced by half. •... -
Page 51: How To Print The File
• Click Prepare to generate the printing file. The BCN3D Sigma Series printer allows printing the files via two different routes: online printing, either from the BCN3D Cloud dashboard or from BCN3D Cura via cloud, and offline printing, via SD-card. -
Page 52: From The Bcn3D Cloud Dashboard
How to print the file From the BCN3D Cloud dashboard Slice the project in BCN3D Cura as shown in Preparing a print and a Save file button will appear on the right • bottom panel. Click Save file and store the printing file (.GCode) somewhere in the computer. -
Page 53: From Bcn3D Cura Via Cloud
BCN3D Cura. • Slice the project in BCN3D Cura as shown in Preparing a print and a Send to Printer button will appear on the right bottom panel. Click Send to Printer and the printing file will be sent automatically to the selected printer. -
Page 54: Offline Printing
Insert the SD card (or micro-SD card) in the computer. • Slice the project in BCN3D Cura as shown in Preparing a print and a Save to Removable Drive button will appear • on the right bottom panel. Click Save to Removable Drive and the printing file will be automatically stored in the SD card. -
Page 55: Detach Print From Build Plate
Detach print from build plate One the print job is finished, it will be indicated on the touchscreen. There are several methods to detach the print. The process varies slightly on with what material you have used to print. It is very important in order to prevent chipping from the glass and extend its useful lifespan. Use a spatula •... -
Page 56: Use Water
Detach print from build plate Use water • If you are having difficulties removing some of these parts with only a spatula, try out using water as described below. • As described before, wait at least 15 minutes after the print job has finished. •... -
Page 57: Rating
Rating Rating is a very useful feature that the BCN3D Sigma Series printers include. Every print job can be rated from 1 to 5, indicating how bad or well the print comes out of the printer, respectively. This information is sent to the BCN3D Cloud where some statistics are shown. -
Page 58: Menu Structure
Menu structure This chapter provides an overview of the Sigma Series User Interface. In order to set up your printer or perform any operation, please follow the procedures in the corresponding sections: Preparation and Operation. Home screen In the main menu, there is an item for each of the main actions the user can perform: 1. -
Page 59: While Printing
Print When selecting the element on the list, a confirmation message appears to ensure that the file was not selected by mistake. It’s possible that a message shows up on the screen indicating that the combination of materials and/or hotends currently inserted on the printer do not match the combination selected on the print job. - Page 60 Print In this menu, users can perform several actions: Settings: access to several parameters that can be tweaked during a print: adjust build plate and hotend temperatures, cooler fan speed, flow rate, print speed or light intensity. Pause: pause the current print. Printheads automatically move to their home position. At this point, several operations are available to perform, such as purge, change filament or adjust light intensity.
-
Page 61: Utilities
Utilities Select the Utilities menu icon to scroll over all setup, maintenance and calibration options. Filament In this menu, all the possible operations related to the printing material are shown. Load: this process guides the users through the operation of feeding a material filament to the hotend. This is also included in the Setup assistant. - Page 62 Utilities HINT: Taking a look at the back of the printer may also help to know if the filament is in the correct position. • Follow the instructions on the screen to finish the operation. At the end, the filament should be coming out of the nozzle.
- Page 63 Utilities Unload: this process guides the users through the operation of removing a material filament from the hotend. It’s normally executed before inserting a new material. • Select the extruder the material will be removed from. • As soon as the nozzle reaches the correct temperature, press Next and the material will automatically purge a little bit before moving backwards.
-
Page 64: Calibration
Utilities Calibration Several options are available with regards to the calibration of the printer. Printing surface calibration: this process ensures that the printing surface is correctly flat before printing. This operation is very easy to perform and at the same time very important to achieve good results. This is also included in the Setup assistant. - Page 65 Utilities Once the Z axis offset of the two extruders is performed, the printer indicates how many shims need to be installed in order to keep both nozzles at the same height. This allows it to print in “mirror” and “duplication” modes more consistently.
-
Page 66: Maintenance
Utilities Maintenance This menu contains several operations to use when the user is performing maintenance tasks. For more information about maintenance processes and recommended frequency, refer to the Maintenance section in this document. Move printing surface: it is used when it is needed to lower or raise the printing platform. This is a very simple operation and it is very useful to separate the printing platform from the print heads. -
Page 67: Printer Setup
Utilities Autotune hotends: this operation adjusts the hotend parameters controlling its temperature. It is essential to perform this task when changing a hotend. The process is very simple and automatic. Just follow the instructions on the screen. Printer setup This menu contains most operations that allow the user to control the configuration of the printer. Change hotend: it starts the operation to change the hotend. - Page 68 Utilities Components setup: this setup screen shows the current hotend configuration in both left and right extruders and whether the filament runout sensor and the door sensor are activated or not. Light intensity: it adjusts the brightness of the LEDs on the printer. Brightness: shows a sliding bar to adjust the brightness of the touchscreen.
- Page 69 Utilities Wireless settings: if the dongle wifi is connected and wireless interface is turned on, this menu shows the list of wireless networks the user can connect the printer to. At the top right of the screen, the wireless interface can be turned off. In this case or when the wifi dongle is not connected, this menu shows the following screen.
- Page 70 Register printer: in case the printer was unregistered from the BCN3D Cloud dashboard, this process runs the wizard to register the printer again and link it to the user’s account. Follow the instructions as in the Register section of this document.
-
Page 71: Temperatures
Temperatures Select the Temperatures menu icon to check hotends and heated bed’s temperatures. The temperatures are shown in the following format: current temperature / target temperature (example: 117º / 200º) Preheating these elements is done by tapping on the corresponding button. The temperatures of the preheat is determined by the printer itself depending on the materials that are loaded into the extruders. -
Page 72: Information
Contact BCN3D: get address, phone number and email address to contact the manufacturer. Unit information: it shows information about the version of the different packages of software that are installed in the printer, and the serial number of the current unit. -
Page 73: Maintenance
The following information shows which activities have to be carried out to give the BCN3D Sigma D25 the proper maintenance and their frequency. Maintenance activities do not take much time and are not complicated. However, for those that need more attention, more detailed guidelines are provided to guide you through the process. -
Page 74: Hotend
Maintenance Hotend Hotends are a very important part of your printer and the quality and reliability of it depends on them. We recommend taking care of them in order to extend their lifespan, that it’s estimated to be more than 1000 printing hours. -
Page 75: Extruder
Maintenance Extruder The extruder motors are responsible for moving the filament towards the hotends. Having the right amount of material in the tip of the nozzle depends on them. They are usually very stressed components that are moving all the time, so that they need very careful maintenance. Activity Frequency Tools... -
Page 76: Printing Surface
Maintenance Printing surface Glass printing surface is a very delicate component of the printer, that can break or degrade if not treated properly. Proper calibration and therefore good printing quality depends on the flatness and cleanliness of this surface. This is a component that has to be maintained every time you start a printing process. The estimated lifespan of this component is 500 printing hours, but it highly depends on the material used, the calibration and the type of printing. -
Page 77: Motion System
BCN3D printers. Firmware upgrade At BCN3D we want you to have a great printing experience, and to achieve this we are continually working to create new firmware upgrades for our printers. To ensure that your printer is equipped with the latest features it is recommended to keep the firmware updated to the latest version. -
Page 78: Troubleshootin
Error message Error message is a list of errors that BCN3D Sigma D25 can show through the screen to isolate the specific cause or causes of the symptom. The symptom is a failure of some process to produce any results. - Page 79 The printer will activate the emergency stop when it is Emergency Stop not able to finish a command. Usually this problem is related to homing issues. The BCN3D Printer has encountered an unknown error. Unfortunately, we do not know the cause of this error. Unknown Error...
-
Page 80: Glossary
Firmware: The software that runs on your BCN3D Printer. Internal storage: The part of the BCN3D Sigma Series onboard storage that you can use to send files directly to the printer and access to print history. - Page 81 Print job: A print job is a file that has been submitted to be printed. This file is the result of preparing your model through BCN3D Cura. The format of print jobs is .Gcode. Print profile: The settings used to slice your 3D model and create a print file. BCN3D Cura software comes with preset profiles carefully optimized and tested for BCN3D products.
-
Page 82: Filaments
Filaments Visit BCN3D website to know more about filaments portfolio or Knowledge base to learn how to handle and print different types of materials. User Manual... -
Page 83: Bcn3D Technical Assistance Services
Email If you have a question that is not related to technical assistance, please send us an email to the address below. A BCN3D Technologies expert will contact you as quickly as possible. info@bcn3d.com You can find all of this information in the Contact Section of our website: https:/ /www.bcn3d.com/contact-us/... -
Page 84: Terms And Conditions
Terms and conditions Overall Vision 2 Defective goods The terms “we”, “us” and “our” refer to BCN3D If you detect any defect in the operation of the product, Technologies. The terms “you” and “your” refer to you have 7 working days from the reception of the... - Page 85 In order to make a return first, you will have to contact us to sales@bcn3d.com, explaining the reason of • The refunds will be carry out between the 1st...
-
Page 86: Open Source
BCN3D Technologies and its products would not be where they are today without the RepRap project and its open source community. The RepRap project started out as an initiative whose objective was to develop a 3D printer which could print most of its own components and be a low-cost printer. - Page 87 MSS-2020-1...
Need help?
Do you have a question about the Sigma Series and is the answer not in the manual?
Questions and answers