
Summary of Contents for Logik L04CTAM10
- Page 1 Instruction Manual Corded Desk Telephone with Speakerphone and Answerphone L04CTAM10...
-
Page 3: Table Of Contents
Contents Safety Warnings .................... 6 Unpacking ..................... 8 Product Overview ..................9 Display Messages and Symbols ................11 Getting Started ................... 12 Connecting the Telephone Line Cable ..............12 Connecting the Handset Cable ................12 Wall Mounting (Optional) ................13 For Wall Mounting .......................13 Preparation ....................15 Setting Up your Phone ....................15 Setting the Language ....................15... - Page 4 To Mute the Mouthpiece or Microphone ............21 Outgoing Call Record ................. 22 Last Number Redial .....................22 Viewing the Outgoing Call Records ..............22 Making a Call from the Outgoing Call Record ...........22 Deleting an Outgoing Call Record .................22 Storing an Outgoing Call Record into the Phonebook Memory ....23 Phonebook ....................24 To View the Phonebook Records ................24 To Add a New Record into the Phonebook ............25...
- Page 5 Repeat/Rewind ......................33 Skip/Fast Forward ......................33 Stop Playback ........................33 Volume Control......................33 To Intercept a Call ......................34 To Delete Incoming Messages ................34 To Delete all Messages ....................34 To Go Back to the Default OGM ................34 Remote Operation ..................35 To Check your Remote Access Code ..............35 To Check your Message from a Remote Location ..........35 Using the Remote Instruction Code ..............36 Switching ON from a Remote Location ...............36...
-
Page 6: Safety Warnings
Safety Warings For your continued safety and to reduce the risk of injury or electric shock, please follow all the safety precautions listed below. • Read all instructions carefully before using the telephone and keep them for future reference. • Retain the manual. - Page 7 • Attention should be drawn to the use of apparatus in moderate climates. Use mains adapter listed in the user manual only. • The base unit must be used only with the mains adapter supplied by Shenzhen YMK Electronics Co., Ltd. (5/F, 4 Building, Bingtang Mountain Industrial District, Nanwan, Longgang, Shenzhen, Guangdong, P.R China) Adapter model: YMK-AD070042-B.
-
Page 8: Unpacking
Thank you for purchasing your new Logik Corded Telephone. We recommend that you spend some time to read this Instruction Manual in order to fully understand how to install and operate it. Read all the safety instructions carefully before use and keep this instruction manual for future reference. -
Page 9: Product Overview
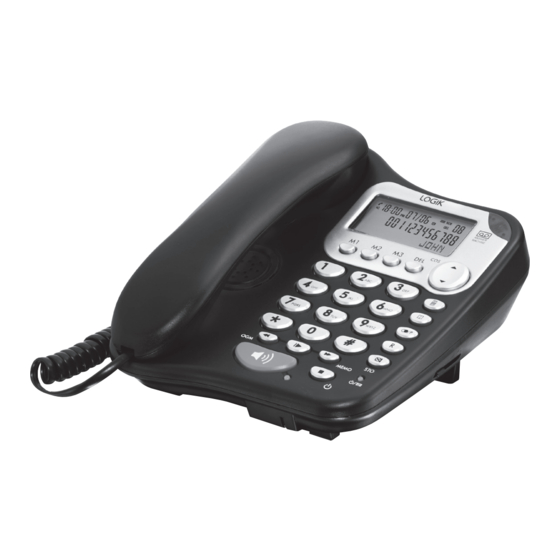
Product Overview ANSWER MACHINE Hook PQRS WXYZ rotate Recess MEMO 1. Switch Allows you to make a follow-on call without replacing the handset. 2. Wallmount hook If wall mounted, turn it 180° and it allows your handset to rest securely on the base. 3. - Page 10 (UP/DOWN) Navigation button Use it to navigate and select the preferred settings. 8. Dialpad Use it for entering the number you want to dial. (Menu) button Press to enter Options Menu to set the Date, Time, Screen Contrast, phone/TAM settings. (Phonebook) button Press to access the Phonebook records.
-
Page 11: Display Messages And Symbols
Display Messages and Symbols Number eld: It shows the telephone number and the number of messages. Letter eld: It shows the name, and the status of a call/message. The LCD screen icons: - Phone • You are connected to the telephone line - your Handset is “offhook”. - Time •... -
Page 12: Getting Started
Getting Started Connecting the Telephone Line Cable Plug the telephone line cable into the socket on the base. Plug the other end into the telephone wall socket. To single-line telephone socket • If you want to use the phone on a desk or flat surface, press the telephone line cable into the groove on the underside of the base so that the phone sits flat. -
Page 13: Wall Mounting (Optional)
Wall Mounting (Optional) Before you drill any holes, make sure there is no electrical wiring or pipes hidden in the wall. 1. Drill 2 holes in the wall. 2. Insert the wall plugs into the holes. 3. Drive in the screws and make sure to leave approximately 5mm of the screw head from the wall to hold the base securely. - Page 14 For Desk Mounting Follow the diagrams below to remove the mounting stand from the bottom of the telephone. Insert the mounting stand onto the top of the telephone.
-
Page 15: Preparation
Preparation Setting Up your Phone Press the button to access the telephone setup menu. Then, press the button to cycle through the options. The telephone will time out if you leave more than 8 seconds between key presses. Setting the Language With the phone in standby mode;... -
Page 16: Setting Up The Time And Date
Setting Up the Time and Date If you subscribe to the caller display service the time and date will be set automatically, but the year may still need to be adjusted to ensure the answering machine time stamp gives the correct day. 1. -
Page 17: Setting Up The Flash Time
Setting Up the Flash Time You may need the Recall function if your phone is connected to a PBX, or if you use BT Calling Features. Flash is another name for the R (Recall) button, and the normal UK requirement is for 100ms, but some PBX may need a longer time, in which case you can change the setting from the options menu. -
Page 18: Message Length
Message Length To set the maximum recording time for each incoming message or memo message on the answering machine. 1. Press the button. The display shows “OPTIONS MENU ”. 2. Press the button until the display shows “MESSAGE LENGHT”. 3. Press the button to confirm. 4. -
Page 19: Remote Access
Remote Access The remote access is a three-digit code you need if you call away from home to check your messages. The default is 321. To change code: 1. Press the button. The display shows “OPTIONS MENU ”. 2. Press the button until the display shows “REMOTE ACCESS”. -
Page 20: Operation
Operation Ringer Volume The Ringer High-Low switch located at the back of the base unit allows you to adjust the volume of the ringer. • High volume • Low volume To Make a Call Method 1 1. Lift the handset or press the button on the base unit. -
Page 21: One Touch Memory
To Switch Between the Handset and the Speakerphone During a phone conversation through the handset, press the button to speak hands-free. The speakerphone light will turn on, but conversation remains through the handset until the handset is replaced on the base unit cradle. While in speakerphone mode, lift the handset to enable a private conversation. -
Page 22: Outgoing Call Record
Outgoing Call Record Last Number Redial 1. Lift the handset or press the button. 2. Press the button. The phone automatically redials the last number you called. Viewing the Outgoing Call Records 1. The telephone remembers the last 50 outgoing calls. In standby mode, press the button. -
Page 23: Storing An Outgoing Call Record Into The Phonebook Memory
Storing an Outgoing Call Record into the Phonebook Memory 1. When viewing the outgoing call records, press the button to find the record you wish to store. 2. When the record is displayed, press the button. The display shows the cursor blinking on the first digit of the number. -
Page 24: Phonebook
Phonebook The Phonebook can store up to 120 names (max. of 15 characters) and telephone numbers (max. of 24 digits) in the Memory. To View the Phonebook Records 1. Make sure the handset is idle (not connected to a call). 2. -
Page 25: To Add A New Record Into The Phonebook
To Add a New Record into the Phonebook 1. Press the button. The display shows “SEARCH ADD”, with the “SEARCH” option flashing. 2. Press the button to select “ADD”. 3. Press the button to confirm. The display shows the cursor flashing on the number field. 4. -
Page 26: To Edit A Stored Number And/Or Name
To Edit a Stored Number and/or Name 1. When viewing the phonebook records, press the button to find the record you wish to edit. 2. When the record is displayed, press the button. The display shows the cursor flashing on the first digit of the telephone number. -
Page 27: Caller Display Operation
Caller Display Operation The caller display feature of this product requires a subscription to caller display service from your telephone company. If you subscribe to this feature from your local telephone company, you can see the phone number of the person calling you before you answer. The caller display information includes: •... -
Page 28: Viewing The Caller Display List
Viewing the Caller Display List 1. With the phone on standby mode, press the button. The display shows the most recent record. If there are no Caller Display records, the display will show “NO CALLS”. The “MSG” icon will show to indicate that the caller has recorded a message. -
Page 29: To Delete A Caller Display Record
To Delete a Caller Display Record When the caller display record is displayed: 1. Press the DEL button. The display prompts “DELETE CALL?”. 2. Press the DEL button again to confirm. 3. Press the button to return to the standby mode. To Delete all Caller Display Records When the caller display record is displayed: 1. -
Page 30: Answering Machine System
Answering Machine System Outgoing Messages (OGM) An OGM is the announcement callers will hear when the machine answers a call. This telephone has two pre-recorded announcements available if you choose not to record your own OGMs. OGM1 - this invites callers to leave a message after the tone. The default is “Please leave your message after the beep”. -
Page 31: To Record Ogm 1
To Record OGM 1 Make sure the answering machine is turned on. Each OGM must be at least 3 seconds and no more than 1 minute in length 1. Press the ( ) button briefly until you hear, “Announcement 1. ” 2. -
Page 32: To Turn The Answering Machine On Or Off
To Turn the Answering Machine On or Off 1. Press and hold the ( ) button to turn ON the answering system. You will hear, “Answering machine ON. Announcement one”. The display shows “ANSWER ON” and the message light will light up. 2. -
Page 33: To Playback Your Messages
To Playback your Messages If you have messages or memos, the display will show the total number of messages “XX MESSAGES” and the message light flashes. If you have new messages or memos, the display shows “XX NEW” and it will be shown alternately with the total messages. -
Page 34: To Intercept A Call
To Intercept a Call If you hear the answering machine recording a message, you can intercept the call and speak to the caller, EITHER by: 1. Lifting the handset, or pressing the button on the base unit, or lifting the handset of any other phone connected to the same line. 2. -
Page 35: Remote Operation
Remote Operation You can use the Answering System features of this telephone when you are away from home. To protect your privacy, most of the features can be used only after you enter the three-digit REMOTE ACCESS Code. The display will show REMOTE while the telephone is being accessed remotely. -
Page 36: Using The Remote Instruction Code
Using the Remote Instruction Code • To repeat message, press “1”. To skip back to the previous message,press “1” twice. • To skip message, press “3”. • To play announcement, press “4”. • To record greeting, press “5”. • To stop function, press “6”. •... -
Page 37: Hints And Tips
Hints and Tips Environment - Place the unit in a room where the temperature • is between 0°C and 40°C. Allow 5cm clearance around the unit for proper ventilation. Avoid excessive smoke, dust, mechanical vibration, shock, or direct sunlight. Cleaning - Wipe the unit with a soft cloth. Do not use benzine, •... -
Page 38: Specification
Specification Model L04CTAM10 Mains Adapter (Use only mains adapter listed below) Shenzhen YWK Manufacturer Electronics Co., Ltd. Model YWK-AD070042-B AC 100-240V ~50/60 Hz Input 0.15A Output DC 7V 420 mA Main Unit Power Input DC 7V 420 mA Ecodesign Information... - Page 39 Possibility of deactivation of wireless network connection Number of network ports 1 wired port Type of network ports PSTN (wired) Where these ports are located? Base unit (except for wireless network ports) Whether all network ports are Cannot be deactivated deactivated before delivery? Whether the equipment qualifies as HiNA equipment or equipment with...
- Page 40 All trademarks are the property of their respective owners and all rights are acknowledged. DSG Retail Ltd. (co. no. 504877) 1 Portal Way, London, W3 6RS, UK IB-L04CTAM10-160422V7...
Need help?
Do you have a question about the L04CTAM10 and is the answer not in the manual?
Questions and answers