
Summary of Contents for wiwa FLEXIMIX 2 PHOENIX Series
- Page 1 Operation manual FLEXI Serial-No. ⸏ ⸏ ⸏ ⸏ ⸏ ⸏ ⸏ ⸏ Translation of the original operation manual FMII_DBK_en_1312 · rs...
-
Page 3: Table Of Contents
Contents Contents 1 Foreword......................7 2 Safety ......................8 2.1 Explanation of symbols ................8 2.2 Safety notes ....................10 2.2.1 Operating pressure ................10 2.2.2 Risks caused by the spray jet ............10 2.2.3 Risks caused by electrostatic charging ..........11 2.2.4 Explosion protection ................ 11 2.2.5 Health risks ..................12 2.3 Information signs on the unit ..............12 2.4 Safety features ...................13... - Page 4 Contents 3.7 Mixing unit ....................25 3.7.1 Standard mixing unit ................25 3.7.2 External mixing unit .................26 3.8 Material feed ....................27 3.9 Metering pumps ..................28 3.10 Flushing pump ..................28 3.11 Optional expansion parts and accessories ..........29 3.11.1 Material Flow Heaters ..............29 3.11.2 Frame extension ................29 3.11.3 Remote control ................30 3.11.4 USB interface .................31 3.11.5 Volumetric measurement valves ............31...
- Page 5 Contents 5.4.9 Fill level indication ................45 5.4.10 Recipe selection ................45 5.4.11 Information relating to mixing ratio and volume ......46 5.4.12 Alarms ....................46 5.4.13 Control measurement ..............47 5.4.14 USB datalog ...................48 5.4.15 Language selection ................48 5.4.16 Alarm history ..................48 5.4.17 Day and batch counters ..............49 5.4.18 Information ..................49 5.5 Setup......................50 5.5.1 Keypads ...................51...
- Page 6 Contents 7 Maintenance ....................67 7.1 Regular inspections ...................67 7.2 Maintenance plan..................68 7.3 Recommended operating materials ............68 7.4 Maintenance unit..................69 7.4.1 Check the lubricant level in the fog oiler ..........69 7.4.2 Checking and adjusting the fog oiler ..........69 7.4.3 Checking and cleaning the water separator ........70 7.4.4 Setting the A to B pressure differential ..........70 7.5 High pressure filters ...................71 7.5.1 Clean the filter element in the high pressure filter ......71...
-
Page 7: Foreword
WIWA Wilhelm Wagner GmbH & Co. KG. Gewerbestr. 1-3 • 35633 Lahnau • Germany Tel.: +49 6441 609-0 • Fax.: +49 6441 609-50 • E-mail: info@wiwa.de • Internet: www.wiwa.de This operation manual is solely intended for personnel involved in preparation, operation and servicing. -
Page 8: Safety
2.1 Explanation of symbols Safety information warns you of potential risks of accidents and tell you the measures that are needed to prevent accidents. In WIWA operation manuals, safety information is specially highlighted and marked as follows: DANGER Indicates danger of accidents; if you ignore the safety notes, there is a high... - Page 9 Safety In the safety notes about the risk of accidents, different pictograms are shown after each hazard source - examples: General accident risk Risk of explosion from explosive atmosphere Risk of explosion from explosive substances Danger of injury due to electric voltage or electrostatic charging Risk of crushing by moving components Risk of burning due to hot surfaces Mandatory safety instructions concern protective gear to be worn in the first...
-
Page 10: Safety Notes
Safety 2.2 Safety notes Please remember that the unit works at high pressure and may cause life-threatening injuries if used inappropriately! Always observe and follow all instructions in this operation manual and in the separate operation manuals of individual unit components and/or the option- ally available accessory devices. -
Page 11: Risks Caused By Electrostatic Charging
➤ and container wall. Only use conductive material hoses. All original material hoses from ➤ WIWA are conductive and perfectly adapted to our equipment. 2.2.4 Explosion protection WARNING Units that are designed without explosion protection must not be used in workshops that come under the explosion protection ordinance. -
Page 12: Health Risks
Safety 2.2.5 Health risks Follow the safety notes and dosing information of the manufacturer and the generally applicable regulations when handling paints, solvents, oils, greas- es and other chemical substances. CAUTION Depending on the materials being applied solvent vapours may be generat- ed which could cause damage to health and objects. -
Page 13: Safety Features
Safety 2.4 Safety features WARNING If one of the safety features is missing or not fully functional, the operating safety of the unit cannot be guaranteed! If you discover any faults in the safety features or other deficiencies on ➤ the unit, stop operation of the unit immediately. -
Page 14: Master Switch
Safety WARNING If the maximum permissible air inlet pressure is exceeded, unit components may burst. This may result in damage to persons and property. Never allow the unit to run with or without defective safety valves! ➤ If a safety valve needs to be replaced, you can find the corresponding ➤... -
Page 15: Ground Cable
Safety 2.4.5 Ground cable Upon delivery the ground cable is already connected to the unit. To ground the unit, connect the clamp of the ground cable to an electrically conductive object. Reorder the ground cable immediately (or- der no.: 0474487) if lost or damaged Fig. -
Page 16: Personal Protective Equipment (Ppe)
The unit must only be operated within the specified limiting values and ➤ parameters. 2.6.2 Spare parts When carrying out maintenance and repair work, you must only use WIWA ➤ original spare parts. Use of spare parts which have not been manufactured or delivered by ➤... -
Page 17: Accessories
➤ ticularly with regard to the operating pressure, the electrical connection data and the connection sizes. WIWA accepts no liability for damage or injuries resulting from the use of these parts. You must observe the safety regulations of the accessories. These safety ➤... -
Page 18: Unit Description
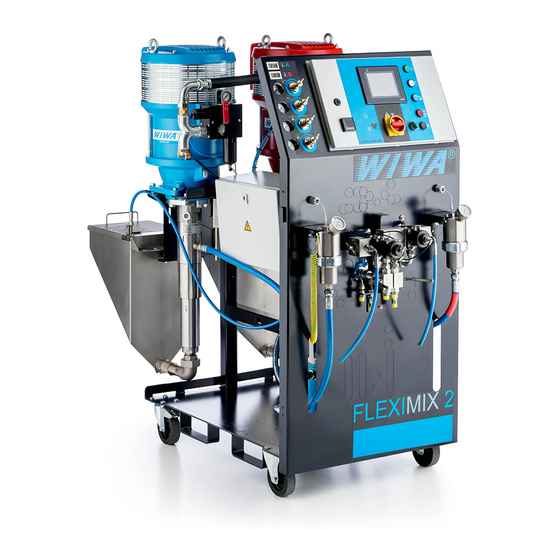
Any other use is considered to be unintended. If you intend to use the unit for other purposes or with other materials and thus not for the purpose for which it is intended, you must ask WIWA for permission – otherwise the warranty will be invalidated. - Page 19 Unit description The front view of the FLEXIMIX is very similar for all basic types: Fig. 7: Front view of the FLEXIMIX PHOENIX (example) No. Designation Compressed air control unit Return flow hoses from the mixing unit to the material containers Mixing unit Material supply hoses from the metering pumps to the mixing unit Connection for the atomizer air to the Air Combi gun (optional)
-
Page 20: Phoenix Series
PHOENIX (example) No. Designation Ethernet interface – this interface is used for remote service on the FLEXIMIX unit through WIWA customer service. Maintenance unit Compressed air connection Metering pump for B-component Control box for electrical connections of material flow heater for the... -
Page 21: Professional Series
Unit description 3.2.2 PROFESSIONAL series Fig. 9: Rear view of the FLEXIMIX PROFESSIONAL (example) No. Designation Control box for electrical connections of material flow heater for the A-component (optional) Metering pump for A-component Type plate Feed hoppers (optional) Rack Material flow heater for the A component (optional) Originalbetriebsanleitung FLEXIMIX FMII_BAoDB_en_1401 •... -
Page 22: Herkules Series
Unit description 3.2.3 HERKULES series Fig. 10: Rear view of the FLEXIMIX HERKULES (example) No. Designation Metering pump for B-component Metering pump for A-component Feed hoppers (optional) Agitators (optional) Storage compartment for documents – e.g. operating manual Maintenance unit Compressed air connection Flushing pump Control box for electrical connections of material flow heater for the A-component (optional) -
Page 23: Compressed Air Control Unit
Unit description 3.3 Compressed air control unit No. Designation Air pressure regulator and pressure gauge for the air inlet pressure to the metering pumps Air pressure regulator and pressure gauge for the air inlet pressure to the flushing pump Air pressure regulator and pres- sure gauge for the atomizer air to the Air Combi gun (optional) The functional principle of all the air... -
Page 24: Symbolism Of The Controls
Unit description 3.5 Symbolism of the controls The controls on the compressed air control unit and the control panel are indi- cated by the following symbols: Symbol Meaning Symbol Meaning RESET Metering pump Reset Flushing pump Stop STOP Atomizer air Flushing Remote control Spraying... -
Page 25: Mixing Unit
Unit description 3.7 Mixing unit FLEXIMIX can be equipped with a standard mixing unit at the frame or with an external mixing unit. 3.7.1 Standard mixing unit Fig. 15: Front and rear view of the standard mixing unit No. Designation Mixer block Automatic metering valve for A component * High pressure filter for A component... -
Page 26: External Mixing Unit
Unit description 3.7.2 External mixing unit When using an external mixing unit, an intermediate piece with automatic metering valves is mounted on the frame, where the hose package is connect- ed. The material flows unmixed from the intermediate piece through the hose package to the external mixing unit. -
Page 27: Material Feed
Unit description Fig. 20: Circulation mode Fig. 21: Stop mode Alternately open and close the flushing levers several times during flushing, to ensure that each component is separately flushed. Finally flush with both ball valves at the same time. You can extend the lifetime of the ball valves if you do not switch the levers over under pressure, ➤... -
Page 28: Metering Pumps
Unit description 3.9 Metering pumps FLEXIMIX is equipped with one metering pump each for the A-component and the B-component. The metering pumps feed the processing material from the material inlet through the high-pressure filters and the mixing unit to the spray gun (spray mode) or – when the return flow ball valve is opened –... -
Page 29: Optional Expansion Parts And Accessories
The following section lists only some of the most common accessories and expansion parts. The detailed accessory catalogue can be found at www.wiwa.de. More information and order numbers can also be obtained from an authorised WIWA dealer or the WIWA service department. -
Page 30: Remote Control
Unit description 3.11.3 Remote control The remote control allows using the FLEXIMIX in workshops that come under the explosion protection ordinance. This assumes that the not explo- sion-protected control panel is installed outside the hazardous area. The most important operational functions can be run inside the hazardous area using the explosion-protected remote control. -
Page 31: Usb Interface
(the spray gun). In contrast, the two volumetric measurement valves enable separate filling of the A and B component. www.wiwa.de The valves are only opened for control measurement or volumetric measurement and remain closed otherwise: turn counterclockwise to open, ➤... -
Page 32: Mounting Kit For Atomizing Air
Unit description Depending on the safety time buffer of the potlife and the length of time exceeded, this may make it necessary to replace the entire machine section from the mixing unit to the gun as it may be difficult or impossible to remove any dried up material from these parts. -
Page 33: Transportation, Installation And Assembly
Transportation, installation and assembly 4 Transportation, installation and assembly The unit left the factory in flawless condition and was appropriately packed for transportation. Check the unit on receipt for any damage in transit and for completeness. 4.1 Transportation Please follow these notes when transporting the unit: Ensure sufficient load bearing capacity of lifting gear and lifting tackle when ➤... - Page 34 Transportation, installation and assembly WARNING If the unit is used outside during a thunderstorm, a lightning strike can cause a life-threatening situation for the operating personnel. Do not operate a unit out of doors during a thunderstorm! ➤ The unit owner must ensure that the unit is equipped with suitable light- ➤...
-
Page 35: Assembly
Transportation, installation and assembly 4.3 Assembly WARNING If assembly work is carried out by people who have not been trained for this work, you endanger yourself and other people and impair the safety and reliability of the unit. Electrical components must only be mounted by trained time-served ➤... -
Page 36: Assembling Spray Hose And Spray Gun
Transportation, installation and assembly 4.3.2 Assembling spray hose and spray gun WARNING Components that do not comply with the maximum permitted operating pres- sure of the unit can burst and cause serious injury. Check the maximum permitted operating pressure of the material hose ➤... -
Page 37: Connecting Compressed Air Supply And Electric Power Supply
Transportation, installation and assembly 4.3.5 Connecting compressed air supply and electric power supply The compressor capacity must match the air requirements of the unit and the diameters of the air supply hoses must match the connections such that an adequate air supply is ensured. Operation with contaminated or moist compressed air causes damage to the unit's pneumatic system. -
Page 38: Control Module
Control module 5 Control module 5.1 Controls OMRON Fig. 38: Control elements on the control module The Fig. 38 shows the control module with a small touch-screen and 5 function keys. Alternatively, a control module with a large touch screen and 6 function keys can be used, in which the F6 key has no function. -
Page 39: Menu Structure
Control module 5.3 Menu structure WIWA Set fill Set fill Set fill Set fill Start screen level 4-6 level 7-9 level 10 level 1-3 automatic Change recipe Flush before- Recipe No / Yes No / Yes selection Overview Mixing ratio... -
Page 40: Navigation
Control module 5.3.1 Navigation The individual menu windows can be selected using the corresponding buttons in the overview, the main menu or the settings menu. In addition, the following standard functions are available for navigation within the menu structure: Home: Return to the basic display (Overview) Level up: switch to the next higher menu level Continue: scroll forward on the same menu level Back: scroll on the same menu level back... -
Page 41: Operation Area
Control module 5.4 Operation area All operating functions can be run using the function keys F1 - F5 and the but- tons in the overview and those of the Main menu. 5.4.1 Function keys and overview Fig. 41: Function keys and overview No. -
Page 42: Main Menu
Control module 5.4.2 Main menu Fig. 42: Main menu No. Display / function Display current alarm message (if present) Run control measurement USB datalog Language selection Display alarm history Switch to Setup menu (password required) Display day and batch counter Show display and control system software versions 5.4.3 Status display The control system uses the status display to indicate selected operating... -
Page 43: Displaying The Operating Mode
Control module 5.4.4 Displaying the operating mode The operating mode currently selected is indicated in all menu windows by the icon to the far right of the title bar. The following icons may be seen here: Filling Spraying Flushing Circulating Volumetric measurement Stop 5.4.5 Spraying mode (F2) -
Page 44: Circulation Mode (F3)
Control module During automatic flushing operation, the touchscreen shows the steps and the current status of the background flushing program. A flushing program may comprise up to eight steps that are executed automatically. The cur- rent volume is displayed all the time a step is running. -
Page 45: Fill Level Indication
Control module 5.4.9 Fill level indication Container monitoring makes it possible to guarantee a constant supply of ma- terial and hence to prevent the unit being shut down because the material con- tainers have run dry. This assumes that the material containers are swapped or completely filled on every update and that the filling levels are reset to the maximum level. -
Page 46: Information Relating To Mixing Ratio And Volume
Control module You must flush the unit for each change of recipe to prevent reactions between materials! If you want to launch the flushing program, press the Yes button. If the system has already flushed, press the No button to go to Recipe selection. -
Page 47: Control Measurement
Control module 5.4.13 Control measurement For the purposes of a control measurement, a predefined measured volume of component A and the corresponding volume according to the mixing ratio of component B are fed separately and dispensed through the spray gun into measuring cups. -
Page 48: Usb Datalog
Control module 5.4.14 USB datalog The data stored in the system control unit (volumes, alarm messages etc.) can be downloaded to a USB stick from the USB datalog. To run a USB datalog, plug a USB stick into the USB port on the control panel and press the button in the Main menu shown on the left. -
Page 49: Day And Batch Counters
Control module The service engineer can also read off later which faults occurred when and how frequently. Use the scroll bar on the right-hand edge of the window to navigate through the alarm history. 5.4.17 Day and batch counters The day and batch counters record the consumption through the various valves per day and batch. -
Page 50: Setup
Log out from the Setup menu and return to the Main menu Set date and time Manual valve control Set up valve management Set up recipes Change to the Service level (accessible only to WIWA Customer Service) Originalbetriebsanleitung FLEXIMIX FMII_BAoDB_en_1401 • rs... -
Page 51: Keypads
Control module 5.5.1 Keypads Unlike in the operating area, the menu windows for the setup area include input fields in addition to the display and selection fields. Input fields have a yellow back- ground, with a few exceptions. Press the input field concerned if you wish to enter some information. -
Page 52: Flush Parameters
Control module Adjust the air inlet pressure for the metering pumps up to 3,0-3,5 bar. When prompted by the control system, pour a specified quantity of material via the spray gun into a measuring cup (generally 1000 cm³) and acknowledge this step by pressing Close and secure the spray gun again once the filling process is... -
Page 53: Manual Valve Control
Control module Clicking the button after the input field switches the unit between sec and cm³. If the unit is not equipped with flow rate measuring cells or a flush pump with shaft encoder or stroke sensor, the flushing volume can not be detected. In this case, only a time target can be specified for each step of the flushing program. -
Page 54: Filling Parameters (Setup Fill)
Control module 5.5.5 Filling parameters (Setup fill) Press the button in the Setup menu shown on the left to open the input window for entering the filling parameters. In this input window, enter: the volume of the spray hose ➤ under “Spray hose volume”. - Page 55 Control module Use the arrow button to access another window in which you can make the following entries: “Delay start of flushing via spray ➤ gun”: Period, which is available to the user to place the gun into the gun triggering device after a pot life alarm.
-
Page 56: Filling Level Monitoring
Control module 5.5.6 Filling level monitoring Filling level monitoring makes it possible to guarantee a constant supply of ma- terial and hence to prevent the system being shut down because the material containers have run dry. The prerequisite for this is that the maximum and mini- mum filling levels of the material containers are stored in the control system. -
Page 57: Recipe Management
Control module In Valve management, you can enter: Current valve: Number of the valve/pump combination – this can be se- ➤ lected using the Valve - and Valve + buttons. Impulses per litre: The output of the metering pump is calculated from the ➤... -
Page 58: Date And Time
Control module Shutdown: In the event that the deviation from the desired mixing ratio ➤ is greater than the tolerance, we define an error limit and a period, which exceeding the error limit must continue before the controller outputs an alarm message and shuts down the unit automatically. -
Page 59: Operation
Operation 6 Operation Before starting work, check: Are all the safety features present and fully functional (see chapter 2.4 on page 13)? Are all unit components tight? If required, tighten up these connections. Is there enough release agent in the metering pumps (see chapter 7.6.1 on page 72)? WARNING If material pumps run dry, the generated friction heat can cause fire or an... -
Page 60: Switching On The Unit
Operation 6.1.1 Switching on the unit Make sure that all air pressure regulators have been fully regulated back. Switch on the unit at the master switch on the control panel. When the unit is switched on the touchscreen first displays the Welcome screen (see Fig. 39 on page 38). -
Page 61: Filling The Unit With Material To Be Applied And Venting The Unit
Operation 6.1.5 Filling the unit with material to be applied and venting the unit Connect the material feed: For metering pumps with material supply by suction pipes, place the ➤ suction pipes into the corresponding material drums with components A and B. -
Page 62: Performing A Control Measurement
Operation 6.1.7 Performing a control measurement At the end of the commissioning, you perform a control measurement to check the metering pumps and the metering valves for correct operation. Select the recipe you wish to work with from the Overview window in the control system. -
Page 63: Hints To Achieve Good Coating Results
Operation 6.2.2 Hints to achieve good coating results Hold the spray gun at right angles (90°) to ➤ the area to be coated. If the spray gun is held right under a different angle, the coating becomes irregular and blotchy (see Fig. 82). Ensure an even speed and move the spray ➤... -
Page 64: Complete Cleaning
Operation 6.5 Complete cleaning A complete cleaning of the unit is required: during initial comissioning in order to flush out any test medium residues. ➤ when the unit is to be shut down for an extended period. ➤ WARNING Explosive gases may be generated by the evaporation of flushing agent, which may ignite on hot heat sources. -
Page 65: Decommissioning
Operation Regulate the compressed air pressure regulator for the metering pumps fully back. Close the return ball valves again as soon as the circulation comes to a standstill. Close the compressed air shut-off valves at the air inlets of both metering pumps. -
Page 66: Decommissioning For A Long Period Or Permanently
Operation 6.6.2 Decommissioning for a long period or permanently When decommissioning for a long period or permanently, clean the unit com- pletely, perform a pressure release, switch off the unit, disconnect the com- pressed air supply and unplug the electrical power supply. Perform all work steps as described in chapter 6.5 on page 64, in order to clean the unit completely. -
Page 67: Maintenance
Maintenance and repair work on electrical components must only be car- ➤ ried out by trained electricians – any other maintenance and repair work must be performed by WIWA customer service or by specially trained personnel. Before maintenance and repair work: Switch off the unit at the master switch, in order to unplug the electrical pow- er supply and to shut off the compressed air supply. -
Page 68: Maintenance Plan
Every three years Inspection of the compressed air and material hos- es by an expert and replacement if necessary 7.3 Recommended operating materials Only user original operating materials from WIWA: Operating materials WIWA order number Release agent (0.5 l)¹ 0163333 Release agent for isocyanate (0.5 l)¹... -
Page 69: Maintenance Unit
Top up lubricant, if necessary. We recommend using pneumatic oil (order number 0632579) or antifreeze (order number 0631387) from WIWA. Reattach the oil reservoir to the the fog oiler. 7.4.2 Checking and adjusting the fog oiler Let the unit run slowly under load. -
Page 70: Checking And Cleaning The Water Separator
Maintenance 7.4.3 Checking and cleaning the water separator The water separator at the main- tenance unit of the FLEXIMIX PHOENIX (see Fig. 85 left) and PROFESSIONAL or HERKULES (see Fig. 85 right) prevents con- densate and dirt particles from entering the unit. No. -
Page 71: High Pressure Filters
Insert the filter elements suitable for the spraying material and the spraying nozzle into the high pressure filters. The mesh size should always be slightly finer than the bore of the nozzle used. Mesh Color WIWA order number M 200 0467456 M 150 blue... -
Page 72: Metering Pumps
Fig. 89: Release agent drain screw After checking, top up with the necessary volume of fresh release agent through the filler opening. We recommend to use release agent from WIWA (order no. 0163333). Originalbetriebsanleitung FLEXIMIX... -
Page 73: Lubricating The Gear Wheels On The Metering Pump Shaft Encoders
(see Fig. 90). Then apply acid-free grease to the gear wheels and racks (see Fig. 91). We recommend using WIWA grease (order no. 0000025). Fig. 90: Guard plate Fig. 91: Gear wheel 7.7 Metering valves... -
Page 74: Setting The Stroke Limit On The Hardener Metering Valve
Maintenance 7.7.2 Setting the stroke limit on the hardener metering valve The metering valve for the hardener component has a stroke limitation, which prevents the valve opening for too long. This causes the valve to cycle quicker with finer metering results. Basic position is (the metering valve must be closed and depressurized): Loosen the locking nut (2). -
Page 75: Troubleshooting
2. High pressure filter Clean or renew the filter element. opened. clogged. Repair air motor – request WIWA after sales service 3. Air motor defective. if necessary. Metering pump is running 1. Intake or suction hose ... -
Page 76: Alarms
Troubleshooting 8.2 Alarms Alarm Cause Remedy Dosing error The mixing ratio differs Check: from the set value (the Is there enough material in the containers? actual mixing ratio is Is the mixing unit clogged? Switch the system to flushing displayed). operation and check whether flushing agent is delivered to both the A component side and the B component side in alternating flushing. - Page 77 Troubleshooting Alarm Cause Remedy Fill level comp. A, The fill level in the ma- Top up material. terial container for the Fill level comp. B A or B component used in the current recipe has fallen below the minimum volume configured in Con- tainer monitoring.
-
Page 78: Technical Data
9.2 Type plates The type plate of the FLEXIMIX is lo- Gewerbestr. 1 - 3 cated on the rear of the rack. It contains D-35633 Lahnau www.wiwa.de the most important technical data for the Geräte-Type/Unit Fleximix 2 Misch.Verhältnis/MixingRatio 0,5:1 - 17:1 unit: FM p. -
Page 79: Hose Volumes
Hose volumes 10 Hose volumes A hose volume is calculated using the following formula: . π . L Vol = Di ² Vol = Hose volume Di = Inside diameter of the hose = Hose length The following table shows the volume of popular hoses: 4 mm 63 ccm 10 mm... - Page 80 E-Mail: info@wiwa.de Dhabi, Qatar, Bahrain), Kuwait, Saudi Arabia, Iran, Iraq, Cyprus, Homepage: www.wiwa.de Iceland, Syria, Lebanon Support of WIWA sales directors, representatives and distributors in: WIWA Partnership USA South America (except Cuba and Mexico), South East Asia, Japan, WIWA LP South Korea, Australia and New Zealand.
Need help?
Do you have a question about the FLEXIMIX 2 PHOENIX Series and is the answer not in the manual?
Questions and answers