Advertisement
Table of Contents
- 1 Table of Contents
- 2 The Purpose and Benefit of this Tool
- 3 What Is Included
- 4 About the Design
- 5 Specifications
- 6 Power Requirements
- 7 Setting a Low Pass Crossover
- 8 Setting a High Pass Crossover
- 9 Setting a Infrasonic (Subsonic) Filter
- 10 Matching Gains of Multiple Amplifiers
- 11 Troubleshooting
- 12 Where Do I Set My Crossover Frequency
- 13 Where Do I Set My Infrasonic (Subsonic) Filter
- 14 Track List on the CC-1 Disc a
- 15 Track List on the CC-1 Disc B
- 16 Limited Warranty Information
- Download this manual
Advertisement
Table of Contents

Summary of Contents for SMD CC-1
- Page 1 Crossover Calibrator CC-1 Owner ’s Manual...
-
Page 2: Table Of Contents
Setting a infrasonic (subsonic) filter Matching gains of multiple amplifiers Troubleshooting Where do I set my crossover frequency Where do I set my infrasonic (subsonic) filter Track list on the CC-1 Disc A Track list on the CC-1 Disc B Limited warranty information... -
Page 3: The Purpose And Benefit Of This Tool
The purpose and benefit of the D’Amore Engineering / SMD Crossover Calibrator. The purpose of this tool is to enable the installer to set the crossover frequency of an electronic crossover to the desired frequency, accurately and quickly. It can also be useful for matching gains on multiple amplifier competition type systems. -
Page 4: About The Design
About the design When you pick up the CC-1, know that you are holding a precision piece of equipment. If treated as such it should provide you with many years of reliable service. We have chosen a 9V battery as a power source for a few reasons: ... -
Page 5: Power Requirements
Power requirements Pull the silicon rubber boot off of the unit by starting at one end and pulling off towards the other end. On the back side you will see the battery compartment. Slide battery compartment cover off towards bottom end of unit to reveal the 9V battery compartment. -
Page 6: Setting A Low Pass Crossover
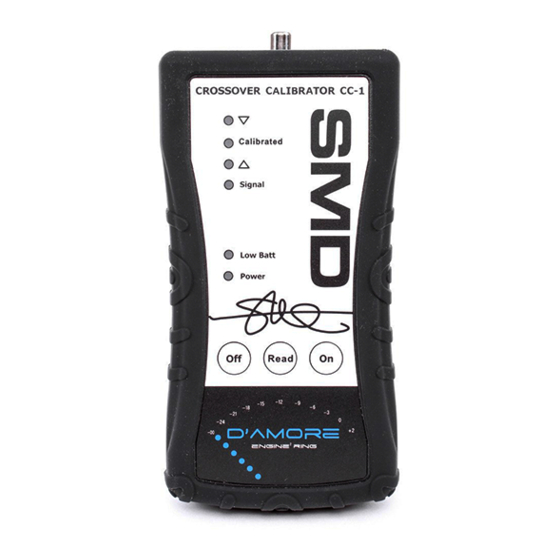
(-) terminal. In this case, connect Red to speaker (-) and Black to battery ground. 3. If the unit is already on, switch the CC-1 off by holding the OFF button for 1 second. (This must be done to initalize the program mode) Now switch CC-1 power on by pressing the ON button. - Page 7 9. When the Signal LED remains Green, press the READ button. 10. Set crossover switch to Low Pass if it has one. 11. Using the LEDs at the top of the CC-1, slowly turn the crossover frequency adjustment pot until the CALIBRATED LED illuminates.
-
Page 8: Setting A High Pass Crossover
(-) terminal. In this case, connect Red to speaker (-) and Black to battery ground. 3. If the unit is already on, switch the CC-1 off by holding the OFF button for 1 second. (This must be done to initalize the program mode) 4. -
Page 9: Setting A Infrasonic (Subsonic) Filter
9. When the Signal LED remains Green, press the READ button. 10. Set crossover switch to High Pass if it has one. 11. Using the LEDs at the top of the CC-1, slowly turn the crossover frequency adjustment pot until the CALIBRATED LED illuminates. - Page 10 (-) terminal. In this case, connect Red to speaker (-) and Black to battery ground. 3. If the unit is already on, switch the CC-1 off by holding the OFF button for 1 second. (This must be done to initalize the program mode) Now switch CC-1 power on by pressing the ON button.
-
Page 11: Matching Gains Of Multiple Amplifiers
11. Using the LEDs at the top of the CC-1, slowly turn the Infrasonic Filter frequency adjustment pot until the CALIBRATED LED illuminates. 12. Congratulations, you have just set the Infrasonic Filter frequency perfectly! Matching the gains of mulitiple amplifiers. - Page 12 9. The LEDs will indicate if the gain is too high or too low compared to the “Master” amplifier. 10. Adjust gain on the amplifier that the CC-1 is now connected to until the Calibrated LED illuminates. The amplifier’s gain is now matched to the Master amplifier’s gain within +/- 0.05dB !!
-
Page 13: Troubleshooting
Solution: Tracks can be ripped to MP3, use 192kbps or higher. Problem: The CC-1 keeps turning off Solution: The CC-1 has an auto turn off timer, it will operate for 8-10 minutes after the “ON” button is pressed. This is to prevent it from eating your battery when you forget to turn it off. -
Page 14: Where Do I Set My Crossover Frequency
Where do I set my crossover frequency? This could be debated for days, and it really comes down to user preference. Here are some guidelines for the novice as a good place to start. If you hear the full range speakers “popping” or “bottoming out” when you play it at high volumes after using value in the chart below, turn the crossover frequency up until it stops. -
Page 15: Where Do I Set My Infrasonic (Subsonic) Filter
Where do I set my infrasonic (subsonic) filter? Again this is up for debate, here are some starting points for the less experienced. Speaker Sealed or Sealed or Ported or Ported or Size order order order order bandpass bandpass bandpass bandpass with with... -
Page 16: Track List On The Cc-1 Disc A
Track list on CC-1 Disc A: These Frequencies are based on ISO Standard 1/6 Octave Centers. Other frequency tracks available for download on our website: DAmoreEngineering.com Track Frequency Duration 14Hz 2:20 16Hz 2:20 18Hz 2:20 20Hz 2:20 22Hz 2:20 25Hz... -
Page 17: Track List On The Cc-1 Disc B
Track list on CC-1 Disc B: These Frequencies are based on ISO Standard 1/6 Octave Centers. Other frequency tracks available for download on our website: DAmoreEngineering.com Track Frequency Duration 450Hz 2:20 500Hz 2:20 560Hz 2:20 630Hz 2:20 710Hz 2:20 800Hz... -
Page 18: Limited Warranty Information
Limited Warranty D’Amore Engineering warrants this product to be free of defects in materials and workmanship for a period of one year. This warranty is not transferrable and applies only to the original purchaser from an authorized D’Amore Engineering dealer. Should service be necessary under this warranty for any reason due to manufacturing defect or malfunction, D’Amore Engineering will (at its discretion) repair or replace the defective product with... - Page 19 To obtain service worldwide please e-mail D’Amore Engineering at Warranty@DAmoreEngineering.com Notes:...
- Page 20 D’Amore Engineering Owner’s Manual Rev. 2 2012 Printed in Camarillo, California...
Need help?
Do you have a question about the CC-1 and is the answer not in the manual?
Questions and answers