Table of Contents
Advertisement
Advertisement
Table of Contents

Related Manuals for Yamaha CBX-K1


Summary of Contents for Yamaha CBX-K1
- Page 2 Dette apparat overholder det gaeldende EF-direktiv verdrørende radiostøj. Cet appareil est conforme aux prescriptions de la directive communautaire 87/308/CEE. YAMAHA CORPORATION Diese Geräte entsprechen der EG-Richtlinie 82/499/ EWG und/oder 87/308/EWG. This product complies with the radio frequency interference requirements of the Council Directive 82/ 499/EEC and/or 87/308/EEC.
- Page 3 SPECIAL MESSAGE SECTION (U.S.A.) SPECIFICATIONS SUBJECT TO CHANGE: NOTICE: ENVIRONMENTAL ISSUES: PLEASE KEEP THIS MANUAL Battery Notice: Warning: Disposal Notice: NAME PLATE LOCATION: Model CBX-K1 Serial No. Purchase Date...
-
Page 4: Table Of Contents
Guided Tour Setting Up Your CBX-K1 ..... 8 What You’ll Need ......8 Setup Examples . -
Page 5: The Cbx-K1 - What It Is And What It Can Do
Using as a Second Keyboard or Dedicated MIDI Controller The CBX-K1 is small enough to fit on top of nearly any keyboard, making it perfect as a second keyboard. Since the CBX-K1 has a MIDI IN terminal, you can connect it... -
Page 6: Precautions
Precautions Your CBX-K1 will give you years of reliable service if you follow the simple precautions below: LOCATION Keep the instrument away from locations where it is likely to be exposed to high temperatures (such as direct sunlight) or humidity. Also avoid locations which are subject to excessive dust accumulation or vibration which could damage the instrument. -
Page 7: How To Use This Manual
— especially before trying some of the more sophisticated MIDI functions. Read through all of the initial sections first, then go on to the “Guided Tour” to set up your CBX-K1, learn how to use its various functions, and try out some of the practical application examples to help you become more familiar with its operations. -
Page 8: Panel Controls And Terminals
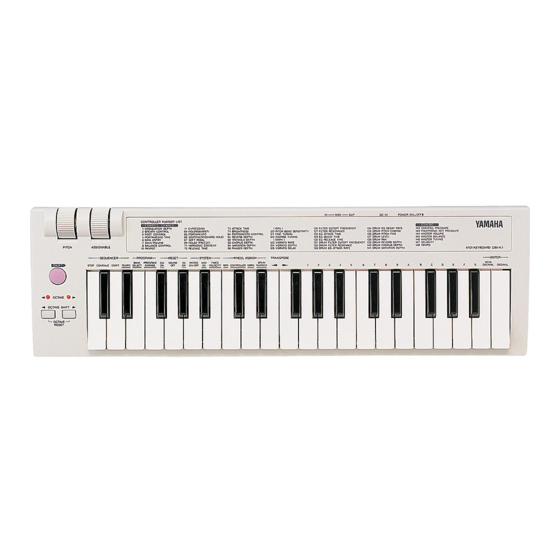
Panel Controls and Terminals Front Panel q Keyboard The CBX-K1 has a 37-key, 3-octave keyboard (C2 to C5), featuring initial touch (velocity) control. All note on, note off and velocity data is transmitted via the MIDI OUT terminal. When used with the C button, the keys are used for changing various settings and sending special MIDI messages. -
Page 9: Note Range Of The Cbx-K1
MIDI receive error. The lamp flashes until you turn the power off and on again, or until you set MIDI Merge to ON. (See page 24.) Note Range of the CBX-K1 (with Octave Shift ) Panel Controls and Terminals u CONTROLLER NUMBER LIST This shows the controller numbers that can be used with the ASSIGNABLE Wheel. -
Page 10: Rear Panel
* ASSIGNABLE Wheel: Modulation i POWER Switch Push this switch in to turn on the power. Each time the power is turned on, the CBX-K1 returns to the default condition. (See boxed section below.) o DC IN Terminal This is for connection to an optional PA-1B or PA-3 AC power adaptor. -
Page 11: Power Supply
Using a Power Adaptor Connect one end of the power adaptor (the optional) Yamaha PA-1B or PA-3) to the DC IN jack on the rear panel, and the other end to a suitable electrical outlet. CAUTION! Do not attempt to use a power adaptor other than the PA-1B or PA-3. -
Page 12: Guided Tour
Guided Tour When using your CBX-K1 for the first time, read through this short section of the manual. It guides you step-by-step in using many of the basic opera- tions: setting the instrument up, connecting it properly to other equipment, and —... -
Page 13: Making The Connections
MIDI With Tone Generator In the simple system below, the CBX-K1 is used to play the voices of the MU80 Tone Generator. This setup could also serve as a simple, yet powerful live performance rig, with the CBX-K1 being used as a portable, hand-held keyboard. -
Page 14: Using The Cbx-K1 - Basic Operations
(For details on individual functions, see pages 18- 22.) Playing the Keyboard and Other Operations The illustration below shows how to use the basic real-time controls of the CBX-K1. Changing Voices (Program Change Up/Down) You can easily step up or down through the voices (program numbers) on the connected MIDI device. - Page 15 Using the CBX-K1 — Basic Operations ASSIGNABLE Wheel When the CBX-K1 is turned on, this Wheel is set to control Modulation Depth on the connected MIDI device. It can be set to control other functions; see page 18 for details. The Wheel’s maximum/minimum positions can be reversed.
-
Page 16: Using The Shift-Related Functions
Using the CBX-K1 — Basic Operations The enormous flexibility and power of the CBX-K1 is in its “hidden” or SHIFT-related functions — allowing you to send virtually any kind of MIDI message directly from the keyboard or use the ASSIGNABLE Wheel for real-time control change. -
Page 17: Basic Operations
C. (See pages 16 and 20 for specific Group B functions and how to use them.) Entering Values Value entry on the CBX-K1 can be done in two number systems: Decimal and Hexadecimal. The keys labeled A through F are for Hexadecimal entry. -
Page 18: Setting The Functions
Setting a Simple Command (on/off) Operation: C + Function Key Relevant Functions: Merge On/Off Example: Switching the MIDI Merge function of the CBX-K1 on or off C + P Setting the Functions K. However, when you wish to enter a decimal value, make sure to press K. - Page 19 G / H keys simultaneously. NOTE You can also enter transpose values directly by using operation above. Using the CBX-K1 — Basic Operations Setting a Specific Value for a Specific Controller MSB value LSB value Operation: C + Function Key Relevant Functions: RPN*;...
-
Page 20: Group B Operations
E (Reset All Controllers) Setting a Simple Command (on/off) Operation: C + K Relevant Function: Merge On/Off (each channel) Example: Switching the MIDI Merge function of the CBX-K1 on or off for MIDI channel 12 C + K { (Merge On/Off for each... - Page 21 This operation assigns a controller number for the ASSIGNABLE Wheel without altering the controller assignment. Using the CBX-K1 — Basic Operations Sending a Single-Byte Data Message This function allows you to quickly and easily send a non-standard MIDI message of a single Function Key byte.
-
Page 22: Reference
C + H • • • • XG is a major new enhancement to the GM format developed by Yamaha, and it provides for more instrument sounds and variations, as well as greater expressive control over voices and effects. XG-compatible instruments... - Page 23 (Only XG-compatible tone generators respond to this message.) When set to ON, this merges all data received at MIDI IN with the data generated by the CBX-K1. Merge can be set independently for each channel in the Group B functions.
-
Page 24: Group B Functions
Group B Functions To select the Group B functions, hold down C and press K. Continue holding C while performing the operation steps for the desired Group B function. Panel Name Function STOP Song Select CONTINUE Song Position Pointer START Reset All Controllers TEMPO —... - Page 25 On and Master Tuning) to more than one connected MIDI devices. This inverts the operation of both Wheels, for ease in playing the CBX-K1 as a hand-held keyboard. An alternate way to change this setting is to simultaneously hold down N and turn on the power.
-
Page 26: Assignable Wheel - Controller Number List
ASSIGNABLE Wheel — Controller Number List For details on these various control numbers and whether or not your particular MIDI device supports them, refer to the owner’s manual of that device. Controller Panel Name Modulation Depth Breath Control Foot Control Portamento Time Data Entry Main Volume... -
Page 27: Troubleshooting
The connected device does not respond to MIDI clock messages, or MIDI clock messages are not sent. — Make sure that the Tempo setting on the CBX-K1 is set to a value other than 0. Also make sure that the connected device is set properly for receiving MIDI clock messages. -
Page 28: Midi Data Format
MIDI Reception Merge-related Notes MIDI messages received from an external device at MIDI IN can be merged with the data generated by the CBX-K1, and are transmitted as is from MIDI OUT. However, there are some exceptions, as listed below: * <<F4>>, <<F5>>... -
Page 29: Transmitted Data
* When pressing several keys simultaneously, after touch of only the highest note number is output. * Though the keyboard of the CBX-K1 itself has no after touch, after touch data can be transmitted from the ASSIGNABLE Wheel when Channel pressure or Polyphonic key pressure is assigned to the Wheel. -
Page 30: Midi Implementation Chart
:All Notes OFF Mes- :Active Sense sages:Reset Notes: *1 Though the keyboard of the CBX-K1 itself has no after touch, after touch data can be transmitted from the ASSIGNABLE Wheel when Channel Pressure or Polyphonic Key Pressure is assigned to the Wheel. - Page 31 M.D.G., EMI Division © Yamaha Corporation 1995 VT05800 502PTCP18.2-01A0 Printed in Japan...