
Related Manuals for Walkin’ Pets Walkin' Wheels Rear


Summary of Contents for Walkin’ Pets Walkin' Wheels Rear
- Page 1 Owner’s Manual SMALL FRAME with Optional Full Support Front Wheel Attachment Kardi THE PROVEN LEADER IN PET MOBILITY...
-
Page 2: Table Of Contents
Thank you for purchasing a Walkin’ Wheels ® Small dog wheelchair. Questions or comments? Call us at: (603) 577-8854 or email us at: HelpMe@WalkinPets.com Contents Quick Start Guide ................3 Parts of the Walkin’ Wheels Rear Small Wheelchair ......4 ® Teach Your Dog How to Use Walkin’... -
Page 3: Quick Start Guide
Quick Start Guide 1. Set up wheelchair length (p.7), height (p.8), and width (p.8) 2. Attach Leg Rings to wheelchair (p.10) 3. Put Front Harness on dog (p.11) 4. Put dog in wheelchair: Now that your dog is wearing the front harness, he/she is ready to get started. -
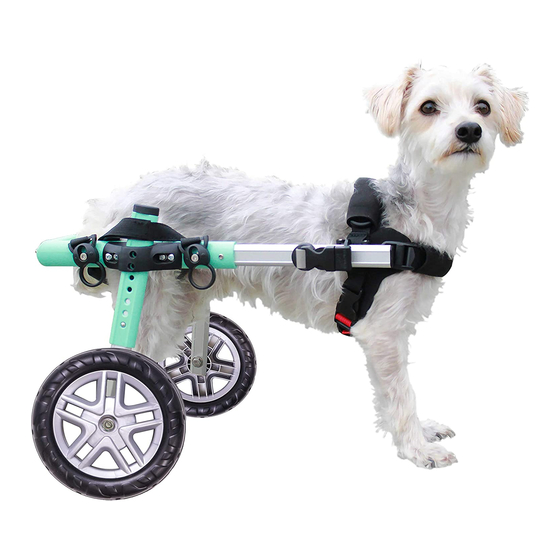
Page 4: Parts Of The Walkin' Wheels ® Rear Small Wheelchair
Parts of the Walkin’ Wheels Rear Small ® Dog Wheelchair Width Connectors Aluminum wheelchair frame Length Extenders 4" installed in frame. with Width Connector and The extenders are Use 7" for wider dogs. Extenders installed. installed in frame. Knuckle Tool kit with Allen wrench Leg Rings for Attached to frame. -
Page 5: Teach Your Dog How To Use Walkin' Wheels
Teach Your Dog How to Use Walkin’ Wheels ® We created the Walkin’ Wheels with the intention that you will adjust ® the wheelchair, put your pet in it, and in a few moments watch him/ her running and playing again. It can happen that way, but it doesn’t always. - Page 6 1. When starting this process we suggest that you use the dog’s favorite treats to reward your dog for walking forward. You won’t need to keep using these treats every day, just in the beginning of the training process. A hungry dog is a motivated dog! Work with your dog before you have fed him/her a meal.
-
Page 7: Setting Up The Dog Wheelchair
Setting Up the Dog Wheelchair: Use Snap Buttons to Adjust Length, Width, and Height The Snap Buttons are an easy way to adjust the length, width, and height of the Walkin’ Wheels® dog wheelchair. Use an Allen key to push the Snap Button when it is inside the knuckle to make height adjustments. -
Page 8: Adjusting The Width
Adjusting the Width Use the snap buttons on the width connector to adjust the wheelchair to the proper width. There should be at least ½" on each side of the hips. The width adjustment will be determined by the widest part of the dog which is usually the chest. -
Page 9: Stirrups
There is a detailed “HOW TO” video on the DVD and online: https://youtu.be/p0hQVIX6VAQ?t=9m30s black block Short Legs position Remove knuckle, re-position Long Legs position leg that holds the wheel Use a Phillips head screwdriver to change the position of the leg: 1. -
Page 10: Clip The Leg Rings To The Wheelchair
Rear Support Leg Rings The Leg Rings support the dog’s hindquarters. They will take the weight off the legs while still allowing the dog to use its legs to maintain muscle mass. The Leg Rings should hang no lower than 3" below the frame. -
Page 11: Front Harness Attachment
The Velcro ® center connector can be moved forward or backward to avoid putting pressure on the dog’s genitals (ideal for intact dogs). In addition, the Velcro connector can be wrapped loosely so there is space between the rings. The Velcro center connector MUST be used. Adjust for best comfort and fit. -
Page 12: Changing Pocket Placement Of D-Ring
Changing Pocket Placement of D-Ring (optional) Note: Unless advised to change pocket by a Walkin' Pets customer service representative, keep the clip in middle pocket (the way it came) because the straps are adjustable. Needed: small Phillips screwdriver to remove (2) screws. Before starting, observe which direction the prongs are facing on the D-Ring. -
Page 13: Is The Wheelchair Adjusted Properly
Is the Wheelchair Adjusted Properly? Check the items below to make sure the wheelchair is fitted properly. If you are still unsure about the fit, please email rear and side view photographs of your dog in the wheelchair to: helpme@walkinpets.com, and we will evaluate the fitting. Make sure you include what name the wheelchair was ordered under and your phone or sales receipt number. - Page 14 Incorrect If the extenders tilt up, then loosen the black strap on the front harness over the dog’s back, and tighten up the red bottom strap. Incorrect If the extenders tilt down, loosen the red bottom strap, and tighten the black strap over the dog’s back to raise extenders.
-
Page 15: Optional Set Screws For Noise Reduction
Optional Set Screws for Noise Reduction Using the set screws is not necessary, but will tighten up your wheelchair and reduce any rattling noises. The set screws also keep the wheelchair tight after it has been adjusted for your dog. When you tighten up the wheelchair, the side arms, called extenders, will be able to move up and down as your pet turns corners. -
Page 16: Walkin' Wheels ® Front Wheel Attachment
Figure A Figure B Figure C A. Take the side with the tri-glide and put the extender through the end of the loop. B. Take the rope and put inside the harness clip on the extender (B). Then, attach the front harness to the harness clip in order to secure the rope. -
Page 17: In The Package
Like the rest of the Walkin’ Wheels ® products, the Front Wheel Attachment is adjustable so it will fit the Walkin’ Wheels® wheelchair for any size dog from 8 to 25 pounds and can be easily removed at any time. In the Package The Front Wheel Attachment is easy to assemble and snap into the wheelchair. -
Page 18: Assembling Fully Supportive Wheelchair
Assembling Fully Supportive Wheelchair Video instructions also available: hpets.net/sfav Step 1: Length: Left and Right Extenders (A & B) Take out existing side extenders on rear wheelchair and replace with the front wheel extenders. Socket Shoulder Screws (4) will be on the outside of wheelchair and used to attach leg rings. -
Page 19: Putting Your Dog Into The Fully Supportive (Quad) Wheelchair
Side view (3" wheels) Front view (2" wheels) Putting Your Dog into the Fully Supportive (Quad) Wheelchair After the fully supportive wheelchair is assembled, place your dog's legs into each leg ring and cross extra strapping from leg rings over the body or Velcro together to form handles (p.11). -
Page 20: Optional Items And Accessories
Optional Items and Accessories Walkin' Small Front Vest ® www.WalkinPets.com/walkin-small-front-vest This vest is designed for smaller breeds of dogs with a broad chest such as Dachshunds or Pugs. This wheelchair compatible vest is made of a durable neoprene material with Velcro enclosure on the belly and front of neck area. - Page 21 Walkin’ Belly Support ® www.WalkinPets.com/walkin-belly-support The Walkin’ Belly Support helps provide ® additional support for your pet’s back while in the Walkin’ Wheels wheelchair. Made of ® lightweight but strong neoprene fabric, the Belly Support helps raise the middle of the pet’s body to relieve undue stress on back.
-
Page 22: Handicapped Pets Foundation, License Plate, & Miracle Dogs Book
Handicapped Pets Foundation www.hpets.org The Handicapped Pets Foundation is a 501(c)3 nonprofit corporation dedicated to the health and well-being of aging, disabled, and injured pets. It's mission is to extend the life of pets by helping them move so that they can get the exercise they need to live long, happy, healthy lives;... -
Page 23: Wear, Maintenance, Liability & Guarantee
Wear, Maintenance, Liability & Guarantee With proper use and maintenance, the wheelchair is designed to last a lifetime. When you need replacement parts for the wheels, harnesses, stickers, and other wear-and-tear items, they may be purchased at www.WalkinPets.com/spare-parts. The wheelchair frame will not rust. - Page 24 Luna Buster BE MOVING BE HAPPY Joni Mitchell Panthana BE AMAZED BE TOGETHER MIRACLES IN MOTION 105 Rt 101A, Suite 18 • Amherst, NH 03031 • (888) 253-0777 www.WalkinPets.com Patents: US 7549398 • Japan 5385584 • Canada 2641092 • EPO 2 050 418 Trademarks: Walkin’...
Need help?
Do you have a question about the Walkin' Wheels Rear and is the answer not in the manual?
Questions and answers