Table of Contents
Advertisement
Advertisement
Table of Contents

Summary of Contents for The Renovator Join-A-Jig
- Page 1 INSTRUCTION MANUAL...
-
Page 3: Table Of Contents
What’s in the kit . . . . . . . . . . . . . . . . . . . . . . . . . . . . . . . . . . . . . . 7 Parts of the Join-A-Jig . - Page 4 Tips and troubleshooting . . . . . . . . . . . . . . . . . . . . . . . . . . . . . . 30 Using the Join-A-Jig for the first time .
-
Page 5: Welcome
Take the time to read this manual so you can create craftsman-like joins . Following a few simple pointers will help you to avoid common mistakes that can spoil your project . Support If you experience problems with the Join-A-Jig or its performance, please ™ call our Customer Service Team for assistance: 1800 890 840 in Australia ✔... -
Page 6: Safety
. Your enjoyment will rely on observing ™ a high level of personal safety as well as protecting the safety of others . This section sets out important safety guidelines for using your Join-A-Jig ™ Work area safety... -
Page 7: Personal Safety
™ Safety guidelines • Stay alert, watch what you are doing and use common sense when using the Join-A-Jig . Do not use the Join-A-Jig while you are tired ™ ™ or under the influence of drugs, alcohol or medication. -
Page 8: Power Tool Use And Care
. Holding the work by your hand or against the body leaves it unstable and may lead to loss of control . • Only use accessories that are recommended for the Join-A-Jig ™ • Never use the Join-A-Jig around flammable or volatile substances, ™... -
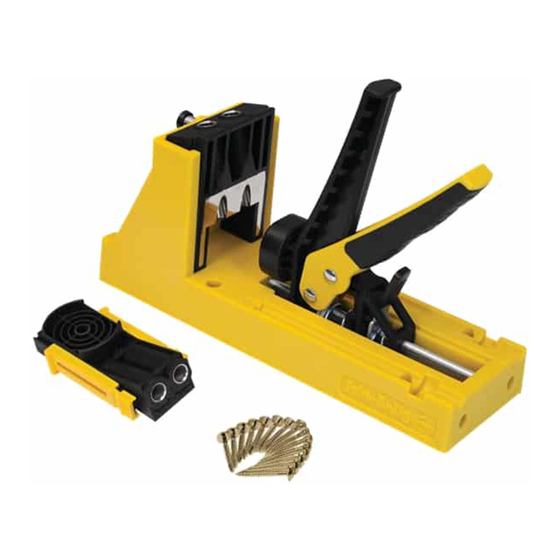
Page 9: What's Included
Collar (for Step Drill Bit) Join-A-Jig Screws (3 .9x32mm Zinc) ™ Join-A-Jig Screws (3 .9x51mm Zinc) ™ Join-A-Jig Plastic Plugs ™ Allen Key Manual Join-A-Jig DIY Project Plans ™ Mini Join-A-Jig™ 5mm Spacer Block Join-A-Jig User Manual Page 7 ™... -
Page 10: Parts Of The Join-A-Jig
Drill Guide Locking Locks the Drill Guide into place while you adjust its height for different workpiece thicknesses . Screw Fixing Holes (4) Used to permanently secure the Join-A-Jig ™ your workbench . Tip: Remember to remove the rubber grip pads... -
Page 11: About Join-A-Jig ™ Screws
Collar Depth Setting Gauge Screw Fixing Clamping Holes (4) Recess About Join-A-Jig Screws ™ Join-A-Jig Screws are made from coated zinc and are ™ engineered to not break or split the timber . The large washer head is designed to sit firmly in the bottom of the pocket hole for maximum joint strength . -
Page 12: About Join-A-Jig ™ Plastic Plugs
What’s Included About Join-A-Jig Plastic Plugs ™ Ten white Join-A-Jig Plastic Plugs for hiding pocket holes are included with ™ the kit . Call our Customer Service Team on 0800 002 999 in New Zealand, 1800 890 840 in Australia, or 1800 200 3111 in United States for information about ordering Join-A-Jig Plastic Plugs . -
Page 13: Using The Join-A-Jig
Selecting the correct screw for the job . ✔ Setting the depth at which your workpiece will be drilled using the ✔ Depth Collar and the Drill Guide . Securing the workpiece in the Join-A-Jig ™ ✔ Drilling the workpiece . ✔... -
Page 14: Selecting The Correct Screw
Using the Join-A-Jig ™ Selecting the correct screw When selecting the Join-A-Jig Screw for your workpiece you need to ™ choose the correct screw length and the correct thread . Selecting the correct screw length Use this table to find the correct screw length for your workpiece. - Page 15 Using the Join-A-Jig ™ Choosing a thread Use this table to select the correct thread for the timber you are using . Type of thread… Description Coarse Softwood, such as: • Pine • Cedar • Plywood • MDF • Particle board •...
-
Page 16: Setting The Depth Collar
Using the Join-A-Jig ™ Setting the Depth Collar For optimal joint strength you need to set your Join-A-Jig Depth Collar so ™ that the pocket holes are drilled at the correct depth for your workpiece . Setting the correct drill depth means that the self-tapping screw will exit at the centre of the first workpiece. -
Page 17: Setting The Drill Guide Height
Using the Join-A-Jig ™ Setting the Drill Guide Height The height of the Drill Guide can be adjusted for varying workpiece thicknesses . Follow the instructions below to set the Drill Guide to the correct thickness . Step Action Retract the drill guide locking pin . -
Page 18: Securing The Workpiece
Using the Join-A-Jig ™ Securing the workpiece Follow these instructions to secure your workpiece in the Join-A-Jig ™ Step Action Place the workpiece in the Join-A-Jig ™ Slide the Clamp Handle up to the workpiece . Lock the workpiece in place by squeezing the Clamp Handle grips . -
Page 19: Drilling The Workpiece
The Join-A-Jig Step Drill Bit drills a flat-bottomed pocket hole and the ™ stepped tip drills down further to create a pilot hole for the Join-A-Jig ™ Screws . To drill pocket and pilot holes in the workpiece, secure the Step Drill Bit in your drill and then drill the holes using the Drill Guide . -
Page 20: Joining Workpieces
Once you have drilled pocket holes in your workpiece you can join it to another workpiece . Refer to Creating wood joints for more information on the types of joints you can create using the Join-A-Jig ™ Follow these instructions to join two workpieces together . -
Page 21: Hiding The Pocket Holes
Using the Join-A-Jig ™ Hiding the pocket holes You can finish the job by hiding the pocket holes using the Join-A-Jig ™ Plastic Plugs . Plastic Plugs allow you to quickly fill all pocket holes. Tips: Be sure the screws are tightened all the way into the pocket hole to ✔... - Page 22 Using the Join-A-Jig ™ Follow these instructions to drill pocket holes using the Mini Join-A-Jig™ . Step Action Set the Positioning Sliding Arms on the Mini Join-A-Jig™ and Depth Collar on the Drill Bit to match the workpiece thickness .
-
Page 23: Making Repairs
Making repairs Note: The Mini Join-A-Jig can only be used on timber 16mm thick and up . ™ You can use your Join-A-Jig to make repairs to existing furniture and ™ cabinetry . Follow these instructions to make repairs . -
Page 24: Using A Spacer Block
Using the Join-A-Jig ™ Using a spacer block The Drill Guide is set to centre a screw in 16mm - 19mm material . The Drill Guide also comes with a 5mm spacer block (already attached) to centre a screw in 20mm - 23mm material . You will need to make your own spacer blocks to compensate for thicker material . -
Page 25: Creating Wood Joints
Butt joints ✔ Mitre joints ✔ Leg and rail joints ✔ 90-degree panel joints ✔ Creating these joints will help you build projects from the Join-A-Jig ™ Ready-to-Build plans that came with your Join-A-Jig ™ Join-A-Jig User Manual Page 23 ™... -
Page 26: Creating A Butt Joint
Clamp the joint . Use the Square Drive to drive in the screws. Note: The Drill Guide lets you drill two pocket holes at the same time, without having to move your workpiece . Page 24 Join-A-Jig User Manual ™... -
Page 27: Creating A Mitre Joint
Follow these instructions to make a mitre joint . Step Action Cut your workpieces at exactly 45 degrees . Place the 45-degree edge flat in the Join-A-Jig ™ Tip: Position the workpiece so that the pocket hole will not go through the edge of the workpiece . -
Page 28: Creating A Leg And Rail Joint
Follow these instructions to make a flush rail joint. Step Action Clamp the leg to the workbench . In the rail, drill the pocket holes required. Use the Square Drive to drive screws through the rail to the Rail Page 26 Join-A-Jig User Manual ™... -
Page 29: Creating A Set-Back Joint
Use a spacer the same width as the desired set-back and clamp the spacer to the leg . In the rail, drill the pocket holes required. Use the Square Drive to drive in the screws. Spacer Join-A-Jig User Manual Page 27 ™... -
Page 30: Creating A 90-Degree Panel Joint
Drill the pocket holes where required on the shelf. Use the Square Drive to drive in the screws. Note: As you drive the screws, the shelf will be pulled firmly against the spacer edge . Shelf Spacer Page 28 Join-A-Jig User Manual ™... -
Page 31: Creating Edge Joins
Drill a pocket hole 50mm in from each end of the workpieces . Drill the remaining pocket holes every 100mm to 200mm . Clamp the workpieces to keep them flush. Use the Square Drive to drive in the screws. Join-A-Jig User Manual Page 29 ™... -
Page 32: Tips And Troubleshooting
. After applying the glue you can immediately carry on with your job, as there should be no need to wait for the glue to dry before using the Join-A-Jig ™ Page 30... -
Page 33: Reducing Wood Splitting
Here are some tips on how to reduce the chances of wood splitting: Always clamp your work securely to reduce the chance of movement ✔ and vibration . Always use Join-A-Jig Screws . Screws are designed to reduce ™ ✔... -
Page 34: Warranty
Your warranty does not cover: • Components that are subject to natural wear and tear caused by normal use in accordance with operating instructions . • Unauthorised/improper maintenance/handling or overload is excluded from this warranty . Page 32 Join-A-Jig User Manual ™... -
Page 35: Warranty Notes
461 Plummer Street, Port Melbourne, VIC 3207 AUST Customer Care: 1800 890 840 United States Contact Brand Developers USA, LLC 2440 Clements Ferry Road, Charleston, South Carolina 29492, USA USA Customer Care: 1800 200 3111 Join-A-Jig User Manual Page 33 ™... - Page 36 Exclusively Distributed by: Brand Developers Australia • New Zealand • United States Brand Developers Aust Pty Ltd 461 Plummer Street, Port Melbourne, VIC 3207, AUSTRALIA AUST Customer Care: 1800 890 840 Brand Developers Limited Unit H, 686 Rosebank Road, Avondale, 1026 Auckland, NEW ZEALAND NZ Customer Care: 0800 002 999 Brand Developers USA LLC 2440 Clements Ferry Road, Charleston,...
Need help?
Do you have a question about the Join-A-Jig and is the answer not in the manual?
Questions and answers