Advertisement
Available languages
Available languages
Quick Links
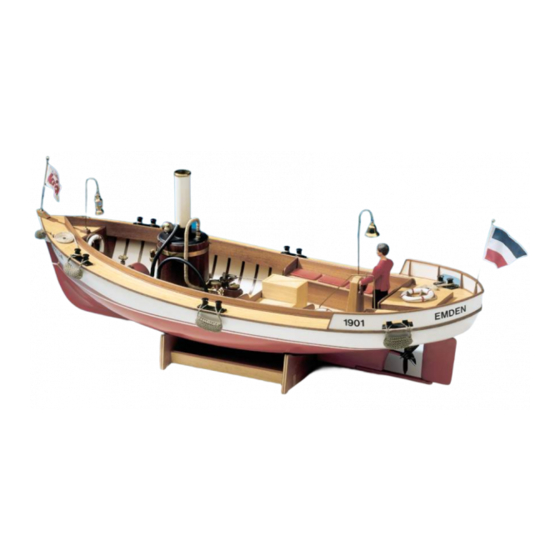
Um die Jahrhundertwende wurden zur Versorgung der
vor der Küste liegenden Inseln seegehende Boote ge-
baut, die die Inselbewohner mit dem Festland verbanden.
Teilweise waren sie auch mit einer Dampfmaschine als
Antrieb versehen.
Unser Modell soll Ihnen eine Vorstellung eines solchen
Versorgers geben.
Um Ihnen den Bau des Modells zu erleichtern, sind alle
Holzteile in der modernen Lasertechnik fertig ausge-
schnitten.
Der Bau der Borkum ist nicht schwierig. Lassen Sie sich
Zeit und verwenden Sie Sorgfalt beim Zusammenbau. Mit
dem extra erhältlichen Ausstattungssatz können Sie Ihr
Modellschiff noch ausschmücken.
Zusatzbedarf:
Inselversorger "Borkum"
Maßstab 1 : 12
Bestell-Nr. 20291
Seite 1
Sie benötigen zum Bau des Modells einigen Zubehör, der
nicht im Baukasten enthalten ist:
Ca. 2 m Gesamtlänge Leistenstücke 5 x 5 mm
1 Tube Silikon farblos Bestell-Nr. 80486
2 Servoverlängerungskabel Ihrer Fernsteuerung
1 Antennensteckerpaar
200 g Porenfüller oder Schleifgrund
Seiden- oder Mattlack farblos
Lackfarbe rot (Seidenmatt)
Lackfarbe weinrot (Seidenmatt)
1 Ausstattungssatz für Borkum, Best.-Nr. 20293
2 Packungen Ballast-Eisenschrot, Best.-Nr. 60112
© Krick Modelltechnik Knittlingen Juli 2015
Advertisement

Related Manuals for Krick Borkum Island Supporter


Summary of Contents for Krick Borkum Island Supporter
- Page 1 Zeit und verwenden Sie Sorgfalt beim Zusammenbau. Mit Lackfarbe weinrot (Seidenmatt) dem extra erhältlichen Ausstattungssatz können Sie Ihr 1 Ausstattungssatz für Borkum, Best.-Nr. 20293 Modellschiff noch ausschmücken. 2 Packungen Ballast-Eisenschrot, Best.-Nr. 60112 Zusatzbedarf: Seite 1 © Krick Modelltechnik Knittlingen Juli 2015...
- Page 2 Verputzen und eventuellem Abrunden im Falz liegt. mit den Schrauben 7 am Rumpf befestigt. Dies muss unbedingt ohne Spannung geschehen, da sich sonst die Spanten verschieben und den Platz für die bei- Seite 2 © Krick Modelltechnik Knittlingen Juli 2015...
- Page 3 Deck, und sichern Sie sie gegen Durchrutschen mit lehne 92 leimen und das Ganze am Schanzkleid 72 an- einem Knoten auf der Oberseite des Decks. Unter dem kleben. Sitzbankseitenteil 93, Sitzbankfuß 94 und Stützen 95 anleimen. Seite 3 © Krick Modelltechnik Knittlingen Juli 2015...
- Page 4 Rumpfwand mit farblosem Silikonkitt ab. Nach dem La- Kürzen Sie das Antennenkabel Ihres Empfängers um die ckieren werden die Sockel 129 bis 131 und die Augbolzen Länge der im Boot verlegten Stahldrahtantenne (500 132 eingeklebt. Seite 4 © Krick Modelltechnik Knittlingen Juli 2015...
- Page 5 75438 Knittlingen Telefon: (07043) 93510 Fax: (07043) 9351-19 Vergessen Sie nicht: Best.-Nr. 20293: Ausstattungssatz Borkum. Alle Teile, die Ihr Modell erst richtig echt machen. Best.-Nr. 60102: Eisenschrott als Ballast (2 Stück erforderlich) Seite 5 © Krick Modelltechnik Knittlingen Juli 2015...
- Page 6 MS-Mutter M4 Schiffsschraube MS-Fertigteil Stellring MS-Fertigteil Ø 4,2 mm Manschette Silikonschlauch Zylinderschraube Stahl M 3 x 14 mm Oberdeck (Plicht) Sperrholz 3 mm Lukenrahmen Linde 1,5 x 5 x 210 mm gesamt Seite 6 © Krick Modelltechnik Knittlingen Juli 2015...
- Page 7 122-123 Podest für Flaggenmastsockel Edelholz 5 x 12 x 30 mm Podest für Lampensockel Edelholz 5 x 12 x 12 mm 125-126 Halter für Rettungsring Tanganjika-Sperrholz 3 mm 127-128 Flaggenmastsockel MS-Fertigteil Lampenmastsockel MS-Fertigteil Glockenmastsockel MS-Fertigteil Seite 7 © Krick Modelltechnik Knittlingen Juli 2015...
- Page 8 MS 2 mm 174-175 Schraube Inbus-Gewindestift M 3 x 3 mm Inbusschlüssel Fertigteil Ballast Eisenschrot 1,8 kg Transportkiste Seitenteil Sperrholz 3 mm Transportkiste Rückteil Sperrholz 3 mm Transportkiste Oberteil Sperrholz 3 mm Seite 8 © Krick Modelltechnik Knittlingen Juli 2015...
- Page 9 Seite 9 © Krick Modelltechnik Knittlingen Juli 2015...
- Page 10 Seite 10 © Krick Modelltechnik Knittlingen Juli 2015...
- Page 11 Seite 11 © Krick Modelltechnik Knittlingen Juli 2015...
- Page 12 Seite 12 © Krick Modelltechnik Knittlingen Juli 2015...
- Page 13 Seite 13 © Krick Modelltechnik Knittlingen Juli 2015...
- Page 14 Modellbau vom Besten krick Borkum • Island Supporter 20291 Klaus Krick Modelltechnik Borkum Building Instructions At the turn of the century boats had been built for supplying the near islands at the coast. Many of them had a steam engine for a fast and powerful run. You have acquired a model kit which in its conception is clearly different from others. The wooden parts are all cut by modern laser technique. The visible parts are all made of African hard wood, which makes this model very attractive. The construction of the Borkum is not very difficult. All you need is a bit of constructor skill, combined with accuracy and patience. Completed with the extra available fitting set you will have a very nice model. Before beginning with the construction, transfer the numbers of all construction parts to the precut parts. Do not yet remove the parts. You will find the corresponding numbers in the reduced figures in the assembly instructions. Please use a lead pencil and mark the numbers only lightly so that you can erase them later. For removing the parts we recommend to use a very thin fretsaw blade (00). We urgently ask you to follow our recommendations concerning the glue. Experience has shown that following these recommendations will ensure success.
-
Page 15: Technical Data
Width: 330 mm Borkum Building Instructions To run the Borkum we recommend our steam engine Victor, article no. 22302. To built-in this machine you will find drawings in the kit which can be layed directly on the plan. 1. Start with the boat stand (parts 1 to 3). Glue all parts together on a flat and true surface. Before the glue sets ensure that the stand feet contact the surface. Building plan 1 As shown on the plan we make the holes for prop shaft tube no. 58 (7 mm) and rudder trunk no. 8 (5mm) at the marked places of the hull. The stiffeners no. 5 must be glued together and then with Uhu plus acrylit into the hull. The rudder heel no. 6 is prefabricated and must be fitted with screw no. 7 to the hull. Set in rudder trunk 8 and push rudder shaft 9 through the trunk and the hole in rudder heel 6. With the steering crank parts 10 to 12, you avoid a falling out of the shaft. 2. Glue the trunk bearings 13 to 15 on the hull and trunk with UHU plus acrylit. 3. The rudder, consisting of parts 9, 16, 17 and 20, must be glued with epoxy glue. File into the rudder shaft at the place where the rudder will be glued some scores to avoid a turning of the rud- der on the shaft. After varnishing, set the complete rudder into the hull to check. Between hull and rudder should be 1 or 2 mm clearance. Building Instructions for Borkum Steamboat Page 3 of 14 4. Glue bulwark holder 21 on the underside of deck 22, on each side 5 pieces. These parts have to flush with the inside corner of the deck. Solder a piece of antenna cable to the antenna 23, push the antenna through the bulwark holders and fix them with glue. At the end of the cable, solder a plug to your receiver. 5. Glue strip 24 beneath frame 25 and grind the form of the frame. Glue frame-bearing 26 to the frame 25. Klaus Krick Modelltechnik • Postfach 11 3 8 • D-75 4 34 Knittlingen Telefon 0 70 43 / 9 35 10 • Telefax 0 70 43 / 3 18 38 • www.krick-modell.de ... - Page 16 Borkum • Island Supporter 20291 6. Use the same way for combining strip 27 and support 28 with frame 29. Before you glue servo support 31 between back frame bearings 30 please check whether your servo fits the hole. When this is ready glue, front and back frame to the deck. Now plank both frames with strips no. 32 and 33. Begin from the middle of each frame to the left and right end. Glue parts 34 as head ledge on the deck. 7. Now you need a bit time for the next steps. You will now fit the deck into the hull. It is necessary to adapt the frames to the form of the hull. Press the deck into the edge. If everything fits perfect, first glue only the deck to the hull giving ABS glue into the edge of the hull and laying the deck inside. With adhesive tape, press the deck into the hull as shown on Fig. 7. Be sure that the deck lies deep enough in the edge. At this moment, there must not be any strain, because the frames could shift to the middle and shorten the place for the floors. During the drying time lay the hull with the deck side down on the table that outcoming glue does not disturb the ship‘s side. When the glue is dry, fix the frames with superglue to the hull. 8. Sand rubbing strake 35 at the outside before you glue it and give it three coats of sealer. Then glue it. The strip has to stay 0,5 to 0,8 mm over the deck. 9. As shown on the plan the deck planking 36 and 37 must be glued on the deck. The planking strips 37 have to be ironed flat with a flat iron as shown on Fig. 9 after they were soaked in hot water. Plank from the middle to the outside. Sand the complete planking carefully after the glue is dry. The plan shows how to glue strip 39 to frame 38 under the marked line. Then plank the frame above the strip with strips 40 10. Glue strips 41 on frame 38 as shown on Fig. 10. Then glue strips 42. Now glue the complete frame into the hull. Fit engine base plate 43 into the hull but do not glue. Sand the edges oblique as shown in Fig. 17 with part 65. Without fig. Glue the hatchway surrounding 52 from below on the engine base plate 43 and fit in the hatch. The engine base plate 43 has to be planked with strips 54 and sanded properly. Give the plate two or three coats of wood sealer, sand and glue in hull with „ruck-zuck“ or a similar cyano acrylit glue. Building Instructions for Borkum Steamboat - Page 4 of 14 14. Push prop shaft tube 58 through the hole in the hull and complete it with shaft 59, shaft nut 60, pro- peller 61, set collar 62, hose 63 and screw 64. Put the ready built steam engine Victor on its positi- on and adjust the height of the shaft to the shaft of the steam engine. If necessary correct frame 38. ...
- Page 17 The rudder with spacing Sleeve will be mounted after the last painting of the boat. Glue the stair out of stair side 118 and steps 119, but glue them after the final painting of the boat. Glue stair base 121 and step 120 as shown in the plan. Sand and drill (4 mm) pedestal 122 to 124 as shown in the plan and glue it. Sand also holders 125 and 126 for the lifebelts and glue them at the correct place. For the mast bases 129 to 131 drill a 4 mm hole at the correct place, also 2 mm holes for mounting eyes 132. You can now finish painting your Borkum. To avoid damage at the hull use some adhesive tape under the deck and under the rail. Seal the engine base plate to the hull with clear silicone sealant. After painting glue bases 129 to 131 and eye 132. Mark the water line at the front and the back of the hull, put the hull on the cradle. Under the cradle put some wood that the height of the water line in the front and back is equal. Now paint the water- line with a pencil that you have mounted on a piece of wood with the correct height around the hull. Now lacquer the hull under the water-line. Unscrew the propeller and nut, draw out the shaft and fill the shaft pipe with vaseline. Now pro- duce both flag staffs with parts 133 and 134, trucks 135 and 136, clamps 137 and 138, ensign halliard 139 and 140 and Flags 141 and 142. Cut to length and curve lamp mast 143 and bell mast 145 as shown in the plan. Heat until Cherry Red the upper ends of the mast with the burner of your steam engine. Then hammer the heated part flat, round it and drill a hole of 1,5 mm in it. Open the holder of the lamp 144 and bell 146 a bit, insert it into the hole of the mast and close the wires again. Curve hand rail 147 as shown on the plan and glue it. Sand life belts 148, lacquer them white and complete them with handling line 149, straps 150 and nameplate 151. Drill holes of 1,5 mm into bollards 152 as shown on the plan, lacquer them black and glue them to the deck. After this drill with 0,8 mm through the holes in the bollards into the deck and hammer in the nails 153. Curve ring hooks 154 as shown on the plan and fasten them with knots to the bowfender. Secure the knots with superglue. Fasten the sidefenders 156 at the bollards. Roll the rope into coils and glue them to the deck. Klaus Krick Modelltechnik • Postfach 11 3 8 • D-75 4 34 Knittlingen Telefon 0 70 43 / 9 35 10 • Telefax 0 70 43 / 3 18 38 • www.krick-modell.de ...
- Page 18 Borkum • Island Supporter 20291 20. Produce the transport box for covering the servo with parts 178 - 180 and plank it with strips 165. Don‘t glue the box to the deck so that you can reach your servo. Drill at the correct place a hole of 1,5 mm, hammer in nail 166 into the wall, grind away the nail‘s head, place the box to the deck that the nail makes a small mark into the deck. Drill a 1,5 mm hole into the mark. Fix the waterslide nameplates to the front and the deck of the boat as shown on the plan. Connect the servos with clevis 168/169, pushrods 170/171, set collars 172/173 and screw 174/175. Building Instructions for Borkum Steamboat - Page 6 of 14 Shorten the antenna of your receiver of the length of the wire in the boat (500 mm). Solder a coup- ling to the cable and connect it with the antenna. Before trimming your boat you have to place all fittings at the correct place. All parts that are put in later will change the trim. Before you fill in the ballast please pay attention to the following points. 1. P ut in steam engine with full boiler. 2. Put in full gas tank. 3. Put in steam condenser. 4. Set in the complete RC (receiver, servos, batteries and switch) 5. Pull the servo cables tight and fix them carefully with tape. 7. To avoid a damage of the deck cover it with a broad tape. 8. Set the boat into the water. 9. Mix the ballast with UHU plus endfest 300 that all balls are moistened a bit. 10. Now fill in the ballast with a spoon. Check after each small addition of ballast the trim and set the boiler in its place. Fill in ballast till the ...
- Page 19 69 deck planking ......1 tanganjika 1 x 10 x 6500 mm total 70 hatch planking ......1 tanganjika 1 x 10 x 210 mm total Klaus Krick Modelltechnik • Postfach 11 3 8 • D-75 4 34 Knittlingen Telefon 0 70 43 / 9 35 10 • Telefax 0 70 43 / 3 18 38 • www.krick-modell.de ...
- Page 20 Borkum • Island Supporter 20291 No. Description Qty. Material Location 71 hatch surrounding ......4 mahagoni 0,5 x 5 x 190 total 72-74 bulwark ....... 4 tanganjika plywood 3 mm 75 ...
- Page 21 180 crate top part ......1 plywood 3 mm # fittings only in fitting set no. 20293 X ballast not included in the kit (2 pack art no. 60102 necessary) Klaus Krick Modelltechnik • Postfach 11 3 8 • D-75 4 34 Knittlingen Telefon 0 70 43 / 9 35 10 • Telefax 0 70 43 / 3 18 38 • www.krick-modell.de ...
- Page 22 Borkum • Island Supporter 20291...
- Page 23 Borkum • Island Supporter 20291 Klaus Krick Modelltechnik • Postfach 11 3 8 • D-75 4 34 Knittlingen Telefon 0 70 43 / 9 35 10 • Telefax 0 70 43 / 3 18 38 • www.krick-modell.de ...
- Page 24 Borkum • Island Supporter 20291...
- Page 25 Borkum • Island Supporter 20291 Klaus Krick Modelltechnik • Postfach 11 3 8 • D-75 4 34 Knittlingen Telefon 0 70 43 / 9 35 10 • Telefax 0 70 43 / 3 18 38 • www.krick-modell.de ...
- Page 26 Borkum • Island Supporter 20291...
- Page 27 - Island Supporter - La restauration insulaire FR • Historisch• Historic• Historique• Die Borkum ist ein typischer offener Inselversorger der Nordsee um die Jahrhundertwende. Dieses Mo- dell eignet sich besonders, um seinen eigenen Ideen für Zusatzausstattung, Ladung usw. so richtig freien Lauf zu lassen. Aufgrund der offenen Bauweise eigent sich die Borkum hervorragend für den Einbau von Dampfmaschinen. The Borkum is a typical open island provider of the North Sea around the turn of the century. This mo- del is suited especially to let so really free run to your own ideas for additional equipment, load etc. On account of the open coverage type is suited the Borkum very well for the installation of vapour machi- nes. Borkum est un soutien de famille d‘île ouvert typique de la mer du Nord au tournant de siècle. Ce modèle convient particulièrement, autour de ses propres idées pour l‘équipement supplémentaire laisser le cours si correctement libre à la charge etc. En raison de la méthode de construction ouverte convient Borkum à la perfection pour l‘installation des machines de vapeur. Modellbau vom Besten krick Klaus Krick Modelltechnik Inhaber Matthias Krick Postfach 11 3 8 · D-75 4 34 Knittlingen Industriestr. 1· D-75 4 38 Knittlingen Telefon 0 70 43 / 9 35 10 Telefax 0 70 43 / 3 18 38 www.krick-modell.de Klaus Krick Modelltechnik • Postfach 11 3 8 • D-75 4 34 Knittlingen Telefon 0 70 43 / 9 35 10 • Telefax 0 70 43 / 3 18 38 • www.krick-modell.de ...
Need help?
Do you have a question about the Borkum Island Supporter and is the answer not in the manual?
Questions and answers